JimLor
Well-known member
I’m writing this for those of us who aren’t wrench-turners by trade or by hobby and experience, but still want to delve into the inner workings of our bikes and do as much maintenance as we can w/o dealer involvement. If you’re at the upper end of mechanical expertise, you can move on unless you want to check my details here, which is fine!
I replaced my steering head bearings with the All Balls Racing (AB) set (22-1003) from All Balls Racing All Balls Racing which as you will see, are much more substantial then the OEM bearings. I will caveat this by saying that I was not unhappy with the OEM bearings and I wasn’t having any problems – I was overdue for the bearing maintenance (I’m at 25k+) and figured I’d go the whole route and put in new ones.
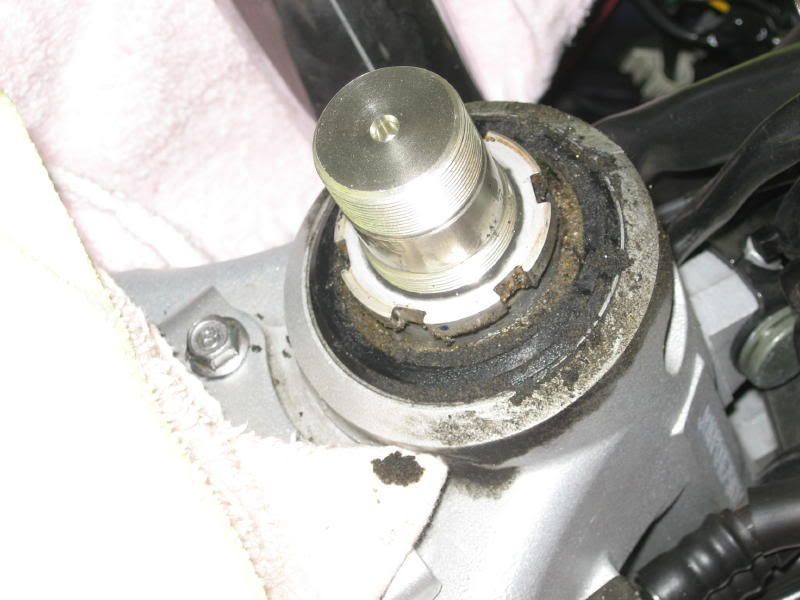
To get this done you have to remove the side plastic, front wheel, forks, and the upper and lower brackets. Here’s a picture of what my upper setup looked like with the upper bracket removed, looks dirty but the grease/dirt wiped right of and the components looked good.
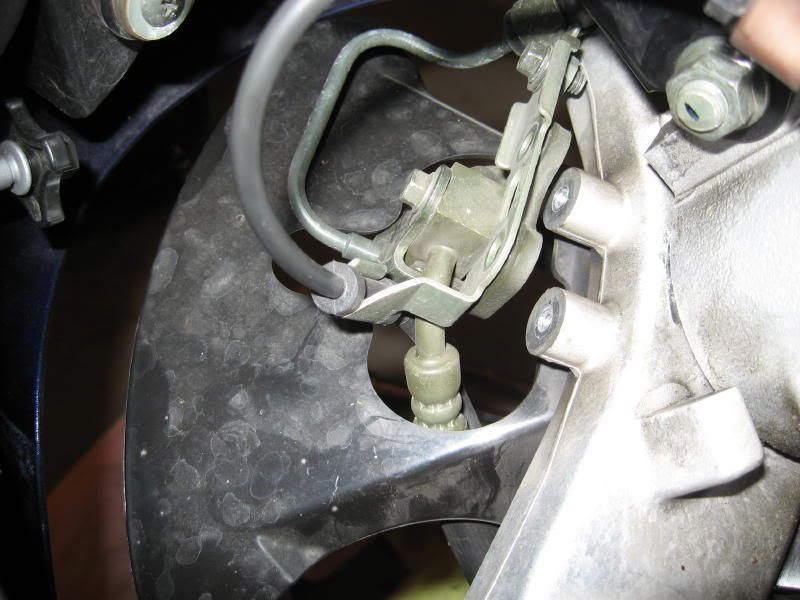
One note of caution – you must remove the brake wire jumble that is attached to the lower bracket. There are 2 horizontal screws (bolt head) that go in front to rear and 2 vertical Allen head bolts that go in from the bottom up. Do not get in a hurry and loosen the single larger bolt underneath (vertical) – brake fluid will leak out and you will realize you screwed up! I got done yesterday, put Maxine back together, crossed my fingers, …nope, no front brakes – no I have to bleed them before I test ride.
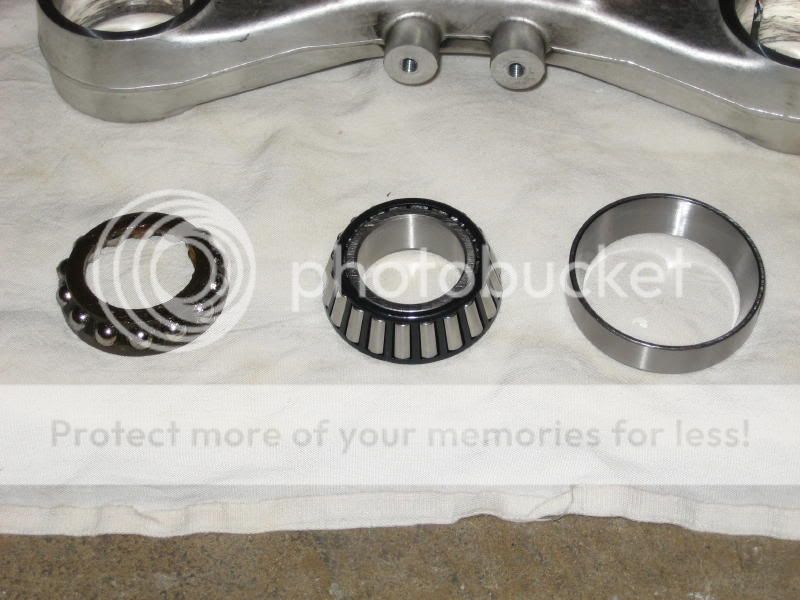
The upper and lower bearings consist of 3 parts; inner race, bearings, outer race. This is a mixed picture, it shows the OEM bearings on the left, and the All Balls bearings in the center (inner race comes installed inside) and the All Balls outer race on the right.
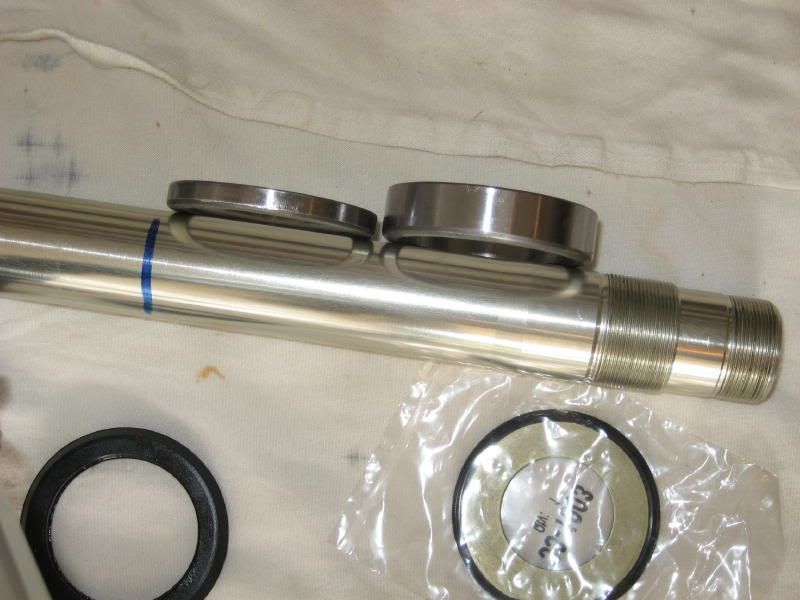
EDIT - here's another picture that shows the difference between the OEM outer race (left) and the AB outer race (right); AB is significantly more robust!
When you pull the lower bracket you’ll see the inner race which is pressed onto the steering stem (pull the rubber dust shield off), it’s a different color then everything else;
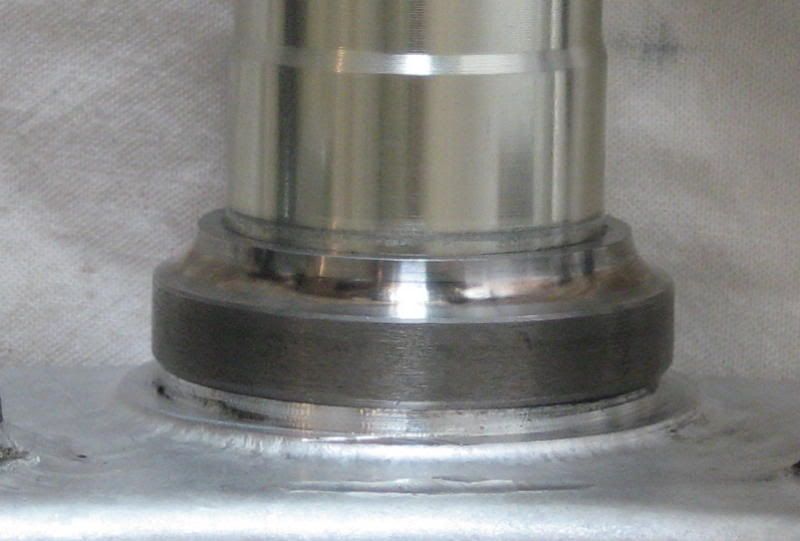
the bearings which are ball bearings in a plastic race; and the outer bearing which is pressed into the steering head. Upper bearing: the outer race is likewise pressed into the top of the steering head, the bearings are the same as the lower bearings, and the inner race is easily removed as it just sits on top of the bearings. I should mention here that the AB bearing sets only have 2 components, the outer race and the bearings which have the inner race already installed.
You need to remove the lower inner race off of the steering stem. I went to 2 dealers (1 Yami and 1 BMW) and neither would remove the bearing (I suspect that didn’t want to take the 30 seconds necessary). So, I took Smitty’s advice and used my handy Dremel with a cutoff wheel and cut a slot in the lower inner race (being careful not to cut into the steering stem) – I whacked it occasionally with a cold chisel hoping it would snap, what finally worked was using the cold chisel at an angle in the slot as if to unscrew the inner race, that did loosen the inner race and I was able to tap it off. This probably took all of 10 minutes.
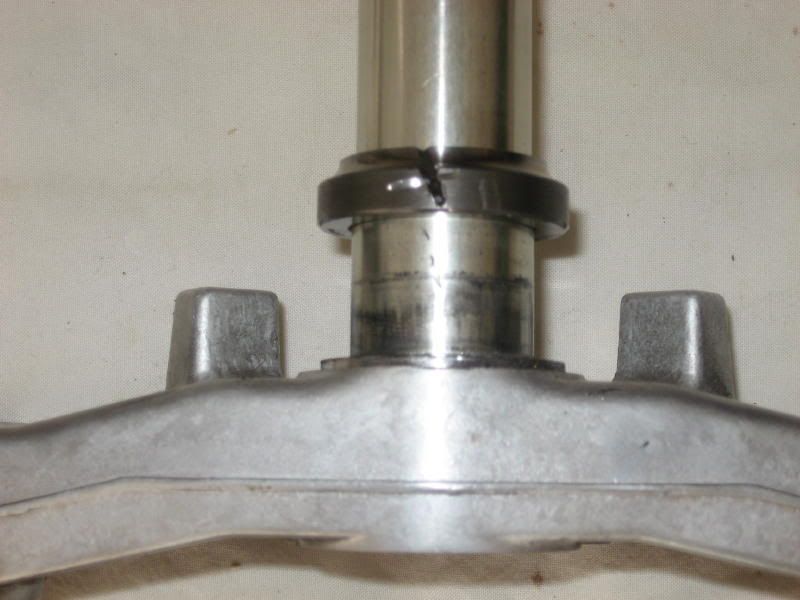
To remove both the lower and upper outer bearings (in the steering head), you take a Drift (a. A tool for ramming or driving something down; b. A tapered steel pin for enlarging and aligning holes) and drive the outer races out of the steering head. As you look down into the steering head, you can see where the race sits, you will also see at 3 and 9 O’clock small indents (I should add that the outer race is already gone in this picture).
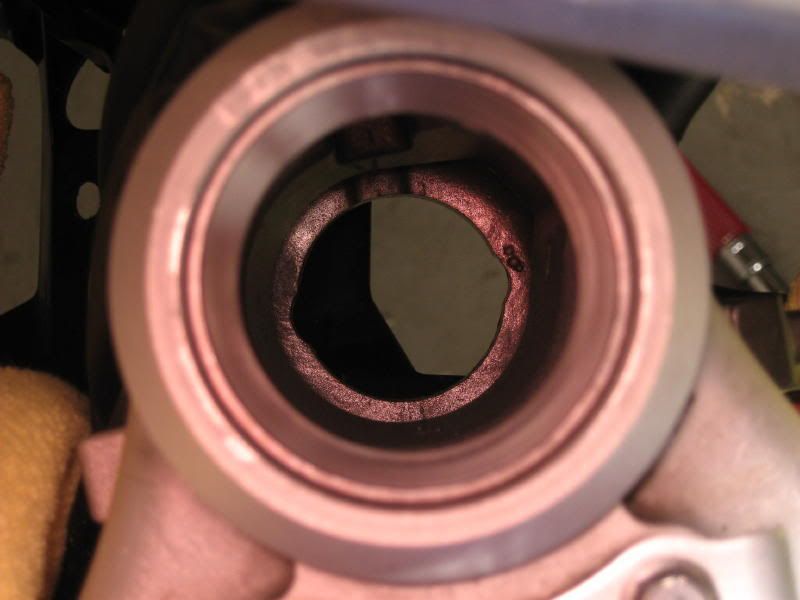
You position your drift on the race within those indents and tap away. You don’t need to whack away for all you’re worth, but “firm” taps are called for. Alternate from side to side and eventually the race will pop out. Put a towel over your gas tank so the upper inner race won’t scratch it when it pops out.
Clean the grease off of everything. I installed the new lower and upper inner races first. I used the old OEM outer races on top of the new outer races to tap the new ones in. When you place the new race into the steering head it will go in about half way or more (just try and get it evenly inserted). I then placed the old race over top of the new race matching their edges, and tapped away with what is actually a small upholstery hammer – rotate your tapping around and you’ll feel the race seating itself. You can feel when it’s reached bottom by the feedback you feel in the hammer, it’ll sound solid and bounce back. The upper is much easier to insert – for the bottom race you’re working on your back looking up, and you have the brake lines in the way, but neither job is difficult.
Getting the lower inner race on the steering stem is next. You first put the dust shield on the stem (you’ll find that the dust shield will actually snap onto the lower part of the bearing to help you tell which side is up/down) then the bearing. You will have to drive the bearing onto the shaft. I put the bearing on the shaft and then used the old inner race (the one I cut off) on top of that. That lets you hit the inner race on the AB inner race and not the entire bearing (put the old inner race on upside down, skinny part down). I then used a 1 ¼” PVC pipe over that, put a piece of wood on top of that, and whacked away. Note – the bottom of the lower bracket is not level, the ends stick down and the center is not supported – put the center of the bracket on something solid to support it, an anvil would be nice if you have one handy. Now, my bearings did not seat all the way down, there is a small gap. But, I did get the feedback that indicates that the race is as far down as it’s going to go. I’ll keep an eye on it in the future, but I’m confident it’s seated as far as it’s going to go. (Edit – sitting in a meeting a few minutes ago I was bored and jotted down a picture of the stem/lower inner race – lo and behold it hit me like a freight train – the lower inner race is wide at the bottom and narrows at top to accept the bearings. In other words, the bearings actually sit on the lower inner race above the bottom of the stem! So, if the AB bearings are to seat at the same place on the stem, there will be a gap at the bottom – that’s my story.)
Grease, I did use the grease in the palm and run the bearing over your hand method before I drove on the bearing – I also put more on the outside just before inserting the lower bracket/stem back inside the steering head.
Next, I greased the upper bearing and put it all back together, wiggling the bracket every once in a while to make sure it was seating/seated and moving properly. The upper bearing goes in like this – outer race (already in the steering head) bearing, dust seal then the various nuts, etc. The book says to torque the nut (the one you need the million dollar spanner to properly tighten) to an initial 37 Lbft, then back off and retorque to a final 13 lbft. Smitty (my guide in this process who deserves and has my appreciation!) said that because these are tapered bearings, he added 10 lbft to both. I split the difference and initially torqued to 43 lbft, backed off and torqued to a final 18 lbft.
Once I got everything back together, I found I had no clutch and no front brakes! No clutch I assume because I had the handlebars laying on top of the bike at strange angles and I assume the fluid was “upset.” (Note – I have the D&D risers and have to remove the handlebars from the upper bracket (triple tree) in order to get the socket on my million dollar nut (Stem nut). After letting the bike sit and squeezing the lever a few times, the clutch is back to normal. I’m sure my brake line harness loosening fubar let air into the front brake system and I will need to bleed the brakes to get them back – it did.
I think this job is well within the capabilities of most shade tree mechanics and those who want to learn to do stuff to their bikes. Looked at in its entirety it might seem a daunting task, but when you break it down into its component parts, nothing is difficult The only special tool you need is the spanner and a drift – frankly, any long, thin, probably metal rod will work in place of the drift (stout screwdriver, metal rod, etc). This took me almost a week because I was doing it in between doing other household chores and duties. If I have set aside the time to do it all at once, I would guess 3 – 5 hours would probably be total time from start to finish with disassembly/assembly taking the majority of the time.
Additionally, the folks at All Balls Racing agreed to send me 2 sets of the bearings to give out as door prizes at EOM – so 2 folks out there will have an opportunity to do this thanks to “All Balls.”
Got my brakes bled last night and rode on Tuesday. Steering feels very nice, smoother at low speeds and I guess I’d say more solid at higher speeds; not difficult to turn, but it does feel more solid. I’ll also add that I did have the “wobble under deceleration” that some folks have mentioned. Yes, it was after I put on my Avons, but it was also after 19,000 or so miles without steering head maintenance. And, it was not at all noticeable unless I took my hands off the handlebars while decelerating (and even then it wasn’t a big deal). That is now gone – can’t say whether that’s because of the tapered bearings, or whether normal maintenance and retorqueing of the OEM bearings would provide the same results. The All Balls are a nice addition and now I know more about my bike then I did before.
I hope this helps explain in sufficient detail (w/pictures) how to do this for those sitting on the fence not sure if they have the skill or not. Not that you need to do this, but if you want to, it’s not too difficult. As a way of thanks one more time, Smitty was very helpful to me on this project and his advice was much appreciated. If anyone has any questions, I’m more than happy to try and answer them based on my vast, vast experience of having done this exactly 1 time.
And I did this in Aug 2007:
I replaced my steering head bearings with the All Balls Racing (AB) set (22-1003) from All Balls Racing All Balls Racing which as you will see, are much more substantial then the OEM bearings. I will caveat this by saying that I was not unhappy with the OEM bearings and I wasn’t having any problems – I was overdue for the bearing maintenance (I’m at 25k+) and figured I’d go the whole route and put in new ones.
To get this done you have to remove the side plastic, front wheel, forks, and the upper and lower brackets. Here’s a picture of what my upper setup looked like with the upper bracket removed, looks dirty but the grease/dirt wiped right of and the components looked good.

One note of caution – you must remove the brake wire jumble that is attached to the lower bracket. There are 2 horizontal screws (bolt head) that go in front to rear and 2 vertical Allen head bolts that go in from the bottom up. Do not get in a hurry and loosen the single larger bolt underneath (vertical) – brake fluid will leak out and you will realize you screwed up! I got done yesterday, put Maxine back together, crossed my fingers, …nope, no front brakes – no I have to bleed them before I test ride.

The upper and lower bearings consist of 3 parts; inner race, bearings, outer race. This is a mixed picture, it shows the OEM bearings on the left, and the All Balls bearings in the center (inner race comes installed inside) and the All Balls outer race on the right.

EDIT - here's another picture that shows the difference between the OEM outer race (left) and the AB outer race (right); AB is significantly more robust!

When you pull the lower bracket you’ll see the inner race which is pressed onto the steering stem (pull the rubber dust shield off), it’s a different color then everything else;

the bearings which are ball bearings in a plastic race; and the outer bearing which is pressed into the steering head. Upper bearing: the outer race is likewise pressed into the top of the steering head, the bearings are the same as the lower bearings, and the inner race is easily removed as it just sits on top of the bearings. I should mention here that the AB bearing sets only have 2 components, the outer race and the bearings which have the inner race already installed.
You need to remove the lower inner race off of the steering stem. I went to 2 dealers (1 Yami and 1 BMW) and neither would remove the bearing (I suspect that didn’t want to take the 30 seconds necessary). So, I took Smitty’s advice and used my handy Dremel with a cutoff wheel and cut a slot in the lower inner race (being careful not to cut into the steering stem) – I whacked it occasionally with a cold chisel hoping it would snap, what finally worked was using the cold chisel at an angle in the slot as if to unscrew the inner race, that did loosen the inner race and I was able to tap it off. This probably took all of 10 minutes.

To remove both the lower and upper outer bearings (in the steering head), you take a Drift (a. A tool for ramming or driving something down; b. A tapered steel pin for enlarging and aligning holes) and drive the outer races out of the steering head. As you look down into the steering head, you can see where the race sits, you will also see at 3 and 9 O’clock small indents (I should add that the outer race is already gone in this picture).

You position your drift on the race within those indents and tap away. You don’t need to whack away for all you’re worth, but “firm” taps are called for. Alternate from side to side and eventually the race will pop out. Put a towel over your gas tank so the upper inner race won’t scratch it when it pops out.
Clean the grease off of everything. I installed the new lower and upper inner races first. I used the old OEM outer races on top of the new outer races to tap the new ones in. When you place the new race into the steering head it will go in about half way or more (just try and get it evenly inserted). I then placed the old race over top of the new race matching their edges, and tapped away with what is actually a small upholstery hammer – rotate your tapping around and you’ll feel the race seating itself. You can feel when it’s reached bottom by the feedback you feel in the hammer, it’ll sound solid and bounce back. The upper is much easier to insert – for the bottom race you’re working on your back looking up, and you have the brake lines in the way, but neither job is difficult.
Getting the lower inner race on the steering stem is next. You first put the dust shield on the stem (you’ll find that the dust shield will actually snap onto the lower part of the bearing to help you tell which side is up/down) then the bearing. You will have to drive the bearing onto the shaft. I put the bearing on the shaft and then used the old inner race (the one I cut off) on top of that. That lets you hit the inner race on the AB inner race and not the entire bearing (put the old inner race on upside down, skinny part down). I then used a 1 ¼” PVC pipe over that, put a piece of wood on top of that, and whacked away. Note – the bottom of the lower bracket is not level, the ends stick down and the center is not supported – put the center of the bracket on something solid to support it, an anvil would be nice if you have one handy. Now, my bearings did not seat all the way down, there is a small gap. But, I did get the feedback that indicates that the race is as far down as it’s going to go. I’ll keep an eye on it in the future, but I’m confident it’s seated as far as it’s going to go. (Edit – sitting in a meeting a few minutes ago I was bored and jotted down a picture of the stem/lower inner race – lo and behold it hit me like a freight train – the lower inner race is wide at the bottom and narrows at top to accept the bearings. In other words, the bearings actually sit on the lower inner race above the bottom of the stem! So, if the AB bearings are to seat at the same place on the stem, there will be a gap at the bottom – that’s my story.)
Grease, I did use the grease in the palm and run the bearing over your hand method before I drove on the bearing – I also put more on the outside just before inserting the lower bracket/stem back inside the steering head.
Next, I greased the upper bearing and put it all back together, wiggling the bracket every once in a while to make sure it was seating/seated and moving properly. The upper bearing goes in like this – outer race (already in the steering head) bearing, dust seal then the various nuts, etc. The book says to torque the nut (the one you need the million dollar spanner to properly tighten) to an initial 37 Lbft, then back off and retorque to a final 13 lbft. Smitty (my guide in this process who deserves and has my appreciation!) said that because these are tapered bearings, he added 10 lbft to both. I split the difference and initially torqued to 43 lbft, backed off and torqued to a final 18 lbft.
Once I got everything back together, I found I had no clutch and no front brakes! No clutch I assume because I had the handlebars laying on top of the bike at strange angles and I assume the fluid was “upset.” (Note – I have the D&D risers and have to remove the handlebars from the upper bracket (triple tree) in order to get the socket on my million dollar nut (Stem nut). After letting the bike sit and squeezing the lever a few times, the clutch is back to normal. I’m sure my brake line harness loosening fubar let air into the front brake system and I will need to bleed the brakes to get them back – it did.
I think this job is well within the capabilities of most shade tree mechanics and those who want to learn to do stuff to their bikes. Looked at in its entirety it might seem a daunting task, but when you break it down into its component parts, nothing is difficult The only special tool you need is the spanner and a drift – frankly, any long, thin, probably metal rod will work in place of the drift (stout screwdriver, metal rod, etc). This took me almost a week because I was doing it in between doing other household chores and duties. If I have set aside the time to do it all at once, I would guess 3 – 5 hours would probably be total time from start to finish with disassembly/assembly taking the majority of the time.
Additionally, the folks at All Balls Racing agreed to send me 2 sets of the bearings to give out as door prizes at EOM – so 2 folks out there will have an opportunity to do this thanks to “All Balls.”
Got my brakes bled last night and rode on Tuesday. Steering feels very nice, smoother at low speeds and I guess I’d say more solid at higher speeds; not difficult to turn, but it does feel more solid. I’ll also add that I did have the “wobble under deceleration” that some folks have mentioned. Yes, it was after I put on my Avons, but it was also after 19,000 or so miles without steering head maintenance. And, it was not at all noticeable unless I took my hands off the handlebars while decelerating (and even then it wasn’t a big deal). That is now gone – can’t say whether that’s because of the tapered bearings, or whether normal maintenance and retorqueing of the OEM bearings would provide the same results. The All Balls are a nice addition and now I know more about my bike then I did before.
I hope this helps explain in sufficient detail (w/pictures) how to do this for those sitting on the fence not sure if they have the skill or not. Not that you need to do this, but if you want to, it’s not too difficult. As a way of thanks one more time, Smitty was very helpful to me on this project and his advice was much appreciated. If anyone has any questions, I’m more than happy to try and answer them based on my vast, vast experience of having done this exactly 1 time.
And I did this in Aug 2007:

Last edited by a moderator:


