Frustrated! Reflector install gone bad!

Yamaha FJR Motorcycle Forum

Help Support Yamaha FJR Motorcycle Forum:

This site may earn a commission from merchant affiliate links, including eBay, Amazon, and others.

USAFFJR

Well-known member
Joined
Apr 21, 2009
Messages
131
Reaction score
-1
Location
Las Vegas, NV
I installed the saddlebag reflector stickers (Clicky) this morning. First, I washed and waxed the bike (no wax on the black plastic, don't worry). Let it dry and proceeded to install the reflectors. Just peeled the top away to line it up and worked my way down by gently rubbing from the inside out as the instructions told me to. No problems at all. They went on straight and not a bubble in sight. Took a soft, dry rag and wiped them down again to get rid of the fingerprints from the install. Stepped back and admired my work. I then parked the bike back in the garage and went about my day.

Took a peek at them tonight (wanted to see how the reflection looked in person) and found them covered in bubbles! How is that possible?!? The bags were cool and dry (well, not cold, it is Hawaii -- but the bike hadn't been in the sun this morning and it was only in the lower 70s outside). They had been cleaned thoroughly. I know for a fact there were no bubbles when I parked the bike in the garage. I had gone over every square inch of the reflectors TWICE. Now I have small bubbles that won't go away. And it only did it on the large reflectors, not the smaller side strips.

So, what are my options? I guess I could get a hair dryer and heat them up/pull them off and hope I could get the residue off with goo gone. But that means I just flushed $20 down the drain (assuming that works without damaging the plastic).

Has anyone experienced this before? I read about the install in a few threads a week or so ago but couldn't find them again (me and this search engine just aren't getting along).

I can't tell you how frustrated this makes me...

Thanks in advance for the help!

EDIT: Here's a pic.
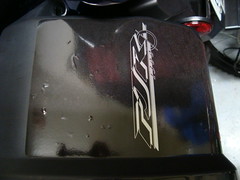
3518020630_bd2415a76d_m.jpg


Last edited by a moderator:
I installed the saddlebag reflector stickers (Clicky) this morning. First, I washed and waxed the bike (no wax on the black plastic, don't worry). Let it dry and proceeded to install the reflectors. Just peeled the top away to line it up and worked my way down by gently rubbing from the inside out as the instructions told me to. No problems at all. They went on straight and not a bubble in sight. Took a soft, dry rag and wiped them down again to get rid of the fingerprints from the install. Stepped back and admired my work. I then parked the bike back in the garage and went about my day.
Took a peek at them tonight (wanted to see how the reflection looked in person) and found them covered in bubbles! How is that possible?!? The bags were cool and dry (well, not cold, it is Hawaii -- but the bike hadn't been in the sun this morning and it was only in the lower 70s outside). They had been cleaned thoroughly. I know for a fact there were no bubbles when I parked the bike in the garage. I had gone over every square inch of the reflectors TWICE. Now I have small bubbles that won't go away. And it only did it on the large reflectors, not the smaller side strips.

So, what are my options? I guess I could get a hair dryer and heat them up/pull them off and hope I could get the residue off with goo gone. But that means I just flushed $20 down the drain (assuming that works without damaging the plastic).

Has anyone experienced this before? I read about the install in a few threads a week or so ago but couldn't find them again (me and this search engine just aren't getting along).

I can't tell you how frustrated this makes me...

Thanks in advance for the help!
Talk with Alex. He is a good guy and is the best person to help you.

 
Not probably what you really want to do but...

Piercing the bubble with a straight pin has worked for me in the past.

Removes the air and allows you to smooth down the vinyl.

Does however leave a small dimple.

You could try one and see. Pulling off the decal now would probably distort it.

Clicky

 
Last edited by a moderator:
Same crap happened on mine the other day. It was too hot when put them on I think and the decal stretches as it goes on and messes it up. I slit mine with a razor blade slightly and got the air out, nothing else you can do...I suck putting stickers on and probably always will.

 
It was too hot when put them on I think and the decal stretches as it goes on and messes it up. I slit mine with a razor blade slightly and got the air out, nothing else you can do...
Yes it's kinda late to take them off. The adhesive has probably taken hold pretty good by now.

I used to apply the graphics on our boats at work ... Yeah it sucked :( .. Anywhere from ten to eighteen feet long by twenty inches tall.

You need plenty of adhesive prep or lightly soaped water, warm, not hot temps. and don't stretch them buggers..

Depending on the bubbles a razor or pin will help, but you're still going to have a blemish

:jester:
But what I don't get is that it wasn't hot and I didn't stretch them. AND, they looked great when I was done. They didn't bubble until much later... What on earth would cause them to bubble AFTER?

Same crap happened on mine the other day. It was too hot when put them on I think and the decal stretches as it goes on and messes it up. I slit mine with a razor blade slightly and got the air out, nothing else you can do...I suck putting stickers on and probably always will.
Have any pics of what it looks like now?

 
Suggest a needle rather than a pin or razor, the finest point possible is the most likely not to leave evidence.

 
But what I don't get is that it wasn't hot and I didn't stretch them. AND, they looked great when I was done. They didn't bubble until much later... What on earth would cause them to bubble AFTER?
This is something Alex should answer, could be any number of reasons.

:jester:

 
It was too hot when put them on I think and the decal stretches as it goes on and messes it up. I slit mine with a razor blade slightly and got the air out, nothing else you can do...
Yes it's kinda late to take them off. The adhesive has probably taken hold pretty good by now.

I used to apply the graphics on our boats at work ... Yeah it sucked :( .. Anywhere from ten to eighteen feet long by twenty inches tall.

You need plenty of adhesive prep or lightly soaped water, warm, not hot temps. and don't stretch them buggers..

Depending on the bubbles a razor or pin will help, but you're still going to have a blemish

:jester:
:poster_stupid: +1 You needed to float them on!

 
I agree Alex will help you, PM him.

If you installed them and it was cold and you had slight bubbles, when it heats up, those slight bubbles will be bigger.

One of the things I do and probably many others do too is, to only uncover a small piece of the sticker by slightly removing the backing and start laying it down and pressing hard and slowly. Start working back while pulling the backing off and laying it down firmly and pressing it. If you are doing it correctly, as you lay it down pressing, the backing comes off automatically. Sorry I don't have a visual to show you this technique. You also need to make sure that this will go on where you want it. If you start at one end and it's off (crooked) it'll be way off at the end. Make sure you pre lay it out before pulling the backing. Some times using tape to hold it at the end helps then start at the opposite side and do what I mentioned previously.

This is the best way to avoid bubbles, you can still get bubbles but maybe work them out. You can also use a piece of flat plastic to press the bubbles to the nearest edge to remove them.

Good luck.

 
Last edited by a moderator:
One of the things I do and probably many others do too is, to only uncover a small piece of the sticker by slightly removing the backing and start laying it down and pressing hard and slowly. Start working back while pulling the backing off and laying it down firmly and pressing it. If you are doing it correctly, as you lay it down pressing, the backing comes off automatically. Sorry I don't have a visual to show you this technique.
This is the best way to avoid bubbles, you can still get bubbles but maybe work them out. You can also use a piece of flat plastic to press the bubbles to the nearest edge to remove them.
+1

I use my most maxxed out credit card for this operation :rolleyes:

 
Last edited by a moderator:
Next time use soapy water, a couple of drops in a spray bottle, clean peel and spray both sticker and area the sticker is going on, spray the top and squgee the excess water out if its not correct peel off and re spray, let dry for 24 hrs

 
One of the things I do and probably many others do too is, to only uncover a small piece of the sticker by slightly removing the backing and start laying it down and pressing hard and slowly. Start working back while pulling the backing off and laying it down firmly and pressing it. If you are doing it correctly, as you lay it down pressing, the backing comes off automatically. Sorry I don't have a visual to show you this technique. You also need to make sure that this will go on where you want it. If you start at one end and it's off (crooked) it'll be way off at the end. Make sure you pre lay it out before pulling the backing. Some times using tape to hold it at the end helps then start at the opposite side and do what I mentioned previously.
That's exactly what I did. I've installed a few large decals in the past and never had problems. I always leave the backing on and work my way from top to bottom, center outward. I started with a credit card on this one as well, but it seemed to be scratching the surface a bit, so I went to the old thumb method (of course the area I used the card on has the most bubbles...). Since I didn't use a card, I did multiple passes to ensure a clean install.

Again, no bubbles immediately after install. Not one. Hours later they bubbled.

As for whether or not the bike was dry, I waxed the bike after washing it, then put on the stickers. It had been over an hour since water was anywhere near it. I assure you, it was dry. :)

I PM'd Alex and am awaiting any suggestions he might have. The way I see it, I either pop the bubbles and see what they look like or leave them be. Either way doesn't sound pleasant. Has anyone removed these and seen the aftermath? I might just pull them off if the pop method doesn't turn out too well. I'll still have some reflection as the skinny side strips look great.

BTW, thanks for all the tips/tricks everyone! :D

 
I put mine on with a hair dryer heat them up found the position I was happy with, starting at the centre and like others smothed out from there to the edges no dramas at all.

 
Hey guys. Sorry I'm late to the party. This appears that the decals were put on properly, but lacking the pressure to squeeze all the air out. They most likely settled in the heat and stuck really well, but formed air bubbles by the tiny bit of air grouping together in spots.

Hope is not lost. Warm up the bag with a blow drier, starting in the corner and they will come off without ANY residue left behind. If they start to seperate, leaving sticky behind, slow down and/or use more heat. They don't have to be that hot to get the decals off.

USAFFJR you have a PM.

 
Hey guys. Sorry I'm late to the party. This appears that the decals were put on properly, but lacking the pressure to squeeze all the air out. They most likely settled in the heat and stuck really well, but formed air bubbles by the tiny bit of air grouping together in spots.
Hope is not lost. Warm up the bag with a blow drier, starting in the corner and they will come off without ANY residue left behind. If they start to seperate, leaving sticky behind, slow down and/or use more heat. They don't have to be that hot to get the decals off.

USAFFJR you have a PM.

Alex,

Thanks for the tip. I'll do that this morning. I responded to your PM!

 
Top