Race Tech Spring Guide

Yamaha FJR Motorcycle Forum

Help Support Yamaha FJR Motorcycle Forum:

This site may earn a commission from merchant affiliate links, including eBay, Amazon, and others.

jpcfjr

Well-known member
Joined
Sep 1, 2009
Messages
132
Reaction score
2
Location
Woodbridge, VA
I am doing a complete front fork rebuild tomorrow and the only thing I can't seem to find any information on is how to install the Race Tech spring guides that RT says I have to put in. I am doing the gold valve and springs from RT and I have not seen any directions that would say/show the details for the spring guides. At this point the only thing I can hold my hat on is that it will be completely obvious once I get in there.

Hoping someone has some insight or pictures.

As it's Friday, I'll hide behind this jersey wall and await replies.

Thanks,

j
You can't find any? Really?

https://www.fjrforum.com/forum//index.php?showtopic=127506 -- great pictorial with loads of comments after.

Also, if you bought your stuff from RaceTech, there's a number you can call for assistance. Get familiar with it.

Your suspension is like your wife....only you should know exactly how it works and how it responds best to your riding style.

Or something....

 
Installed Race Tech 0.95 springs on my previous '06. You're right, the instructions [or lack thereof] from RT is pretty pathetic.

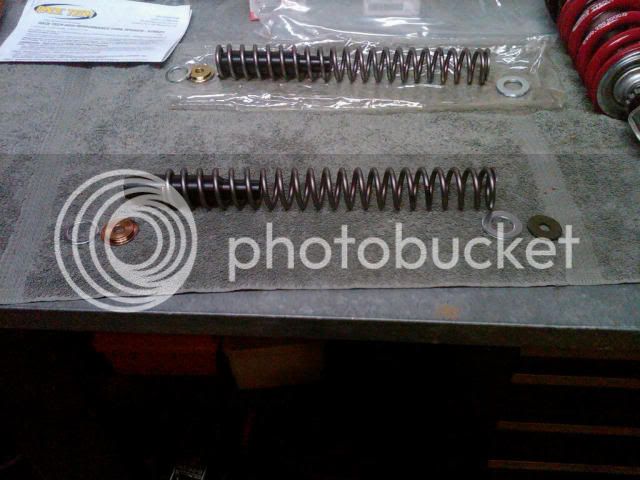
The stack up shown in the pic below is correct EXCEPT the bronze machined guide goes on top, into the larger ID of the spring. From the bottom, thin washer [fits on top of dampener assembly], spring [small end down], bronze guide, OEM washer and lastly cut to length spacer. The package included several large washers that are meant for preload adjustment. I didn't use any.

RaceTechSprings.jpg


Hope this helps!

--G

 
Last edited by a moderator:
I am doing a complete front fork rebuild tomorrow and the only thing I can't seem to find any information on is how to install the Race Tech spring guides that RT says I have to put in. I am doing the gold valve and springs from RT and I have not seen any directions that would say/show the details for the spring guides. At this point the only thing I can hold my hat on is that it will be completely obvious once I get in there.

Hoping someone has some insight or pictures.

As it's Friday, I'll hide behind this jersey wall and await replies.

Thanks,

j
You can't find any? Really?

https://www.fjrforum.com/forum//index.php?showtopic=127506 -- great pictorial with loads of comments after.

Also, if you bought your stuff from RaceTech, there's a number you can call for assistance. Get familiar with it.

Your suspension is like your wife....only you should know exactly how it works and how it responds best to your riding style.

Or something....
Really? REALLY? Why don't you read the thread you threw at me and see if there is ANY mention of a spring guide. Really!

 
Installed Race Tech 0.95 springs on my previous '06. You're right, the instructions [or lack thereof] from RT is pretty pathetic.

The stack up shown in the pic below is correct EXCEPT the bronze machined guide goes on top, into the larger ID of the spring. From the bottom, thin washer [fits on top of dampener assembly], spring [small end down], bronze guide, OEM washer and lastly cut to length spacer. The package included several large washers that are meant for preload adjustment. I didn't use any.

RaceTechSprings.jpg


Hope this helps!

--G
Thanks, this helps a lot. I don't know if it makes a difference but Louie at RT had me putting the spring guide in the other direction. Me thinks it probably doesn't matter.

How do you know how long to make the spacer?

Thanks again,

j

 
.... I don't know if it makes a difference but Louie at RT had me putting the spring guide in the other direction. Me thinks it probably doesn't matter.How do you know how long to make the spacer?

Thanks again,

j
If you don't think it matters, I'd listen to Louie at RT, he's the expert. I'd also call Louie back and ask him your second question. You paid RT big $$ for the kit, they should be happy to support you.
Good luck.

 
Last edited by a moderator:
Thanks, this helps a lot. I don't know if it makes a difference but Louie at RT had me putting the spring guide in the other direction. Me thinks it probably doesn't matter.

How do you know how long to make the spacer?

Thanks again,

j
Interesting on the guide...the guy I spoke to at RT described it installed as shown in the photo. :blink:

IIRC, my spacer ended up at 4 - 1/8". I measured the stock stack up and then followed RT's recommended preload (15mm) and then figgered it out.

--G
In thinking about it...which I apparently did all night because I went to bed thinking about it and woke up thinking about it...your way makes much more sense. Having the fat end with the bevel down would help locate/center the spring. The other way would not. As for what Louie told me, well, let's just say we had a bit of a failure to communicate.

I'm still a little confused about the spacer because I was thinking that the spacer used to go where the spring guide goes. I need to study the thing a little more.

I do appreciate your advice.

Edit: Now I see it. The spacer goes above the spring and thus has no inpact on the spring guide. Whew! That was driving me nuts for some reason. So the last confusion I have is why you need the washers they sent. Not the one for on top of the cartridge to hold the new spring but the ones they sent for the top. You mention you didn't use them. I'm trying to figure out under what circumstances one would use them.

 
Last edited by a moderator:
<snip>...So the last confusion I have is why you need the washers they sent. Not the one for on top of the cartridge to hold the new spring but the ones they sent for the top. You mention you didn't use them. I'm trying to figure out under what circumstances one would use them.
I'm pretty sure the large washers are meant to be used on top of the spring to fine tune the preload. In my example, I could have cut the spacer to 4" and then added one washer to arrive at the 15mm preload. If more preload was needed, then just continue adding washers...

--G

 
This is how mine went together. Lee at Traxxion was on his game with me, the springs and rear shock were right on after I installed them and set them to Lee's recommendation for my weight and riding style.

spring%20guide.jpg


Last edited by a moderator:
After a month of my FJR sitting in the garage unrideable, we finally determined that I got the wrong spring kit. Ok, I'll step back and provide details of this cautionary tale.

I ordered all the Race Tech parts through my local dealer. They ordered the parts from Parts Unlimited, not Race Tech because it's cheaper to go that route. I got all the parts I needed initially with the exception of the spring guide kit. Parts Unlimited did not specify the kit. I only found about about it by talking to RT. So the spring guide kit was ordered.

I did the job. I put the gold valves in as specified (re-stacking them per the RT printout for my weight and riding style), cut the spacer for the desired preload, buttoned her up and noticed I didn't have any rebound adjustment. I stupidly rode it anyway and blew out my left fork seal. After talking to RT and re-reading the directions I realized I had left out a simple step to zero the rebound adjuster. Ok, my **** up. I ordered a new seal and bushings and oil and fixed it.

Then, I started hearing a knocking noise that sounded like it was coming from the wheel hub. Thinking this was the wheel bearings I replaced them. Still had the noise. At this point I should mention that when I originally got the spring kit and talked to RT, they mentioned I needed a 24mm ID washer to sit on the top of the cartridge. This is needed because the RT springs are larger in diameter than stock and don't fit on the brass shoulder on the top of the cartridge. I had a pack of 6 washers that seemed to sort of fit so I used two of those (one for each fork). They seemed a little large but not overly...my first clue something was wrong, but I went with it.

I'm condensing a lot of hand wringing into a few sentences but after talking to RT, we determined that I did not get the proper washers. All makes sense because the larger ID washer was rocking on the cartridge and the sound is heard at the bottom of the fork because the sound is traveling down the damper rod to the point where the cartridge is bolted to the fork...at the bottom!

Finally last week after RT failed to send me the proper washers, I had my dealer call them because I was getting frustrated. After a few minutes on the phone, they came to the conclusion that Parts Unlimited has the WRONG SPRING KIT specified for the FJR. This is the caution part: If you order RT springs through any source other than RT, make sure you are getting the right parts.

I spoke to the RT guy once again and asked if it was simply the washers that were different between the kits and he said "no, the springs are different". Well, yesterday I got the new springs and HOLY ****, they are 2.5" longer than what I originally installed. And there are the two washers that I need and proper instructions.

In this thread someone had mentioned how short they had to make their preload spacer and I was baffled by that because the springs I was originally given required only a 1/4" reduction in the preload spacer. The proper springs clearly will require 2.5" or more of reduction. I suppose that was clue number 2. Anyway, tonight I hope to install the proper springs and washers and ride my FJR to work for the first time in a month. I love my R1100S but it is no fun in traffic and holds a thimble full of gas...and high test to boot.

 
Last edited by a moderator:
It's a ***** to install parts that aren't the right ones. Shame on the dealer and their supplier for not getting it initially correct... :blink:

Sounds like you have the right stuff now and the install will come out correctly. I'll be interested to hear what final spacer length you end up with.

Good luck!

--G
Tru dat. The good news is I got the installation all done last night. The preload spacer ended up being cut to 104mm or about 4.1".

The bad news is the noise is still in the front end. The only things left as potential candidates are the head bearing or the wheel/hub assembly...or possibly I assembled the fork bushings incorrectly? I replaced the head bearing with All Balls Racing tapered roller bearings when I originally did the forks and the wheel bearings were replaced two weeks ago when I first discovered the sound because I wanted to rule that out. I'm done, finished, kaput. Defeat officially declared. Bike is going to the shop and now it's just gonna be about money. Heavy sigh.

 
Mine did not have those in there as you can see from the photos in my write up.
Sorry just trying to help with visual aids. The top is the set up from Race Tech with spacer cut to my weight and to give me proper sag when installed. As I said Lee at Traxxion was right on with my set up. Sag was correct, setting the forks to the clicks top and bottom that Lee recommended were right on and I have never touched the rear shock.

I am sorry for your troubles on anyone's troubles with this but my experience with Lee was top notch and install was a breeze.

I will have AK's next year and have no doubt they will be spec on too.

I think hearing it from the guy who puts them together every day was worth what I may have paid more going direct, if I did pay more. It was worth it to call and know I was talking to someone who does it every day. I did call to verify the shorter oil level but other than that it was cake.

 
Ok, sound turned out to be the floating brake rotors! WTF, who knew? Apparently they get loose and there is nothing you can do about it. Doesn't affect performance so no biggie.

It appears that I am done with this job. Now to fight with Parts-Unlimited for some compensation for my pain and suffering. And I'm taking the feej to work today, YAY!

 
Installed Race Tech 0.95 springs on my previous '06. You're right, the instructions [or lack thereof] from RT is pretty pathetic.
The stack up shown in the pic below is correct EXCEPT the bronze machined guide goes on top, into the larger ID of the spring. From the bottom, thin washer [fits on top of dampener assembly], spring [small end down], bronze guide, OEM washer and lastly cut to length spacer. The package included several large washers that are meant for preload adjustment. I didn't use any.

RaceTechSprings.jpg


Hope this helps!

--G

Just went through this today on BigOgre's bike (an '04 1st gen). He had a Yamaha shop install Race Tech Springs (1.0kg/mm) when they were also replacing the oil seals. After they did the work he immediately began to notice clicking metallic noises when the forks were even slightly compressed, worse when on the real roads, that appeared to be coming from the forks. At CFR a couple of us listened to them and agreed the sound seemed to be coming from inside the fork legs. We made plans then to dig into them later.

Today we (finally) had a chance to pull off the fork legs and found most of the parts seen in the above quoted post. He had no washers underneath the springs, but had the funny torpedo shaped black delrin spacer thingee on the damper shaft with the spring over it. The bronze stepped washer was on the top of the spring with a steel washer over that.

One problem that we immediately found was that the shop had installed the stock length top spacers back into the forks which put about 50mm of preload on the new Race Tech springs. This was made apparent when the lock nut shot across my garage when we released the tension.

I'm pretty sure that what making the noise was that the black delrin torpedo spacers, which are free to slide up and down the damper shaft, probably worked their way up the shaft and then the spring was allowed to work off to one side on the bottom, where it sits on top of the (flat) cartridge top. Once the spring is off center the black spacer would no longer be able to drop down anymore (as far) to help in maintaining the spring centering. Seems like a bad design to me.

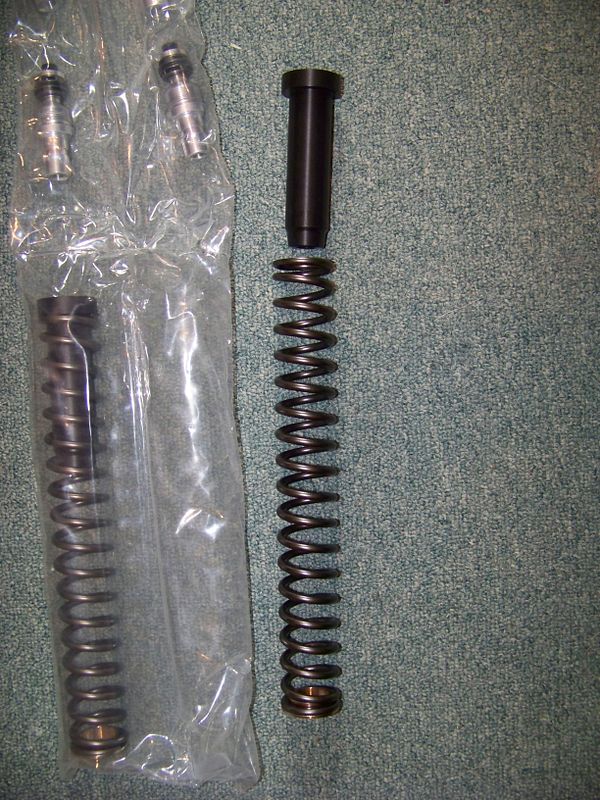
To fix the problem we decided to put the brass lipped washer on the bottom of the spring, to hold the spring centered and also protect the top of the cartridge. Then we installed the springs with a pair of GP Suspension spring buffers (I had on hand waiting to go into my own forks) on the top of the springs to perform the same centering duties up there. They look like this:

100_4017.jpg


It's the black thingee in the picture above.

By installing these spring buffers it holds the spring concentrically centered on the damper shaft, so the spring cannot work its way off center and rub on the inside of the fork legs. But, also being captured at the top of the spring stack, it means that the damper shaft does not ride up and down inside of that soft spacer and potentially wear it.

The above damper adds 10mm to the spring stack-up dimension, so you do need to account for that when you measure and cut your top spacers. Before the change, using only the Race Tech supplied parts, we had a 99mm space between the installed spring stack-up and the lock-nut underneath the fork cap (with the cap installed and the nut locked up). After installing the GP buffers that space decreased to ~ 89 mm. We ended up cutting those spacers a lot.

Some new fork oil and these components re-installed, we made some sag measurements on the bike and got ~25mm of static sag (just the bike weight) and 35mm of dynamic sag (rider weight on the bike). My experience says that this will still be on the sporty/stiff side of the suspension compromise. These are the sags that I have been running on my bike for the past several years and I might want to go a bit softer sprung for dealing with real world roads. But it's bound to be **** ton better than the way that they were installed previously.

I wish we had done sag measurement before, but I'm guessing we had zero static sag and just a little dynamic sag with all of that preload. I'll wait to hear from Mike (BigOgre) on what the results were, but I'm guessing he will be very pleased.

 
Last edited by a moderator:
Top