Anybody Tried This Stuff? ("Bondic")

Yamaha FJR Motorcycle Forum

Help Support Yamaha FJR Motorcycle Forum:

This site may earn a commission from merchant affiliate links, including eBay, Amazon, and others.

SacramentoMike

Not Safe For Work
Joined
Nov 5, 2007
Messages
5,065
Reaction score
1,834
Location
Sacramento, CA (honest)
I've seen ads for this magic fixer called Bondic all over the internet.   You put this liquid on something and then hit it with a UV light they sell with the bottle of the liquid and the claims are pretty extraordinary.  Like "50 times stronger than Chuck Norris" extraordinary.  Only reason it seems somewhat legit is it seems similar to what dentists use now to bond crowns on teeth.  Please google "bondic" to see it, since I can't seem to figure out how to link a damn website to my posts anymore.

The reason I thought to ask here is the famous "stay" (I think it's called) that's inside of the Gen 3 nosecone, the one that holds your mirrors in place.  The one everybody who ever dropped a Gen 3 at 0 mph or better has broken.  People have gone to great lengths to try and fix these, and some have even worked, kind of.  Some involved taking the part out and welding, or replacing, some have tried to do a brace or splint to hold it, including me.  Or even J-B Weld.  Sometimes these fixes have worked, sometimes even fairly permanently.  But it's really tough to get to and an ugly, nasty job.  So this vid popped up on YouTube and I watched the whole thing.  If it works as advertised (and it's expensive), it can do a lot, but if it could do this particular job, the price is nothing.  So anybody tried it?  I mean for anything?  I don't know when I'll be dropping the bike next, but when I do, I'm pretty sure that cheesy-assed stay is going to break again.

(In the meantime, I manage to knock plenty of other stuff over and break it all the time.)

 
While I expect it has pretty good tensile strength, I doubt that flexural strength would be good enough for a mirror stay.  I have seen the stuff around and was intrigued by it but I haven't tried it.  I suppose it might be worth trying but suspect it may be no better than JB Weld or regular epoxy in this application.  It is difficult to glue metals with a "solid" adhesive - needed for this application. 

Very strong (but flexible) bonding materials are frequently used in automotive assembly (i.e. body panels) but that sort of material wouldn't be suitable for this.

Try it out and report back.  I would love to find an adhesive that works better than JB Weld for this sort of repair.  (I find it doesn't work very well.)

 
How about buying a plasma cutter, some A500 steel, and a MIG welder? Make your own replacement parts that'll outlast the rest of the bike. Bonus for 2 new tools and a supply of steel for other projects.

 
Mike,

If the FJR mirrors don't "give" in the right direction, and the mounting studs do not fail, seems like the mirror stay would have to break, unless it could take the full weight of the bike leaning on a mirror.  Even then, the mirror stay might simply break in a different place.  Some riders evade the broken-stay problem by using "stalk-type" Yamaha mirrors, which fold in a better way than the FJR mirrors; as a benefit, you also get a much better view behind you.

Just thinking out loud here, it may be possible to mount the mirrors with good Nylon (not plastic) machine screws, so the screws would break before the internal mirror stay breaks.  The mounting studs would need to be removed (if possible) of course, and the threads matched to the new Nylon screws.  Alternately, the mirror pivot stud might be replaced (if possible) with a Nylon machine bolt.  No doubt the mirrors would break away easily then, with either option, but the Nylon screws may not be strong enough to hold the mirror, I don't know.  The inside repair would still be a hassle, but only the new Nylon screws would be needed.  If the Nylon pivot bolt broke, that would be an easy fix.  If the Nylon bolts are too weak for the job, maybe they can replaced by very low-grade metal bolts.  The difference in breaking strength between a high-grade bolt and a low-grade bolt is amazing.

As for the new goop, Bondic, I would not expect enough strength from it, where JB-Weld is not enough.  For either product, I would saturate heavy silk cloth with it, and make the repair as you would if using Fiberglass.  Silk is incredibly strong stuff, when used that way.  Still, if the repair itself never breaks again, a break may happen someplace else on the mirror stay.  Nylon machine screws might be an answer, if they are strong enough to do the job of holding the mirrors normally.  Low-grade metal bolts, likewise.

 
Alternately, the mirror pivot stud might be replaced (if possible) with a Nylon machine bolt. 
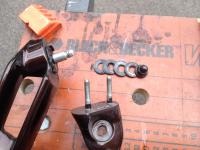
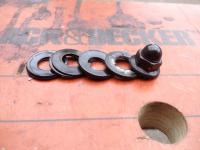
I currently have a Gen2 mirror apart and I see that replacing the pivot stud is not really feasible.  The two attachment studs are cast into the mirror base and it would be a chore to drill them out and retap for nylon screws.  Here's another option: I believe the Gen1 & 3 mirrors use the same pivot style bolt.  Inside are a number of Belleville spring washers that tension the mirror base to the mirror unit.  Taking out a couple of them would reduce the force needed to pivot the mirror and may lower the impact load on the front stay.  Some experimentation may be needed to ensure the mirror does not fold back at speed.  Be sure to reinstall them in the proper sequence: large end against large end and small end against small end and a small end placed against the housing and the acorn nut.

 
I currently have a Gen2 mirror apart and I see that replacing the pivot stud is not really feasible.  The two attachment studs are cast into the mirror base and it would be a chore to drill them out and retap for nylon screws.  
Garauld,

Right, probably not realistic, if the studs are cast into the metal.  I haven't tried that myself; I was just spit-balling.  Nylon nuts may still be an option, though.  Two or three may be needed there.  My 2008 has a Nyloc locking nut on the mirror pivot bolt, so I can adjust the "pivot force" needed to swing the mirror using a socket wrench.  I do not know if that Nyloc nut is OEM, but it works for me. 

If needed, check out Anywho.com for the Nuts & Bolts heading, to find your local bolt sellers.  Sort the findings by distance, using your ZIP code.  Those guys should have the hardware needed; they can match almost anything.

Just a thought . . .

.

 
Just another thought, and probably veering off topic a bit, though breaking the mirror mounting frame is in the OP's initial post ..

The mirrors have stops to prevent them folding back very far. In my case, the frame broke with the mirror against its stop. Maybe if the mirror could fold back more, it wouldn't put as much load on the frame.

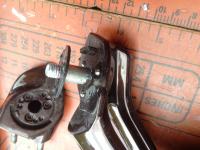
With this thought in mind, it is possible to allow the mirror to fold right back. A couple of pics show how.

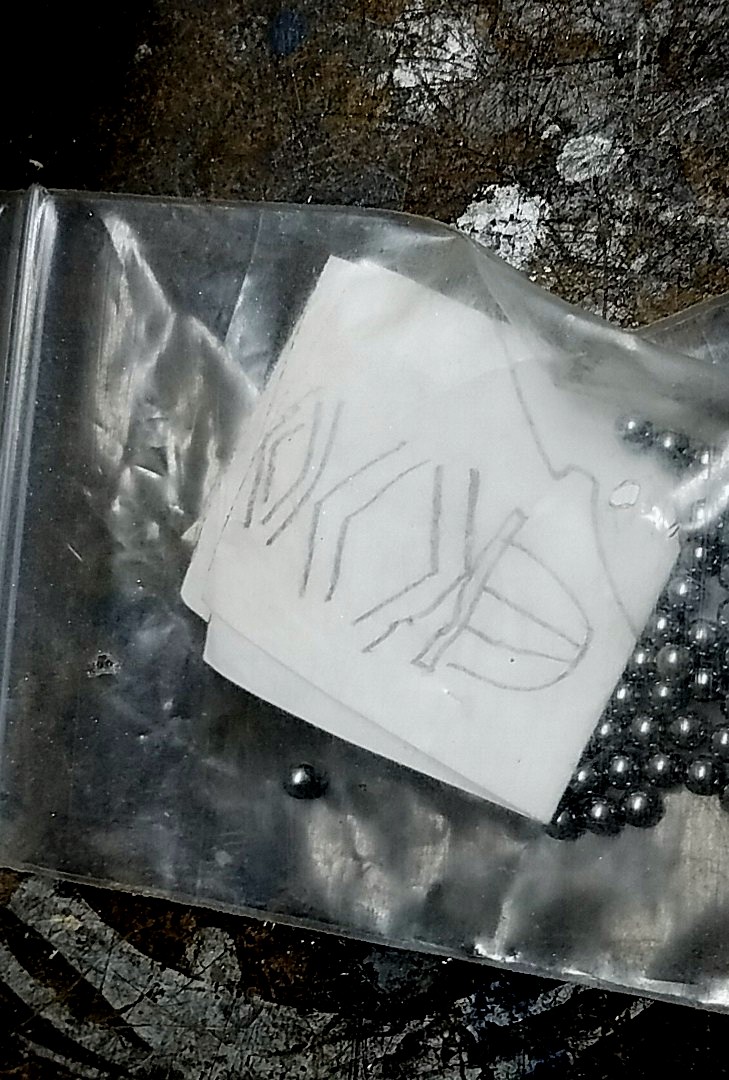
If you dismantle the mirror as shown in the first pic (careful not to lose the balls, and note the orientation of the spring washers), you can see the stop on the revealed face of the stem.

(Click on image for larger view)


It's easy to use a hacksaw (or Dremel or other instrument of choice) to remove that stop, as in the next picture.


This would in no way affect the normal positioning of the mirror, the indenting mechanism is unaffected.

I never implemented this (the pictures were of an already broken mirror), so can't be sure how effective it might be, and it would mean the mirror could hit the screen. But replacing the screen is much, much easier than replacing the mounting frame.

 
Removing the stops on Gen3 mirrors may work to save the aluminum stay.  I have repainted mirrors with the stops broke off.  Here's a photo of how, I believe, the factory stacking of the belleville spring washers should be installed.  My previous post was corrected: "...and a large small end placed against the housing and acorn nut.

J9uykoL.jpg


Here's a photo of how, I believe, the factory stacking of the belleville spring washers should be installed.  My previous post was corrected: "...and a large small end placed against the housing and acorn nut.
Correct.. Photos taken after carefully placing them as they came off.

(Click on image for larger view)


Top