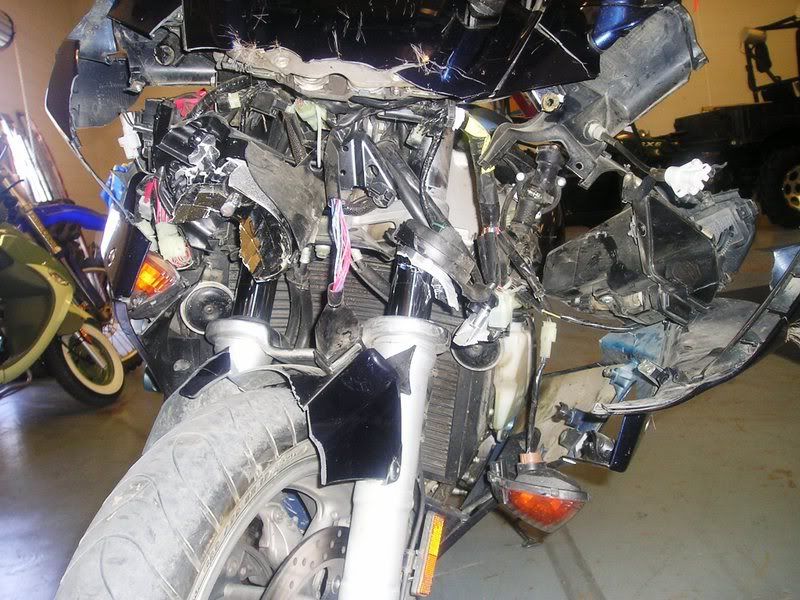
Gen II Front tupperware

Yamaha FJR Motorcycle Forum

Help Support Yamaha FJR Motorcycle Forum:

This site may earn a commission from merchant affiliate links, including eBay, Amazon, and others.

twistedcricket

You have whiskey?
FJR Supporter
Joined
Apr 28, 2007
Messages
1,540
Reaction score
37
Location
Omahell, NE
I'm attempting to remove/replace just one piece. After a few searches and seeing lots of Gen I references, I still see no pics :(

Here's a pic of the piece I need to replace;
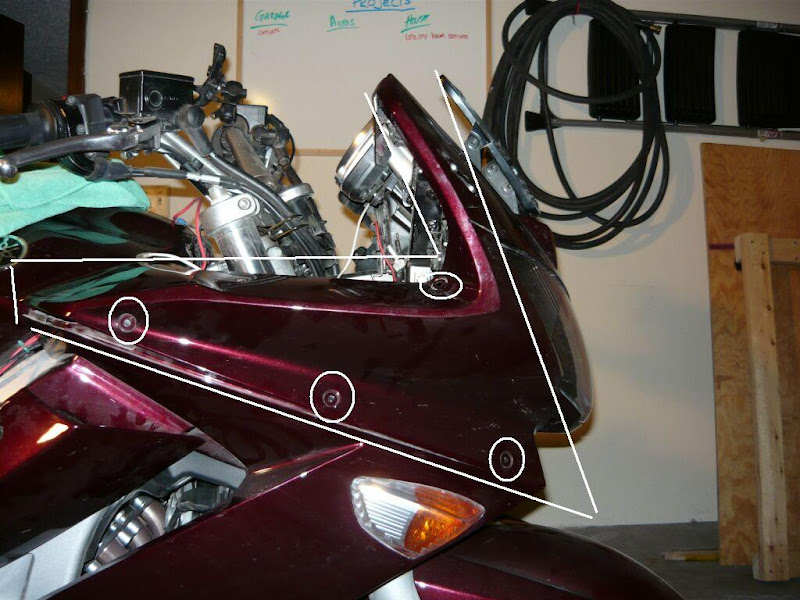
P1000361a.jpg


I've taken a few more pictures from the top of screws I've removed (2) that appear to be holding the plastic.

There seems to be something holding them together just above the turn signal..but not viewable.

Help!

TIA

 
Last edited by a moderator:
I'm attempting to remove/replace just one piece. After a few searches and seeing lots of Gen I references, I still see no pics :(
Here's a pic of the piece I need to replace;

P1000361a.jpg


I've taken a few more pictures from the top of screws I've removed (2) that appear to be holding the plastic.

There seems to be something holding them together just above the turn signal..but not viewable.

Help!

TIA
Hope you get some good answers on this. I'm trying to do the same thing except on the left side.

 
ElCajone, Twistedcricket -

PM me with your email address and I'll send you a .pdf file with step by step instructions.

KD

 
One of the folks on the forum sent me a pdf of the service bulletin for fixing the instant mpg display on the 06's. It's 10 pages of how to disassemble all of the Gen II front plastic. PM me your email address and I'll send it to you.

 
If you're talking about the upper fairing, that's actually the LAST piece to come off, and the nose has to be off the bike to do it.

Don't fight it, just do the whole sequence and it's not so bad. There are a couple of bolts inside the very front of the cowl fastening the upper fairing to the nose cowl, and you cannot access those bolts with the nose on the bike. Once you stop thinking "There's got to be a way. . . " then it gets easier. Really.

 
Don't you guys ever look at the service manual or the illistrated parts list from Yamaha. It can not be that much harder then doing a Gen 1 bike.

Remove the windsheild

remove the little cover under it

remove the inner panels or just disconnect them

remove all the screws from the black panels that are under the nose, should be 3 screws on each side with some of those plastic rivits

remove the 2 side panels make sure to take out the 2 screws that hold the triangle piece behind the front wheel.

then disconnect the lights from there wiring and enything else you have farkled on.

then remove the 4 screws that hold the head light in place and the whole nose comes off as 1 piece.

then remove the head light from the fairing and then take apart the fairings. should not take more then 45 min the first time. By the time you have done it 12 or 20 times. I do it every year to clean and check the wires it takes less then a 1/2 hour to take a part and about 45 min to reassmble.

 
By the way while you have it a apart clean and wax it. Also go over all the little grommits and fasteners that are back there. You should spend about 3 hours just cleaning and checking everything for next years riding season.

 
ElCajone, Twistedcricket -
PM me with your email address and I'll send you a .pdf file with step by step instructions.

KD

Thanks.. Good stuff... now I will take my bike apart....... just cuzz.. I actually mean that too.... I wanna see inside the box.... no one ever let me in before so this is my big chance.... thanks man........ Like buying me my first woman........ **sniffle**,,, dad

 
The one contribution I'd like to make to this forum is a complete step-by-step instruction with photos for complete outer shell removal. It will have to wait until either I am layed off from work or after the annual audit. Maybe I can finish it by April.

 
I did one for the Gen-I, it's in Iggy's 03-05 bin-o-FAQs, and offered to do one with a Gen-II if anybody wanted to bring one by.

With the understanding that I've never torn one down before. . . . :assassin:

I do have the PDF that's been getting PM'd around, and I stayed in a Holiday Inn Express. Once. Sometime back.

 
Last edited by a moderator:
One Bambi, one millisecond of not paying attention...

and then, no problem!

Let me know if you need additional assistance... :blink:

MassDamage.jpg


I don't have detailed pictures of everything as I removed it. However, during the rebuild, I will ask a friend to take lots of pictures. I have a start HERE - but I neglected (or couldn't physically) take pictures during the removal.

The PDF is a HUGE help. I plan/hope to have something similar, but with greater detail and some "gotchas" that I encountered. Nothing major, but that PDF made it seem as though disconnecting the lockbox cylinder wire was easy...I found it easier to remove the whole cylinder. (two screws) I didn't find any shortcuts...

It's as easy as can be, but I'm not really fond of ripping into something with no guidance (or minimal guidance).

I'm not sure about cleaning... :)

 
I just checked Ponyfool's webpage and find no PDF posted there [as yet anyway], ...if it's being passed around via e-mail for download, could someone please put me on the list, Thanx!!

 
Top