BeefSupreme
Member
Tools you'll need:
-Wire stripper
-Wire crimper
-Butane torch (lighter will work here as well
-2 Red butt connectors (use weatherproof for obvious reasons)
-Either a red ring terminal or, as I used, a quick splice
-Electrical tape
-$5 Brake light modulator found here: https://www.superbrightleds.com/moreinfo/strobe-controllers/brake-light-strobe-module/195/845/
-LED Brake lamp replacements. Having a strobe on incandescents will lower their life span significantly and be less effective, since they do not illuminate at full brightness immediately
I used the following bulb in natural white because I wanted an upgrade in visibility. They're oversized and a bit spendy, but they're rated at 675 lumens, where standard 1157 incandescents are rated around 450. Be sure to select natural white. You can also choose red if you have clear housings
https://www.superbrightleds.com/moreinfo/tail-brake-turn/1157-led-bulb-dual-function-28-smd-led-tower-bay15d-retrofit-car/1644/3767/
TOOLS
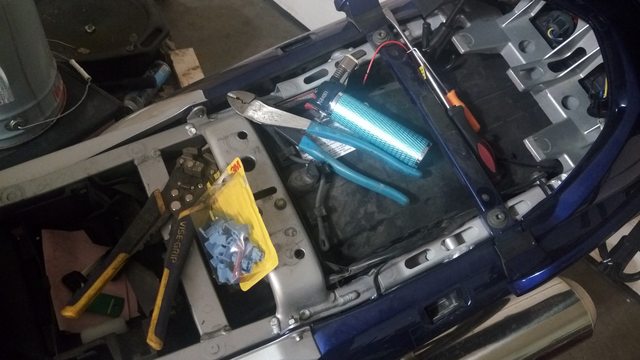
Time estimate: under 15 minutes
Background: I've always wanted a back off brake light modulator, but they're like $70 so no thanks. This one is $5. I've never done this job before so this is my first rodeo, but I've always been pretty decent with wiring so I decided to do it.
PROCESS
Step 1: locate your brake light wire. Be sure that it is, in fact, the BRAKE light and not the marker light. For obvious reasons. Ours is yellow on the FJR.
I found a good spot to access the wires halfway between the lights and the harness, because I had space available and didn't have to remove anything.
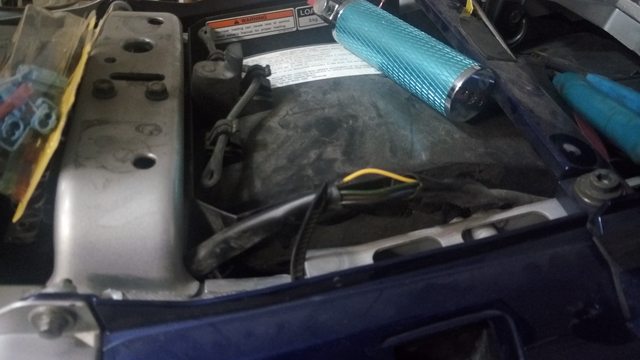
Step 2: cut your brake light wire and strip it. This is where you'll be wiring in the modulator. If you have two brake lights, try to find somewhere where they meet so that you're only dealing with one wire. Technically you should be able to have both outputs, but I'd rather life be easier and just have one to deal with.
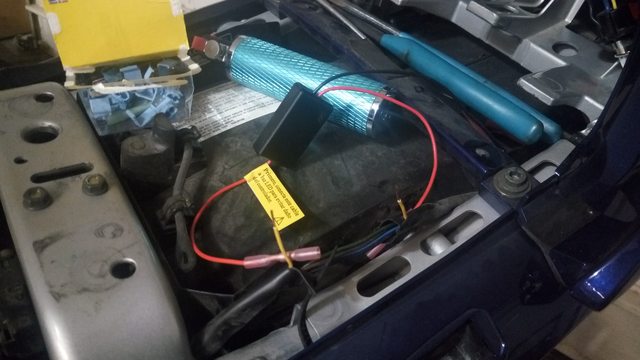
Step 3: crimp your butt connectors on the modulator and connect it in-line with your brake light wire. It is clearly written which wire should go TO the lamps. Do not mess that up.
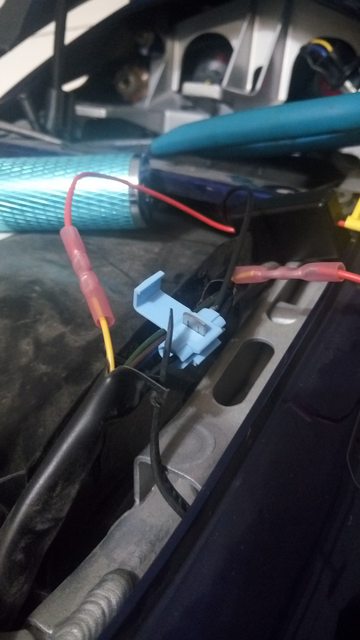
Step 4: ground the modulator. You have two options here: run it in line with another ground with a quick splice (as I did,) or crimp on a ring terminal and ground it to the chassis yourself. Both will work.
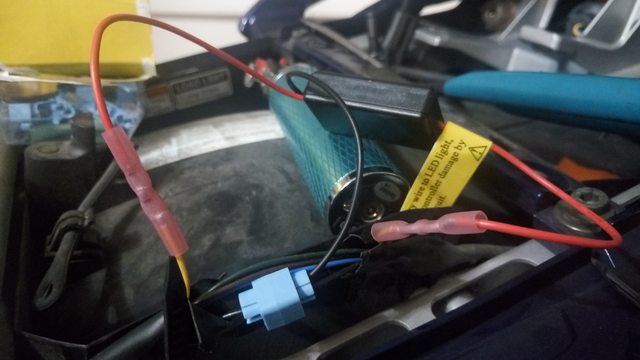
Step 5: by now, you should have all the wires attached again, going yellow from harness-red-modulator-red-yellow to lamp, and the modulator grounded. At this point, check your work. turn the key on, hit the brakes. You should be in business.
Step 6: tidy up. Now it's time to weatherproof everything. Using your torch or lighter, heat up the butt connectors so the heat shrink tightens up against the wires. Wrap up any exposed wires with electrical tape or conduit if you want to do that. Tuck your wires and your modulator. There will be vibration, so find a good spot where it won't rub apart.
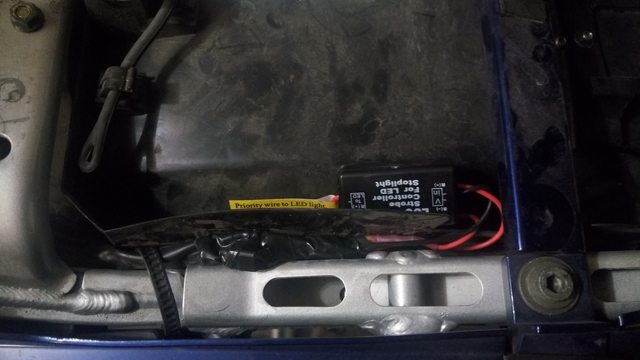
Step 7: Congratulations, you now have a brake light modulator for less than a tenth of a name brand modulator.
-Wire stripper
-Wire crimper
-Butane torch (lighter will work here as well
-2 Red butt connectors (use weatherproof for obvious reasons)
-Either a red ring terminal or, as I used, a quick splice
-Electrical tape
-$5 Brake light modulator found here: https://www.superbrightleds.com/moreinfo/strobe-controllers/brake-light-strobe-module/195/845/
-LED Brake lamp replacements. Having a strobe on incandescents will lower their life span significantly and be less effective, since they do not illuminate at full brightness immediately
I used the following bulb in natural white because I wanted an upgrade in visibility. They're oversized and a bit spendy, but they're rated at 675 lumens, where standard 1157 incandescents are rated around 450. Be sure to select natural white. You can also choose red if you have clear housings
https://www.superbrightleds.com/moreinfo/tail-brake-turn/1157-led-bulb-dual-function-28-smd-led-tower-bay15d-retrofit-car/1644/3767/
TOOLS

Time estimate: under 15 minutes
Background: I've always wanted a back off brake light modulator, but they're like $70 so no thanks. This one is $5. I've never done this job before so this is my first rodeo, but I've always been pretty decent with wiring so I decided to do it.
PROCESS
Step 1: locate your brake light wire. Be sure that it is, in fact, the BRAKE light and not the marker light. For obvious reasons. Ours is yellow on the FJR.
I found a good spot to access the wires halfway between the lights and the harness, because I had space available and didn't have to remove anything.

Step 2: cut your brake light wire and strip it. This is where you'll be wiring in the modulator. If you have two brake lights, try to find somewhere where they meet so that you're only dealing with one wire. Technically you should be able to have both outputs, but I'd rather life be easier and just have one to deal with.

Step 3: crimp your butt connectors on the modulator and connect it in-line with your brake light wire. It is clearly written which wire should go TO the lamps. Do not mess that up.

Step 4: ground the modulator. You have two options here: run it in line with another ground with a quick splice (as I did,) or crimp on a ring terminal and ground it to the chassis yourself. Both will work.

Step 5: by now, you should have all the wires attached again, going yellow from harness-red-modulator-red-yellow to lamp, and the modulator grounded. At this point, check your work. turn the key on, hit the brakes. You should be in business.
Step 6: tidy up. Now it's time to weatherproof everything. Using your torch or lighter, heat up the butt connectors so the heat shrink tightens up against the wires. Wrap up any exposed wires with electrical tape or conduit if you want to do that. Tuck your wires and your modulator. There will be vibration, so find a good spot where it won't rub apart.

Step 7: Congratulations, you now have a brake light modulator for less than a tenth of a name brand modulator.


