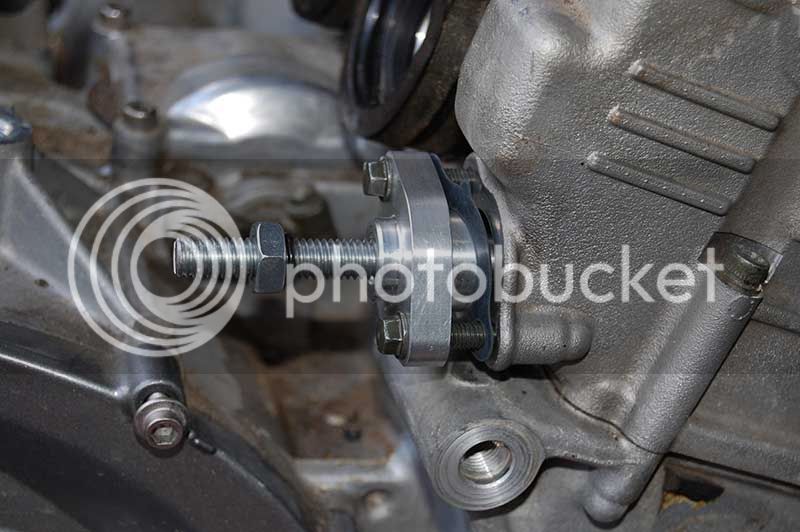
manual camchain tensioner

Yamaha FJR Motorcycle Forum

Help Support Yamaha FJR Motorcycle Forum:

This site may earn a commission from merchant affiliate links, including eBay, Amazon, and others.

Smooth_Gary

Active member
Joined
May 30, 2008
Messages
36
Reaction score
0
Radiohowie are you there,,lol,,anyway guys I have an 06 fjr that I replaced the motor at 81000, the new motor has 32000 miles, I am getting the camchain noise from this motor, I read somewhere that they make a manual camchain tensioner,,my question is?? is it hard to adjust and how offen do your adjust it??if u remove the timing cover is there enough room to get your fingers in there to feel the tension??and how much slack if any should it have??and how offen do u adjust it?? i would appreciate feed back,, this forum have helped me a lot in the past,,thanx,, best regards Gary

 
The timing cover has a pin which secures the cam chain slipper so when the cover is removed the chain goes slack.. Meeself-I'm just going to throw in the new style tensioner just for giggles.

 
...??if u remove the timing cover is there enough room to get your fingers in there to feel the tension??
The timing cover has a pin which secures the cam chain slipper so when the cover is removed the chain goes slack..
You could (or, have done...) fabricate an inspection cover on your timing cover -- either a plate/gasket attached over a hole with 3~4 threaded fasteners; or have a threaded bung heli-arced onto your timing cover for a large threaded cap.

You could then stick your finger in there anytime you wanted to check things out.

 
Radiohowie are you there,,lol,,anyway guys I have an 06 fjr that I replaced the motor at 81000, the new motor has 32000 miles, I am getting the camchain noise from this motor, I read somewhere that they make a manual camchain tensioner,,my question is?? is it hard to adjust and how offen do your adjust it??if u remove the timing cover is there enough room to get your fingers in there to feel the tension??and how much slack if any should it have??and how offen do u adjust it?? i would appreciate feed back,, this forum have helped me a lot in the past,,thanx,, best regards Gary
If you're VERY careful, you can replace the OEM CCT with the Manual CCT without opening up the chain case. I wouldn't, but it can be done.

The downside of doing the R & R WITHOUT pulling the case cover is you won't know if the chain slips. The downside of doing the R & R WITH pulling the case cover is that the dowel pin that locates the tensioner guide will probably pull out of the engine block when the cover comes off, allowing the guide to slip down, putting a TON of slack in the chain, and allowing the slack to pile up on the crank sprocket. It's a Catch22.

All that being said, HERE is a thread well worth reading concerning your planned replacement. And another.

As to your other questions, take a look at the picture:

chain05.jpg


The APE CCT is very simple to adjust....loosen the big-ass locknut on the threaded shaft, screw the shaft in clockwise.

I used finger pressure only, even though the shaft is slotted for a screwdriver. After screwing the shaft in as tight as I could using ONLY my fingers, I snugged down the locknut, and since I had the case cover off, rotated the motor clockwise two or three turns with a wrench, to make sure the chain had rotated around at least twice. Loosened the locknut and was able to turn the screw in MAYBE 1/16th of a turn more. Snugged the locknut up again, did the rotate the crank boogie another 6 or 7 revolutions, and checked the tension shaft again. Could NOT turn it in any further.

I'm confident that put enough pressure on the chain slider to be "just enough" to keep the chain tight without being over-tight. That was at 46,000 miles when I replaced my motor.

At 50,000 miles, I did my first oil change and checked the APE CCT. Loosened the locknut, attempted to turn the adjuster shaft ONLY with my fingers, tightened the locknut down. Didn't move. Bumped the starter to rotate the motor a few revs, re-checked...still no movement. My original setting a month earlier was still Goldilocks....."just right!"

Went through the same process at 54,000 miles and no adjustment was necessary. I'm due for ANOTHER oil change, but doubt I'll bother checking again until I hit 62K, my next oil change. I don't have any problem skipping this oil check.

But so far, I've checked the APE tensioner 3 times in 8,000 miles and the chain hasn't developed a hint of slack, so I feel good about it.

 
It should be pointed out that it's not quite as accessible as Howie's picture implies. His motor was out when the pic was tooked.

 
Howie, can you describe or better yet, shoot a pic of the shaft of the APE in relation to the frame.

Do I remember correctly that the hole in the frame was right up to the bolt covering the slotted end of the plunger.

Does it matter how long the shaft of the APE is to clear the frame. It looks pretty long in your pic compared to just the bolt head sticking out the Yammy part.

 
howie i built my motor and if i remember right that pin goes into both case and timing cover if it comes out u can slide it back into the engine case to hold the tensioner shoe,,whats this new oem camchain tensioner about???,,it just started doing it,,so i think i will get the manual tensioner and not replace the chain,,it only has 30000 on it

 
howie i built my motor and if i remember right that pin goes into both case and timing cover if it comes out u can slide it back into the engine case to hold the tensioner shoe,,whats this new oem camchain tensioner about???,,it just started doing it,,so i think i will get the manual tensioner and not replace the chain,,it only has 30000 on it
Yammy replaced an "old" part number tensioner with a new one (has new part number)

it seems to have a longer plunger and a better spring

I and some others believe it's an improvement

It's pretty rare that folks have had a grenaded engine

If hearing the marbles in a can, just replace the tensioner with a new one

My marbles sound lasted over 10k miles and it was my fault to ignore it too long

I also think the new tensioner is better...personally I'm not installing a manual part

I do keep a tensioner and gasket handy in case I need it.

I've given the advice to just change the tensioner anyway every 50k miles on the second valve check.

YMMV

 
It should be pointed out that it's not quite as accessible as Howie's picture implies. His motor was out when the pic was tooked.

No S*&t !! I'm still trying to get rid of the extra knuckle I had to install in my left index finger to install that sucker in the bike.

The install was actually very straight forward, but it took a wee bit of "fiddle" time. Very close quarters for working on it.

 
Howie, can you describe or better yet, shoot a pic of the shaft of the APE in relation to the frame.
Do I remember correctly that the hole in the frame was right up to the bolt covering the slotted end of the plunger.

Does it matter how long the shaft of the APE is to clear the frame. It looks pretty long in your pic compared to just the bolt head sticking out the Yammy part.
Mike, I'll see if I can lift the tank this weekend and get a picture.

The adjusting shaft looks so long in the above picture since it was fully retracted. That pic was taken on initial install. You can see it's not not even bolted to the block at this point.

It really doesn't matter how long it is, since there's that hole in the frame directly in line with the adjuster shaft, but I do remember it's nowhere near that long to need to enter the hole in the frame.

Just went on a brief search (HA!) and found a picture HERE of my APE CCT mounted in Brodie's bike (2nd picture), before he got APE Production Unit #1 and graciously donated his prototype to me . Again, thanks, Brodie....

That's mounted, but not tensioned, in Brodie's '06. The angle of the photo ain't perfect, but you can see space between the end of the adjuster shaft and the frame spar, and that's with the tensioner shaft NOT screwed in, according to Brodie's description and pic .

 
R.H. 's observation about the dowel pin [ The downside of doing the R & R WITHOUT pulling the case cover is you won't know if the chain slips. The downside of doing the R & R WITH pulling the case cover is that the dowel pin that locates the tensioner guide will probably pull out of the engine block when the cover comes off, allowing the guide to slip down, putting a TON of slack in the chain, and allowing the slack to pile up on the crank sprocket. It's a Catch22 ] ...made me wonder if it is really a problem... If my thinking is correct, there would be zero slack on the foward run of chain between the exhaust cam sprocket and crank sprocket so you could pull down on that run of chain and reengage the sprocket without losing the proper timing..Then zip tie the chain to the sprocket and reinstall the dowel pin. After R&R of the CCT the ties would be removed and there should be enought tension to keep the chain on the sprocket. Am I wrong on this??

 
... If my thinking is correct, there would be zero slack on the foward run of chain between the exhaust cam sprocket and crank sprocket so you could pull down on that run of chain and reengage the sprocket without losing the proper timing..Then zip tie the chain to the sprocket and reinstall the dowel pin. After R&R of the CCT the ties would be removed and there should be enought tension to keep the chain on the sprocket. Am I wrong on this??
I don't know -- but, I'd suggest: that if you don't know, for sure, that the cam timing is correct? -- that you make sure. That involves removing the cam cover and checking the marks on the cam sprockets.

One of the possible issues: the valve springs want to push on the ramps of the cam lobes and rotate the camshafts when tension is removed from the cam chain. It's quite possibe, and easy, for cam timing to be 'off ' -- even if you didn't do it (the engine did...).

My advice would be to remove all covers and set the camshaft timing correctly when replacing the tensioner -- thus, removing all doubt (and, if using a manual camchain tensioner, setting the tension as you like it).

 
Sounds like good advice considering the consequences...while adjusting valves on other bikes I have seen the springs along with residual compression turn the engine...at least the cams would be in phase. CCT replacement will await the valve check..

 
I agree too, but if you removed the right cover before backing off the tensioner, etc. and replacing it, wouldn't things tend to stay in place while you got your zip ties done up? I definitely wouldn't replace the tensioner without having at least the right cover off first.

 
I read that very carefully.... but I thought with a bit of tension on it, it might not happen... nevertheless, prolly save to have the top cover off too so you can see what's going on. Coordinate this with a valve check......

 
i replaced the camchain tensioner with an ape manual tensioner without pulling the timing cover,,if u dont turn the engine over while the tensioner is out it wont jump teeth,,when u bulid the motor n set the timing n u dont have a tensioner in there n it dont jump teeth,,the bike runs much better now,,because the valve timing is back in order,,i would highly recommend this modification to anyone with an fjr1300

quote name='Yzerman19' date='Aug 22 2010, 05:14 PM' post='778458']

I read that very carefully.... but I thought with a bit of tension on it, it might not happen... nevertheless, prolly save to have the top cover off too so you can see what's going on. Coordinate this with a valve check......

 
i replaced the camchain tensioner with an ape manual tensioner without pulling the timing cover,,if u dont turn the engine over while the tensioner is out it wont jump teeth,
Not necessarily.

If you do not know where the engine is, rotationally, it is possible that it stops in a position where one or more valve springs are exerting force on the side of a cam lobe(s). When you release the chain tension the cam (or cams) may rotate and skip a tooth on the now slack chain.

Yes, there are certain crank / cam positions where there is no rotational force being applied to the cams. That would be the spot you'd want to build the engine in, and also to replace the tensioner at. This is not the same as the spot you check your clearance at because that is just the low spot for one cylinder and could still have pressure on one of the other cylinders cams.

Finding that spot usually means pulling the valve cover to see the cams, so at that point you can just tie-wrap them to be sure they don't move.

Maybe if we knew that it was at TDC on cylinder #X we could just move the crank to that position and go to town? Anyone know for sure?

 
Top