Removing plastic

Yamaha FJR Motorcycle Forum

Help Support Yamaha FJR Motorcycle Forum:

This site may earn a commission from merchant affiliate links, including eBay, Amazon, and others.

RadioHowie

I Miss Beemerdons!
Joined
Jun 27, 2005
Messages
7,847
Reaction score
1,008
Location
Winter Haven, FL
panel1.jpg


Trying to get some work done...deep cleaning...battery maintenance...farkle installs...and need to get the tupperware off.

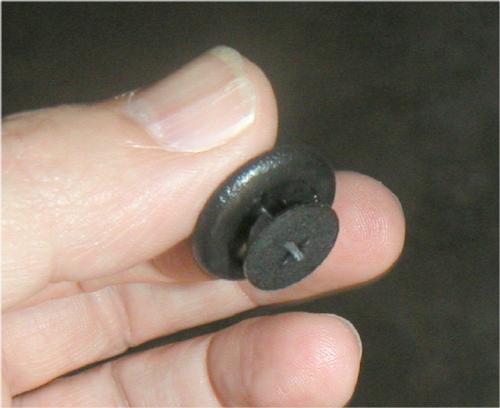
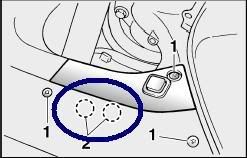
Jeezus, what a nightmare I'm having! From Image #1 above, how the hell do you get the two plastic panel screws out? I know they're basically pop-in screws that spread the insides of the grommets to hold two panels together, but the grommets themselves just turn and turn. Can't get both my big, fat hands in there to grab the back of the grommet (on the inside of the panel holding the glovebox) and can't get a grip on the outside of the grommets to keep 'em from spinning so the screw comes out. Any suggestions short of oxyacetylene?
panel2.jpg


For image #2, I'm missing the screw, and I'm guessing, the spring nut behind the panel.
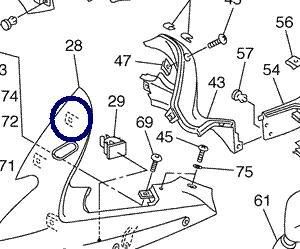
panel3.jpg


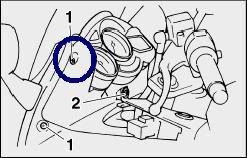
I guess I can get both from the dealer, but looking at image #3, where the hell does the spring nut, #47 on the diagram, attach to? The tab I circled on the headlight surround?

I wouldn't have to ask if I could get the panels off. :)

 
I use a long skinny sharp screw driver as a pokie to hold the rim of the retainer while I turn the philips screw. Part of the key is to put very little pressure on the phillips so that it can pop out easily. Push on the rim of the round retainer/washer from the side and it is easy to access. I have a very short, stubby phillips that I obtained just for the purpose of taking those fasteners out.

The tab you have circled I think if I remember it correctly. Once the panel is off it is pretty obvious. When you order the fasteners order an extra one or two of each of everything, put them in an empty film container and stick them under the seat for later.

 
Last edited by a moderator:
I use a long skinny sharp screw driver as a pokie to hold the rim of the retainer while I turn the philips screw. Part of the key is to put very little pressure on the phillips so that it can pop out easily. Push on the rim of the round retainer/washer from the side and it is easy to access. I have a very short, stubby phillips that I obtained just for the purpose of taking those fasteners out.
The tab you have circled I think if I remember it correctly. Once the panel is off it is pretty obvious. When you order the fasteners order an extra one or two of each of everything, put them in an empty film container and stick them under the seat for later.
So if I understand correctly, just stab/***/wedge the retainer and hold it in place to keep it from spinning and try unscrewing the phillips without exerting a lot of pressure towards the retainer.

That about right?

Thanks for the quick reply.

 
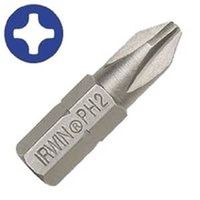
I use a phillips bit-tip that is normally used in drywall fastener drivers, like so-
6072805.JPG


Easy to carry with you, fits anywhere, even the tightest areas. Hold the outer edge of the fastener, then turn the phillips screw CCW a half turn or so-it turns within the bezel you're holding. It will pop out just a bit, then pull or pry the fastener out.

 
Last edited by a moderator:
More like stab it from the side. If you try to pry it out to put pressure on it it sort of defeats the whole process. The fasteners actually come out really easily if you just gently turn the philips while holding the washer part stationary with the tip of the sharp screwdriver. Doesn't take must force at all......unlike removing the panels A-B-C-D after getting all the screws out....LOL. THAT takes a little force I find.

It is much easier to get all the panels out if you lift the tank up first. That gives you some room to move the inner panels. Take ALL the screws out of the panels and the fairing lowers before removing panels A-D. It helps getting them out if you gently pull the fairing lowers outboard a little.

Wait till you get those panels A-D full of switches and extra wires and *****.....

Yea on Rad's tool bit idea. If not for the super stubby phillips I would definitely carry one of those.

 
Last edited by a moderator:
Geez. The little black plastic ones-just raise the phillips head with your knife. It is a quick-fastener. While the threads will work, they don't have to. Do you think they took the time to screw the thing when they put it in, or just mashed it?

And there ya go. :D

The fact that there is a phillips head carved into it, implying that it un-screws, was actually just a cruel engineers joke. Pop it in, pop it out.

There's an egghead somewhere laughing right now.

 
Last edited by a moderator:
Geez. The little black plastic ones-just raise the phillips head with your knife. It is a quick-fastener. While the threads will work, they don't have to. Do you think they took the time to screw the thing when they put it in, or just mashed it. And there ya go. :D

They are designed to be pushed in but need to be unscrewed to remove/release them. They will not live forever if you just pry the phillips out each time.

 
Geez. The little black plastic ones-just raise the phillips head with your knife. It is a quick-fastener. While the threads will work, they don't have to. Do you think they took the time to screw the thing when they put it in, or just mashed it? And there ya go. :D
Hence his forum handle.

 
They are designed to be pushed in but need to be unscrewed to remove/release them. They will not live forever if you just pry the phillips out each time.

I see you fell for it. (the engineer's joke) They will not survive many removals/fitments regardless. Many, many times the initial instalation will skank the so-called threads. There is no more chance of ruining either way. Besides, these things are cheap. Next time you have one out, stop by your local body shop supplier and pick up a box.

 
Geez. The little black plastic ones-just raise the phillips head with your knife. It is a quick-fastener. While the threads will work, they don't have to. Do you think they took the time to screw the thing when they put it in, or just mashed it? And there ya go. :D

The fact that there is a phillips head carved into it, implying that it un-screws, was actually just a cruel engineers joke. Pop it in, pop it out.

There's an egghead somewhere laughing right now.
Scab.....my hero!

Tip of my cheapest pocket knife...lift up...pop out.

And after looking at the actual design, I think I'll die of old age before I would ever wear out the locking design by using your method.

I owe ya one, bud. :yahoo:

Oops...hit the submit button too soon.

Jestal/Rad...those suckers just wouldn't turn. Stubby screwdriver...retainer immobilized. Didn't matter. After I got them out and had a good look at 'em in the light of day, they appear to have been removed and replaced at least once. Phillips slots on both fairly worn. Maybe the original owner had boogered them up to where they wouldn't rotate anymore. Hell, even off the bike, with the "screws" popped down in their normal position, they STILL won't turn. I'll just pick up some more at my local Honda shop. Same part holding all the panels in the trunk of my Del Sol.

 
Last edited by a moderator:
I use a phillips bit-tip that is normally used in drywall fastener drivers, like so-
6072805.JPG
Easy to carry with you, fits anywhere, even the tightest areas. Hold the outer edge of the fastener, then turn the phillips screw CCW a half turn or so-it turns within the bezel you're holding. It will pop out just a bit, then pull or pry the fastener out.
What, yer tryin' to get you quote removed from his sig line or sumpin'? But you're right, 1/4 turn with the drill gun bit and you're done. Too, here's a tip on reassembling the left side panels... On the instrument panel filler where it meets the fairing pocket... break the tab off that locates the panel into the pocket. No effect on the final install or fit, but makes it soooooooooo much easier to reassemble those three parts. ;)

 
twn,

I find that removing the tupperware to be very easy. Maybe it's your perception that needs adjustment? I mean, how hard can it be!?

:D

:D

:D

 
Last edited by a moderator:
Geez. The little black plastic ones-just raise the phillips head with your knife. It is a quick-fastener. While the threads will work, they don't have to. Do you think they took the time to screw the thing when they put it in, or just mashed it?

And there ya go. :D
Hence his forum handle.

I saw no mention of the techique that uses no extra tools such as a knife... so, here it is... Just be sure there is a small amount of pressure/tension between the two panels that you are trying to remove the fastener from (by pushing or pulling panel away fr/ each other) & be sure that the fastener is sitting tight when turning the Phillips head. Been in this same predicament & discovered this worketh liketh charmeth.

Hey, I'm a chick! I ain't supposed to know this stuff!

There are instances when you cannot put tension on the panels... in this instance I'd use the knife technique.

 
Last edited by a moderator:
Brought to you by TWN, offending mankind in general since 1957.
:)

No, not '57! It was '58, as it took me a few months between shitting my britches and barfing up my Gerber's Strained Carrots and Peas to learn how to say, 'bite me'.

[SIZE=8pt]'bite me' is a trademark of the Scab Communications, Inc. All rights reserved. Use by permission only.[/SIZE]

 
I found out the hard way that those fasteners on the inner fairing panels with the center pin and grommet (not phillips head-the smooth ones) are removed by punching IN the center pin and then removing the grommet (?). Punching IN the pin allows the fingers to collapse, allowing the fastener to be removed. For re-installing, pull pin out, insert into hole, then push pin in. That's it.

 
Top