


BugR
Well-known member
Just to be up front I'm the First FJR owner to install one of these units and have received a modest discount ($20) for writing up this install. I also want to say that $20 is not sufficient for me to enhance any features to hide any faults in this unit
Admin's if this is outside the bounds of the board rules pull this post.
Chris.
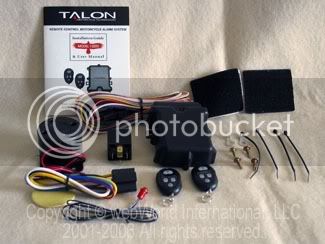
Talon Alarm Install Yamaha FJR1300
www.talonalarms.com
As someone who tours long distances, usually alone, I’ve been looking for an alarm system for a while. There are always places where you have to stop due to fatigue or hunger but are always a little on edge leaving the bike unattended. Yes I have all requisite chains and rotor locks but having it ripped off a 1000 miles from home is not on my list of activities when I’m touring.
Yamaha do offer an alarm on European FJR’s but for some bizarre reason don’t see the need for them in Canada and the US. Of the aftermarket ones I had come to the conclusion that there are two types, Cheap and Crap, Useful but very $$$. I was just about to fork out North of $500 CDN when this review popped up in WebBikeWorld Talon review
Talon T-2200 ummmm...
[SIZE=8pt][/SIZE]
Talon T-2200 Specifications:
Compact microprocessor control module
Weatherproof design
Starter immobilizer
Current Sensor (prevents hotwiring)
2 Multi-function 4 button miniature remote transmitters
Multi-function LED status indicator
Remote control arming / disarming
Passive / active arming (selectable by remote)
Audible and visual arming / disarming
Silent arming / disarming (selectable by remote)
Automatic rearming (selectable by remote)
Remote controlled panic operation
Built-in flashing lights relay
Built-in dual stage shock sensor
Built-in tilt sensor
Adjustable shock sensitivity (selectable by remote)
On/off shock sensor (selectable by remote)
Remote control trunk release
Instant negative trigger input (protect saddlebags, fairings or any other removable part)
30 second siren duration with automatic reset
Automatic siren off (ten times output)
Current consumption under 5mA
Valet / emergency override switch
Multi-code learning
Remote searching
Compact design piezo siren
Batteries included
2 year warranty
Looks like the ticket.
Canadian Company Cool
[SIZE=14pt]$109 US \ $139 CDN [/SIZE]
Now we are talking
I checked out the web site and after a couple of email’s to Brad Vansickle (the owner) I placed my order, The unit arrived 2 days later, It’s tiny and appears to be extremely well made.
Brad can supply a connector harness for the FJR (and other bikes) For 18.95US/22.95Cdn, that meant that I didn’t have to break into the tail light harness which is a big plus, I hate patching into the original harness, it can be the cause of all sorts of problems.
The wiring on the whole is pretty basic however there are two issues which took a while to sort out.
Where to put the unit?
The unit needs un-switched power, and on the FJR the battery is located in the front right fairing while the harness connector for the indicators hooks in the tail unit.
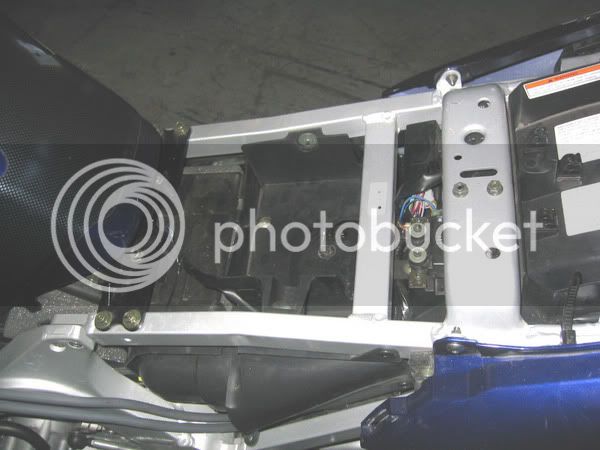
If I was going to have to run wires the length of the bike I opted to install a BlueSea distribution box for the alarm (plus more electrical stuff later) in the tool tray under the seat and the unit in the tail where I suspect the Yamaha Alarm is intended to go as there is a hold down strap at just the right location.
I liked this location also because under the seat is a lot more protected from the weather and fingers and what space I have under there is going to get filled up soon with HID ballasts.
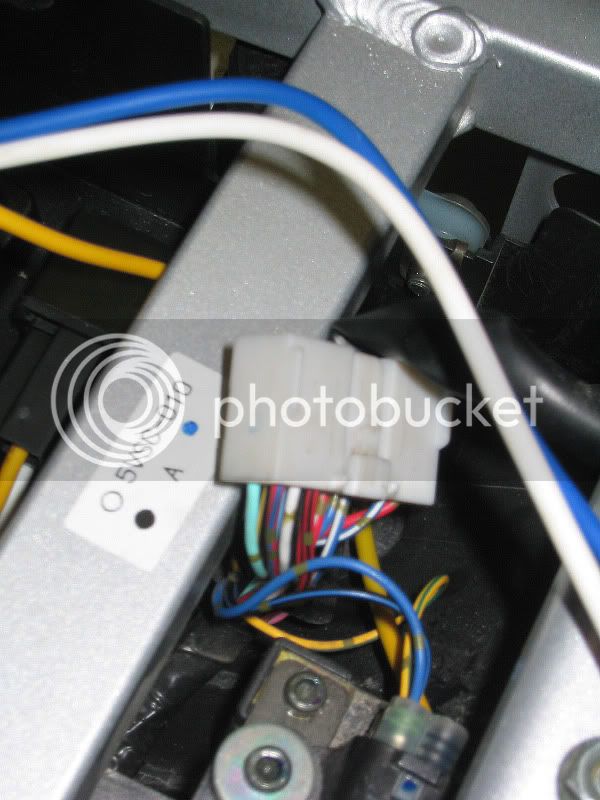
The second issue is the immobilizer, if you are going to fit this you have to cut into a relay circuit, again all the easy relays are up with the battery but I found a solution to that right under the seat, The Starting Circuit Cut-Off Relay is sited between the two crossrails (far or right side in picture below) right next to the tool tray.
The alarm is pretty small and ended up under the passenger seat which is very close to where the harness plugs in.
Installation:
1) Wire in 12V from the battery. This means lifting the tank, don’t forget to remove the plastic side covers.
2) On the 12V line install a inline fuse as close to the battery as possible to prevent unprotected shorts (Very bad news). Take care in running wires through the engine compartment, If you own one you know how hot it gets in there, I managed to run my wires down the right side under the side covers. Recommend running the wire in braided mesh to prevent wire fraying
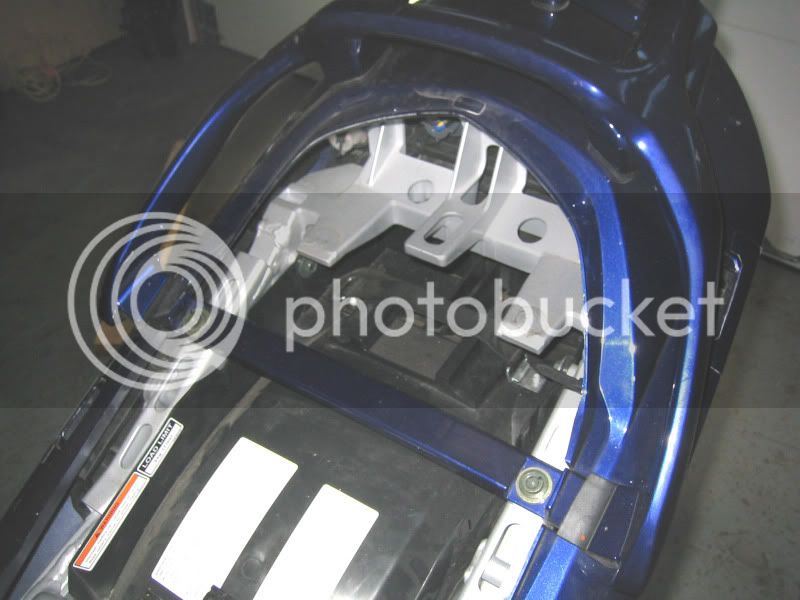
3) Remove the rack and tail plastic (5 bolts, 4 connectors looks bad but take 5 mins) so you can access the tail light connector.
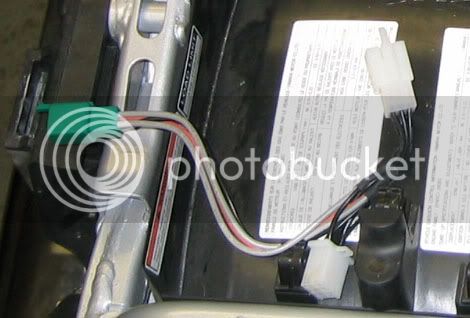
4) Plug in the Scorpio harness and pull the pig tail in so that you can access the wires.
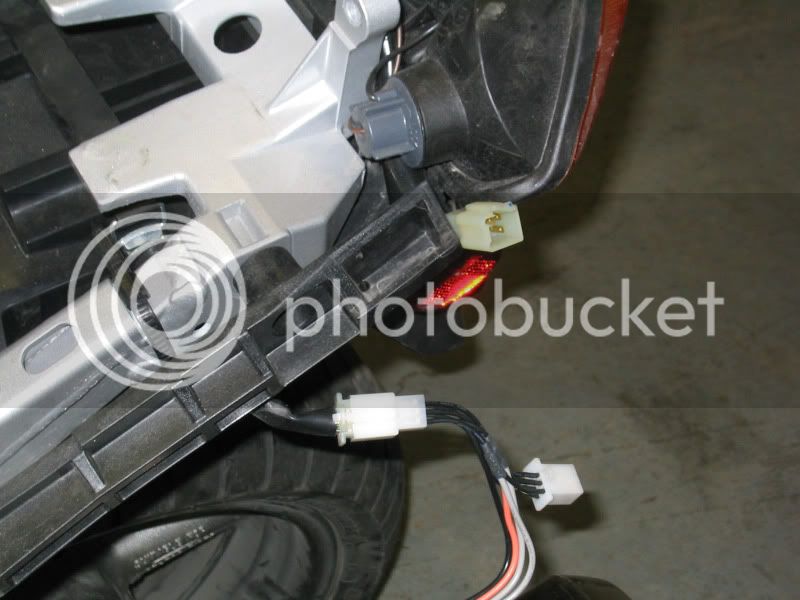
Pigtail, Two Whites (Indicator +ve), Orange (Tail light +ve), Black (-ve)
5) Mount the tail unit, Currently I have it held by the tie down strap as I am still experimenting with the best position. It’s not clear in the picture but it is possible to almost have the unit level here when the bike is on the sidestand. The unit is most sensitive horizontal but will trip at almost any angle if you take it off the center stand.
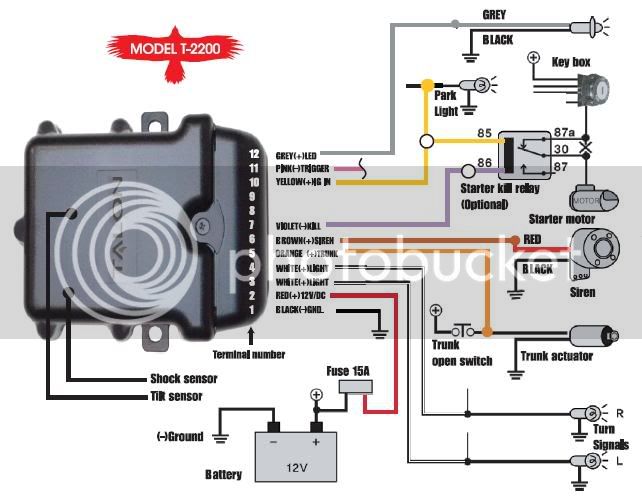
6) Wire the Unit White’s to the Harness Grey’s
7) Wire the Unit Yellow to the Harness Orange
8) Run Unit Red, Black, Brown and Purple back down to the Tool Tray
9) Tee into the Unit Yellow and run that also down to the tool tray (I used the excess Yellow from 7)).
10) Mount the LED (mine’s on the left just under the rack (Use a Unibit if you like nice clean holes).
11) Remount the Tail unit and rack
12) Connect Unit Grey to LED Gray, LED Black to Harness or Unit Black.
13) Store Unit Pink and Orange for future use.
You should have something which looks like below. (This is before cleanup and again braiding to prevent fraying)
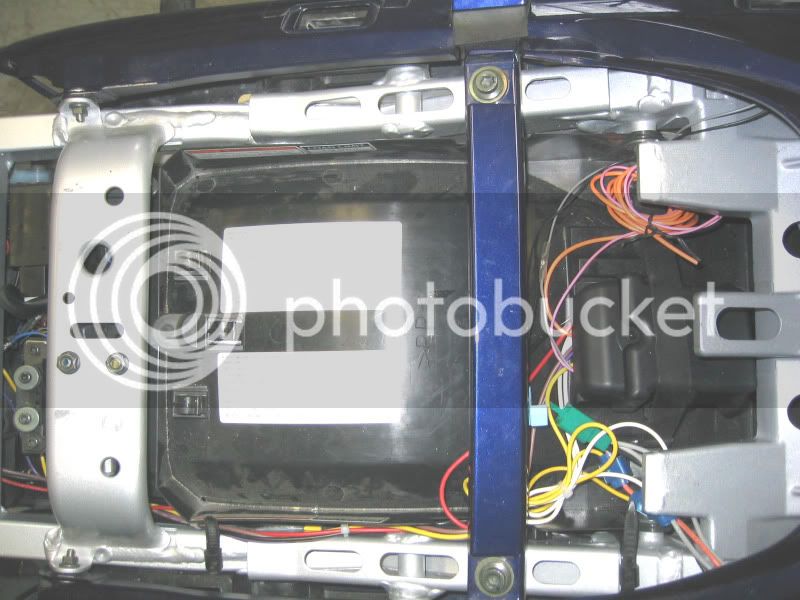
Here is what the under the seat looks like.
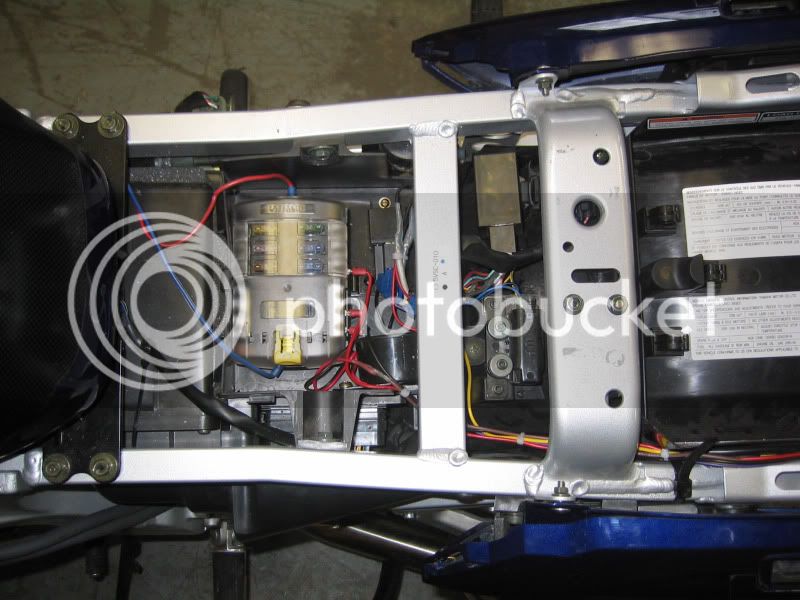
The Red and Blue wires on the left run to the battery, again to repeat myself make sure you have fused the (+ve) lead with an inline fuse right at the battery else you could be looking at a short in the engine bay under the fuel tank.
In the tool tray on the left is the Blue Sea Distribution Box, lower right is the siren, upper right is the immobilizer relay.
The Starting Circuit Cut-Off Relay can clearly be seen between the rails at the top.
Basic wiring (Excluding Immobilizer)
Unit Red to Bike (+ve), Unit Black to Bike (-ve)
Unit Brown to Siren Red, Siren Black to Bike (-ve)
At this point the basic wiring is complete and the system will work if you connect up the lead to the battery. The next section is only if you want to install the immobilizer relay and is a little tricky.
[SIZE=14pt]Immobilizer Relay Install[/SIZE]
The alarm unit comes with an Immobilizer Relay. This is a normally closed relay which is opened when the alarm is triggered. What you want to do is place this relay in series with either the starting circuit so the bike will not start or with the fuel pump relay so the fuel cuts out. With Murphy’s Law indicating that this relay may fail at some time I opted to cut the starting circuit as random fuel cut outs could be a little too exciting. True they can bump start the bike but if they are that determined then the alarm isn’t going to stop them.
Either way at this point you are going to have to cut into the existing harness.
Starting the FJR is controlled in part by a unit called the Starting Circuit Cut-Off Relay. (Number (6))
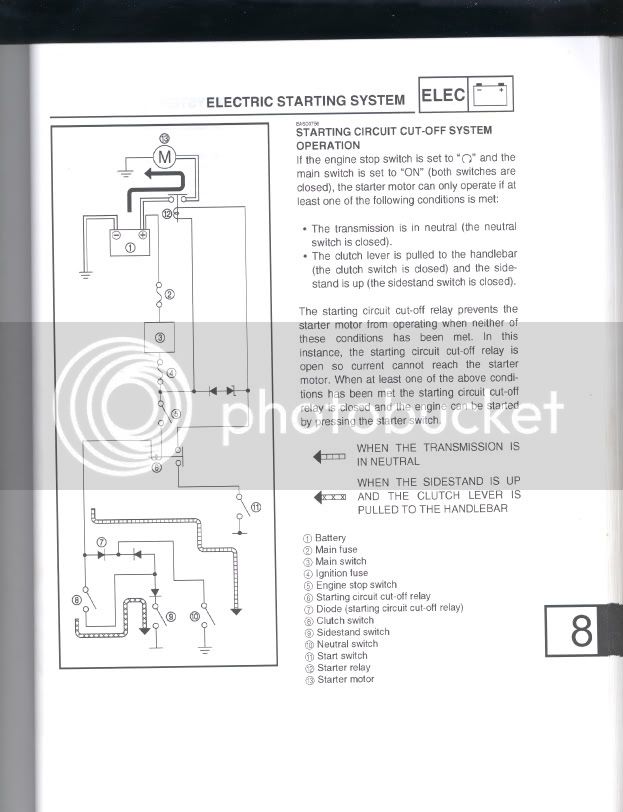
This unit takes the inputs from the sidestand switch, the neutral switch and the clutch lever switch and decides if it’s safe to actuate the starter motor without having the bike lurch into whatever is in front off you. It looks like this.
The obvious point is to put the relay in on the signal side of the relay controlling the starter switch.
For reason which will become apparent I ended up inserting it right into the start switch circuit, doesn’t make a difference because that’s the signal side of the starter relay so there is no effective load.
The Starting Circuit Cut-Off Relay is under the seat on the other side of the rail. Just grab the unit pull it out off it’s rubber mount and remove the connector.
According to the wiring diagram signal side of the relay controlling the starter switch is Blue\White the problem I found was that on this connector there were two Blue\White wires. Reading the diagram it looked like it shouldn't make a difference but I got a little gun shy about hooking in the relay there, the wiring harness is very tight at this location with almost no slack, get it wrong and bike will not start period.
I did find the White\Blue which runs straight to the start switch on the handle bar and disabling that would have the same effect, since there was only one wire I was much more confident about this.
To finish this:
Cut the White\Blue wire.
One White\Blue to immoblizer relay 87a.
The other White\Blue to immoblizer relay 30.
Alarm Violet to immoblizer relay 86
Alarm Yellow (The one you ran down to the tool tray) to immoblizer relay 30.
There is quite a wire gauge change between the immoblizer relay and the White\Blue wire.
I extended the White\Blue wires first by soldering on some spare wire. That made it much easier to complete the connections.
Solder and heat shrink these connections, do not use crimp connectors or at some point in the future, (it will be dark and wet and miles and miles from anywhere) the bike will not start and you will be SOOL.
[SIZE=14pt]Experiences[/SIZE]
With the Alarm itself I am extremely pleased, very easy to program the sensitivity, works exactly as specified and is plenty loud enough.
With the bike though I have had a few problems starting it on cold mornings (25 F, -4C). This I have now traced back to the battery which has a rep on the FJR to be a little flaky and when cold just does not have the juice to get the bike going.
Since the weather has warmed up I have not had any problems at all but would recommend a battery tender if you are going to be leaving the bike for a week or more before starting and charging the battery.
Chris
Admin's if this is outside the bounds of the board rules pull this post.
Chris.
Talon Alarm Install Yamaha FJR1300
www.talonalarms.com
As someone who tours long distances, usually alone, I’ve been looking for an alarm system for a while. There are always places where you have to stop due to fatigue or hunger but are always a little on edge leaving the bike unattended. Yes I have all requisite chains and rotor locks but having it ripped off a 1000 miles from home is not on my list of activities when I’m touring.
Yamaha do offer an alarm on European FJR’s but for some bizarre reason don’t see the need for them in Canada and the US. Of the aftermarket ones I had come to the conclusion that there are two types, Cheap and Crap, Useful but very $$$. I was just about to fork out North of $500 CDN when this review popped up in WebBikeWorld Talon review
Talon T-2200 ummmm...
[SIZE=8pt][/SIZE]
Talon T-2200 Specifications:
Compact microprocessor control module
Weatherproof design
Starter immobilizer
Current Sensor (prevents hotwiring)
2 Multi-function 4 button miniature remote transmitters
Multi-function LED status indicator
Remote control arming / disarming
Passive / active arming (selectable by remote)
Audible and visual arming / disarming
Silent arming / disarming (selectable by remote)
Automatic rearming (selectable by remote)
Remote controlled panic operation
Built-in flashing lights relay
Built-in dual stage shock sensor
Built-in tilt sensor
Adjustable shock sensitivity (selectable by remote)
On/off shock sensor (selectable by remote)
Remote control trunk release
Instant negative trigger input (protect saddlebags, fairings or any other removable part)
30 second siren duration with automatic reset
Automatic siren off (ten times output)
Current consumption under 5mA
Valet / emergency override switch
Multi-code learning
Remote searching
Compact design piezo siren
Batteries included
2 year warranty
Looks like the ticket.
Canadian Company Cool
[SIZE=14pt]$109 US \ $139 CDN [/SIZE]
Now we are talking
I checked out the web site and after a couple of email’s to Brad Vansickle (the owner) I placed my order, The unit arrived 2 days later, It’s tiny and appears to be extremely well made.
Brad can supply a connector harness for the FJR (and other bikes) For 18.95US/22.95Cdn, that meant that I didn’t have to break into the tail light harness which is a big plus, I hate patching into the original harness, it can be the cause of all sorts of problems.
The wiring on the whole is pretty basic however there are two issues which took a while to sort out.
Where to put the unit?
The unit needs un-switched power, and on the FJR the battery is located in the front right fairing while the harness connector for the indicators hooks in the tail unit.
If I was going to have to run wires the length of the bike I opted to install a BlueSea distribution box for the alarm (plus more electrical stuff later) in the tool tray under the seat and the unit in the tail where I suspect the Yamaha Alarm is intended to go as there is a hold down strap at just the right location.
I liked this location also because under the seat is a lot more protected from the weather and fingers and what space I have under there is going to get filled up soon with HID ballasts.
The second issue is the immobilizer, if you are going to fit this you have to cut into a relay circuit, again all the easy relays are up with the battery but I found a solution to that right under the seat, The Starting Circuit Cut-Off Relay is sited between the two crossrails (far or right side in picture below) right next to the tool tray.
The alarm is pretty small and ended up under the passenger seat which is very close to where the harness plugs in.
Installation:
1) Wire in 12V from the battery. This means lifting the tank, don’t forget to remove the plastic side covers.
2) On the 12V line install a inline fuse as close to the battery as possible to prevent unprotected shorts (Very bad news). Take care in running wires through the engine compartment, If you own one you know how hot it gets in there, I managed to run my wires down the right side under the side covers. Recommend running the wire in braided mesh to prevent wire fraying
3) Remove the rack and tail plastic (5 bolts, 4 connectors looks bad but take 5 mins) so you can access the tail light connector.
4) Plug in the Scorpio harness and pull the pig tail in so that you can access the wires.
Pigtail, Two Whites (Indicator +ve), Orange (Tail light +ve), Black (-ve)
5) Mount the tail unit, Currently I have it held by the tie down strap as I am still experimenting with the best position. It’s not clear in the picture but it is possible to almost have the unit level here when the bike is on the sidestand. The unit is most sensitive horizontal but will trip at almost any angle if you take it off the center stand.
6) Wire the Unit White’s to the Harness Grey’s
7) Wire the Unit Yellow to the Harness Orange
8) Run Unit Red, Black, Brown and Purple back down to the Tool Tray
9) Tee into the Unit Yellow and run that also down to the tool tray (I used the excess Yellow from 7)).
10) Mount the LED (mine’s on the left just under the rack (Use a Unibit if you like nice clean holes).
11) Remount the Tail unit and rack
12) Connect Unit Grey to LED Gray, LED Black to Harness or Unit Black.
13) Store Unit Pink and Orange for future use.
You should have something which looks like below. (This is before cleanup and again braiding to prevent fraying)
Here is what the under the seat looks like.
The Red and Blue wires on the left run to the battery, again to repeat myself make sure you have fused the (+ve) lead with an inline fuse right at the battery else you could be looking at a short in the engine bay under the fuel tank.
In the tool tray on the left is the Blue Sea Distribution Box, lower right is the siren, upper right is the immobilizer relay.
The Starting Circuit Cut-Off Relay can clearly be seen between the rails at the top.
Basic wiring (Excluding Immobilizer)
Unit Red to Bike (+ve), Unit Black to Bike (-ve)
Unit Brown to Siren Red, Siren Black to Bike (-ve)
At this point the basic wiring is complete and the system will work if you connect up the lead to the battery. The next section is only if you want to install the immobilizer relay and is a little tricky.
[SIZE=14pt]Immobilizer Relay Install[/SIZE]
The alarm unit comes with an Immobilizer Relay. This is a normally closed relay which is opened when the alarm is triggered. What you want to do is place this relay in series with either the starting circuit so the bike will not start or with the fuel pump relay so the fuel cuts out. With Murphy’s Law indicating that this relay may fail at some time I opted to cut the starting circuit as random fuel cut outs could be a little too exciting. True they can bump start the bike but if they are that determined then the alarm isn’t going to stop them.
Either way at this point you are going to have to cut into the existing harness.
Starting the FJR is controlled in part by a unit called the Starting Circuit Cut-Off Relay. (Number (6))
This unit takes the inputs from the sidestand switch, the neutral switch and the clutch lever switch and decides if it’s safe to actuate the starter motor without having the bike lurch into whatever is in front off you. It looks like this.
The obvious point is to put the relay in on the signal side of the relay controlling the starter switch.
For reason which will become apparent I ended up inserting it right into the start switch circuit, doesn’t make a difference because that’s the signal side of the starter relay so there is no effective load.
The Starting Circuit Cut-Off Relay is under the seat on the other side of the rail. Just grab the unit pull it out off it’s rubber mount and remove the connector.
According to the wiring diagram signal side of the relay controlling the starter switch is Blue\White the problem I found was that on this connector there were two Blue\White wires. Reading the diagram it looked like it shouldn't make a difference but I got a little gun shy about hooking in the relay there, the wiring harness is very tight at this location with almost no slack, get it wrong and bike will not start period.
I did find the White\Blue which runs straight to the start switch on the handle bar and disabling that would have the same effect, since there was only one wire I was much more confident about this.
To finish this:
Cut the White\Blue wire.
One White\Blue to immoblizer relay 87a.
The other White\Blue to immoblizer relay 30.
Alarm Violet to immoblizer relay 86
Alarm Yellow (The one you ran down to the tool tray) to immoblizer relay 30.
There is quite a wire gauge change between the immoblizer relay and the White\Blue wire.
I extended the White\Blue wires first by soldering on some spare wire. That made it much easier to complete the connections.
Solder and heat shrink these connections, do not use crimp connectors or at some point in the future, (it will be dark and wet and miles and miles from anywhere) the bike will not start and you will be SOOL.
[SIZE=14pt]Experiences[/SIZE]
With the Alarm itself I am extremely pleased, very easy to program the sensitivity, works exactly as specified and is plenty loud enough.
With the bike though I have had a few problems starting it on cold mornings (25 F, -4C). This I have now traced back to the battery which has a rep on the FJR to be a little flaky and when cold just does not have the juice to get the bike going.
Since the weather has warmed up I have not had any problems at all but would recommend a battery tender if you are going to be leaving the bike for a week or more before starting and charging the battery.
Chris
Last edited by a moderator:


