exskibum
~<>~<>~<>~<>~
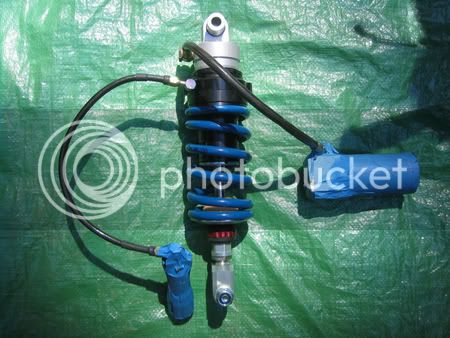
As usual, Warchild's excellent illustrated directions in "Installing the Wilbers Shock Absorber" on fjrtech.com beats the crap outta the Yamaha Service Manual. This install specifically addresses the Model 640 with the remote hydraulic preload -- same as I got. So, I'm cruising along, flipping pages as I do the install. But . . .
It appears that the patient for the mod in his instructions was H. Marc's non-ABS Feejer. And there's apparently a lot of room above and to the right side of the shock on that bike, which is significant when it comes to routing the SS braided line with the remote preload adjuster at the end of it. I'm thinking: "Hmmmm, the pics of that space sure don't look like what I'm looking at!" And then I see Warchild's discussion of the situation I'm facing: "(you ABS guys will have a treat doing this, I'm sure!)"
NO ****, Dale!!!!! :headbonk:
So, where to start? First, you gotta figure this out BEFORE you get the upper shock bolt installed, or you won't have any space in which to stuff the SS line and the adjuster while you scratch your head and read Dale's prediction.
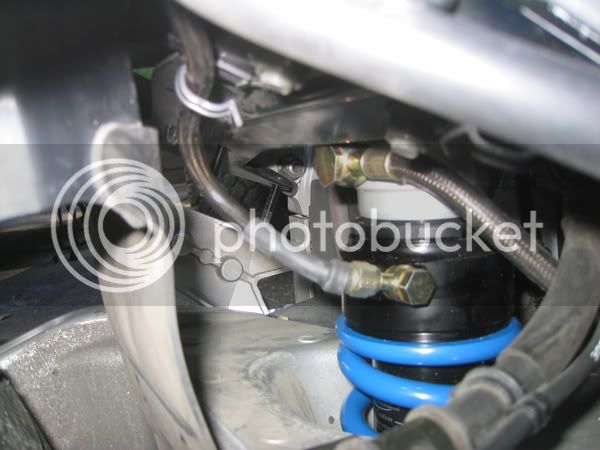
The solution was to remove the cross bar (mounting plate) that had held both the stock pre-load level assembly and its clips that secured the cables from that assembly to the stock shock. There are 4 allen headed bolts holding the cross bar to the subframe which have to come out, and there are two nuts securing the rectangular aluminum ABS hydraulic unit to the top of the cross bar which must also come off. I also pulled the plastic tool tray that sits under the front seat halfway out (leaving it connected by the wiring to the ECU that is a part of its plastic bottom on the left side of the bike). This gives you a little room to maneuver and manipulate the SS line.
With the bottom of the new shock sitting on a block of wood so that it was vertical (through the hole for the shock in the swing arm) but below the level necessary to install the top shock bolt, I then threaded the adjuster unit past the right front corner of the rear fender with the cross bar out of the way and situated the line just inboard of the ABS hydraulic unit (now in something of a contorted and inverted S shape, while I suspect that in the non ABS, it's in more of a simple U shape). This is the ONLY place there is any room to put this, and there isn't much room, even at that. Having the ABS hydraulic unit loose allows you to rock it outwards enough to situate the line just inboard of where the ABS hydraulic unit resides when it's bolted to the cross bar.
I also sliced two pieces of bicycle inner tube lengthwise and wrapped them around the SS line with electrical tape to protect the SS line from a couple places where it is impossible to avoid contact between the SS line and (1) the front right corner of the fender and (2) the inside portion of the ABS hydraulic unit and its connectors. With the ABS bike, you pretty much have to do the routing of this line before and during the time that you are mounting the top of the shock with its bolt.
Clean install, but routing that SS line for the remote hydraulic preload adjuster was by far the most time consuming part of the operation. (To keep from scratching up the anodized adjuster while I tried to thread it and its SS line into position to mount it on the exhaust hanger, I wrapped it in Handi-Wrap with some tape.) Mounting the shock was a piece of cake. Because I was putting on a new tire, lubing the drive shaft spline and doing Toecutter's lock pin pannier securing mod, I had the mufflers off and the rear tire out, which undoubtedly made it easier.
Thanks for the steller installation guide, WC, :clap: but a big NO ****!!! to its one line discussion of installation on an ABS bike. :axed: :haha:
:cigar: :cigar:
Last edited by a moderator:


