RZ350’s Gen II Mods, Part 4 - Custom Highway Pegs

Yamaha FJR Motorcycle Forum

Help Support Yamaha FJR Motorcycle Forum:

This site may earn a commission from merchant affiliate links, including eBay, Amazon, and others.

RZ350

Well-known member
Joined
Dec 18, 2007
Messages
364
Reaction score
27
Location
Florida
Link to all my Gen II mods

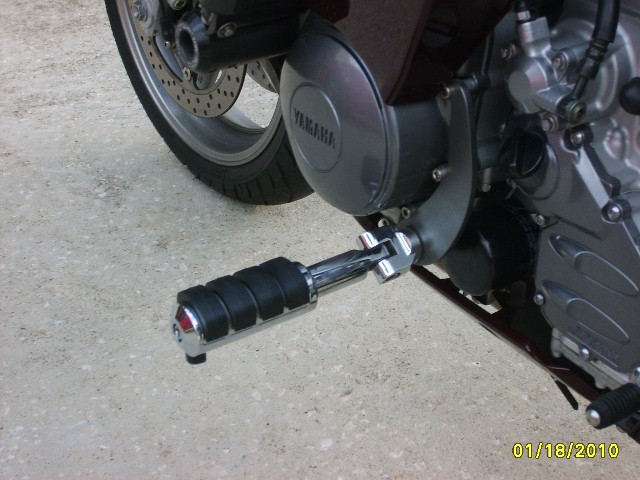
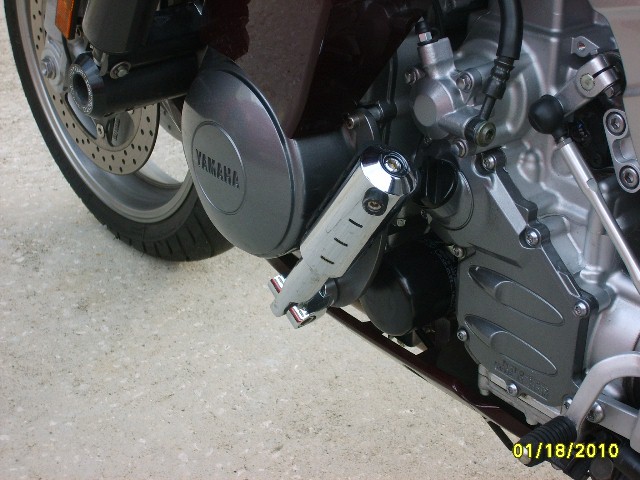
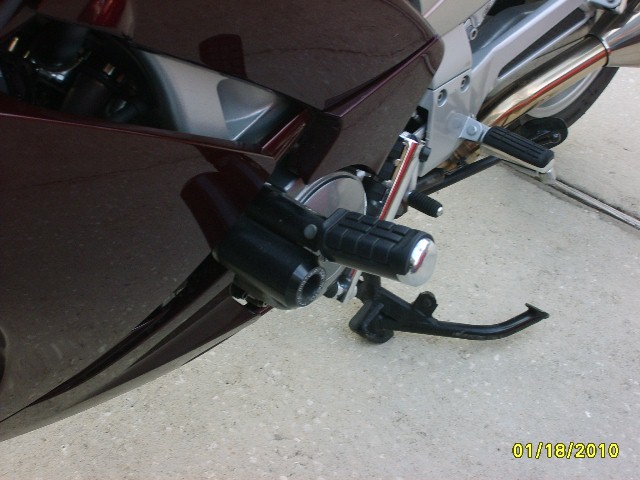
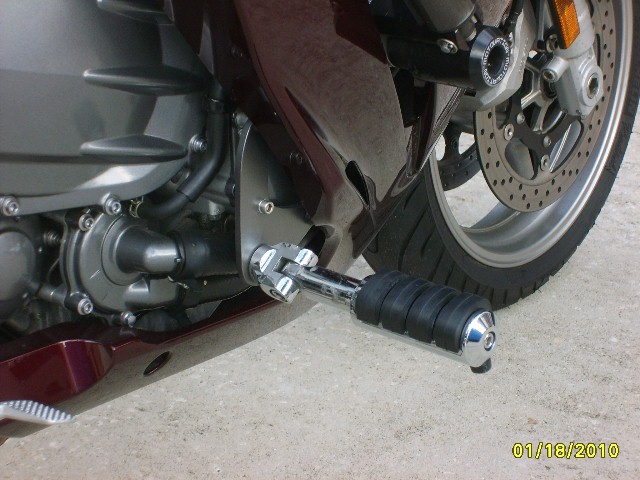
I now have two different sets of highway pegs on my Gen II FJR that I’m happy with. It started out as a comparison but I decided to keep both of them, because both have merits.

The first set I installed were Wild Bill’s highway peg plates coupled with some Kuryakyn pegs. I painted the plates to match the engine cases with Dulpi-Color Import Auto Spray (#8800564) in the 5oz can and it matches pretty good (paint and W-B plates discovered on this forum - thanks).

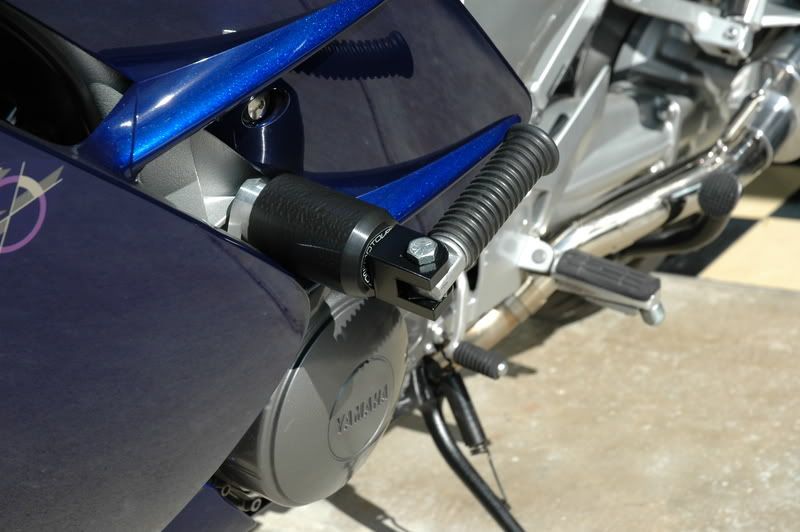
IMHO, for this low peg position to work, you need to get them out away from the engine cases quite a ways. But if you don’t keep the hinge point of the pegs close to the W-B plates (thus allowing them to fold up close to the engine), you risk cracking an engine case cover in even a minor tip over because they will be the first to hit the pavement. I found a set that hinges very close to the plate yet has a long reach for comfortable riding. Kuryakyn part numbers are 8061 (clevis), 8064 (extension), 8025 (peg). Personally, I would prefer something other than chrome on the pegs, but it’s alright. Remove the supplied 1” extension from the pegs and replace with the extension. You also have to enlarge the mount hole in the WB plates to accept the 1/2” bolt in the clevis. They will drag a lot sooner than the stock FJR pegs, so I added a little rub bung on the bottom in case I forget to flip them up after using.

Here are some pictures:
4287116854_7b411acbdf_o.jpg


4286376223_66ac35c8e3_o.jpg


4287116940_f9597c0e07_o.jpg


4286376123_5393945fa2_o.jpg


The only downfall of the W-B peg position is that you really can’t straighten your legs and rest them out in front of the pegs (for me, my feet seem to get to close to the ground during highway travel). They are very comfortable when just setting your foot on them, however.

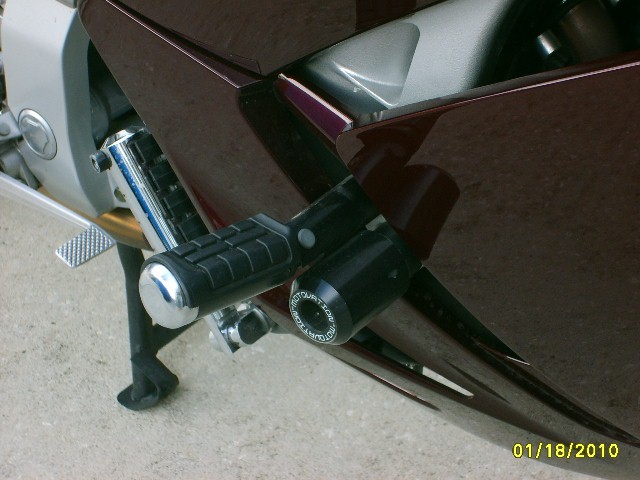
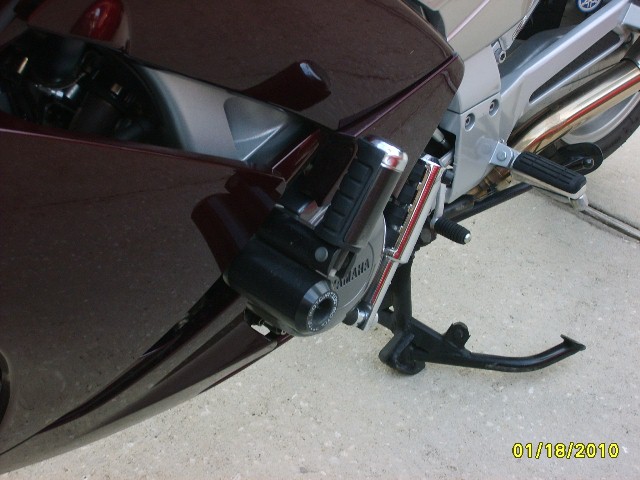
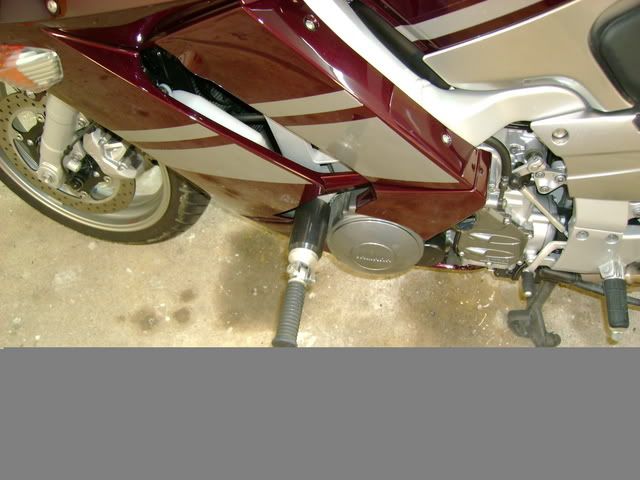
I then decided to try another set mounted up by the frame sliders for comparison. I tried a couple different variations in this location but settled on this one as the best solution. I mounted a set of flip-down passenger pegs from a Honda Valkerie directly to the frame slider. They flip up and still let the slider function as intended (this is the most important thing, IMHO). These work best when I want to straighten my legs completely and just rest the back of my leg on the peg. These Honda pegs don’t fold out completely horizontal and this is actually beneficial for keeping my leg from bouncing off (or at least it makes me feel like it won’t). I can rest the sole of my boot on them too, but in that position it seems the metal parts on the side of my boots could scratch the FJR painted bodywork, so I normally don’t do it.

Here are the Valkerie pegs:

4286376477_aa8474e37a_o.jpg


4286376413_267229d9dc_o.jpg


4286376339_e06d0997ab_o.jpg


4286376281_cac4c03e74_o.jpg


There is a custom-made aluminum plate that gets sandwiched between the slider and the engine providing the inside mount point for the peg. I made this plate match the profile of the Valkerie mount. Another bolt connects the slider and peg at the outboard end to stabilize the peg and this bolt threads into the slider. Since this whole assembly mounts to the bike with just one screw, I needed to add something to keep it from rotating on the bolt and hitting my bodywork. I used a third bolt (well, really just the head of it) on the inside of the plate to engage in a small existing frame pocket to keep it indexed.

4286376563_d58dc0f35b_o.jpg


4286376643_e597b4c889_o.jpg


Last edited by a moderator:
RZ350, I am using these slider pegs, and whilst not very pretty they work pretty well. The one thing I worry about, and thank God have not tested so far is how they would behave in a low-side. My fear is that instead of sliding these might dig into the road causing the bike to cartwheel until there's nothing left.

I have the W-B pegs as well but don't use them very much since they are way too low and even riding in Flori-Duh I easily catch these on most turns and any on-ramps.

Your version not only looks better but would remove most of that concern.

I have a few questions:

1. from the pics and your description of putting a stabilizer pin into the gap in the frame might cause frame damage in a low-side. I can see that folded up your pegs are "inside" the slider length but the delrin sliders grind away pretty quickly even at low speed so that little bit of clearance would not last very long - what do you think?

2. why not drill two holes in the slider to eliminate rotation vs the stabilizer pin?

3. would you consider making and selling a set of these brackets you made up, and if yes how much would you think they would run for?


Here is a picture of these pegs on a Gen1 folded up... As you can see these are just begging to dig into the road :dntknw:


Last edited by a moderator:
RZ350, I am using these slider pegs, and whilst not very pretty they work pretty well. The one thing I worry about, and thank God have not tested so far is how they would behave in a low-side. My fear is that instead of sliding these might dig into the road causing the bike to cartwheel until there's nothing left.I have the W-B pegs as well but don't use them very much since they are way too low and even riding in Flori-Duh I easily catch these on most turns and any on-ramps.

Your version not only looks better but would remove most of that concern.

I have a few questions:

1. from the pics and your description of putting a stabilizer pin into the gap in the frame might cause frame damage in a low-side. I can see that folded up your pegs are "inside" the slider length but the delrin sliders grind away pretty quickly even at low speed so that little bit of clearance would not last very long - what do you think?

2. why not drill two holes in the slider to eliminate rotation vs the stabilizer pin?

3. would you consider making and selling a set of these brackets you made up, and if yes how much would you think they would run for?
JamesK,

The two other versions I played with inserted into the slider much like yours do. I just wasn't comfortable with them because of the same exact concern you have, so they ended up in the parts bin.

To answer your questions:

1. You have a good point about the sliders wearing away and I've seen pictures on this site showing it. My pegs are inset about 1/4", which isn't much. To be honest, I was concerned more with a stupid parking lot mistake than a higher speed incident. At speed, there's probably more damage that's going to happen and that's when I call the insurance man (if I'm able to!) As you say, I hope I never have to find any of this out.

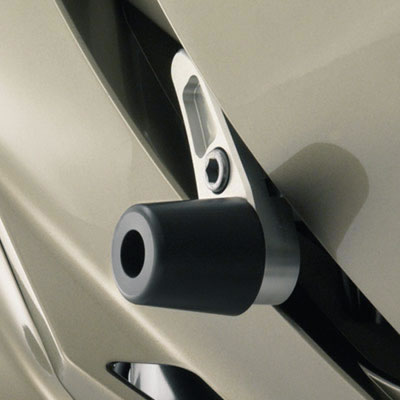
2. With my sliders, even with the engine bolt tight, the delrin slider can still rotate (with some effort) on its small aluminum spacer tube. Multiple bolts do not help because the entire slider/peg simply rotates on the spacer tube. I had to stabilize back to the frame somehow to keep everything from spinning. I don't think where the bolt head contacts the frame could cause any structural damage, even if the peg started to make contact with the road and deflected. The head is wedged in a V, and direction of impact would force it somewhat out of the V. It would, however, possibly start damaging the fairly nearby if it moved too much. I believe the OEM sliders (available in Canada/Europe as p/n 5VS-W0741-00-00) use this V also. I enquired to a dealer in Canada about buying a set from them, but didn't get a response until after I built these. I think they would be a great foundation for my version of peg.

3. I've made a little custom part for the Tiger before and sold about 50 of them through ebay. It was great meeting and helping out fellow Triumph riders (there's very few aftermarket parts for those bikes). But it takes a lot of time since I custom build everything, and I have quite a few projects going at the moment. I will have to think about it - lets keep in touch.

 
Here is a picture of the Can/Euro slider (p/n 5VS-W0741-00-00). I was quoted this at $230 CDN a couple years ago (from www.ingliscycle.com, 1-877-734-BIKE), but by the time the quote arrived, I had a different solution designed and built.

4291088905_1e33df6a01_o.jpg


My assumption was that the bolt head seen in the picture is a longer motor mount bolt supplied with the kit and the Delrin slider mounts forward of it. I also assumed the extension of the base plate extended back over the V-recess I mentioned earlier and there is a boss that protrudes into it. This is purely speculation, but I don’t see how else it would be kept from rotating during a hard impact. I merely copied what I thought Yamaha did with a protruding bolt head into the recess. I would really like to see the backside of these OEM sliders - anyone have a picture to post?

If I had to do it all over again, I would probably start with these OEM sliders as a foundation and adapt the highway pegs to them.

 
I never quite understood why the OEM sliders seem to be so short, these will not completely protect the top of the faring in 0mph tip over. This is why the longer Skyway sliders were quite popular.

 
I never quite understood why the OEM sliders seem to be so short, these will not completely protect the top of the faring in 0mph tip over. This is why the longer Skyway sliders were quite popular.
+1 - they look short. I would hope that Yamaha designed these things to actually work, but you never know. I already had the MotoVation sliders (bought them the first week I had the bike for a quick solution), so I was planning to mount them in place of the OEM Delrin parts if they were shorter than I wanted.

 
FYI - Here is a photo of the OEM slider for and FZ1.

It looks very similar to the FJR version so I think my hunch was correct. You can see the little boss projecting from the back side that would engage the frame pocket. It makes me feel more comfortable with the method I used.

4294206342_166f4a2e06_o.jpg


As you contemplate how short they are, keep in mind that they mount with the bracket which is itself part way out of the fairing, unlike most sliders which mount directly at the engine mount bolt. (What Yammy may be doing with that is spreading the slider's shear load along the frame, rather than only at the engine mount.)

The black part of the slider is not all there is of the slider. . . . .

Of course I say that while never having seen a set of these in the flesh. As tight as the picture on the Canana web site is, there's not enough bike shown to get a scale of reference. Is that on purpose, maybe?

 
Last edited by a moderator:
Link to all my Gen II mods
I now have two different sets of highway pegs on my Gen II FJR that I’m happy with. It started out as a comparison but I decided to keep both of them, because both have merits.

The first set I installed were Wild Bill’s highway peg plates coupled with some Kuryakyn pegs. I painted the plates to match the engine cases with Dulpi-Color Import Auto Spray (#8800564) in the 5oz can and it matches pretty good (paint and W-B plates discovered on this forum - thanks).

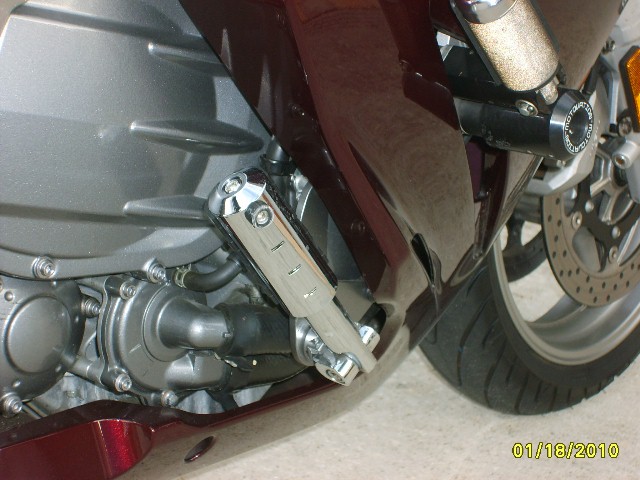
IMHO, for this low peg position to work, you need to get them out away from the engine cases quite a ways. But if you don’t keep the hinge point of the pegs close to the W-B plates (thus allowing them to fold up close to the engine), you risk cracking an engine case cover in even a minor tip over because they will be the first to hit the pavement. I found a set that hinges very close to the plate yet has a long reach for comfortable riding. Kuryakyn part numbers are 8061 (clevis), 8064 (extension), 8025 (peg). Personally, I would prefer something other than chrome on the pegs, but it’s alright. Remove the supplied 1” extension from the pegs and replace with the extension. You also have to enlarge the mount hole in the WB plates to accept the 1/2” bolt in the clevis. They will drag a lot sooner than the stock FJR pegs, so I added a little rub bung on the bottom in case I forget to flip them up after using.

Here are some pictures:
4287116854_7b411acbdf_o.jpg


4286376223_66ac35c8e3_o.jpg


4287116940_f9597c0e07_o.jpg


4286376123_5393945fa2_o.jpg


The only downfall of the W-B peg position is that you really can’t straighten your legs and rest them out in front of the pegs (for me, my feet seem to get to close to the ground during highway travel). They are very comfortable when just setting your foot on them, however.

I then decided to try another set mounted up by the frame sliders for comparison. I tried a couple different variations in this location but settled on this one as the best solution. I mounted a set of flip-down passenger pegs from a Honda Valkerie directly to the frame slider. They flip up and still let the slider function as intended (this is the most important thing, IMHO). These work best when I want to straighten my legs completely and just rest the back of my leg on the peg. These Honda pegs don’t fold out completely horizontal and this is actually beneficial for keeping my leg from bouncing off (or at least it makes me feel like it won’t). I can rest the sole of my boot on them too, but in that position it seems the metal parts on the side of my boots could scratch the FJR painted bodywork, so I normally don’t do it.

Here are the Valkerie pegs:
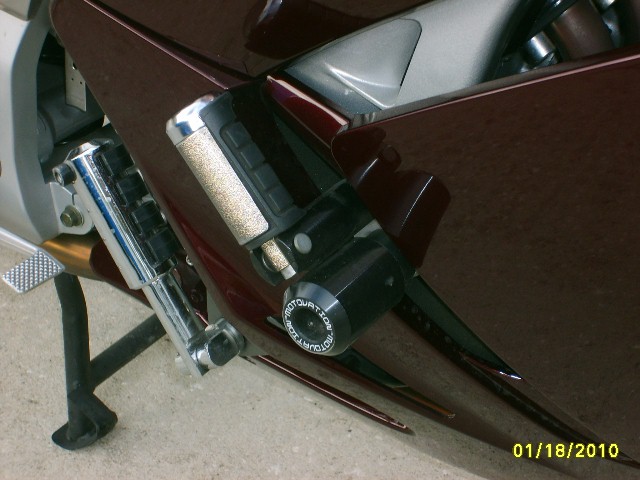
4286376477_aa8474e37a_o.jpg


4286376413_267229d9dc_o.jpg


4286376339_e06d0997ab_o.jpg


4286376281_cac4c03e74_o.jpg


There is a custom-made aluminum plate that gets sandwiched between the slider and the engine providing the inside mount point for the peg. I made this plate match the profile of the Valkerie mount. Another bolt connects the slider and peg at the outboard end to stabilize the peg and this bolt threads into the slider. Since this whole assembly mounts to the bike with just one screw, I needed to add something to keep it from rotating on the bolt and hitting my bodywork. I used a third bolt (well, really just the head of it) on the inside of the plate to engage in a small existing frame pocket to keep it indexed.
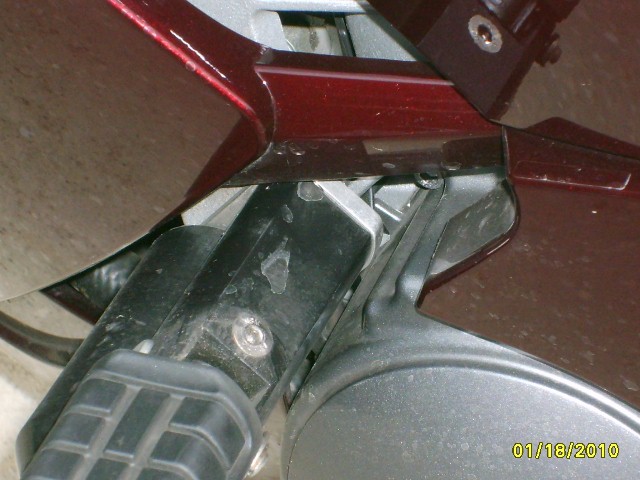
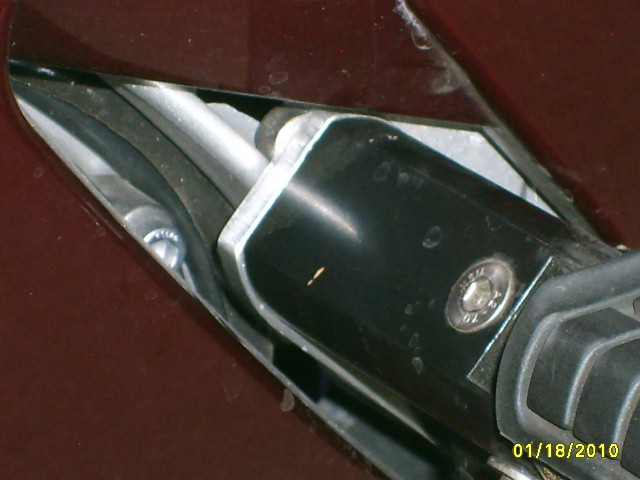
4286376563_d58dc0f35b_o.jpg


4286376643_e597b4c889_o.jpg

THanks for posting this. I spent the day tinkering with some Kury foot rests that I have off a cruiser. Then I saw this. I was looking at retro fit with WBs and the Sliders. Im wondering if anyone who may ride more aggressive than I has scraped WB's or had a get off because of them.

R

 
<snip>
THanks for posting this. I spent the day tinkering with some Kury foot rests that I have off a cruiser. Then I saw this. I was looking at retro fit with WBs and the Sliders. Im wondering if anyone who may ride more aggressive than I has scraped WB's or had a get off because of them.

R
Hopefully my posts are helping some of you out there.

I only use this the W-B pegs on long stretches of the interstate and try to get them flipped up before I exit. I foresaw myself forgetting they were down and going hot into an off-ramp scraping them up so hence the little rub protectors. Before I found the Kury parts, I bolted on a few other pegs I had lying around (hinging about 2-3" out from the plates) and the first thing that came to mind was I needed to add a couple of slots to the W-B plates to let them "give" a little before cracking a case. I almost took the dremel to them but luckily discovered the close hinging alternative in time.
Ok. Lets see if I can do this without copying the entire post....

I also like the work you did with the driver seat back. Im thinking about a way to make an adjustable Top Case platform. I dont like the look of the box when its on the OEM pad site. I would like to be able to move it forward closer to the driver and put a back pad on it. Then if going two up, be able to move it back to the OEM position. I think its doable by redesigning the grab bar in some fashion to work with a quick release two stage setting. To the drawing board....

Im thinking about

 
I also like the work you did with the driver seat back. Im thinking about a way to make an adjustable Top Case platform. I dont like the look of the box when its on the OEM pad site. I would like to be able to move it forward closer to the driver and put a back pad on it. Then if going two up, be able to move it back to the OEM position. I think its doable by redesigning the grab bar in some fashion to work with a quick release two stage setting. To the drawing board....
Im thinking about
We're getting a little off topic here, but since you brought it up...

I like the idea of a two position case as I very seldom have a passenger. And, that OEM topcase bracket (and grab bar) flexes a lot with the case mounted in the stock position (hanging back from the 3 mount bolts), so moving it forward most of the time would no doubt minumize the flex and help its longevity. I would be cautious, however, about drilling into or doing anything to the aluminum grab bar other than clamping around it, as I believe it's being pushed to it's limits (or beyond) as is.

Keep us posted on what you come up with.

 
I had the pegs off so I could remove the side panels and snapped a couple of pictures…

4495710172_34bfa5078f_o.jpg


4495710228_c56c16cc43_o.jpg


Another forum member, GillaFunk, just PM'ed me to pass on some information on the pegs I used. He said they appear to be from a 1999 Valkyrie GL 1500C. Thanks for doing the research G-F, and add a reply here if you have specific Honda part numbers to add. Like you said, it may save someone looking to do this a little time.

 
Last edited by a moderator:
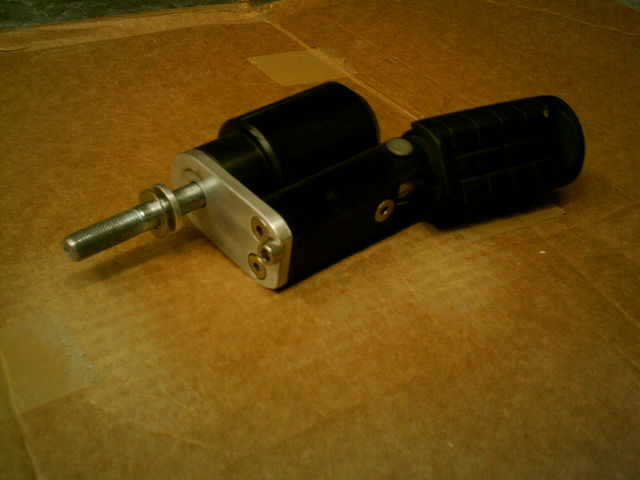
The Pegs are from a '99 or '00 Valkyrie 1500C.

You will also need the metal bracket stem hooya's the pegs attach to as well, not JUST the pegs.

The cheapest solution I found was to join one of the Valkyrie forums (like this FJR forum) and post in classifies. Many guys replace their pegs right off the bat so they have these littery just laying around collecting dust. I got about 6 emails within 24 hours for guys offering sell me their pegs for less than $25. Pick up the stems at cyclepartswearhouse.com for about $15 each if they are not included.

Now to fabricate a bracket

 
Top