yamafitter
Reigning NERDS Granite Lane Gold Medalist
This post descibes changing out the CCT (Cam Chain Tensioner) using a method we developed during the recent Bustanut Tech Weekend in Owosso. I edited this post to show the CCT with the motor out of the frame...
DON'T PANIC!! We will not be removing the motor for this procedure.
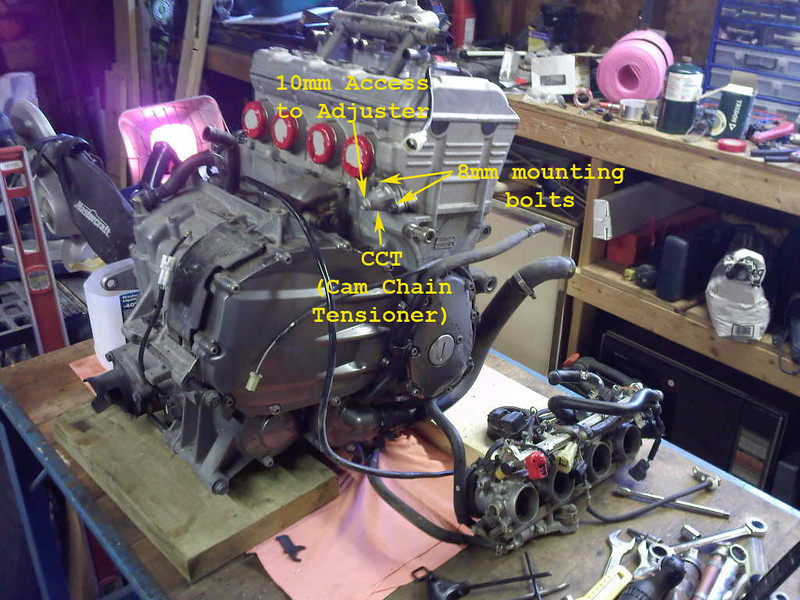
This is a list of the parts for all generations of the FJR:
NOTE - The Gen I have the Oil Pump Cover Gasket listed as 5JW-15456-00-00. The Gen II before 2008 list the part as 5JW-15456-10-00 however all three versions of the FJR (Gen I, Gen II prior 2008 and cureent Gen II) share the same Oil Pump Cover (5JW-15416-00-00). Based on this all three gaskets should be interchangable. It appears the gasket was upgraded the same time that the CCT was.
Here are the tools required to change the Cam Chain Tensioner using the Bustanut Owosso method...
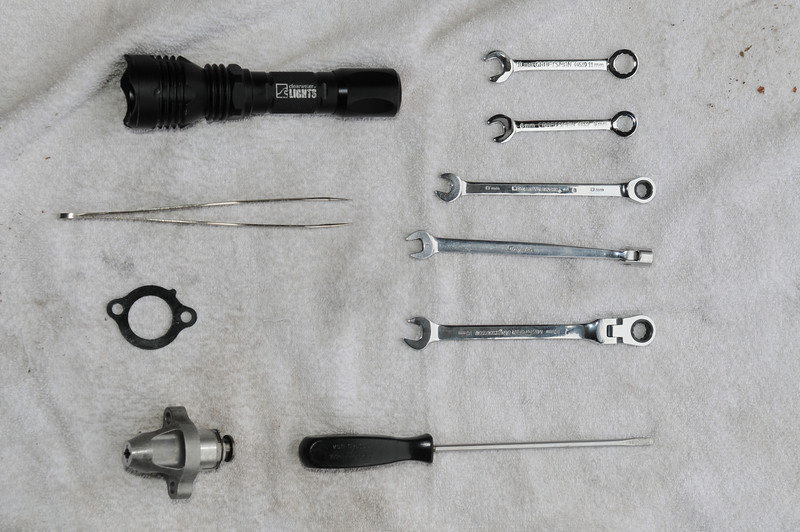
From the top right going clockwise
Missing from the photo is Bustanut's Dremel tool with a cut-off wheel.
Other tools for pulling the cam chain cover and panels
Step 1 -
Remove the seats & gas tank.
For Gen II's remove T-Bar & heat shield.
Next remove the dash covers on the righthand side and righthand lower cowling. If you have frame sliders the righthand slider will also have to removed.
Step 2 -
Remove the cam chain cover and place a ty-rap around the cam chain guides. Tighten the ty-rap to hold the cam chain in position for the rest of this procedure.
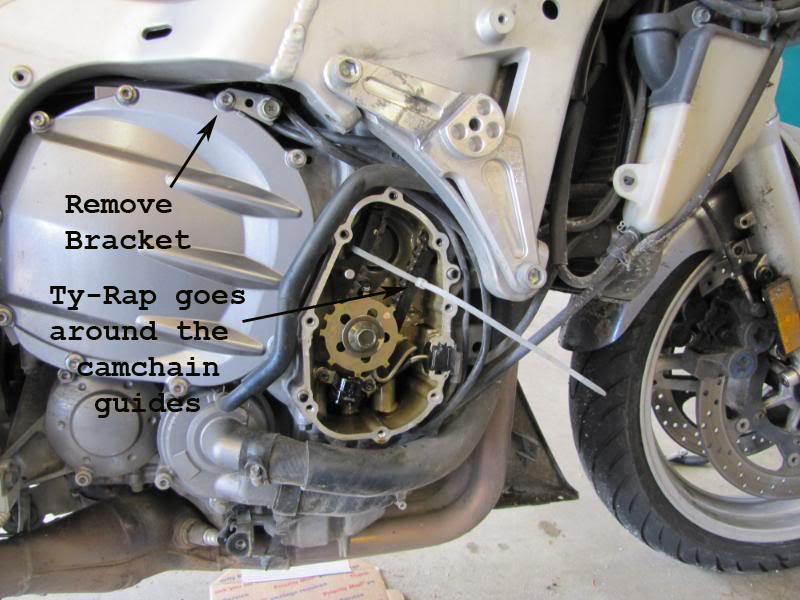
Also remove the bracket holding the idle speed adjustment screw and move the bracket out of the way.
Looking from the top you will be able to see the CCT between the frame and the throttle bodies...
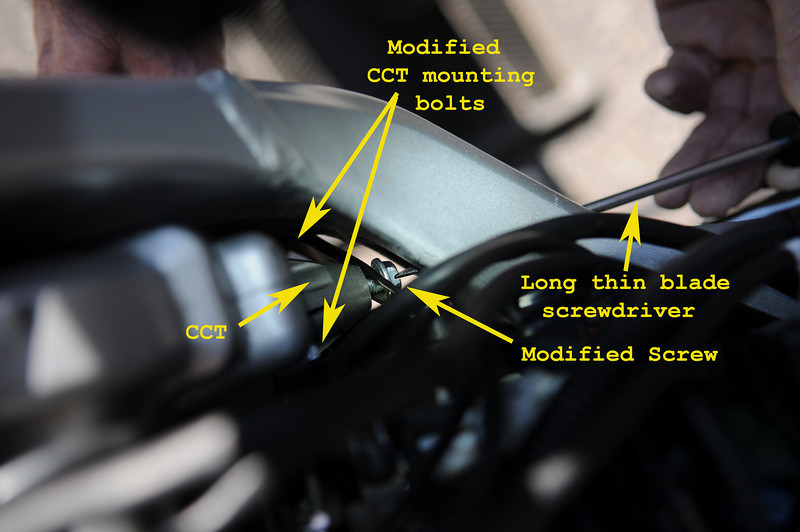
Step 3 -
Remove the access plug in the frame.
Using a 10mm wrench start removing the bolt that covers the access to CCT adjuster. see photo below.
This nut will not the modified yet so either using the 10mm ignition wrench or your fingers remove the screw.
Photo of CCT with screwdriver inserted into access port - CCT is in the 'extended' position
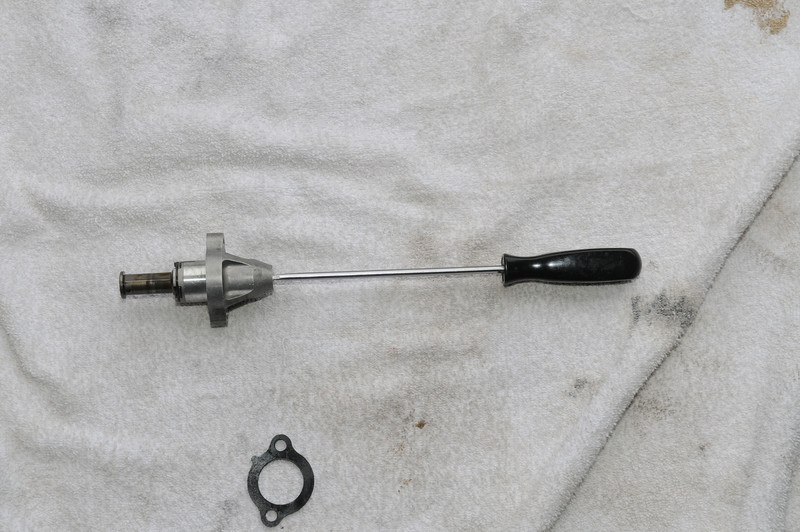
Insert the screwdriver through the access in the frame and into the CCT. Turn the screwdriver clockwise until you can no longer turn the adjuster in the CCT. Note - very little force required.
The CCT is now locked in the 'retracted' position.
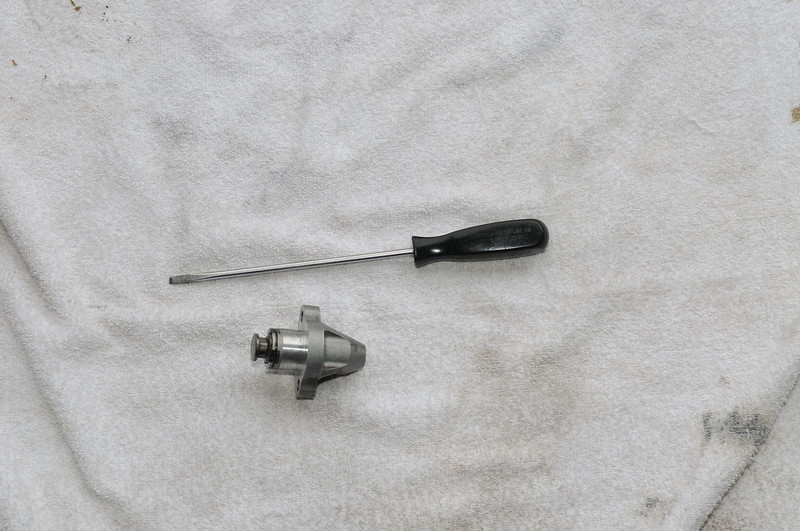
Now for the PITA.
Step 4 -
Using the 8mm combination wrench break free the bolt closest the the throttle bodies.
Using either the 8mm combination wrent or the 8mm ignition wrench (whichever works best for you) break free the bolt closest to the frame.
Using the 8mm ignition wrench and / or fingers work the bolt closest to the frame out of the motor. Once loose use the tweezers to remove.
Using the 8mm gear ratchet wrench remove the bolt closest to the throttle body. I used a screwdriver pressed up against the ratcheting section to stop the wrench from spinning back. Again use the tweezers to remove once the bolt is loose.
Remove the CCT from the motor. There is only enough room to remove the CCT from below the frame.
Take a deep breath and a refreshment break - the hard part is done.
Step 5 - The Genius of the Owosso Way
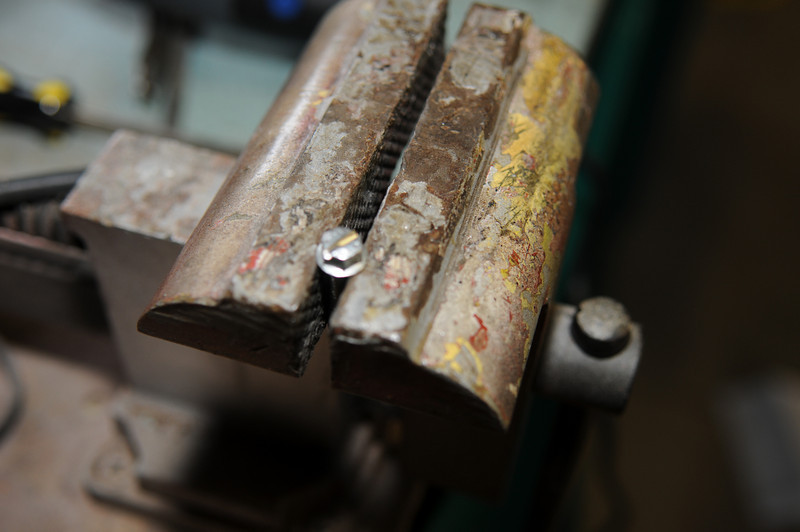
Using a Dremel tool with a cut-off wheel cut a slot in all three bolts so that the resulting slot will accept the screwdriver.
Step 6 -
The new CCT should have a blue dot. This dot goes to the top also the tab on the gasket goes to the top.
The new CCT has a retainer installed that is holding the CCT in the retracted position. I would suggest that you remove the retainer and using a screwdriver turn the adjuster a few turns counterclockwise until the CCT releases the spring and moves to the extended position. Turn the screwdriver clockwise the retract the CCT to the locked retracted position.
You should note that there is significantly more resistance offered by the new spring in the redesigned CCT.
Some folks now replace the retainer but I find it easier to leave it out. If your new CCT does not lock you will have to reinstall the retainer and then remove the retainer with needle nose pliers after installing the CCT.
Insert the new CCT & gasket from the bottom and place it into the motor opening.
Ensure that the blue dot on the CCT is facing up and the gasket tab is also up.
Step 7 -
Using tweezers to position the bolt start with the bolt closest to the throttle bodies. Using the screwdriver it is possible to angle the screwdriver into the modified bolt and use the screwdriver to spin the bolt in. Leave slightly loose for now.
Repeat the above process for the bolt closest to the frame turning it in as far as possible.
Using the 8mm ignition wrench tighten the bolt closest to the frame. You may need to use the 8mm combination to bring to final torque but these bolts are small so be careful. Breaking a bolt at this point means removing the motor.
Using the 8mm ratchet wrench tighten the bolt closest to the throttle bodies.
See how time saving that all was!!! :yahoo:
Step 8 -
Insert the screwdriver through the frame access and turn the CCT adjuster counterclockwise until the adjuster releases. You will feel the screwdriver spin when this occurs.
Using the screwdriver in the adjuster, exercise the tensioner a few times to confirm that the plunger is in fact hitting the chain guide. Now you can feel more comfortable releasing that ty-wrap (to be done a little later).

Using tweezers to position the screw use the screwdriver to install the CCT access screw cover.
Replace the frame access plug.
Step 9 - almost done!!
Remove the ty-rap from around the cam chain.
After cutting the ty-wrap and before buttoning things up, manually turn the engine through at least two complete crankshaft revolutions (crank turns CW from the right side) while observing the timing chain . If you are going to skip (or have already skipped) a tooth on a sprocket you want to discover that before thumbing the starter button. Obviously do not force it if you feel any obstruction.
Replace cam chain cover.
Replace Idle Speed Adjuster Bracket.
Replace all the tupperware.
You're DONE!!!
You must be hungry by now.
I rewarded myself with a pita from the Pita Deli in Whitby...
https://yamafitter.smugmug.com/Motorcycles/FJR-CCT-Change/food-****/1250810534_bVFmL-L.jpg
Thanks to Fred W & others for a few suggestions on improvements. I have made the upgrades.
DON'T PANIC!! We will not be removing the motor for this procedure.

This is a list of the parts for all generations of the FJR:
- CCT (updated blue dot) - Tension Assembly, CAM - Yamaha Part# 5JW12210-10-00 (item 6)
- CCT gasket - Gasket, Tensioner CA - 5JW-12213-00-00 (item 7)
- Cam Chain Cover Gasket - Gasket, Oil Pump Cover - 5JW-15456-11-00 (item 30)
NOTE - The Gen I have the Oil Pump Cover Gasket listed as 5JW-15456-00-00. The Gen II before 2008 list the part as 5JW-15456-10-00 however all three versions of the FJR (Gen I, Gen II prior 2008 and cureent Gen II) share the same Oil Pump Cover (5JW-15416-00-00). Based on this all three gaskets should be interchangable. It appears the gasket was upgraded the same time that the CCT was.
Here are the tools required to change the Cam Chain Tensioner using the Bustanut Owosso method...

From the top right going clockwise
- 10mm ignition wrench
- 8 mm ignition wrench
- 8 mm gear ratchet wrench
- 8 mm conbination wrench
- 10mm gear ratchet wrench
- 1/8" x 6" standard screwdriver
- Cam Chain Tensioner
- gasket
- long tweezers - about 4"
- some sort of lightsource - I like my Clearwater LED flashlight
Missing from the photo is Bustanut's Dremel tool with a cut-off wheel.
Other tools for pulling the cam chain cover and panels

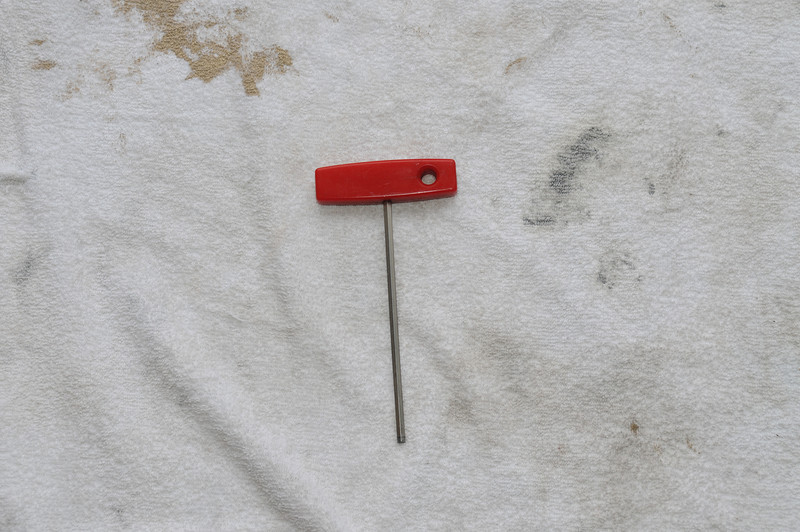
- 5mm Allen Key for cam chain cover
- 4mm Allen Key for plastics - not shown
- small pick for popping plastic grommet fasteners (beside battery) - not shown
Step 1 -
Remove the seats & gas tank.
For Gen II's remove T-Bar & heat shield.
Next remove the dash covers on the righthand side and righthand lower cowling. If you have frame sliders the righthand slider will also have to removed.
Step 2 -
Remove the cam chain cover and place a ty-rap around the cam chain guides. Tighten the ty-rap to hold the cam chain in position for the rest of this procedure.

Also remove the bracket holding the idle speed adjustment screw and move the bracket out of the way.
Looking from the top you will be able to see the CCT between the frame and the throttle bodies...

Step 3 -
Remove the access plug in the frame.
Using a 10mm wrench start removing the bolt that covers the access to CCT adjuster. see photo below.
This nut will not the modified yet so either using the 10mm ignition wrench or your fingers remove the screw.
Photo of CCT with screwdriver inserted into access port - CCT is in the 'extended' position

Insert the screwdriver through the access in the frame and into the CCT. Turn the screwdriver clockwise until you can no longer turn the adjuster in the CCT. Note - very little force required.
The CCT is now locked in the 'retracted' position.

Now for the PITA.
Step 4 -
Using the 8mm combination wrench break free the bolt closest the the throttle bodies.
Using either the 8mm combination wrent or the 8mm ignition wrench (whichever works best for you) break free the bolt closest to the frame.
Using the 8mm ignition wrench and / or fingers work the bolt closest to the frame out of the motor. Once loose use the tweezers to remove.
Using the 8mm gear ratchet wrench remove the bolt closest to the throttle body. I used a screwdriver pressed up against the ratcheting section to stop the wrench from spinning back. Again use the tweezers to remove once the bolt is loose.
Remove the CCT from the motor. There is only enough room to remove the CCT from below the frame.
Take a deep breath and a refreshment break - the hard part is done.
Step 5 - The Genius of the Owosso Way

Using a Dremel tool with a cut-off wheel cut a slot in all three bolts so that the resulting slot will accept the screwdriver.
Step 6 -
The new CCT should have a blue dot. This dot goes to the top also the tab on the gasket goes to the top.
The new CCT has a retainer installed that is holding the CCT in the retracted position. I would suggest that you remove the retainer and using a screwdriver turn the adjuster a few turns counterclockwise until the CCT releases the spring and moves to the extended position. Turn the screwdriver clockwise the retract the CCT to the locked retracted position.
You should note that there is significantly more resistance offered by the new spring in the redesigned CCT.
Some folks now replace the retainer but I find it easier to leave it out. If your new CCT does not lock you will have to reinstall the retainer and then remove the retainer with needle nose pliers after installing the CCT.
Insert the new CCT & gasket from the bottom and place it into the motor opening.
Ensure that the blue dot on the CCT is facing up and the gasket tab is also up.
Step 7 -
Using tweezers to position the bolt start with the bolt closest to the throttle bodies. Using the screwdriver it is possible to angle the screwdriver into the modified bolt and use the screwdriver to spin the bolt in. Leave slightly loose for now.
Repeat the above process for the bolt closest to the frame turning it in as far as possible.
Using the 8mm ignition wrench tighten the bolt closest to the frame. You may need to use the 8mm combination to bring to final torque but these bolts are small so be careful. Breaking a bolt at this point means removing the motor.
Using the 8mm ratchet wrench tighten the bolt closest to the throttle bodies.
See how time saving that all was!!! :yahoo:
Step 8 -
Insert the screwdriver through the frame access and turn the CCT adjuster counterclockwise until the adjuster releases. You will feel the screwdriver spin when this occurs.
Using the screwdriver in the adjuster, exercise the tensioner a few times to confirm that the plunger is in fact hitting the chain guide. Now you can feel more comfortable releasing that ty-wrap (to be done a little later).

Using tweezers to position the screw use the screwdriver to install the CCT access screw cover.
Replace the frame access plug.
Step 9 - almost done!!
Remove the ty-rap from around the cam chain.
After cutting the ty-wrap and before buttoning things up, manually turn the engine through at least two complete crankshaft revolutions (crank turns CW from the right side) while observing the timing chain . If you are going to skip (or have already skipped) a tooth on a sprocket you want to discover that before thumbing the starter button. Obviously do not force it if you feel any obstruction.
Replace cam chain cover.
Replace Idle Speed Adjuster Bracket.
Replace all the tupperware.
You're DONE!!!
You must be hungry by now.
I rewarded myself with a pita from the Pita Deli in Whitby...
https://yamafitter.smugmug.com/Motorcycles/FJR-CCT-Change/food-****/1250810534_bVFmL-L.jpg
Thanks to Fred W & others for a few suggestions on improvements. I have made the upgrades.
Last edited by a moderator:


