Leaking Radiator

Yamaha FJR Motorcycle Forum

Help Support Yamaha FJR Motorcycle Forum:

This site may earn a commission from merchant affiliate links, including eBay, Amazon, and others.

RossKean

Well-known member
Joined
Feb 15, 2010
Messages
7,232
Reaction score
3,731
Location
Fredericton, NB
With my running warm and leaking overflow tank, I had piggybacked on an old "Running Hot" thread. Starting this one new because this has been a common issue for a number of people. Thought it would be nice to draw some solutions and comments together.

My plastic overflow tank WAS cracked and leaking so I have ordered a new one and (temporarily) patched the old one. When I installed the repaired tank and warmed up the bike, a coolant leak started at a temperature a couple of bars before the fans would have started. Not from hoses, junctions, thermostat housing or radiator cap (or water pump). Top left corner of the radiator from the rider's perspective. No obvious physical damage to the front of the rad. Bike is 2007 with 170,000 miles. Coolant changed every two years with a suitable name brand product. No accidents or front-end mishaps.

  • Was the problem physical (impact) damage, corrosion or a crack?
  • Has anyone had good experience with radiator repair? If so, was it DIY or a rad shop?
  • Epoxy repair or weld/braze?
  • Did you replace the radiator with a used one?
  • OEM new radiator?
  • dcarver tried an aftermarket one but returned it because of poor fit and construction. Anyone have good luck with an aftermarket rad? What brand? (tons on eBay but could be all the same mfgr.)
I haven't taken the radiator off the bike for a close examination yet. I am hoping it is something obvious and simple. I will try to get some photos.

Going to the service manual!! Anyone know how to get at the right hand top bolt to remove the radiator???

 
Last edited by a moderator:
If the Gen 2's are anything like the Gen 1's then I just used a long 10mm extension. There are some

wires and a hose to squeeze around but it actually went pretty smoothly.

Good luck.

Canadian FJR

 
^ Yep, I do the same...move wires out of the way and use a 1/4" drive 10mm on a long extension. The bolt comes out easier than it goes back in.

 
Got it out but had to snip a half dozen cable ties and remove the battery box to get at the top right bolt. It would have been easier if I had taken the front fairing off.

No obvious damage to the radiator but very dirty. Got most of the crap out of it, I think. Plan on taking it to a local shop and see if they think they can do anything. I can't really pinpoint the location of the leak.

^ Yep, I do the same...move wires out of the way and use a 1/4" drive 10mm on a long extension. The bolt comes out easier than it goes back in.
I didn't need to hear that!!
 
Last edited by a moderator:
Sorry, I just assumed you had the fairing off. I've never done it with the fairing on.

That bolt threads into the aluminum frame and has to pass through the mounting bracket, while lining everything up through a mess of wires. It takes a little patience to make sure you aren't cross threading that hole.

 
Sorry, I just assumed you had the fairing off. I've never done it with the fairing on. That bolt threads into the aluminum frame and has to pass through the mounting bracket, while lining everything up through a mess of wires. It takes a little patience to make sure you aren't cross threading that hole.
It is very easy to damage these aluminium threads..Unfortunately happened to me on the left bolt on the installation of the radiator some years ago...

Never repaired,only i added some washers between the bolt and the radiator mount for a tight fit.Still works good.

Need some patience on the installation of these bolts...Also on my other bike XTZ 750 i repaired a small hole on the radiator with metal epoxy glue.Still works fine for many years now!

 
Last edited by a moderator:
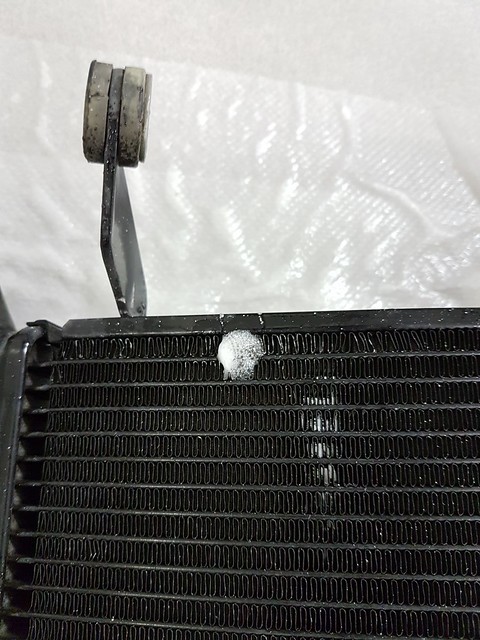
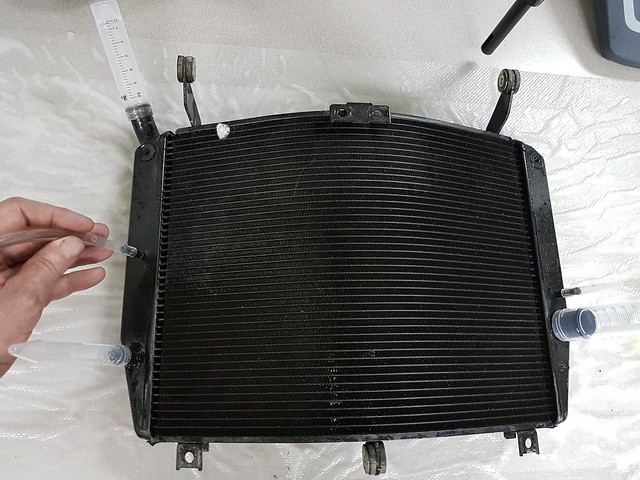
OK. I found the leak location. Nothing really visible but I closed off all the openings and pressurized it with air. A soap solution pinpointed the leak.

Only one spot as far as I could tell and there doesn't seem to be much obvious physical damage.

I can wait and see if there is anyone local who is willing to tackle this.

I can try sealing with JB Weld

I could try a radiator leak-stop "fix" but that worries me.

If I do the JB Weld, should I remove the fins around the spot or count on them to help hold everything in place?

Does anybody know if there are concerns about the stop-leak compound plugging up stuff - engine, water pump, radiator? Thinking about using some along with the JB Weld fix - belt AND suspenders!

Anybody had any luck with one method or another?

Couple of pix of my leak detector...

35627017012_36665ca4e7_z.jpg


35796552865_77be549175_z.jpg


Last edited by a moderator:
If you've got a competent radiator shop around you, they can cut open the end caps of the radiator, solder/braze closed that particular tube, and weld the end caps back up again. You'd lose a small fraction of your cooling capacity, but it wouldn't leak anymore.

I've used these guys for my Royal Star radiator in the past, and I haven't had any issues since. I picked them because I used to live in Southern California though. Might want to call them and ask if/how they'd handle international shipping.

https://fontanaradiator.net/

 
Yep.

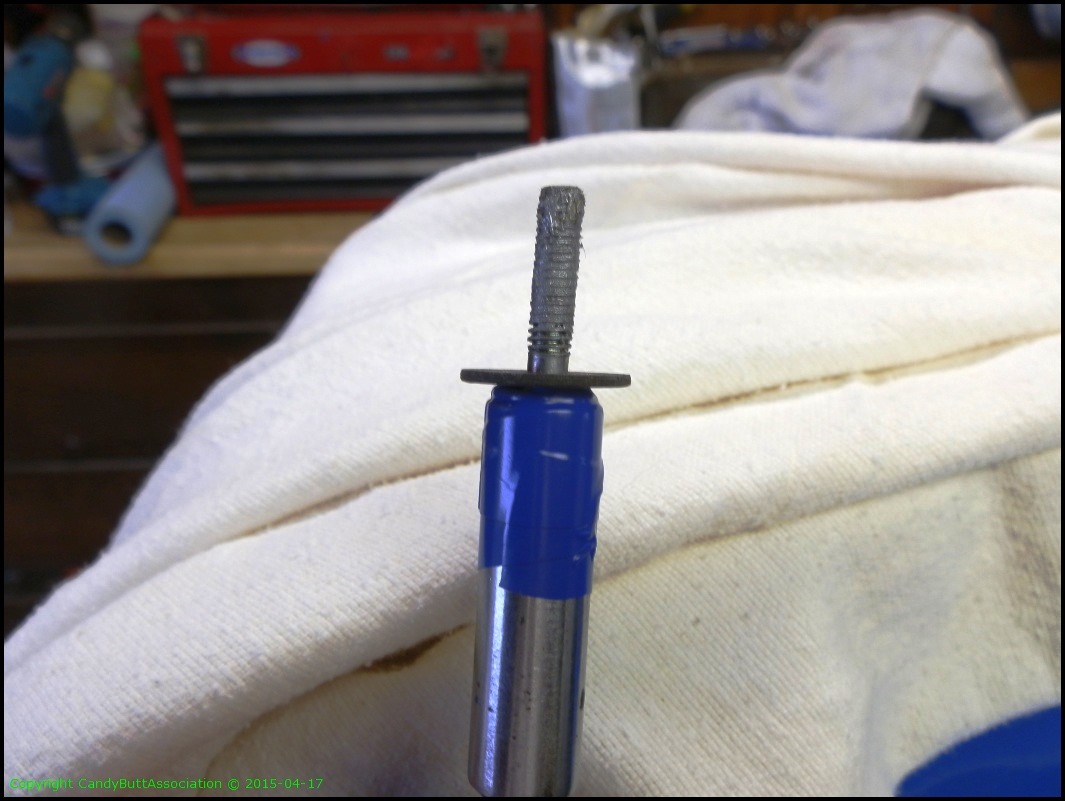
The radiator mount, battery side, was a real bugger. I had the left side already in, but due to a tangle of wires, gaining a straight shot to the threads was difficult. I botched the initial threads by trying to center the bolt using a t-handle wrench. Had to chase it with a tap, using a 1/4" ratchet extension and 5 mm socket with electrical tape on the tap end to prevent slipping from the socket being slightly oversized. What a royal pain in the ***. Took me over an hour to recover from my initial hasty mistake.


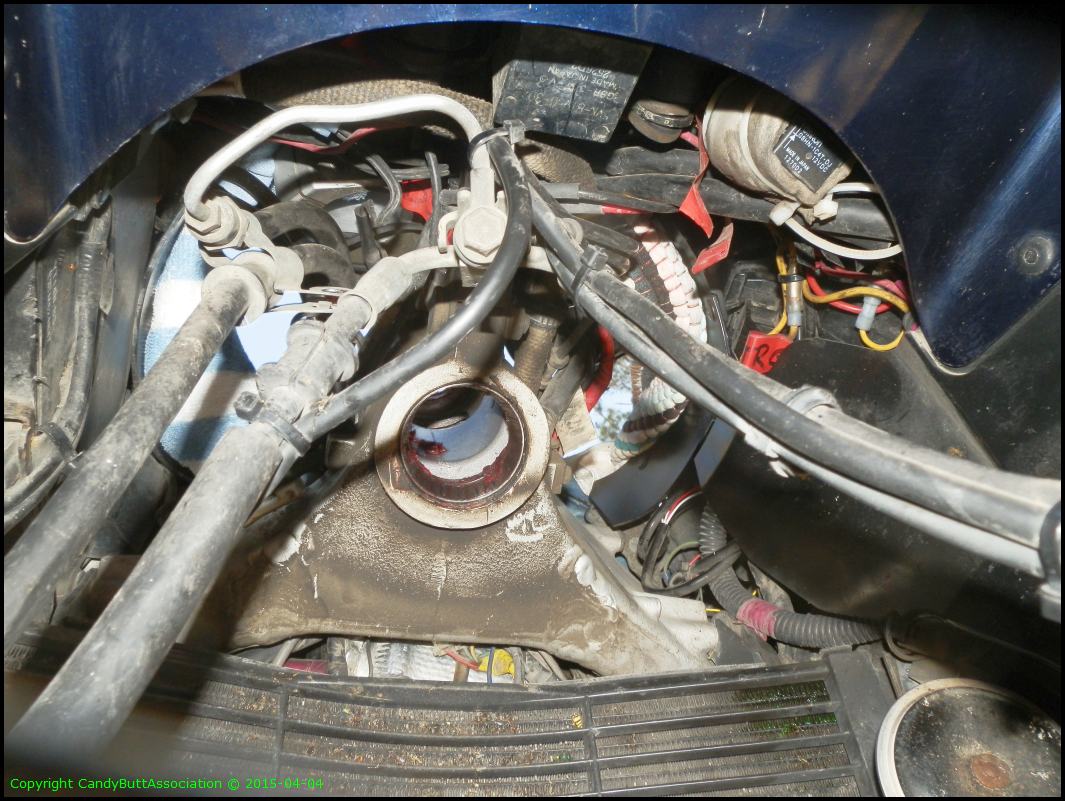
Just found this pix - from when I performed steering head bearing service - note the leak in the upper right corner.

 
Last edited by a moderator:
Thanks rPGoatBoy. I'm not shipping it anywhere - too expensive and too much time for a repair that might not work. If I can find someone local I can trust to do a good job, I may try getting it brazed/soldered.

I might just try the JB Weld epoxy fix and if it doesn't work, I would be buying a new radiator. I'm not too crazy about multiple installations to test something.

 
I see the leak in your photo, Don. At this point, I have to wait until Monday to see if there is anyone in town who might be able to do a competent repair. Nobody works weekends anymore.

 
IMHO don't waste your time with JBWeld. That stuff is useless. Over the yrs I've had good success by cutting fins and soldering on cars, trucks and forklifts. If you're not into that sort of thing either A) take it to a local shop and get their opinion and quote, it's usually free; or 2) get Pig Putty. Google is your friend. Light yrs superior to ****** JBWeld. I've used Pig Putty in places that would make silver solder cry like a little gurl and it worked really well.

There's always Flex Tape......

 
Last edited by a moderator:
IMHO don't waste your time with JBWeld. That stuff is useless. Over the yrs I've had good success by cutting fins and soldering on cars, trucks and forklifts. If you're not into that sort of thing either A) take it to a local shop and get their opinion and quote, it's usually free; or 2) get Pig Putty. Google is your friend. Light yrs superior to ****** JBWeld. I've used Pig Putty in places that would make silver solder cry like a little gurl and it worked really well.
rbentnail

I am going to get around to a couple radiator shops in town and see what they have to say. While the old copper core radiators solder very well, aluminum is a lot tougher. Normal solder doesn't stick, metal is too thin to weld and you would need an expert touch with a brazing rod. I wouldn't try it myself but I will see if I can find someone who can. I looked up your Pig Putty (hadn't heard of it before). Max temperature is 250 °F - could be a problem on a radiator? International mail order wouldn't happen very quickly, anyway. I appreciate your JB Weld comments in relation to this application.

Thanks

I used this for the repair on the radiator and works fine for many years without any leak. https://www.permatex.com/products/adhesives-sealants/epoxies/permatex-cold-weld-bonding-compound/
Mihalis

I think that Permatex product is very similar to JB Weld. Both are a metal-filled two part epoxy. I have used JB Weld for lots of stuff but with variable success. Never tried it on a radiator which is why I was asking here.

Thank you

 
I had a local radiator shop repair my 05 rad and it held fine as long as I kept the bike. But I sold it after about two more weeks.

Still, they did fix it. Hope the new owner still loves it.

 
My 07 original radiator leaked in the same spot at somewhere north of 100,000 miles and it looks like DCarver's did also. No visible damage in that area. I wonder why they always fail in that area?

In the interest of expediency, I bought a used OEM FJR radiator off ebay and replaced my leaky one. Having a replacement on hand eliminated any extended downtime waiting on parts or repairs, which is desireable because my FJR is my main transportation. No more leaks and I have the old one sitting here in case someone needs a radiator and wants to get it repaired. Good luck in your repair search.

 
Not having a lot of luck in the local radiator repair market - figured I would find someone capable of welding or brazing it.

I have taken it to an autobody place that repairs radiators. They drill holes in the tube where it is leaking and inject some sort of polymer (or epoxy) to seal off that tube permanently. I hope it works!! I would not be inclined to buy a used OEM radiator - mostly because of the amount of work necessary to swap them out if you get a bad one. If this doesn't work, I'm not sure where I will go from there.

 
Last edited by a moderator:
According to the tech who did the repair for me, the top cross tube was split - I assume at a seam. Absolutely no evidence of stone damage in that area. From what I can see inside the rad openings, there is no evidence of deposits or corrosion but I can't tell about the cross tubes. He said that the stuff they use hardens quickly but I think I will wait until tomorrow before adding coolant and running the engine. I still have to get it all back together anyway. Maybe I should do my valve check now since the coolant is already drained...

There is no way that the loss of one (out of 40 or so) radiator tubes will make a significant difference in cooling capacity.

Here's hoping that the repair is effective and reasonably permanent.

 
Put the radiator back on the bike. No trouble at all - just minor cussing and gnashing of teeth. I was going to do the valve check while I had it drained but didn't have the patience. Filled it with some fresh coolant, started it up and ran it until the fans came on. Took about 8 minutes to fans on temperature in still air in a hot garage at idle with occasional throttle blips. My feet didn't get wet so I am calling it good for now. I don't think I will venture too far from home until I have put it through a dozen or so heat cycles. I'm tempted to run it without the fairings for a couple of days...

I still have to find places for about a dozen cable ties and get the plastics re-installed. I always seem to use fewer than I removed when taking things apart. A couple more times and there won't be any!

I did manage to get my right front marker light replaced while I had it apart. It's been out for about a year but it never bothered me enough to open it up just to change the bulb(s). (I did them both while I was at it.)

I'll probably do the valve check (and plugs) when the replacement expansion tank I ordered comes in. They told me up to 2 weeks!!

 
Top