Battery Access 2013/Gen III

Yamaha FJR Motorcycle Forum

Help Support Yamaha FJR Motorcycle Forum:

This site may earn a commission from merchant affiliate links, including eBay, Amazon, and others.

Charlie

Active member
Joined
Feb 3, 2007
Messages
33
Reaction score
1
Location
Marietta, GA
Recently had to go back into the battery area on my bike. The first time I used a screw driver to unsnap the instrument panel plastic from the fairing. The screwdriver worked but it did leave some markes in the panels. This time I used some nylon pry tools that worked very good and left no marks in the paint or panel. I bought a set of nylon pry tools from Northern Tools. The kit came from GRIP( Grand Rapids Industrial Produts). It is a 7 piece set under item #60270, UPC#097257602705. The price was a little under $7.00.

 
This is the third time/thread I will have posted this on this board:

You do NOT need any tools to separate the dash panel. After removing all the fasteners, simply grab the mirror at the mount in one hand and the large, conical, black plastic piece on the other side and forcefully wiggle them back and forth. Do one side at a time. The dash will pop off with NO pry tools needed. Yes, it will take more force in the beginning than you think is necessary, but it WILL work.

 
I've had mine apart twice. The first time at the dealer the day I picked it up to add my heated gear power cord. Even the tech helping me was a little worried. Couldn't have done it without him.

The second time was at home a month later hooking up my fuseblock, GPS and battery tender. As mentioned above, after all the push rivets, screws and the headlight adjuster knobs are removed, you can pop the center section apart on the top with your fingers one side at a time. If you pull up on the center panel after you have the top loose it will come right off.

That said, it's not something I want to do every day. I planned ahead and did all the connections I needed at the battery all at once. With luck, I won't be in there again until the battery dies in 4-6 years.

 
Last edited by a moderator:
That said, it's not something I want to do every day. I planned ahead and did all the connections I needed at the battery all at once. With luck, I won't be in there again until the battery dies in 4-6 years.
Yep. I had mine off to do GPS and Clearwater lighting. I'll take it off again to do my PDM60 and Auxiliary sockets. Another thing I am going to add is a hard-wired jumper cable. Will probably get this one - pricey though!

https://www.powerlet.com/product/real-motorcycle-jumper-cables/410

If I ever have to jump this bike, or jump a friends bike - having to pull all that plastic on the side of the road would suck.

 
Last edited by a moderator:
Even car batteries on some newer models are difficult to get to let alone find it at times. But the manufactures install terminals to provide a very easy way to jump start the car if needed or give a jump. Wish Yamaha would do something similar; running some wire and adding terminals under the seat someplace wouldn't be that difficult or expensive. Disappointed and kind of surprised they don't do this. Having to break out a tool box just to get to the battery terminals is ridiculous.

 
Do yourself a favor Bro. On the forward edge of the battery cover is a tab with a bolt that connects the battery cover to the forward fairing. Throw that bolt over the fence. I promise you that no ill effects will result. And you will be able to access the battery anytine you please by pulling two easy bolts and two push pins. Two minute job. No pulling the facia or any other nonsense. That bolt serves no purpose whatsoever other than to aggravate the owner and to run up shop time for the dealer.

Good luck.

AK

 
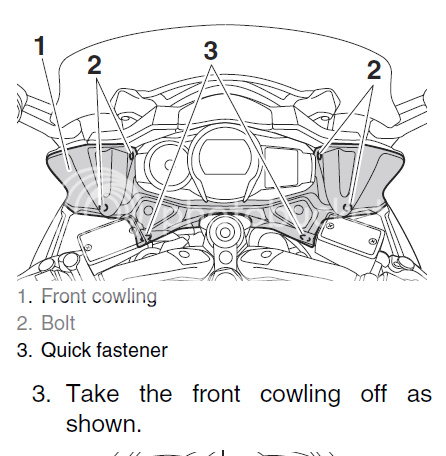
AK - sorry man not seeing it. I see 4 bolts on panel A. Two hex, two quick fasteners. Everything is captured with tabs out the *** - to get to them I have to first remove panel C which is held by several bolts (see picture below - not shown are the two pesky screws holding the headlight adjustment knobs).

FrontCowing_zpsd8d76018.png


AK - sorry man not seeing it. I see 4 bolts on panel A. Two hex, two quick fasteners. Everything is captured with tabs out the *** - to get to them I have to first remove panel C which is held by several bolts (see picture below - not shown are the two pesky screws holding the headlight adjustment knobs).
FrontCowing_zpsd8d76018.png
That's because it's underneath the front cowling. Thus the object of the exercise. Go through the book process of getting to the battery. Pull the front cowing. Then you have to remove (among other things) the bolt under discussion. Once you toss that bolt over the fence, you no longer have to remove the cowing to get the battery cover off. You can just remove two bolts and two push pins, all of which are accessable externally, and the battery cover comes right off.

Good luck.

AK

 
I'm not getting it either. Now, I don't have the bike in front of me at the moment, but IIRC Panel “A” has a sort of lip that tucks under the cowling and it seems to me that even if you were to leave the securing bolts out (I’m pretty sure there are 2) and leave things flapping around in the wind, you’d still have a hard time yanking that panel off with the cowling in place. Have you actually done this or is this a theoretical suggestion?

 
I agree with G-Man have you actually done this, AKitsu?. The dealer told me that that the battery cover, Panel A I believe, could be removed without removing the front cowling if that bolt is left out. I said show me and they couldn't. do it. They had left the bolt out when they installed the battery and I said I wanted it replaced.

 
Last edited by a moderator:
I'm a Gen II owner and I assisted my friend with his 2013 battery access. Without a doubt we are definitely one up on the GenIII crowd when it comes to battery access. Sadly, Its a poor design and should be corrected. Battery access and or changing the battery should not be that difficult.

 
I must be doing a **** job of explaining myself because this ain’t rocket surgery. It’s dirt simple and it works. Lemme try again:

Go through the “normal” process of getting to the battery: Pull the headlight adjusters, pull the few bolts on the fascia, wiggle the fascia off, and commence to detach the battery cover. In the latter process you’ll have to detach a bolt through a tab on the front edge of the battery cover. When you re-assemble, just don’t replace that bolt. In my own case, after satisfying myself that the connection serves no purpose whatsoever, I sawed off the tab.

As to results; Just this past weekend I had to get to the battery to replace the battery tender fuse. The battery cover came off clickity quick with no need to touch any of the other plastic. 7,000 miles in and there is no flapping, no creaking no miss-fit of plastics, nada.

 
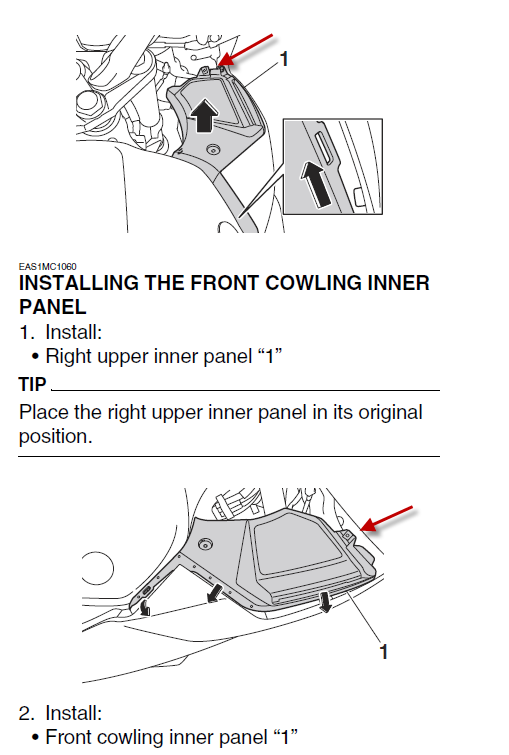
Thanks AK. I see if you were to remove the tab marked in the picture that you would be able to get the panel off rather quickly. I'll have to consider this!

BatteryPanel_zps5baa6e17.png


Top