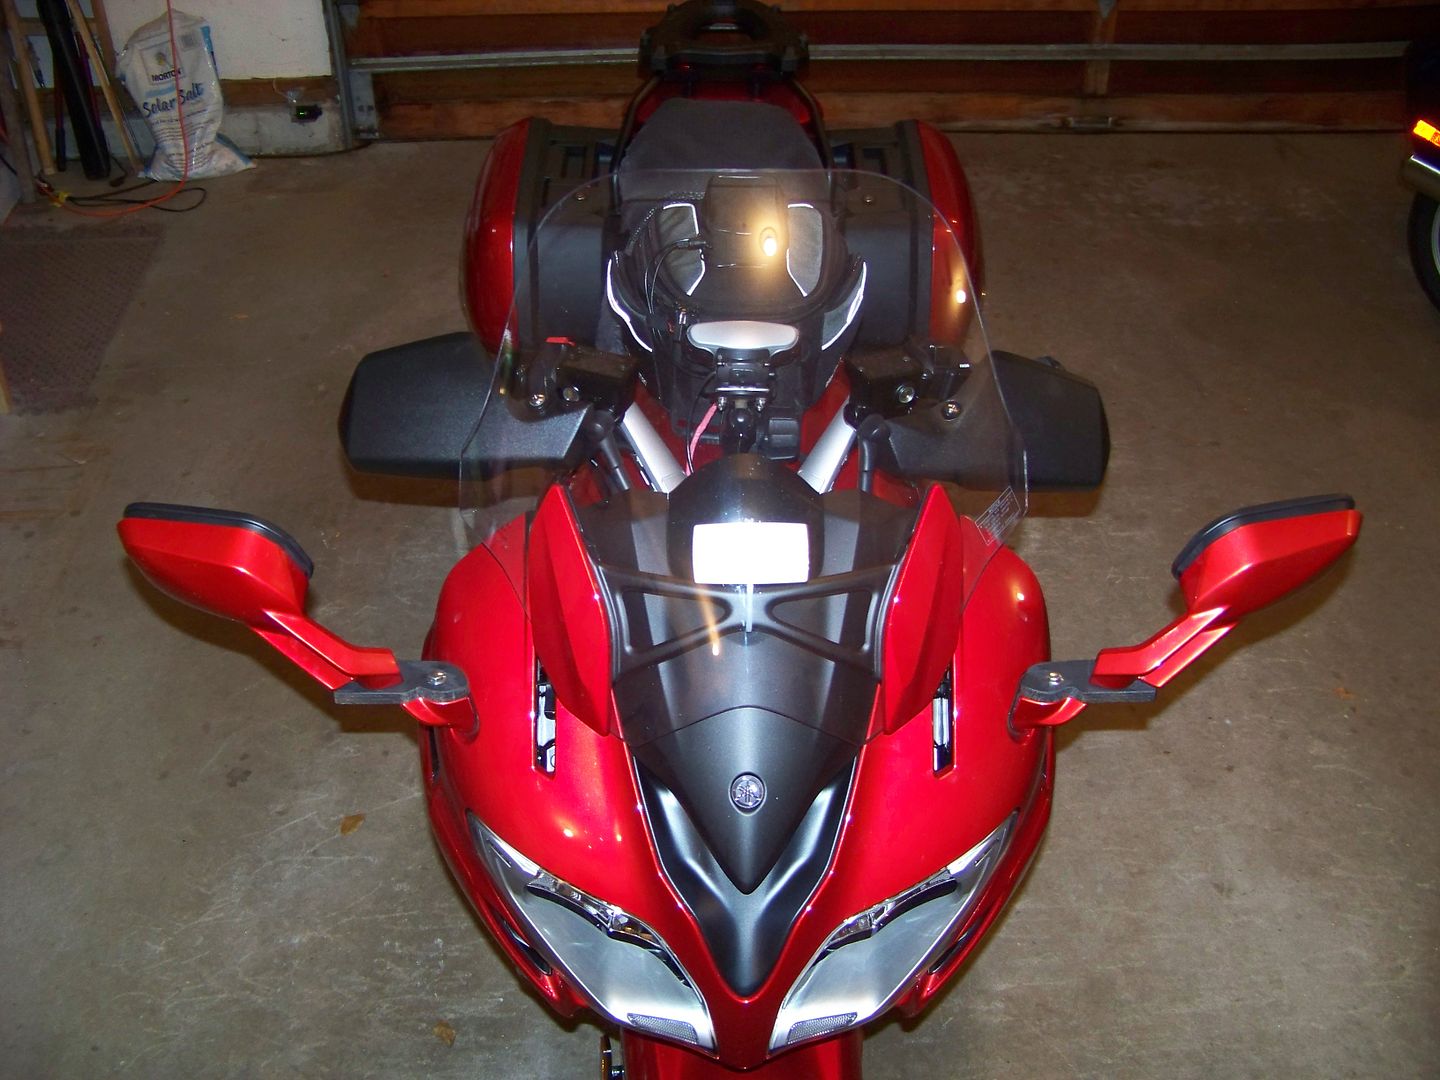
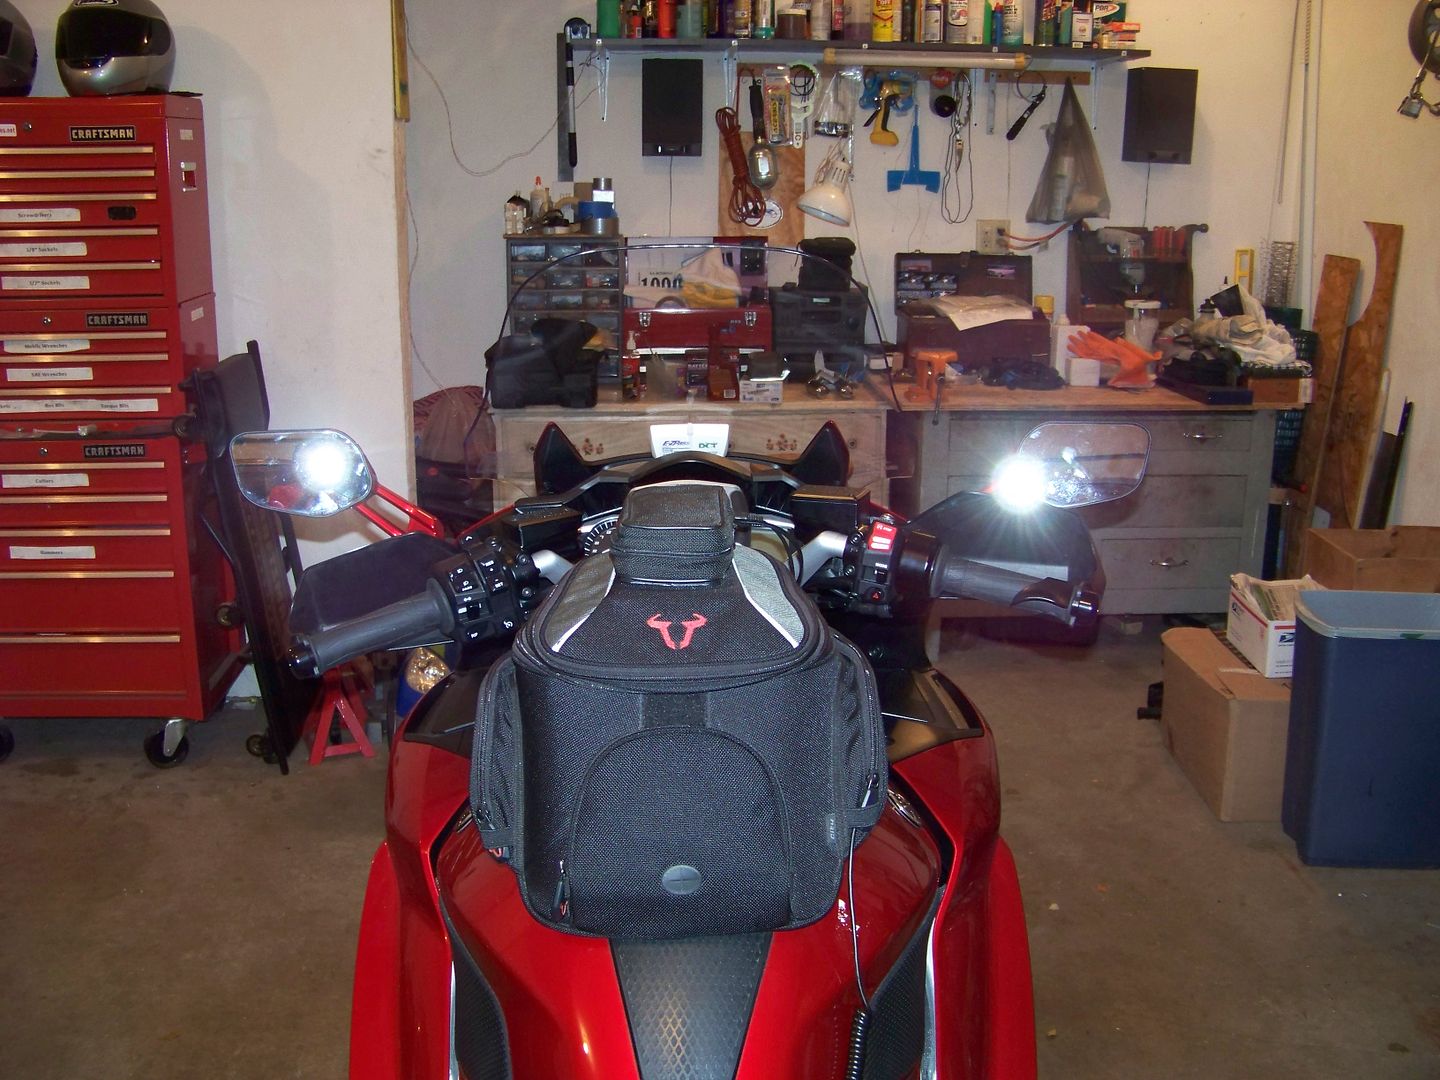
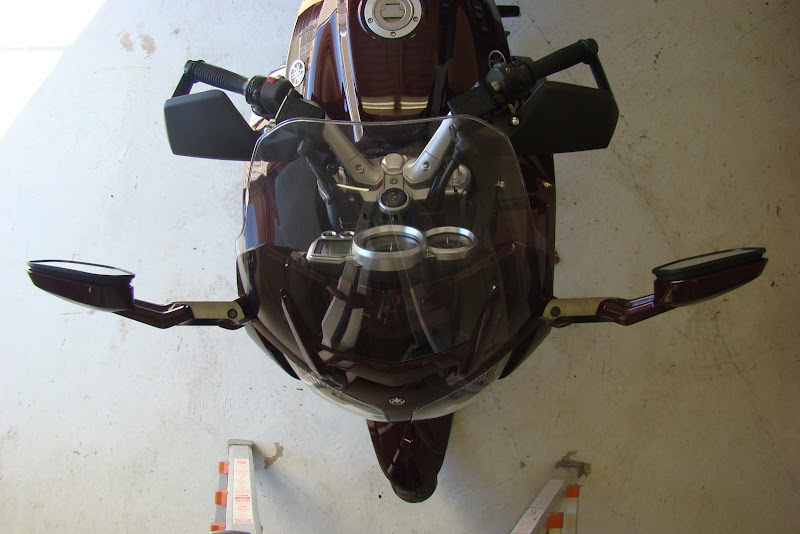
As many of you know, I have recently become the proud owner of a new 3rd Gen FJR. Having skipped the entire second generation, I was never fully aware of just how truly bad the mirrors are on those bikes, and now the Third Gens adopted the same mirror head design, but with the added inconvenience of the faring being reshaped up front making it difficult to slip an aux light bracket of some kind under the mirror bases
Even on the test ride I was aware that I was getting a great view of my hands, arms and elbows (and not much else), nothing like the great rearward vision I had on my old 1st gen with the FZ1 mirror farkle. Now that I have added Vstrom handguards on my 3rd gen I really can't see much back there.
Let's look at some actual measurements to get an idea of what we need to accomplish. Using the 1st Gen with FZ1 mirrors as the gold standard, the mirror edge to edge dimensions on the two mirrors:
1st Gen w/ FZ1 Mirrors
Outside edge to outside edge is 44"
Inside edge to inside edge is 32 1/2"
On the 3rd gen mirrors (should be same on 2nd Gen)
Outside to outside is 37"
Inside to inside is only 24"
As a point of reference, the outside to outside dimension of the 3rd Gen bags is about 37"
The mirror heads themselves are much larger on the newer gens, and I think that the outside to outside is the most important gauge.
Based on the above, I'd estimate that we'd want to move the mirror heads each at least 2" outwards, so the total outside to outside dimension then would be ~ 41".
There are some mirror "spacers" and mirror stud extender kits available (SW Motech for example, below)

The problem with these kind of spacers is that you do not gain very much "outward" movement of the mirrors, since the bases are angled forward and up as much as out to the sides. So a 1" spacer may only net you about 1/2" of outward movement.
One might be able to use these spacers and sandwich one of the various aux light mounting brackets in between the spacer and the mirror base to clear the 3rd gen bodywork. I've not really investigated it fully because I don't believe it is an adequate solution.
Over 4 years ago a forum member at the time (Joe2Lmaker) designed and fabricated some mirror spacers that could be installed as an intermediate piece between the two halves of the 2nd gen pivoting mirror stalk. He documented his work in this extensive thread and produced some beautiful CNC machined alloy spacers that looked like this:

The goals he that was working towards was to space the mirrors out and also have room on the bottom of these brackets to hang the Soltek HID Aux lights, which were in vogue at that time. My goals are different as I only want to be able to hang a pair of the small 4-CREE LED lightheads (like the LEDrider LR4's that I already own) but I can definitely appreciate the artistry and efforts that went into his design work.
So, I contacted him directly, and have communicated with him (off forum since he no longer participates here) and he gave Dave Wynne and me his blessing to use any and all of his prior work to our best advantage. He even provided his CAD drawings and CAM files of the brackets that he had made.
As you can see, in order to provide enough space on the bracket for mounting the large diameter Solteks, he made his brackets ~6" long (end to end) which spaced the mirrors out ~ 3 3/4". This resulted in some pretty ungainly looking mirrors that not too many people got excited about wanting.
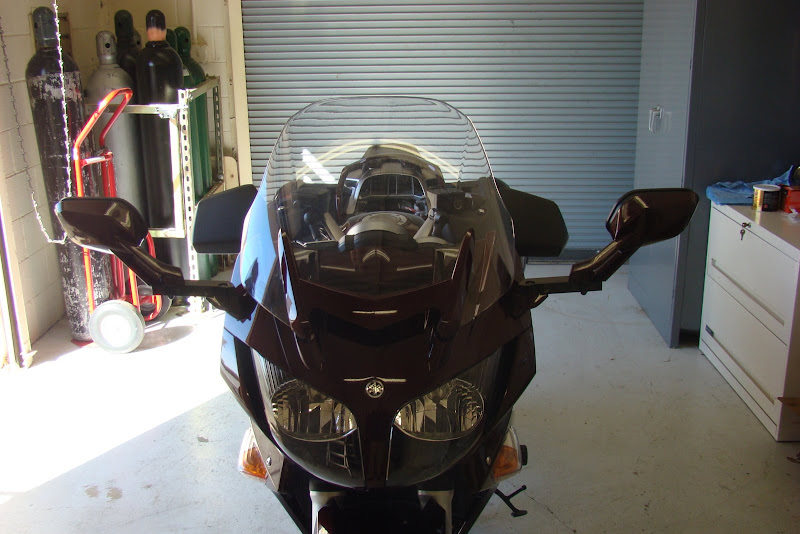
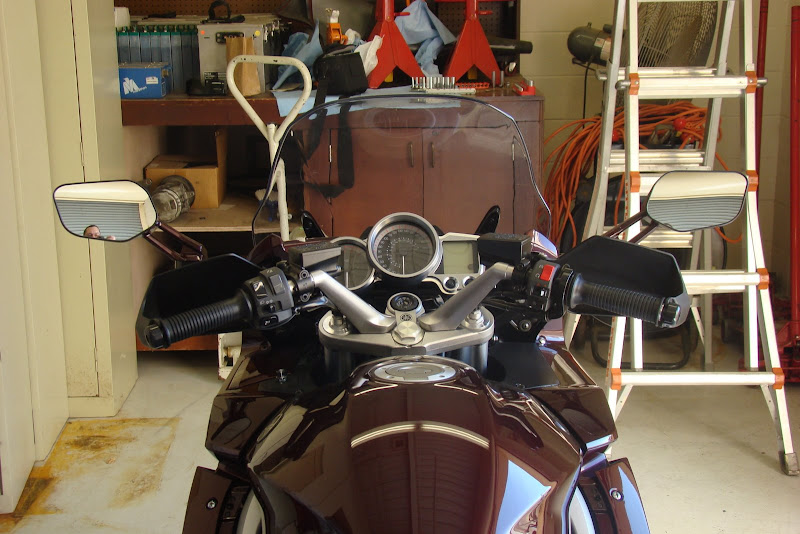
While our good forum farkle friend Dave (WynPro) is tied up in some ****** business (they are having some big septic issues at home) and will be away on vacation starting this weekend, we have bounced some ideas back and forth and got the plans and files from Joe. I figured that I would go ahead and make a prototype to help establish if my estimate of 2" spacing will be adequate.
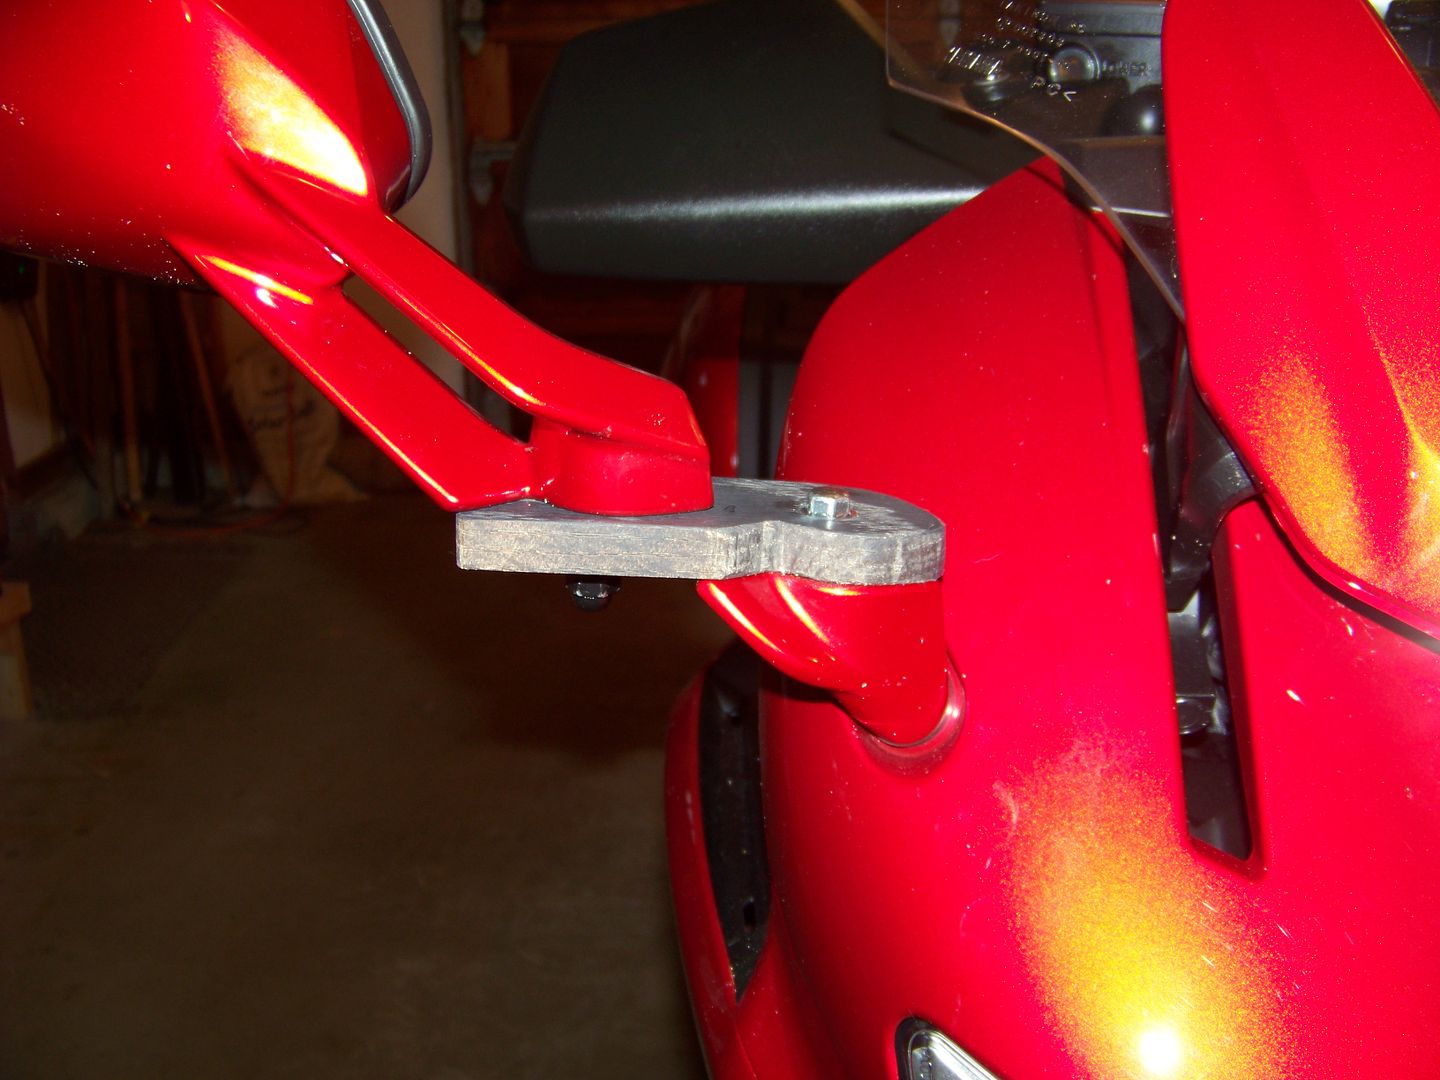
Since Joe's design spaced the mirrors out by 4 3/4", I just took an inch and a half out of the relativity straight center section of his bracket design and made myself a quickee prototype bracket to see how it would work.
Being that I do not have a milling machine, I just used some 1/4" Steel stock I had around (from making 1-off tools with) and drilled and cut the steel to the approximate shape.
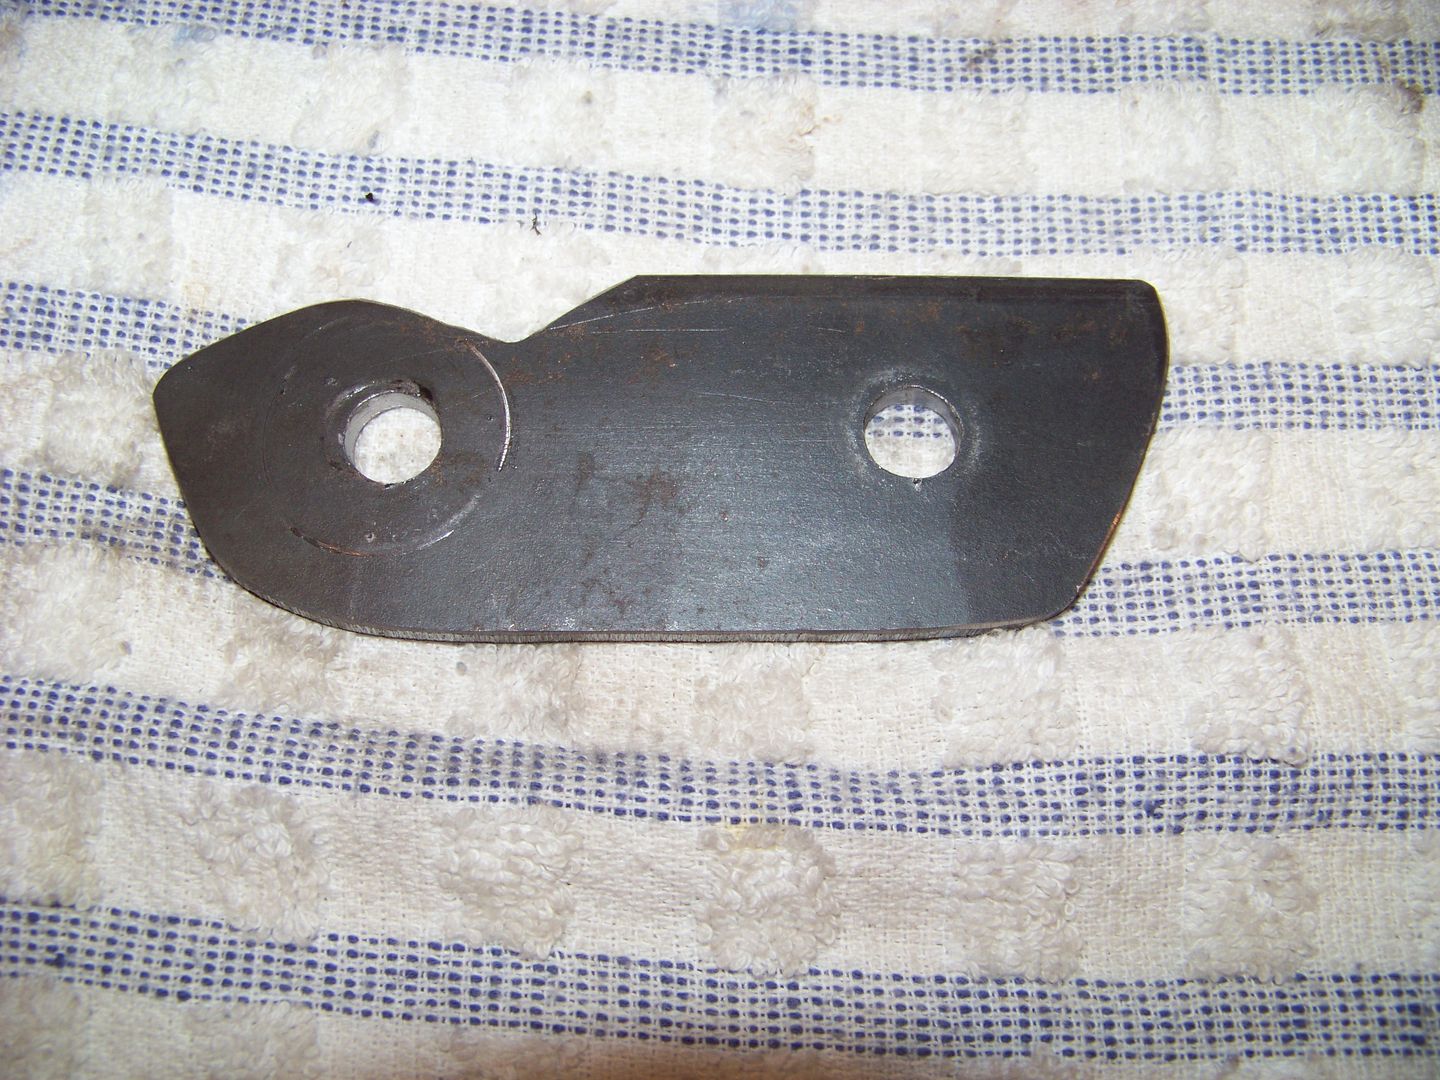
I did not bother drilling the three divots, to hold the steel ball bearings for the detents. I just dropped a bolt down through the bracket into the mirror base piece and installed the 8 belleville spring washers underneath to provide some tension. The final product will need to have the detent ball pockets.
There is also a small alloy tab that sticks down from the bottom of the upper mirror half that normally fits into a slot in the base. This is what limits the mirror from rotating in too far and hitting the faring when folded in. Unfortuantely I don't think it allows the mirror to fold in far enough for tight parking, so I would opt to eliminate that "feature" altogether, either by grinding the tab off the bottom of the mirrors (as I have done) or by milling a longer arc in the top of the spacers. The final product will likely have the latter.
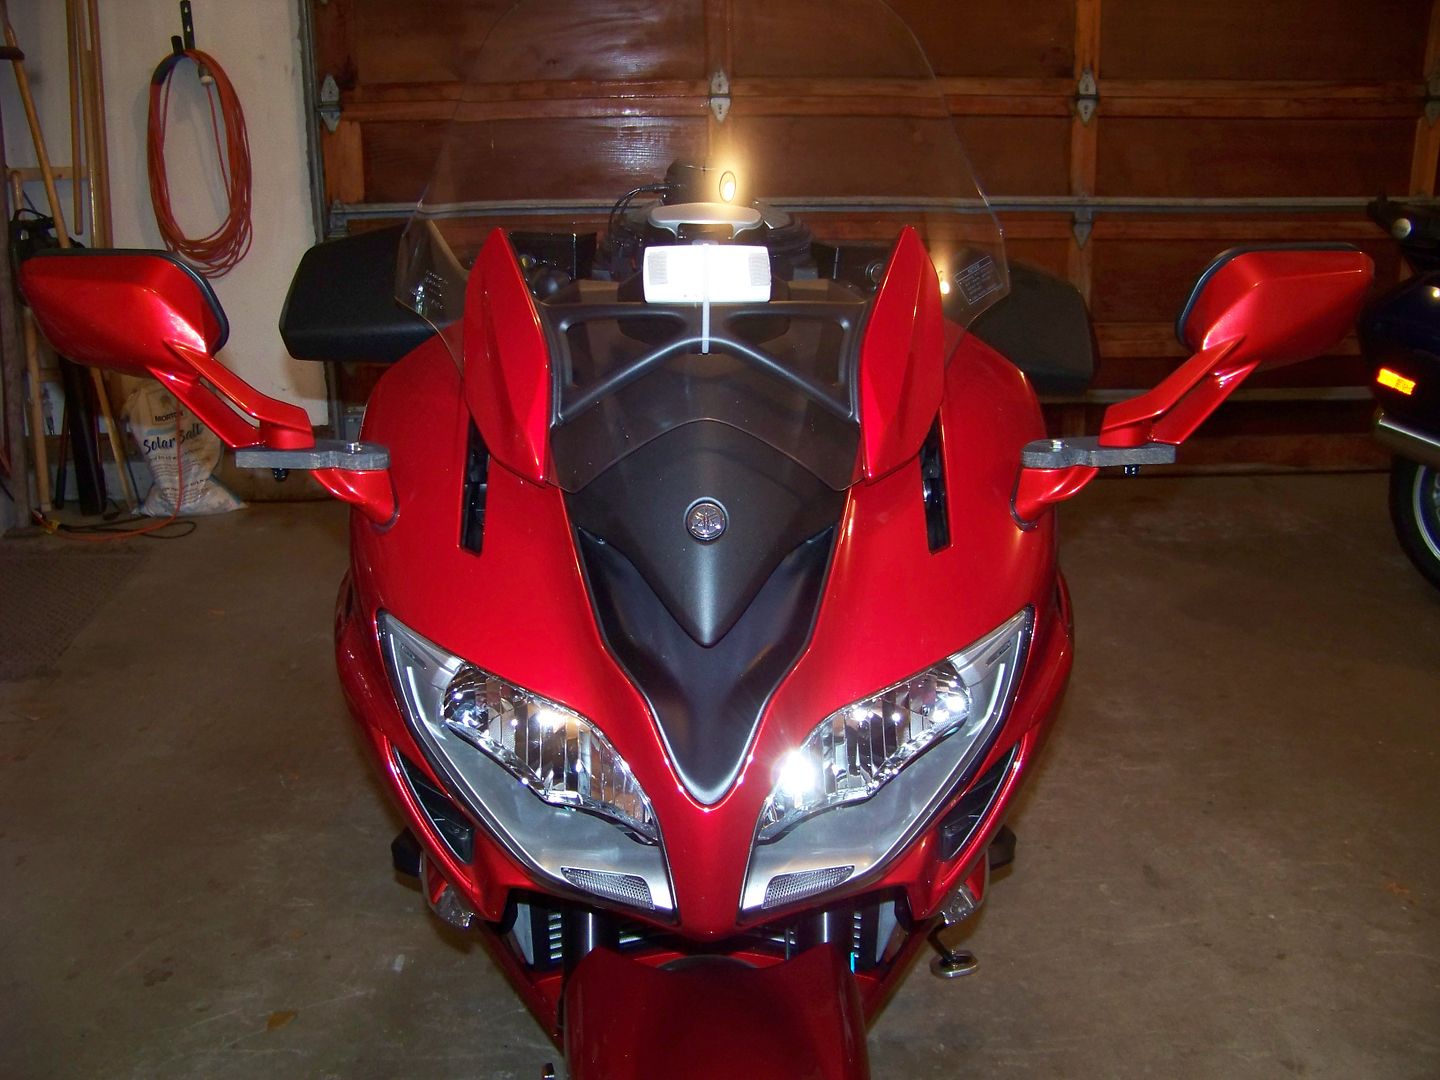
Anyway, here's what the mirrors look like on 2 1/4" spacers
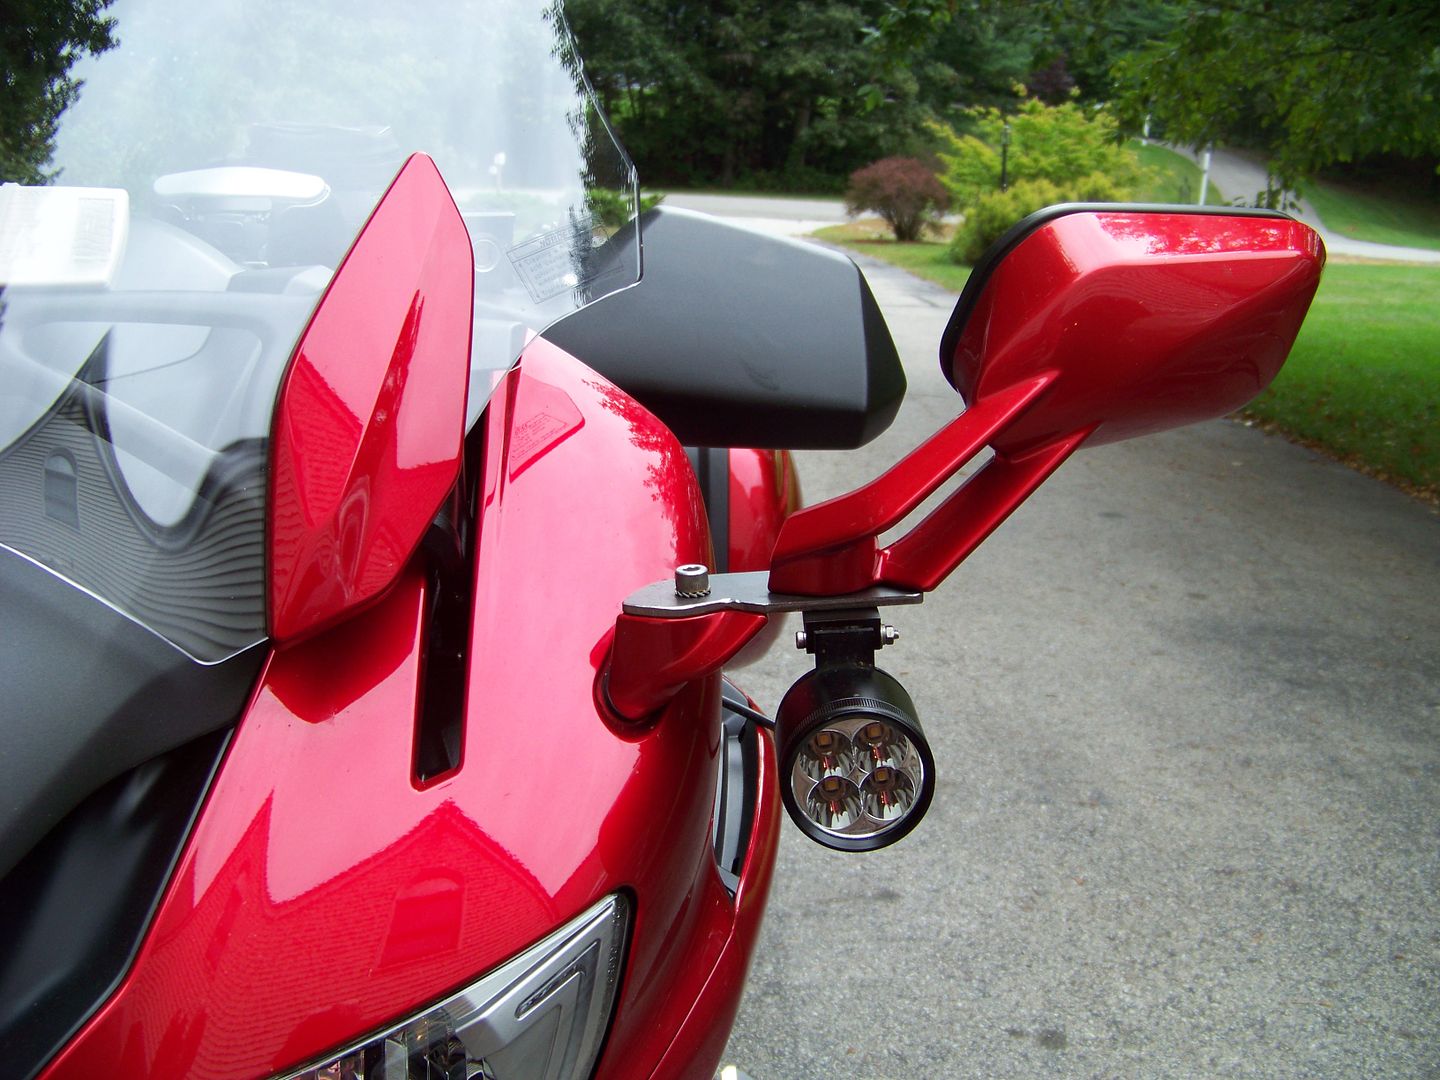
For these photos, the bracket for the LR4 is just pushed underneath the large nut that I uses as a spacer (to compensate for the relatively thin steel plate), Final product will be milled from thicker aluminum and the LR4 bracket will need to be drilled out and slipped onto the upper mirror half stud.
The upper mirror head will be fixed in position relative to the spacer (after selecting the optimum angle), and the inner joint will retain the detents and springs to pivot forwards or backwards.
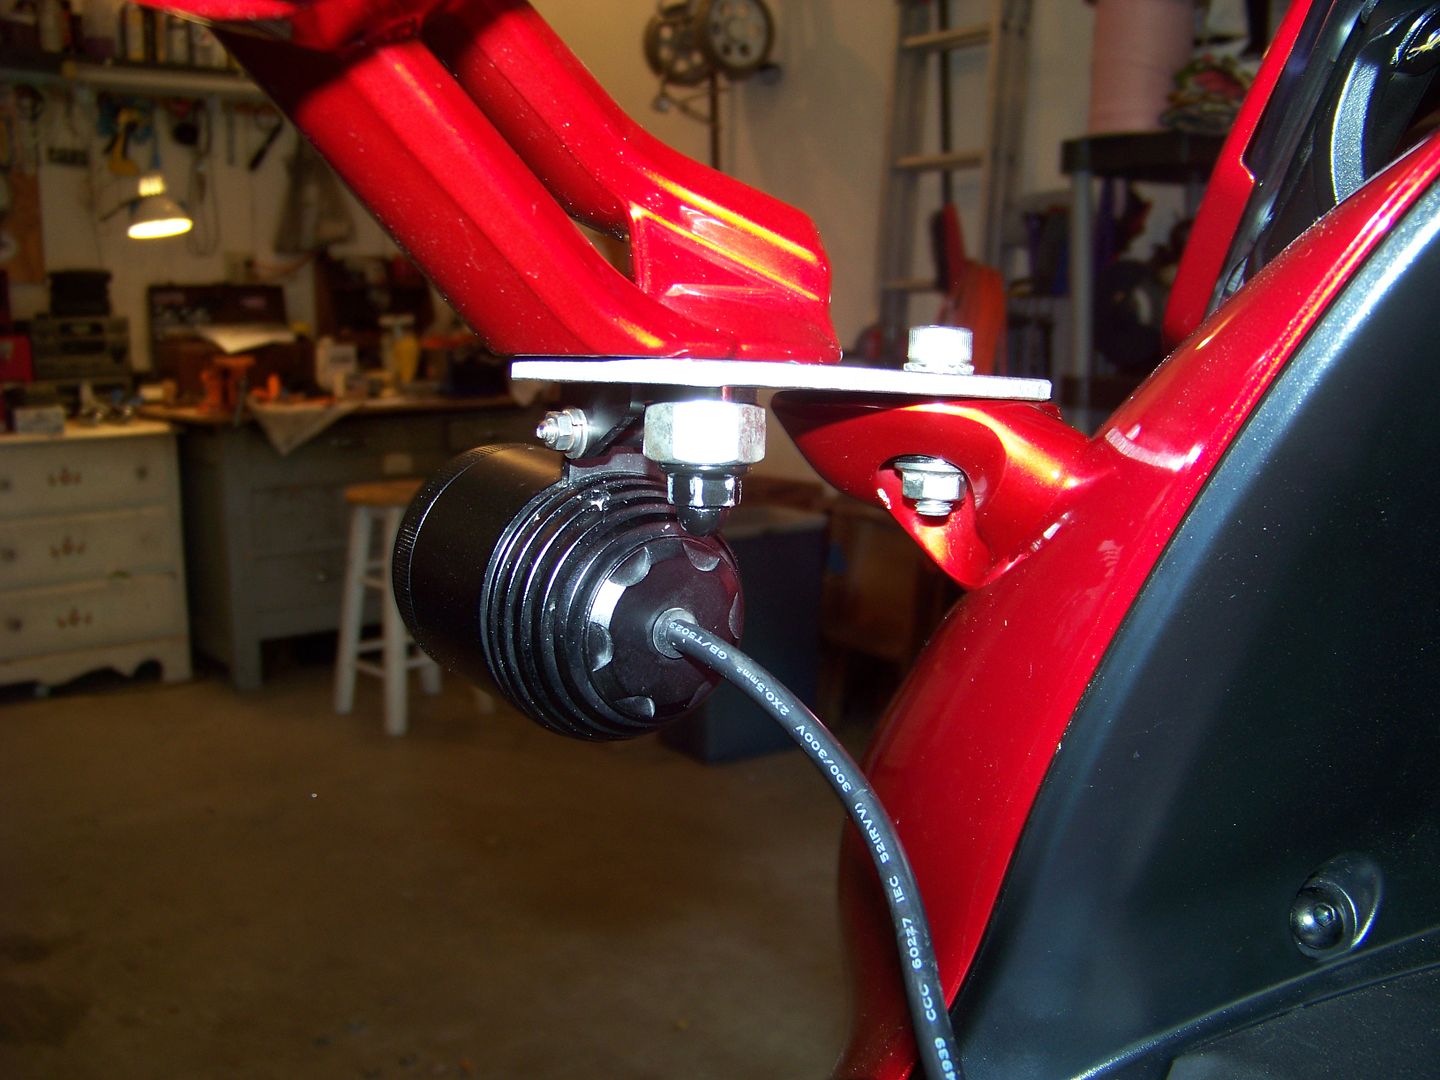
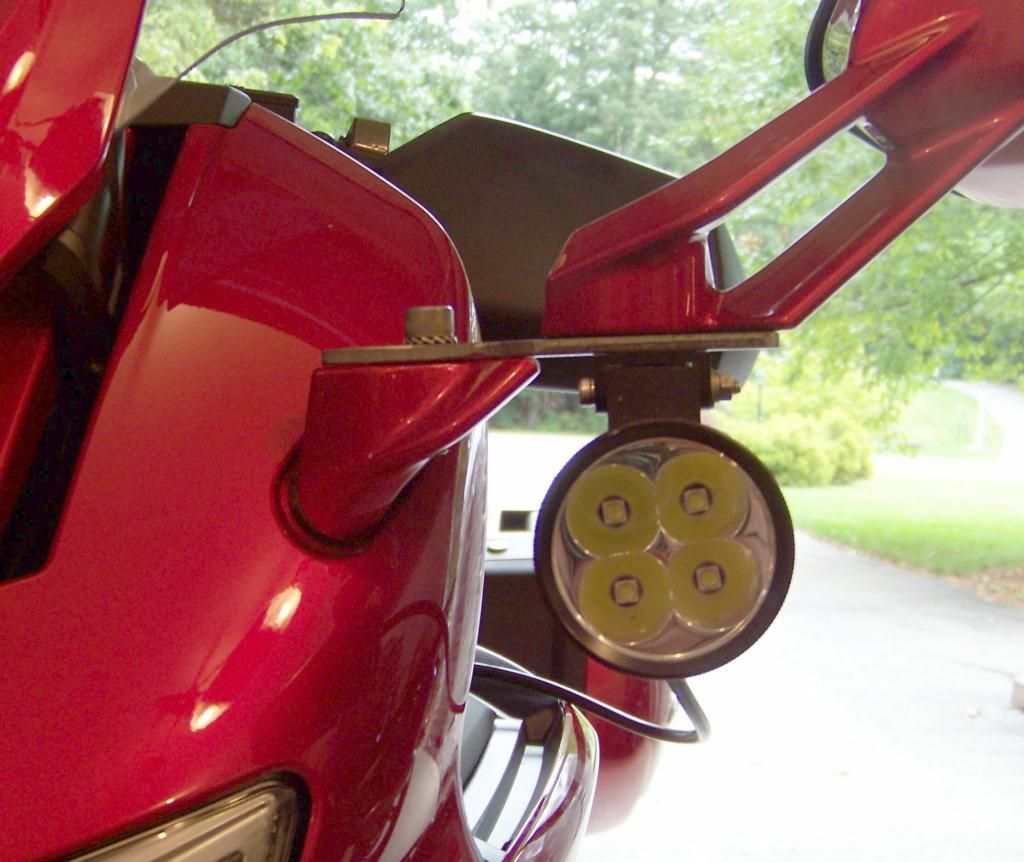
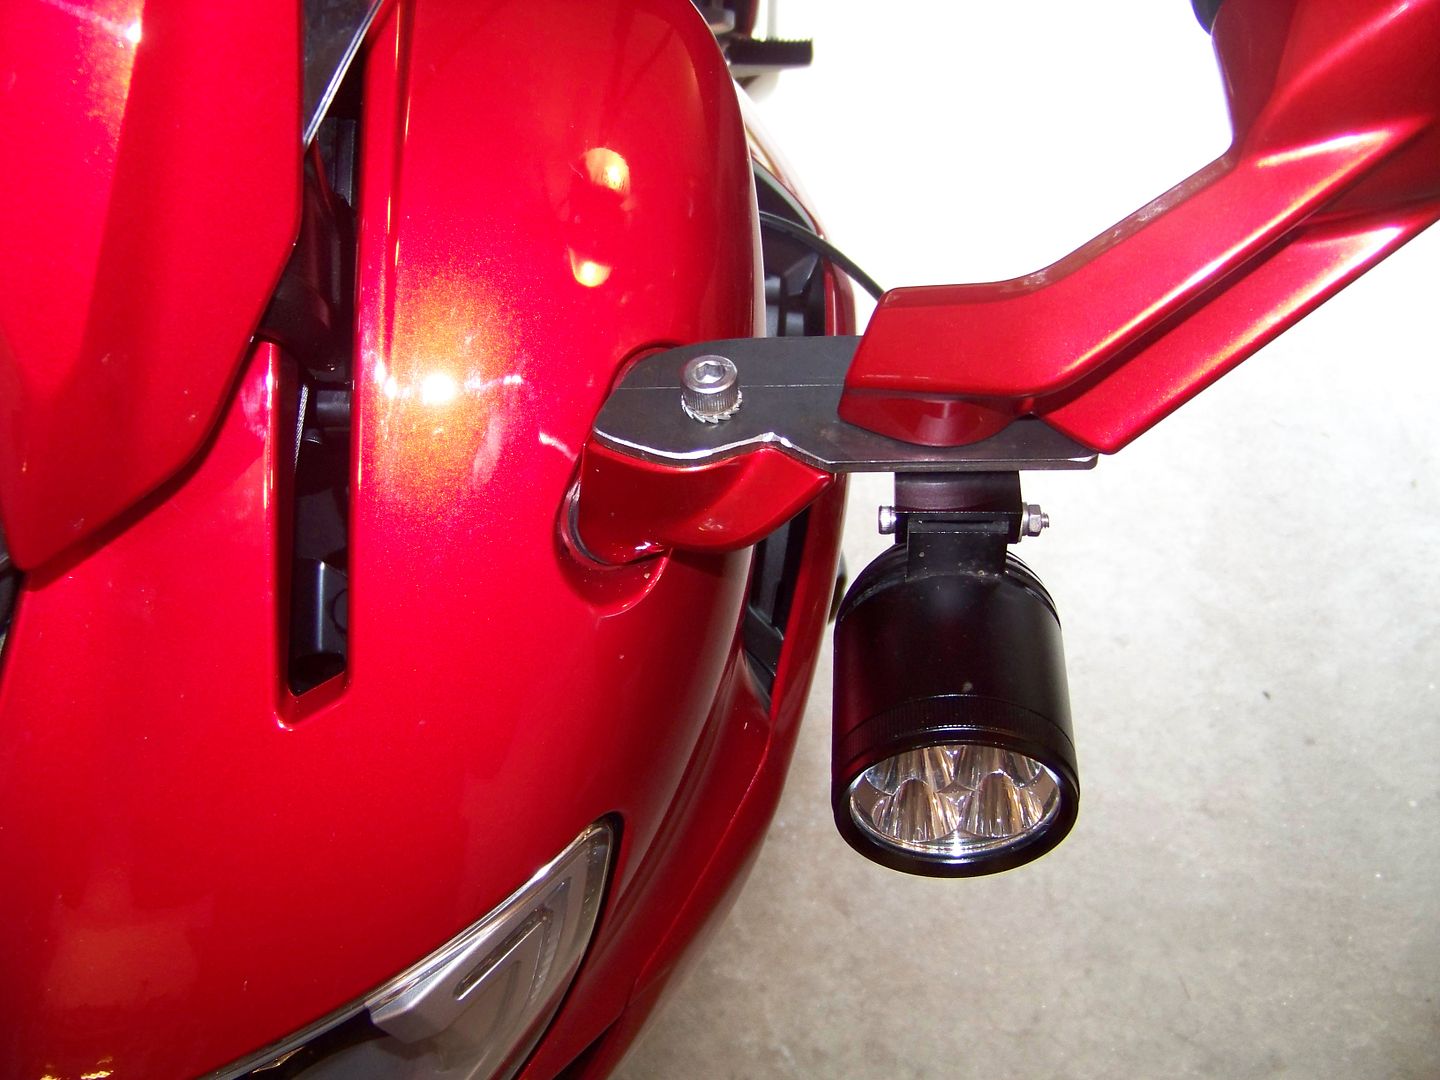
I think that this length of bracket is nearly perfect. When the spacer is thicker and formed to the curves of the mirror I think it will not look so klugey as the longer ones did. There is plenty of room underneath for the LR4's or even a slightly larger light head.
The rearward view is about as good as with FZ1 mirrors, but with the added advantage of having much larger mirrors, so you'll have a good shot of seeing both what is behind you and to the sides. As the final brackets will be a bit thicker, raising the mirror head by its thickness, that will also improve the rear view even more.
I may go ahead and try and duplicate the one bracket I made and run them on the bike for a while (without the LR4 lights mounted) just to be sure the spacing will be good.
Stay tuned. There is bound to be more to come.
Even on the test ride I was aware that I was getting a great view of my hands, arms and elbows (and not much else), nothing like the great rearward vision I had on my old 1st gen with the FZ1 mirror farkle. Now that I have added Vstrom handguards on my 3rd gen I really can't see much back there.
Let's look at some actual measurements to get an idea of what we need to accomplish. Using the 1st Gen with FZ1 mirrors as the gold standard, the mirror edge to edge dimensions on the two mirrors:
1st Gen w/ FZ1 Mirrors
Outside edge to outside edge is 44"
Inside edge to inside edge is 32 1/2"
On the 3rd gen mirrors (should be same on 2nd Gen)
Outside to outside is 37"
Inside to inside is only 24"
As a point of reference, the outside to outside dimension of the 3rd Gen bags is about 37"
The mirror heads themselves are much larger on the newer gens, and I think that the outside to outside is the most important gauge.
Based on the above, I'd estimate that we'd want to move the mirror heads each at least 2" outwards, so the total outside to outside dimension then would be ~ 41".
There are some mirror "spacers" and mirror stud extender kits available (SW Motech for example, below)

The problem with these kind of spacers is that you do not gain very much "outward" movement of the mirrors, since the bases are angled forward and up as much as out to the sides. So a 1" spacer may only net you about 1/2" of outward movement.
One might be able to use these spacers and sandwich one of the various aux light mounting brackets in between the spacer and the mirror base to clear the 3rd gen bodywork. I've not really investigated it fully because I don't believe it is an adequate solution.
Over 4 years ago a forum member at the time (Joe2Lmaker) designed and fabricated some mirror spacers that could be installed as an intermediate piece between the two halves of the 2nd gen pivoting mirror stalk. He documented his work in this extensive thread and produced some beautiful CNC machined alloy spacers that looked like this:

The goals he that was working towards was to space the mirrors out and also have room on the bottom of these brackets to hang the Soltek HID Aux lights, which were in vogue at that time. My goals are different as I only want to be able to hang a pair of the small 4-CREE LED lightheads (like the LEDrider LR4's that I already own) but I can definitely appreciate the artistry and efforts that went into his design work.
So, I contacted him directly, and have communicated with him (off forum since he no longer participates here) and he gave Dave Wynne and me his blessing to use any and all of his prior work to our best advantage. He even provided his CAD drawings and CAM files of the brackets that he had made.
As you can see, in order to provide enough space on the bracket for mounting the large diameter Solteks, he made his brackets ~6" long (end to end) which spaced the mirrors out ~ 3 3/4". This resulted in some pretty ungainly looking mirrors that not too many people got excited about wanting.


While our good forum farkle friend Dave (WynPro) is tied up in some ****** business (they are having some big septic issues at home) and will be away on vacation starting this weekend, we have bounced some ideas back and forth and got the plans and files from Joe. I figured that I would go ahead and make a prototype to help establish if my estimate of 2" spacing will be adequate.
Since Joe's design spaced the mirrors out by 4 3/4", I just took an inch and a half out of the relativity straight center section of his bracket design and made myself a quickee prototype bracket to see how it would work.
Being that I do not have a milling machine, I just used some 1/4" Steel stock I had around (from making 1-off tools with) and drilled and cut the steel to the approximate shape.

I did not bother drilling the three divots, to hold the steel ball bearings for the detents. I just dropped a bolt down through the bracket into the mirror base piece and installed the 8 belleville spring washers underneath to provide some tension. The final product will need to have the detent ball pockets.
There is also a small alloy tab that sticks down from the bottom of the upper mirror half that normally fits into a slot in the base. This is what limits the mirror from rotating in too far and hitting the faring when folded in. Unfortuantely I don't think it allows the mirror to fold in far enough for tight parking, so I would opt to eliminate that "feature" altogether, either by grinding the tab off the bottom of the mirrors (as I have done) or by milling a longer arc in the top of the spacers. The final product will likely have the latter.
Anyway, here's what the mirrors look like on 2 1/4" spacers

For these photos, the bracket for the LR4 is just pushed underneath the large nut that I uses as a spacer (to compensate for the relatively thin steel plate), Final product will be milled from thicker aluminum and the LR4 bracket will need to be drilled out and slipped onto the upper mirror half stud.
The upper mirror head will be fixed in position relative to the spacer (after selecting the optimum angle), and the inner joint will retain the detents and springs to pivot forwards or backwards.


I think that this length of bracket is nearly perfect. When the spacer is thicker and formed to the curves of the mirror I think it will not look so klugey as the longer ones did. There is plenty of room underneath for the LR4's or even a slightly larger light head.
The rearward view is about as good as with FZ1 mirrors, but with the added advantage of having much larger mirrors, so you'll have a good shot of seeing both what is behind you and to the sides. As the final brackets will be a bit thicker, raising the mirror head by its thickness, that will also improve the rear view even more.
I may go ahead and try and duplicate the one bracket I made and run them on the bike for a while (without the LR4 lights mounted) just to be sure the spacing will be good.
Stay tuned. There is bound to be more to come.
Last edited by a moderator:


