Manual Cam Chain Adjuster

Yamaha FJR Motorcycle Forum

Help Support Yamaha FJR Motorcycle Forum:

This site may earn a commission from merchant affiliate links, including eBay, Amazon, and others.
Here's an update on the APE front...

I got a call from the nice people at American Performance Engineering (APE). They have the first Manual Cam Chain Tensioner fabricated but not anodized yet. I should be getting it later this week (UPS) to try in my bike. They want to check form, fit, and function before they go into production. My bike will be down well into next week due to the painters, but I can bolt it up and see how well it fits in the tight space.

When it gets in, I would also like to try fitting it on a first generation FJR. If anyone near by is interested in helping out the cause, send me a PM. Perhaps we can temporarily install it on your bike to see how it works out. It will just be for a short time, I will need to send that unit back.

It's getting close! :clapping:

Brodie

Milpitas, California
 
Here's an update on the APE front...
I got a call from the nice people at American Performance Engineering (APE). They have the first Manual Cam Chain Tensioner fabricated but not anodized yet. I should be getting it later this week (UPS) to try in my bike. They want to check form, fit, and function before they go into production. My bike will be down well into next week due to the painters, but I can bolt it up and see how well it fits in the tight space.

When it gets in, I would also like to try fitting it on a first generation FJR. If anyone near by is interested in helping out the cause, send me a PM. Perhaps we can temporarily install it on your bike to see how it works out. It will just be for a short time, I will need to send that unit back.

It's getting close! :clapping:

Brodie

Milpitas, California
Damn, bro....wish I was closer.

I'm still down for #2.

Tell APE you can guarantee at least two buyers....you AND ME! :D

 
They say "idle hands are the devil's workshop."

They were right. I'm done working on the Feej tonight, and I was thinking abouit this manual CCT thread when an idea struck me.

A simple, easy to do way to convert the OEM auto into a foolproof manual.

Follow along.....

The weak-*** spring in the OEM serves two purposes: Primarily to extend the screw plunger into the chain case to take up slack as the chain wears. Secondarily, to prevent the screw plunger from retracting due to vibration, chain pressure, whatever.

Fortunately, Yamaha's design has already provided us with a screw mechanism to either extend or retract the plunger. So if you take the spring out of the OEM CCT equation, one could simply use the built-in screw function to extend the plunger as needed. Just like a manual, whether it's an aftermarket, like an APE unit, or a converted unit like FJRay's.

But the most important element of the equation is to prevent the plunger from retracting accidentally. Here's my idea...

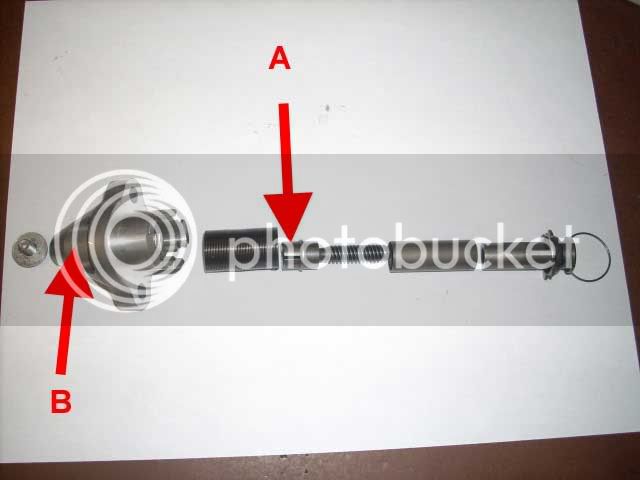
Looking at FJRay's picture from Post #1 in this thread, you can plainly see the slotted portion of the screw plunger base, Arrow A, that retains the spring as well as gives you a slot to turn the plunger externally to retract or extend the plunger.

cct13.jpg


Arrow B points the the depth the screw plunger extends into the entire assembly.

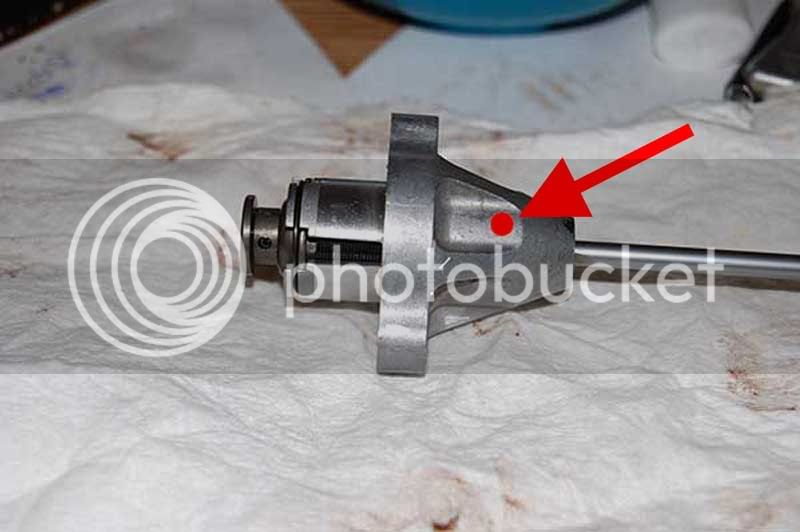
Now a closeup of the area Arrow B is pointing to:

cct12.jpg


Now here's the omigod simple solution to converting an OEM auto into an OEM manual --

Drill a small hole at the red dot, which is exactly at the depth the plunger sits, tap some threads in there, and screw in a small allen set screw. Pull out the spring, manually set your screw plunger and lightly snug down the set screw.

There is NO rotational stress on the plunger at all, so the set screw would only have to be tightened just enough to contact the base of the plunger to keep it from rotating due to vibration. No need at all to "crank it down" and risk stripping your tapped hole. A drop of locktite on the screw for security and you're done.

Chain starting to rattle? Pull the access bolt out of the exterior end of your now-converted CCT, loosen your set screw a 1/4 turn, give the CCT plunger a little CCW twist to extend it to take up the new chain slack, and snug the set screw back down with a fresh drop of locktite on it.

Don't trust a single set screw? Drill and tap two of 'em.

Now you might be thinking "Howie, would you trust it?" Yep. More than the clockwork spring, that's for sure.

And you might be thinking "Howie, would you buy an APE manual instead?" Yep. But I'd modify my OEM and have a spare just in case.

Thoughts?

 
Doesn't the spring go over the part A when installed?

How would the set screw make contact with part A?

Or would you be tossing the spring altogether?

One attribute for a manual CCT would be a fairly fine pitch thread to make small adjustments in length easier. The stock "thread" look very course.
 
Last edited by a moderator:
Yes, the spring goes over Part A. If you look in the end of the spring, the last turn of the spring is bent 90° and crosses the center of the spring. This cross piece goes in the slot of Part A leaving the spring in this location:

CCTSpring.jpg


The B Arrow in RadioHowie's post shows the set screw contacting the bare head of the screw. If that set screw is all that would be holding the CCT threaded screw in place I would want to use at least red loctite on it!!! I would also want the end of the set screw to have some kind of checker pattern cut in it for better grip.

The pitch of the thread won't matter much because you are tightening to a tension spec, not a dimensional spec. On the new CCTs that I've played with the spring tension is in the neighborhood of 150 grams of force. You would be turning the screw until the screw achieves 150-200 grams of force on the cam chain slipper. Too little force and you get the big bang valve action, too much force and the chain slippers will wear forcing you to keep chasing the adjustment. The extra force wouldn't be too cool on the rest of the cam chain system either.

The early Connies had a ratchet and pawl adjuster. To achieve small tension adjustments (like the FJR needs) the teeth were small and closely spaced. This proved to be a Bad Thing allowing the pawl to skip teeth, leading to a recall. Because the FJR CCT extends 1/4 inch or less over its lifetime, a ratchet and pawl adjuster would have to have small teeth which is proven to be a bad idea. By using a screw adjuster like the one FJRay is suggesting, all you have to be concerned with is setting the correct pressure on the chain slipper. It is then up to the rider to vigilantly monitor the cam chain for changes in noise. How much noise resolution do your ears have?

 
Last edited by a moderator:
Another reason to use a new housing, specifically designed to function as a manual CCT is that stinkin' bolt that plugs the end of the OEM CCT. I assume it keeps dirt from getting in and is needed even if you convert the CCT to manual. An after market manual CCT should be adjustable by just using a screwdriver or hex key or whatever, no need to remove a small plug, drop it inside the frame, fish it out, repeat.

The APE CCTs also look a lot smaller than the OEM, so it should be easier to install.

I am looking forward to seeing some pictures of the APE unit.

 
Doesn't the spring go over the part A when installed? How would the set screw make contact with part A?

Or would you be tossing the spring altogether?

One attribute for a manual CCT would be a fairly fine pitch thread to make small adjustments in length easier. The stock "thread" look very course.
Fred,

I felt the need to clarify my idea because of your questions and a bit of confusion Alan may have added with his answer to you that "Yes, the spring goes over Part A" so I took some more pics to better illustrate what I'm trying to get across.

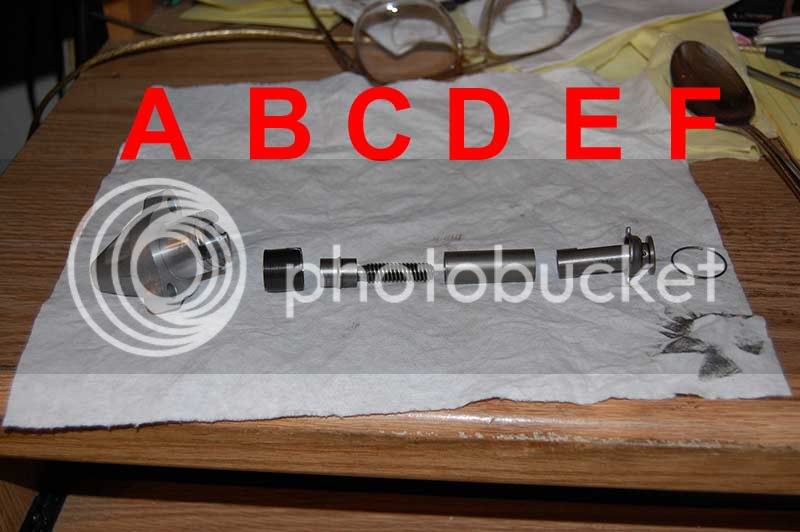
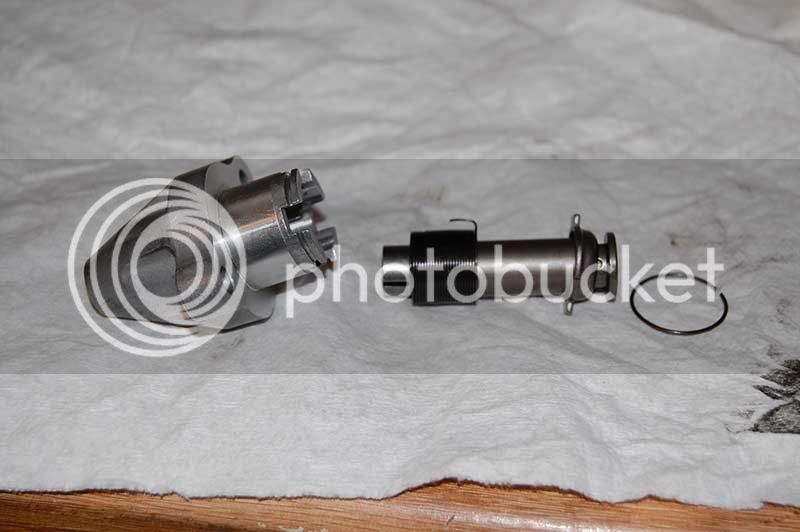
The CCT in the exact order of assembly:

cct14.jpg


The actual adjusting screw, "C", sit's inside a metal sleeve, "D", and screws into the plunger, "E", that contacts the cam chain slipper and pushes it to maintain tension.

Taking a close-up look at the next picture, you see the interior mechanism of the CCT assembled. Part C passes through the sleeve, part D, and screws in to the plunger, part E. Then the spring is slid over the base of the assembled plunger mechanism with one end of the spring engaging the slod in part C. You can see in this picture a "hook" at the right end of the spring (in this orientation of the picture) which hooks into a slot on the main CCT body. So one end of the spring is "trapped" in the base of the "screw" while the other is "trapped" in the external shell. Twist the screw (the slot in part C) with a screwdrive and the spring winds up. Release the screw and the spring torsionally twists the plunger back out, extending the plunger.

cct15.jpg


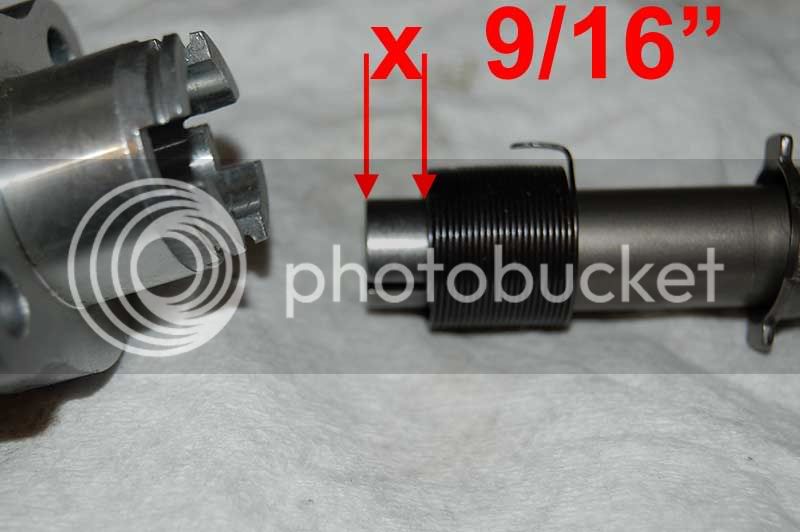
But in an even tighter closeup, you see the spring, while sliding over part C, actually rides on the sleeve, part D, leaving "X", 9/16" of the base of the plunger exposed, which corresponds with the ridge you see near the base of the screw. That ridge serves as the base of sleeve D when everything is put together.

cct16.jpg


Then, when the interior mechanism is placed in the housing, the portion "X" in the previous photo sits where I placed the red dot in this photo:

cct12.jpg


So there's plenty of material for a set screw to contact the "X" portion of part C. In my scenario, the spring isn't even put back in the unit. It's not needed anymore, since the plunger will be adjusted manually. The person adjusting the plunger becomes "the spring". And there's no risk of the plunger accidentally "backing out", allowing dangerous slack in the chain (unlike the weak spring) since you've locked the plunger in place with a set screw.

Just for a side note, in FJRay's "redesign" he uses a bronze bushing drilled longitudinally for his adjust screw to pass through. In my scenario, you just use the OEM internals, MINUS the spring, and lock it in place with a set screw on the housing rather than a lock nut on the long screw used to replace the OEM screw adjust mechanism. Part D, the metal sleeve, is really there to serve two purposes...the give the spring a place to sit, and to keep the adjuster screw C and plunger E centered in the mechanism.

To answer your question about the coarsness of tthe plunger threads, yes, a finer pitched thread would give you more control, but it's not like you're trying to adjust a vernier caliper. You're just screwing the plunger in until it contacts the chain snuggly. That's all the spring in the OEM design does...it extends as far as the plunger can go, but with a fairly weak "twist" on the screw, so overtightening with the OEM design isn't likely to happen. With ANY manual design, it's not how much distance control you have over the screw, but how tight you screw it. To best duplicate what the OEM spring does, you'd simply NOT tighten more than finger tight.

Hope this clears things up a little bit.

'Howie

 
Another reason to use a new housing, specifically designed to function as a manual CCT is that stinkin' bolt that plugs the end of the OEM CCT. I assume it keeps dirt from getting in and is needed even if you convert the CCT to manual.
I'd say it serves more of a purpose to keep oil in, rather than dirt out.

An after market manual CCT should be adjustable by just using a screwdriver or hex key or whatever, no need to remove a small plug, drop it inside the frame, fish it out, repeat.
Absolutely correct. The APE unit, as shown on their website and various places around here, certainly adheres to the K.I.S.S. principle. No doubt about it. Elegant in its simplicity.

The APE CCTs also look a lot smaller than the OEM, so it should be easier to install.
Again, couldn't agree more. Probably fit right in from the top, under the TPS, rather than wrestling in from underneath and having to remove the idle adjuster mechanism.

I am looking forward to seeing some pictures of the APE unit.
I'm looking forward to BUYING an APE unit.

I don't at all suggest that my conversion theory of the OEM auto to manual is any shape or fashion a better alternative than a purpose built item. But just like FJRay, who started this whole conversion idea, I was just "blue skying" an idea on another way to do such a conversion. If there's one thing I've learned from this forum, sharing ideas and knowledge is a GOOD thing. :)

'Howie

 
Yup. I got it.

I'm still not sure that a set screw holding it is any more secure or reliable than a lock/jam nut, but I understand your premise now.

Thanks

 
The question that remains in my brain is just how tight to adjust the chain. That is one reason I added the spring in the second one. It probably doesn't matter whether it is there or not. It is known that the tensioner moves very little throughout the life of the unit. When I install mine I plan on picking a spot for installation and then start the engine and back it off until I hear noise and then tighten it up until quiet and then a bit more to preload the spring. I think I will mark it after I lock it in place and record how much preload it took and compare that when adjusting a few thousand miles later.

I guess nobody will know until the first few are installed and we see if it explodes or stays together and then find out how long between adjustments.

 
Yup. I got it.
I'm still not sure that a set screw holding it is any more secure or reliable than a lock/jam nut, but I understand your premise now.

Thanks
Probably NOT any more secure or reliable. Just suppositioning a different way to climb the same mountain. :)

 
Just suppositioning a different way to climb the same mountain. :)
Rodger that.

The other thing to consider is how much the chain "grows" as it warms up to operating temps. But I'm guessing this is moving into the analysis to paralysis phase... :blink:

Personally, I think as long as you take all of the slack out when cold, you'll be fine.

I would definitely not slacken it further while the engine is running to create noise as you also risk loosening it just a bit too much with only a minor slip of the wrist. I believe that was the situation in one of the 3 famous engine lunch-outs.

 
Last edited by a moderator:
The question that remains in my brain is just how tight to adjust the chain.
THAT is the $64,000 question. Or $6,000 if the answer is wrong!

...start the engine and back it off until I hear noise...
Now that there just doesn't sound like a good idea to me. Nosiree Bob. er, Ray. Not a good idea.

May I remind you.....

day_02a.jpg


Last edited by a moderator:
The question that remains in my brain is just how tight to adjust the chain. When I install mine I plan on picking a spot for installation and then start the engine and back it off until I hear noise and then tighten it up until quiet and then a bit more to preload the spring. I think I will mark it after I lock it in place and record how much preload it took and compare that when adjusting a few thousand miles later.

I guess nobody will know until the first few are installed and we see if it explodes or stays together and then find out how long between adjustments.
The cam chain will "whine" when running too tight.

Maybe better would be: tighten to "whine" and then back-off to "silent"? :unsure:

Many years of m/c manual cam chain adjusters have used a compression spring in the lock-nut style adjuster to exert the prescribed (by the factory) pressure on the chain (when the tensioner bolt is freed by lock-nut assy). Often, a certain place in crankshaft rotation is assigned.

In previous years (B.A.A. -- before automatic adjusters), cam chains were adjusted when they were noticed to be "noisy" or during 'periodic, scheduled, maintenence'.

 
On my DRZE thumper with a manual CCT I will start it ,warm it up , back the tensioner off slightly ,until I hear chain ticking ,and turn back in until noise is gone ,and am good to go for the summer of trail riding. If you don't get carried away on the backing off part, you won't have a problem.

 
Just to ask the question, would it simply be better to replace the OEM unit every 20k miles? Pre-planned maintenance? Hell, one tire costs more than a CCT..

 
Just to ask the question, would it simply be better to replace the OEM unit every 20k miles? Pre-planned maintenance? Hell, one tire costs more than a CCT..
Better? Unknown at this point since we have no data on how well a manual adjuster will work. Every 20k is probably overkill, but I did have one go south at only a little more than that, with the original lasting 60k or so before becoming noisy. Perhaps every 30-40k might be more reasonable, unless noise becomes apparent.

Honestly, this isn't really a big problem if you simply replace the CCT when you start hearing noise. The problems have come from people screwing around with the CCT instead of replacing it. (Sorry guys, just calling it like I see it). We know the stock CCT is not adjustable in any manual sort of sense. When it stops doing it's thing automatically, it's time to yank it out and install a new one. Howie and the others are here to tell us the uselessness of playing with it or cleaning it or attempting a manual reset. It's been a painful lesson to learn, but now we know.

 
Just to ask the question, would it simply be better to replace the OEM unit every 20k miles? Pre-planned maintenance? Hell, one tire costs more than a CCT..
Don, I was thinking the same thing. Perhaps at the 26K service? Does it make any sense to go ahead and also change the chain while you are at it? I guess the downsides are:

1) You may be replacing a perfectly good and servicable part for nothing

2) Possibly spending money unecessarily

3) Replacing a servicable part unknowingly with a defective CCT

4) No matter the outcome after changing the CCT, until the next replacement of the CCT (failure or no failure), you will never know if you did the right thing.

 
Last edited by a moderator:
Top