Gen II ground spider discussion (bench racing)

Yamaha FJR Motorcycle Forum

Help Support Yamaha FJR Motorcycle Forum:

This site may earn a commission from merchant affiliate links, including eBay, Amazon, and others.
Step 1: Build one "5-INTO-1" repair spider connector as shown below and install it when I lift the tank to replace spark plugs. I just happen to have a spare spider and cap from the damaged portion of the front cowling harness so I can prepare the spider with ground lead prior to tearing into the bike. It wouldn't take long to make one once the bike is apart though. I will not know exactly where to ground it on the chassis until I open it up, so [SIZE=12pt]I will solder on a long length of wire[/SIZE] so I can cut-to-fit and crimp the ring terminal during installation. I'm in need of a spark plug change in the very near future so this will be an opportune time to do this step. This extra ground wire helps reduce the current flowing through spider S4-Pin3, the actual battery ground, where I believe the true trouble lies. This will eliminate a majority of the meltdown risk.
Solder is not recommended for use in vehicular wiring harnesses because it is brittle which is why everything is crimped.

 
Last edited by a moderator:
Step 1: Build one "5-INTO-1" repair spider connector as shown below and install it when I lift the tank to replace spark plugs. I just happen to have a spare spider and cap from the damaged portion of the front cowling harness so I can prepare the spider with ground lead prior to tearing into the bike. It wouldn't take long to make one once the bike is apart though. I will not know exactly where to ground it on the chassis until I open it up, so [SIZE=12pt]I will solder on a long length of wire[/SIZE] so I can cut-to-fit and crimp the ring terminal during installation. I'm in need of a spark plug change in the very near future so this will be an opportune time to do this step. This extra ground wire helps reduce the current flowing through spider S4-Pin3, the actual battery ground, where I believe the true trouble lies. This will eliminate a majority of the meltdown risk.
Solder is not recommended for use in vehicular wiring harnesses because it is brittle which is why everything is crimped.
Tell people that all the time and they just won't believe me (Patriot). Allot of us don't keep vehicles long enough for it to be a problem, for us (as in me), anyway.

 
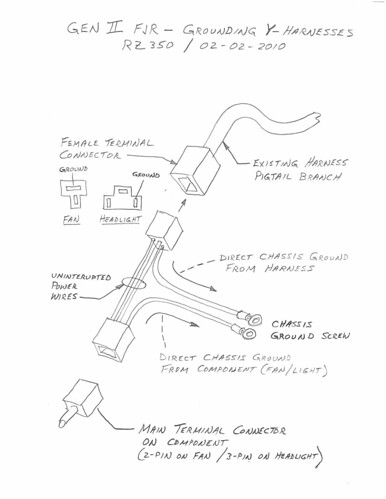
Here's a repost from the Poll thread of an idea I came up with after seeing RZ350's spider chart, and reading replies from others.

Looking at the FSM wiring diagram, and looking at the wiring on the bike. It looks to me like the black wires (in the diagram) that end with one line threw the end is a spider, and where 2 wires meet to look like a splice may also be a spider.
Also I only see 3 chassis grounds.

-neg battery cable

-starter

-ABS ECU

So everything else is going threw a spider. And we know the BLACK WIDOW is the one that all other B spiders go threw. So all lights, fans, shield drive etc. are going threw it.

This is worse than I thought, because of the fans. I didn't think to check them until it was mentioned. I just assumed (I know) they would go to chassis with something like that. While we're on the subject, how many amps do the headlights and shield drive draw ?

Here's an idea. ;) Maybe good , maybe not so good. Check it out and let me know.

So maybe if someone didn't want to mess with the spiders they could remove the original grnd wires from the fans, ground the fans to the chassis by making up 2 new wires, then hook the original 2 fan grnd wires (previously removed) to the chassis. This will take the fans out of the equation and add 2 chassis grnd wires to the S4 (BLACK WIDOW) spider without modifying it.

Then they could tap into the Acc. jack or the glove box grnd wire or both, then run them to chassis also. This will add 1or 2 grnd wires to the S6 spider, and should take care of the headlights and shield drive.

I think that would take care of the overload situation. Of coarse they would still have to clean, and grease all the spiders once a year.

I couldn't have come up with this idea if not for RZ350s excellent chart of what goes where. Thanks RZ

More food for thought; A.C.
I think it will go to the root of the problem (overload), and eliminate it at the source.

Then RZ350 improved my idea of eliminating the fans and headlights (instead of the Acc. jack) by using T-Harnesses.

Here's a repost of that idea from the Poll thread

4326460400_a7a27b2af2.jpg
Interesting. However, you don't say that you are going to provide a ground wire for the S6 Spider, the one on the left side near the glove box, yet I think at least one owner reported that this connector failed, too. Will you solder a ground wire to that one?


By grounding the headlights to frame he is taking them out of the "chain" and lowering the current threw the S6 spider.

And by grounding the harness end to the frame at each light he is adding 2 more ground wires between the frame and S6 spider.

So after it's done the current going threw the S6 will be lower, the S6 spider will have 2 more wires going to the frame, and one wire (the original) going to frame threw the S4 spider. This should bring the current going threw both spiders way down.

I would prefer this approach because it is lowering the current on the overloaded spiders and the wiring. Instead of fixing the spiders and hoping the wiring is capable. It is dealing with the overload at the source, instead of down steam. And it is done without altering the factory harness.
IMHO I think this may be the easiest and none obtrusive way to fix the spider issue.

-It requires no solder.

-It goes to the root of the problem

-NO harness mods, just plug in T-harnesses that can easily be removed

-NO spider hunting, the S7 & S8 are very hard to get to, and the S4 is easily seen under the tank but very hard to get to.

-Get the parts from Eastern Beaver and make T-harnesses ahead of time, or maybe one of us will offer them here

-The light T-harness will be no harder to install then changing the bulb.

-The fan T-harness will require removing the lower fairing, which has to be done anyway and only takes about 15 minutes.

Of course all of this is just bench racing. We should leave the bikes alone and wait for Yamaha to fix this, if it's a problem. I'm confident that if there is a problem that Yamaha will take care of it. Until then keep your spiders clean and well nourished with dielectric grease, they like that stuff. And please no Yamaha bashing, because that really won't help anything.

edit; Brodies 6 connector harness will fix the issue just as good, but will require taking more of the plastic off to get to all the spiders.

 
Last edited by a moderator:
Wow... I've read and read and I see three basic approaches here and I'm trying to decide which is the easiest as I think they are all adequate fixes. Let me see if I can regurgitate the three approaches in simple terms.

1. Brodie's god like grounding harness augment... probably the hardest in terms of pure work hours to install but also probably the surest fix.

2. Rip apart the S4 and maybe the S6 spiders and solder the ground wires together and run heavier gauge wire to the battery... definitely tears up the original harness.

3. T into the light and fan connectors (where do you get the parts for those connectors??) and dump their grounds straight to the frame thus eliminating their current load from the factory grounding harness (oh, and BTW providing another path to ground for everything connected to that grounding harness thus reducing the current flow across the entire harness)... This seems to be the easiest and quickest solution.

So... number 3 appears to be a good choice to me... but what are the part numbers or source for those connectors? They're not the 6 Position 090 MT-SP-A Connectors right?

 
I installed Brodies harness this past weekend. It took all of 2 1/2 hours. In 4 hours I installed his grounding harness, ignition harness, and replaced my J&M CB unit. Not a bad days work and not that hard at all.

 
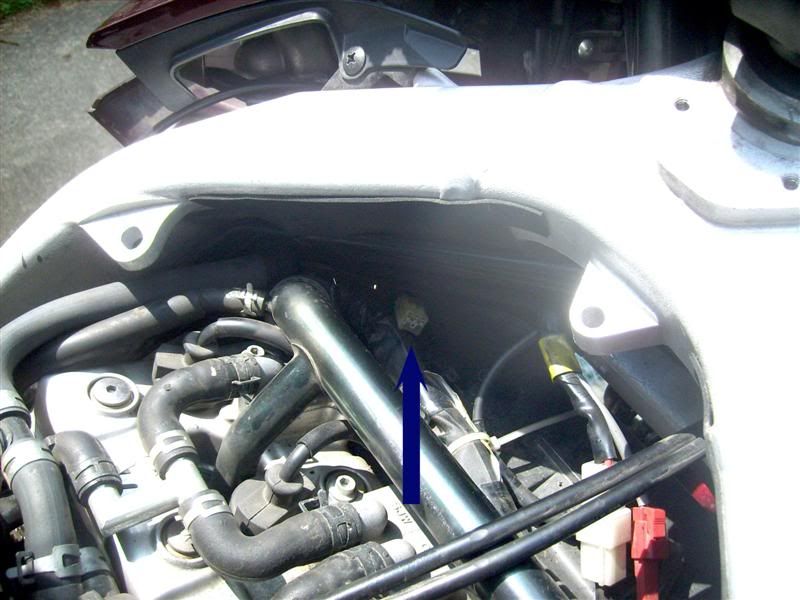
Is there a picture of where this thing is at on the bike?
I have the same question. I have spent the past few hours reading up on the S4 problem, then went out and took off a bunch of my plastic. Is this the famous S4 Black Widow (with the cap off and the shiny aluminum spidery thing in it)? There is no way I could get in that tiny area and clip it off and solder or crimp that.

S4maybe1M.jpg


Last edited by a moderator:
You got it Marty.

The proximity of that spider, and many others, is one of the reasons I came up with the spider overload harnesses that I'm offering. With these harnesses you need to locate both fan and both headlight plugs. No spider hunting.

Brodie's harness would also be a plug and play deal, just plug into the spider plugs, although you have to locate all the spiders.

Art

 
You got it Marty.
Art
Thanks Art!

I found another one behind the left headlight, two under the right fuel rail / tube / thing, those 4 were shiny clean new looking, no hint of deterioration. With 37K miles do I need to worry soon?

Would be nice for us of limited mechanical ability and less electrical diagram understanding to maybe have a photo of the bike and point to where those little bastiches are so we know what to take off to look and which ones are which? Took me a long time to find the Black Widow and I had several descriptions to follow.

Anyway, after reading those many pages of probable causes investigations and the corrective actions kudos on y'all for the workable solutions.

 
Last edited by a moderator:
I've been waiting on Yamaha to come up with a fix for this but Canucklehead's failure of 2 spiders this week and a friendly nudge on the topic got me looking into this again.

Plug and play is very nice, and being reversible is all very nice but I'm a cheap *******. I'm thinking that just PosiTapping into the ground wires of the fans and headlights to provide the additional ground paths would provide the same effect as the RR harnesses and would cost me under $10. Other than the additional labour to install and pinholes in some ground wires if I ever un-install it, does anyone see any other drawbacks of my cheap-*** approach? :unsure:

 
I've been waiting on Yamaha to come up with a fix for this but Canucklehead's failure of 2 spiders this week and a friendly nudge on the topic got me looking into this again.
Plug and play is very nice, and being reversible is all very nice but I'm a cheap *******. I'm thinking that just PosiTapping into the ground wires of the fans and headlights to provide the additional ground paths would provide the same effect as the RR harnesses and would cost me under $10. Other than the additional labour to install and pinholes in some ground wires if I ever un-install it, does anyone see any other drawbacks of my cheap-*** approach? :unsure:
Nope, that'll work. The posi-taps wont have as strong a connection but should be fine. Just make sure you get the right wires or you're in for a surprise.

 
Nope, that'll work. The posi-taps wont have as strong a connection but should be fine. Just make sure you get the right wires or you're in for a surprise.
My experience is that a properly installed PosiTap, which included using the appropriate size Tap, provides a great connection. Another benefit is this approach elimiates adding 20 crimped connections and 10 spade connections in the connectors (weak points.)

Thanks for the tip! Finding the right wires is pretty easy but I always double check after a tap just to be sure! ;)

 
I'm not a fan of posi-taps because they compress the wiring, which can lead to fracturing of the conductors; Actually, what Yamaha did was not bad, as far as it went, but they SHOULD have used waterproof connectors and heavier gauge wiring.

Not having checked the specification for the ones they used I don't know if they are rated for the 40+ amps the S4 Spider has running through it . . . . . if not, then that would be another 'issue'.

 
Last edited by a moderator:
Nope, that'll work. The posi-taps wont have as strong a connection but should be fine. Just make sure you get the right wires or you're in for a surprise.
My experience is that a properly installed PosiTap, which included using the appropriate size Tap, provides a great connection. Another benefit is this approach elimiates adding 20 crimped connections and 10 spade connections in the connectors (weak points.)

Thanks for the tip! Finding the right wires is pretty easy but I always double check after a tap just to be sure! ;)
Very good point on the additional connections...

 
Ok, so the way I understand this whole spider thingy is that the connection builds resistance over time because it gets corroded from water and goo getting at the contacts. This resistance creates heat which creates more resistance until it finally melts and leaves you stranded in BF nowhere.

So why don't we just fix the cause and keep the connection from getting corroded? I could just separate the connector, check it for corrosion, fill it with grease, wrap it in electrical tape and put it back together. Problem solved. Maybe if I feel generous I might check it again after 5 years.

Since it's a ground harness would it be better to use a conductive grease or dielectric grease? The dielectric grease might create more resistance if the connectors don't rub hard enough against each other. I think a conductive grease would be better because it would keep the resistance down and the splooge out.

 
Ok, so the way I understand this whole spider thingy is that the connection builds resistance over time because it gets corroded from water and goo getting at the contacts. This resistance creates heat which creates more resistance until it finally melts and leaves you stranded in BF nowhere.
So why don't we just fix the cause and keep the connection from getting corroded? I could just separate the connector, check it for corrosion, fill it with grease, wrap it in electrical tape and put it back together. Problem solved. Maybe if I feel generous I might check it again after 5 years.

Since it's a ground harness would it be better to use a conductive grease or dielectric grease? The dielectric grease might create more resistance if the connectors don't rub hard enough against each other. I think a conductive grease would be better because it would keep the resistance down and the splooge out.
I would have used dielectric... just because conductive grease around electricity gives me the heebies. However, are ALL 6 connections within those spiders ground points? If so then conductive wouldn't be a bad idea at all.

I think the real concern is around how many amps they are putting through that one little bitty connector pin. Is it rated for it? Evidently so, however they appear to be running it so close to the rated limit that ANY increase in resistance bumps it over the edge and you have a catastrophic failure. Keeping that from happening COULD be as simple as greasing that baby up and going on your merry way... but I'm more paranoid than that. FJRguy's approach seems pretty clean and cheap as dirt. I've actually purchased two fan harnesses from roadrunner and hope to install those this weekend. That will triple the ground paths... I also plan to grease up every connector I can reach as well.

 
Ok... so now that I'm back in Calgary after the S4 adventure in Michigan, it's time to get back under the tank, and make the temp repair that was done at the dealer in Michigan a permanent one.

Bike is out of warranty, and the harness is $$$, and replacing the whole thing isn't being considered.

I've read the posts that say "no solder" and my aviation background agrees. So the question is, how to replace the S4 connector (that was cut out by the dealer) with a good, solid, weather, heat and vibration resistant splice?

I have one of Brodie's harnesses, which I'd like to used to augment the ground spider, at least until Yamaha comes up with a factory fix. Since that harness has to plug into the S4 connector, which isn't there, what should I do?

Easiest solution would seem to be:

a) cut the connector off the Brodie harness (the bit that connects to S4);

B) use an appropriately-sized Marr-type wire nut/splice, (preferably a weatherproof one) to tie all 6 wires at S4 AND the big wire from the Brodie harness together;

c) install the Brodie harness into the other S-connectors per his instructions.

d) ride the wheels off the damned bike and stop worrying about the grounds.

The connector I'm looking at is a Marr-type weatherproof wire nut, which has some sort of goop inside to keep the splooge out, and is good for over 220 degrees F, which seems enough for the location. To ensure it stays together with the vibration, I'd wrap the wires and connector in good 'ol electrical tape to make sure it doesn't shake loose.

Does anyone see a problem with this? Is there another way to tie everything together at S4 that I should be considering? :huh:

Thanks!

Griff

 
Griff

I see a problem with what you are proposing to do. My grounding Harness is designed to take ALL the electrical loads carried by the bike's grounding system and provide an alternate path to battery negative terminal. The largest wire Yamaha uses is the metric equivalent to 16 gage. Every one of my connectors channel the electrical path to an 8 gage butt splice via 16 gage TXL wire. This 16 gage is the largest wire the connector's pins is rated for. The butt splice performs the same task that the 6 tined "spyder" does - it ties together (shorts) all the wires within that connector. From this 8 gage butt splice, I run a 10 gage SXL wire back to the battery negative terminal.

Think of it... Yamaha runs one skinny wire from spider to spider. The last one before Battery neg. is the S4 connector. My Grounding Harness adds to this with a big piece of copper wire - not take the place of it. It takes the power away from the bikes harness at each connector, so it does not allow the build up of resistance at the S4, or S6 spyders.

Also note that the S4 connector is special, it forms a Y in the path. It is fed by S3, and S6 as well as the path to Batt. S3 and S6 are plugged into my Grounding Harness and are channeling power away from S4.

Install the Grounding Harness I sent you. Check the repair work that the mechanic did in Michigan, and let the S4 plug on my harness dangle. There is enough redundancy built in, that you are still fully protected.

If you still feel uncomfortable with this, let me make you a special replacement Male connector to plug into my Grounding Harness S4 and splice into your repair. Just bare in mind, there is no room to work in that spot. You may want to leave that repair alone if it is done well.

By the way, All the wires are crimped. There is only one spot I used solder and that is at the ring terminal at the battery negative terminal. I chose to use it there "just in case" someone has a problem with battery corrosion. I bought a High Dollar "PressMaster" crimping tool rated just for the Sumitomo .090 series pins. The crimps meet Sumitomo's design specifications.

Griff, you paid good money for my product, install it un modified as per the instructions laid out on my personal website. It will not let you down.

Let me know how it turns out. :rolleyes:

Brodie

 
Last edited by a moderator:
Top