I've recently finished the installation of the Sampson Sport Touring prototype fuel cell using Garauld's rack - and thought I would post up the results, and findings.
I a previous post I showed the prototype being manufactured, which digressed, however, there is some very good information in that post regarding fuel cells, thanks to Warchild and Skyway - here's the link: Prototype Info
I'm still at about 98% on this install - there are some changes to line routing I'll be making, but overall, I'm happy with it. Ron manufactures quality stuff - as he has for several years.
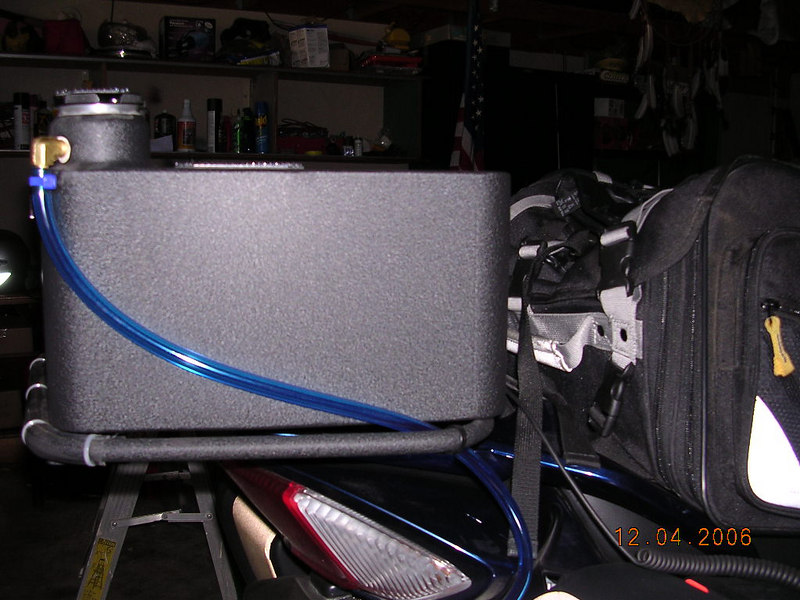
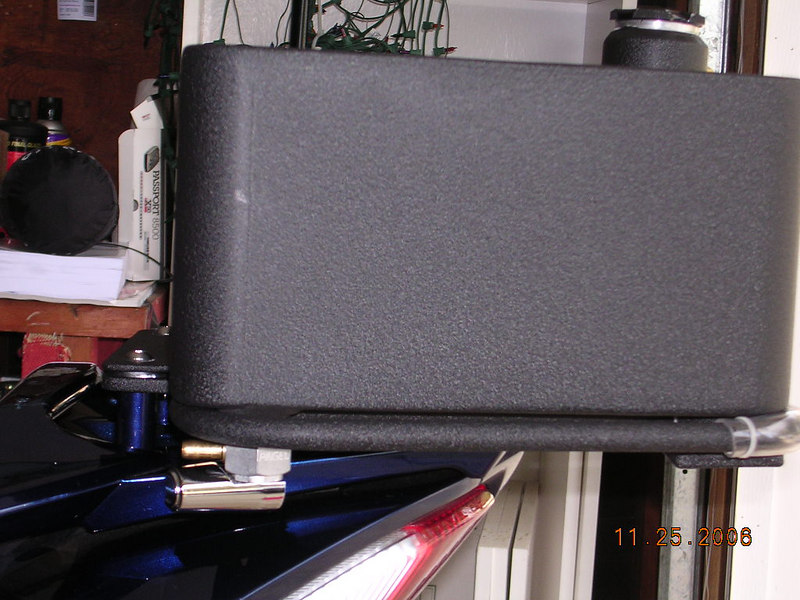
Ron Sampson designed this to sit on the rack manufactured by Garauld - Garauld's Rack and so it is trapezoidal in shape. During the fabrication process, we found out from Gary that my rack was also a prototype - and was slightly different than current design. However, those of you with a current production design rack will easily be able to mount one of these tanks, as Ron is aware of the differences.
Volume on this tank works out to approx 3.5 U.S. Gallons - but can easily be expanded by a few minor changes during the fab process, bringing it to 4.1, or 4.7 U.S. Gallons. (These numbers are about as close as I can get them - your results may vary.)
Tom Melchild posted an excellent write up on his Tanji cell modification and tank penetration process on the 06 - Tom is the only person I know (as of now - that should soon change when Skyway gets busy!) that has done a penetration on both an 06 and earlier tanks. Here's the link to his write up - (Thanks, Tom ! ) FJR Mods 06
The 06 tank is different - (gee, no kidding!) and once I had it siphoned out, the extra gas soaked out with a towel, and it had set for 24 hours, I started removing the fuel pump. On earlier models I understand that the fuel pump has to be fiddled with to get JUST the right spot for removal. So - there I am, turning, twisting, pulling, and there is one little part of the pump assembly that will not clear the hole -
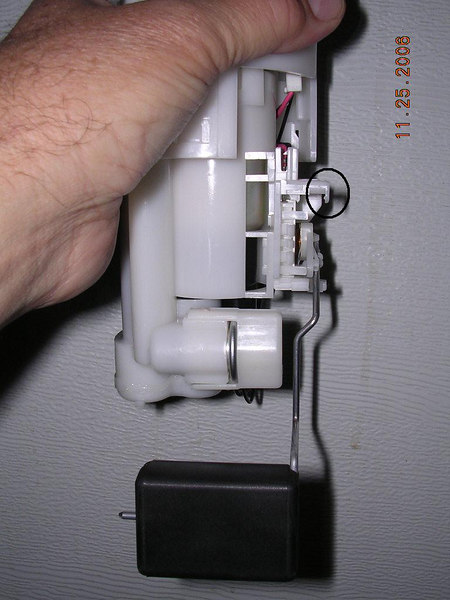
It's that little barb poking out there - it prevents a smooth removal - so I pull a little bit harder, and "poink!" something gives. It seems that little barb is part of the float assembly, and that assembly is designed to slide off of the pump, allowing removal of the fuel pump assembly. Which is what happened. The float assembly is now loose, hanging by it's wires from the pump, and now the assembly can be easily lifted out of the tank. (that little barb is the stop for the float arm - these pics are upside down)
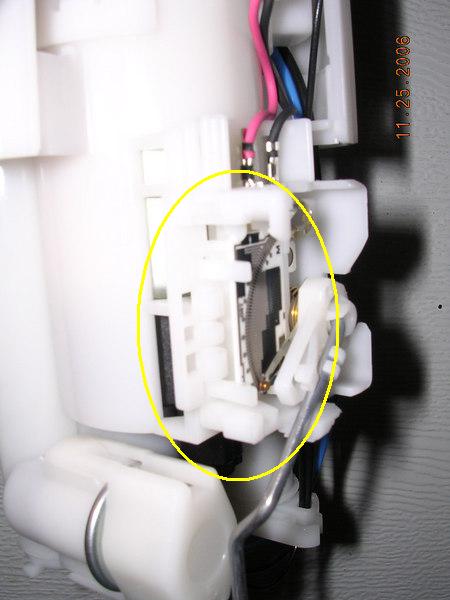
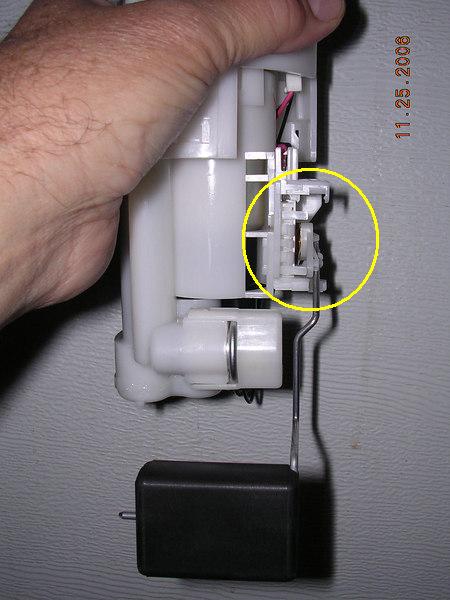
It's on a 'keyed' bracket on the pump - so it just snaps right back on, and can go back into the tank without removal.
(And do you think I'd take a picture of the float hanging off of the pump? NoooooOOOOoooo, not me!)
The tank has a partial 'collar' in which the fuel pump sits - probably to help channel or hold fuel during near empty manuvers -
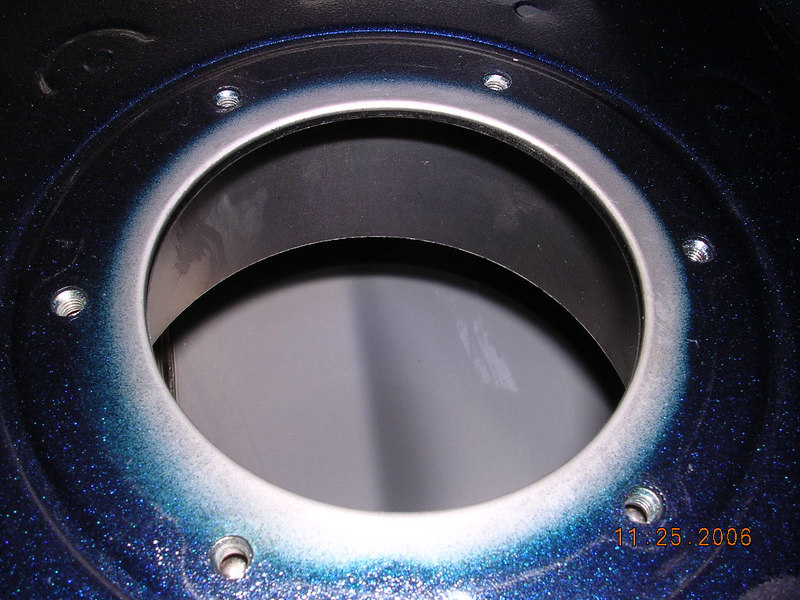
This collar gets in the way during drilling the hole, as well as installing the penetration. You have to reach inside, then bend your wrist about, oh, 180 degrees - which doesn't work too well. I was unable to use the cup and tape method to capture the shavings, and had to resort to placing a clean terry towel inside the tank, spreading it out to cover the inside of the top (now the bottom) and after drilling, fold it up very carefully, and remove it. I then used a magnet to pull any missed chips out of the tank, and then wiped it out with another clean towel with WD40 sprayed on it.
Here's the penetration fitting:
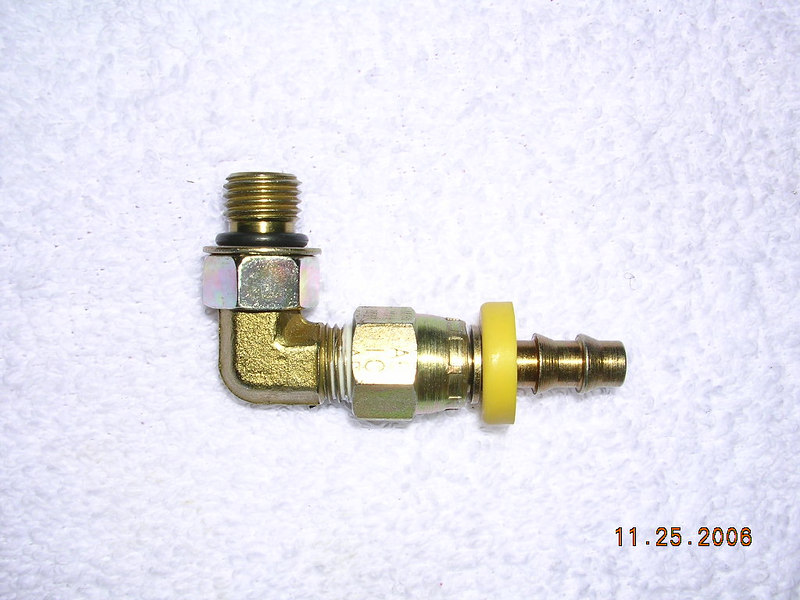
Note the Loctite 567 sealant on the threads - if you use this stuff, please remember to use the recommended primer. 567 PST Thread Sealant High Temperature You will need to enter "567" in the search field for the info. I used this on the penetration fitting, the tank petcock, and even the vent tube fitting.
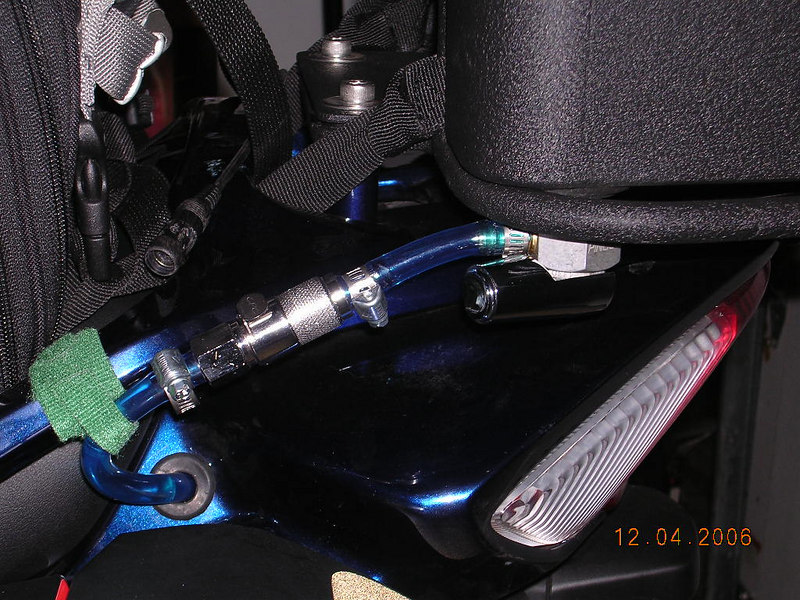
I used 1/4" fittings and fuel line throughout - smaller diameter, easier to route, and still flows faster than consumption.
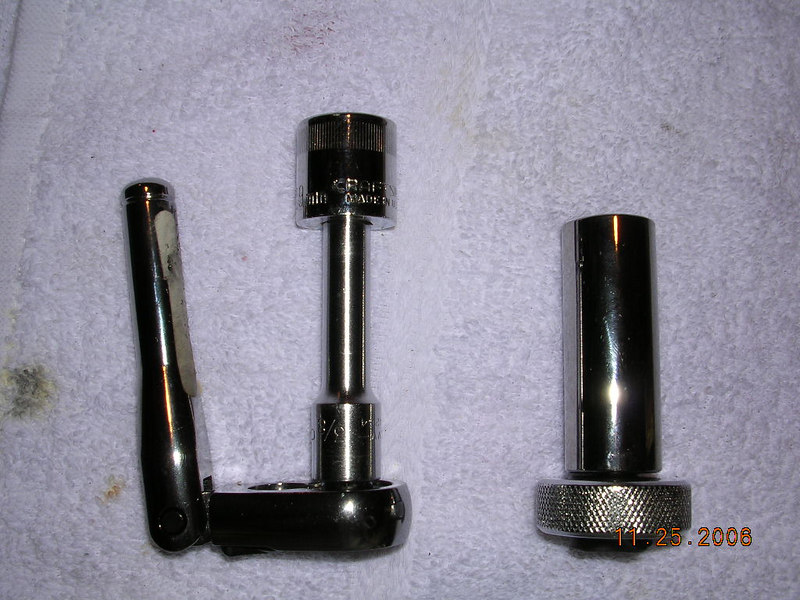
I used a 3/8" 'stubby' ratchet with a swivel handle - it allowed me to reach back up around the collar inside the tank (does that make sense ? ) The finger ratchet is a good way to seat the nut inside the tank, but you can't get enough force on it to tighten the nut properly, and need the swivel handle to properly tighten it.
I routed the fuel line up the left side of the bike - then under the tank, sharing the same "V" space that the factory fuel line shares.
I installed a disconnect under the tank - this will allow me to easily remove the main tank without removing the fuel line. I have done a TBS since this install, and it allows the tank to be propped up for the process.
(EDIT 16:34 hours - image correction)
And now the Sampson tank:
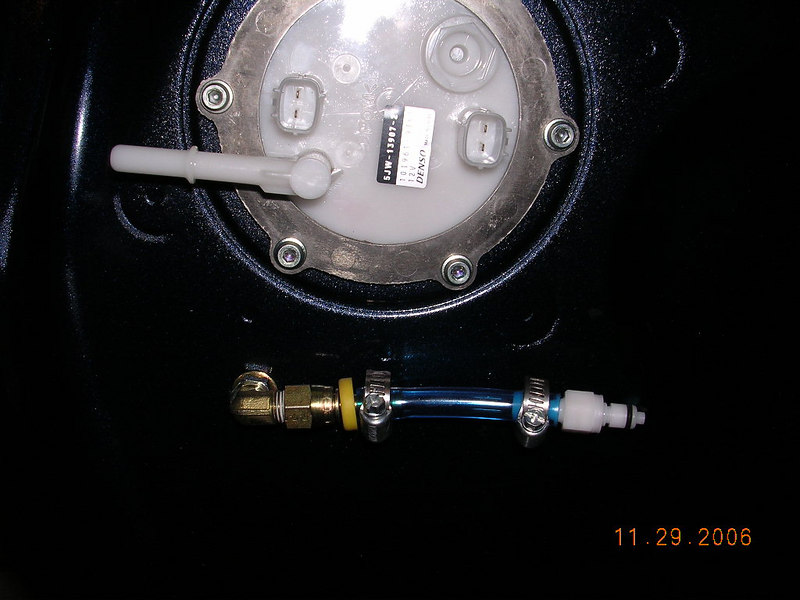
Disconnect fitting - This is the only place fuel line is visible.
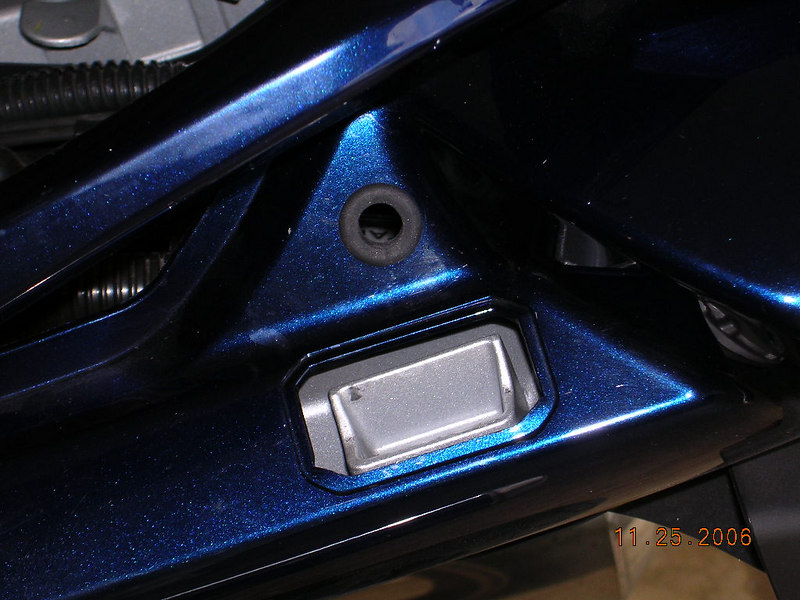
Fuel line pass through with grommet -
And that's my limit on picture posting.
Here's a link the gallery: Sampson Tank Install
Changes yet to make -
I'm going to route the overflow vent tube (it currently drops down aside the rear fender, and just drips fuel on the ground) back inside the bike via another grommeted hole in the plastic - it will then tee into the fuel line above the fuel filter. This will prevent vented fuel from becoming a problem. The filter location can be seen in the gallery.
I'll be installing another disconnect fitting on the vent tube - so there will be a disconnect on each side of the bike - which will allow easy removal of the tank. I can pull it in less than 5 minutes.
So - if you're interested in one of these, contact Ron Sampson - Sampson Sport Touring and discuss it.
And the usual caveats apply - I receive no benefit, no relationship, etc., etc.
I a previous post I showed the prototype being manufactured, which digressed, however, there is some very good information in that post regarding fuel cells, thanks to Warchild and Skyway - here's the link: Prototype Info
I'm still at about 98% on this install - there are some changes to line routing I'll be making, but overall, I'm happy with it. Ron manufactures quality stuff - as he has for several years.
Ron Sampson designed this to sit on the rack manufactured by Garauld - Garauld's Rack and so it is trapezoidal in shape. During the fabrication process, we found out from Gary that my rack was also a prototype - and was slightly different than current design. However, those of you with a current production design rack will easily be able to mount one of these tanks, as Ron is aware of the differences.
Volume on this tank works out to approx 3.5 U.S. Gallons - but can easily be expanded by a few minor changes during the fab process, bringing it to 4.1, or 4.7 U.S. Gallons. (These numbers are about as close as I can get them - your results may vary.)
Tom Melchild posted an excellent write up on his Tanji cell modification and tank penetration process on the 06 - Tom is the only person I know (as of now - that should soon change when Skyway gets busy!) that has done a penetration on both an 06 and earlier tanks. Here's the link to his write up - (Thanks, Tom ! ) FJR Mods 06
The 06 tank is different - (gee, no kidding!) and once I had it siphoned out, the extra gas soaked out with a towel, and it had set for 24 hours, I started removing the fuel pump. On earlier models I understand that the fuel pump has to be fiddled with to get JUST the right spot for removal. So - there I am, turning, twisting, pulling, and there is one little part of the pump assembly that will not clear the hole -
It's that little barb poking out there - it prevents a smooth removal - so I pull a little bit harder, and "poink!" something gives. It seems that little barb is part of the float assembly, and that assembly is designed to slide off of the pump, allowing removal of the fuel pump assembly. Which is what happened. The float assembly is now loose, hanging by it's wires from the pump, and now the assembly can be easily lifted out of the tank. (that little barb is the stop for the float arm - these pics are upside down)
It's on a 'keyed' bracket on the pump - so it just snaps right back on, and can go back into the tank without removal.
(And do you think I'd take a picture of the float hanging off of the pump? NoooooOOOOoooo, not me!)
The tank has a partial 'collar' in which the fuel pump sits - probably to help channel or hold fuel during near empty manuvers -
This collar gets in the way during drilling the hole, as well as installing the penetration. You have to reach inside, then bend your wrist about, oh, 180 degrees - which doesn't work too well. I was unable to use the cup and tape method to capture the shavings, and had to resort to placing a clean terry towel inside the tank, spreading it out to cover the inside of the top (now the bottom) and after drilling, fold it up very carefully, and remove it. I then used a magnet to pull any missed chips out of the tank, and then wiped it out with another clean towel with WD40 sprayed on it.
Here's the penetration fitting:
Note the Loctite 567 sealant on the threads - if you use this stuff, please remember to use the recommended primer. 567 PST Thread Sealant High Temperature You will need to enter "567" in the search field for the info. I used this on the penetration fitting, the tank petcock, and even the vent tube fitting.
I used 1/4" fittings and fuel line throughout - smaller diameter, easier to route, and still flows faster than consumption.
I used a 3/8" 'stubby' ratchet with a swivel handle - it allowed me to reach back up around the collar inside the tank (does that make sense ? ) The finger ratchet is a good way to seat the nut inside the tank, but you can't get enough force on it to tighten the nut properly, and need the swivel handle to properly tighten it.
I routed the fuel line up the left side of the bike - then under the tank, sharing the same "V" space that the factory fuel line shares.
I installed a disconnect under the tank - this will allow me to easily remove the main tank without removing the fuel line. I have done a TBS since this install, and it allows the tank to be propped up for the process.
(EDIT 16:34 hours - image correction)
And now the Sampson tank:
Disconnect fitting - This is the only place fuel line is visible.
Fuel line pass through with grommet -
And that's my limit on picture posting.
Here's a link the gallery: Sampson Tank Install
Changes yet to make -
I'm going to route the overflow vent tube (it currently drops down aside the rear fender, and just drips fuel on the ground) back inside the bike via another grommeted hole in the plastic - it will then tee into the fuel line above the fuel filter. This will prevent vented fuel from becoming a problem. The filter location can be seen in the gallery.
I'll be installing another disconnect fitting on the vent tube - so there will be a disconnect on each side of the bike - which will allow easy removal of the tank. I can pull it in less than 5 minutes.
So - if you're interested in one of these, contact Ron Sampson - Sampson Sport Touring and discuss it.
And the usual caveats apply - I receive no benefit, no relationship, etc., etc.
Last edited by a moderator:
 ) I don't open it until I have room in the main tank for the capacity of the aux tank (about 1/2 tank) and it then empties completely.