UselessPickles
Making Grand Canyon replicas from air boxes...
First of all, you're probably wondering what the heck a Motty AFR Tuner is. Explore www.afrtuner.com for the full explanation. You can even get the user manual from the downloads page, which contains some great detail on what it does, how it does it and how you can customize its behavior.
The short answer is that it's kinda like a Power Commander, except that it can continuously remap itself to achieve the desired air/fuel ratios. A Power Commander uses a lookup table of fuel injection adjustment values for combinations of throttle position and engine RPM. It intercepts the fuel injection signal from the ECU, looks up the adjustment value based on the current throttle position and RPMs, then adjusts the signal by the desired amount. Since the "map" on a Power Commander contains adjustment values that are to be applied to stock fuel injection signals, it's not something that you can just mess around with safely. To get a good map, you have to get your bike tuned on a Dyno. Unfortunately, the resulting map will only be 100% in tune for the exact conditions under which your bike was tuned. If you alter anything in the air intake, exhaust or the engine itself, you'll need to get a new map tuned for your bike. Even more subtle changes such as your air filter getting dirty or changes in temperature and humidity can cause the map to be out of tune.
The Motty uses a fuel injection map at its core like a Power Commander, but it also has a corresponding target air/fuel ratio (AFR) map. It uses a wideband O2 sensor in the exhaust to measure the actual AFR, then adjusts its injection map to get closer to the target AFR. Air/fuel ratio is a much more meaningful value than fuel injection adjustment values. AFR values for specific goals (max power, max fuel economy, etc) are well discussed (google it), so you can safely make your own adjustments to the AFR map and let the Motty take care of the rest. With the Motty, your bike is continuously being re-tuned to stay 100% in tune with the desired AFRs. It can handle changes in weather, exhaust, intake, etc.
The Motty also has a built-in data logger, which is most useful for pinpointing the parts of the map that are in use for your common cruising speeds. You can then adjust those portions of the AFR map to use AFR values for better fuel economy.
Before you get started, here's most of what you'll need:
Note that my installation was on a 2008 FJR A. I know that a Motty has been successfully installed on a non-ABS Gen I FJR (2005 and prior years). It was originally believed that the Motty could not be installed on any FJR with ABS due to the lack of VSS (speed signal) input to the ECU. I took the risk and verified that the wire that is in the same place as the VSS wire from the non-ABS Gen I bikes does indeed carry the same speed signal on the Gen II bikes, even though the wire is now coming from the ABS controller (speed signal is probably generated by the ABS controller from the signals of the ABS sensors on the wheels). The tips/instructions here should be valid for all 2006-2009 FJRs and they still may be helpful for 2005 and prior FJRs.
A good first step is to remove the air injection system from the engine. This system allows fresh air to enter the exhaust in some situations to allow unburned fuel to burn. This introduction of fresh air in the exhaust will give false readings to the O2 sensor, which will cause the Motty to tune your bike incorrectly. This is also the source of deceleration popping with aftermarket exhaust.
You'll have to at least lift the gas tank and prop it up, but I suggest removing it completely. Remove the T bar and heat shield, then you'll see this monstrosity (sorry; don't have a picture of it still on the bike):
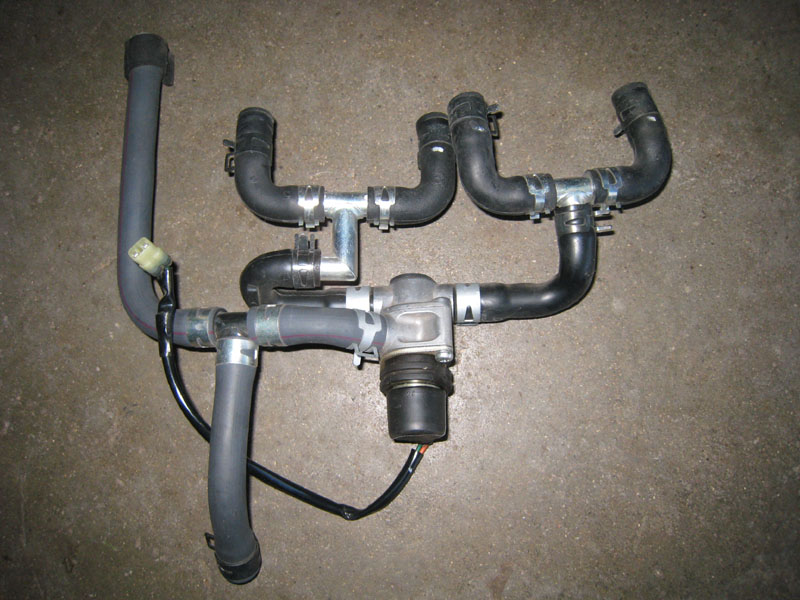
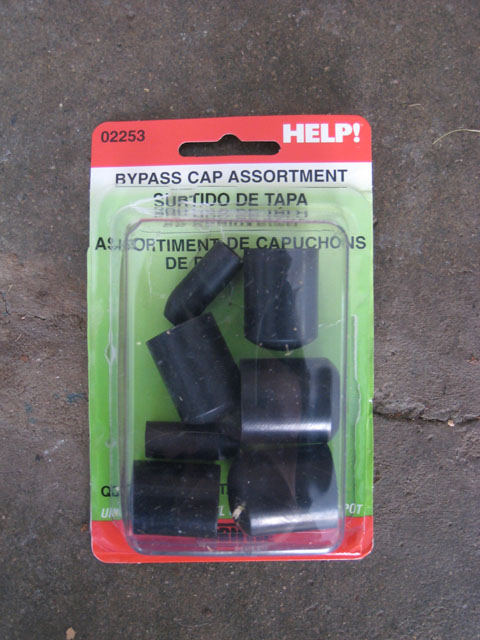
You'll need some way of plugging up the 5 holes that are left behind. I used some rubber caps that are sold as "bypass caps" in a variety pack that I found at Autozone (the pictured package actually contains some leftovers from multiple packages after I had used what I needed):
The final result is a very clean engine compartment:
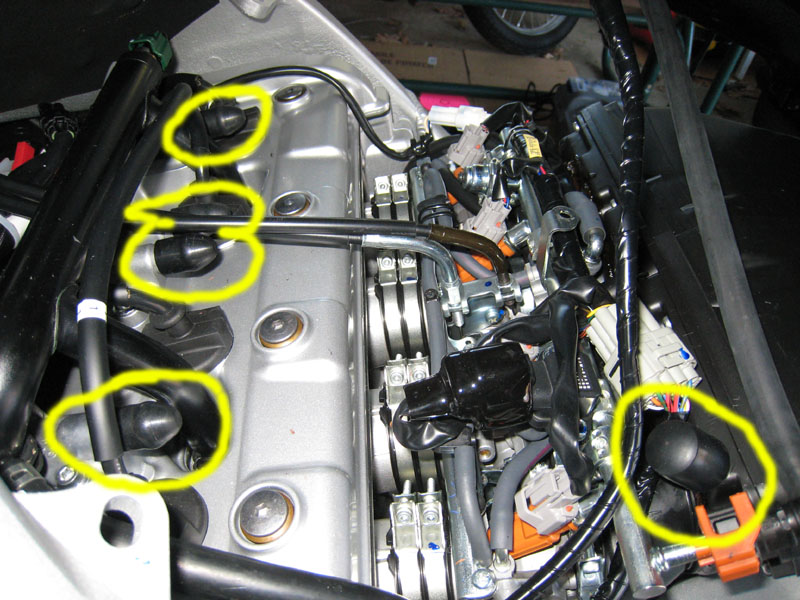
If you want to remove the metal wire that holds the reed valve solenoid thingy in place, be aware that the screw is very tight and easily damaged. I used an impact driver to loosen the screw.
!!! UPDATE - WARNING - PAY ATTENTION !!!
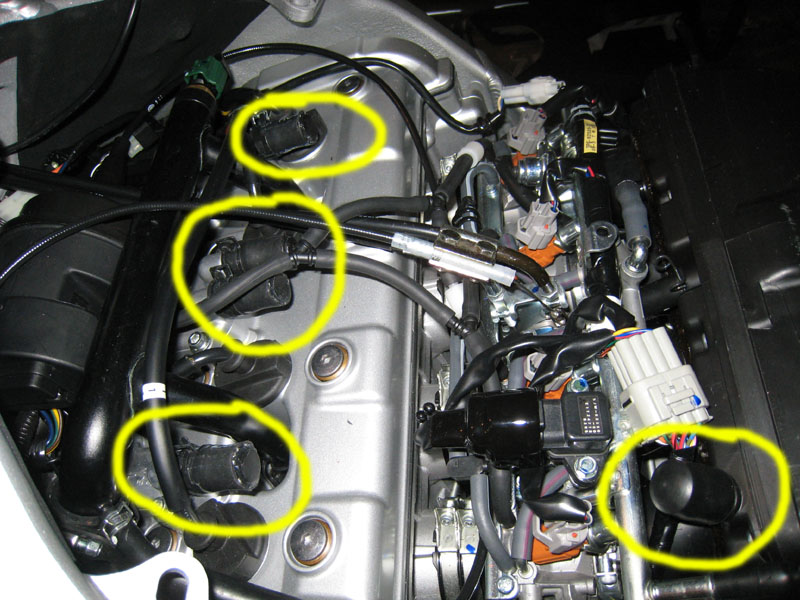
The above method of capping off the 4 air injection inlets has been proven to be faulty: https://www.fjrforum.com/forum//index.php?showtopic=114689
The bypass caps have failed for a few people (including myself) by splitting. The larger bypass cap used on the air box seems much sturdier and further away from extreme heat, so it's probably OK. I have replaced the 4 smaller caps with custom caps made out of 1/2" heater hose (from an auto parts store) and small rubber stoppers (found at a hardware store). The fat end of the stopper is glued to the inside of the hose with silicone adhesive. The original hose clamps from the stock hoses are re-used to secure the short lengths of hose in place:
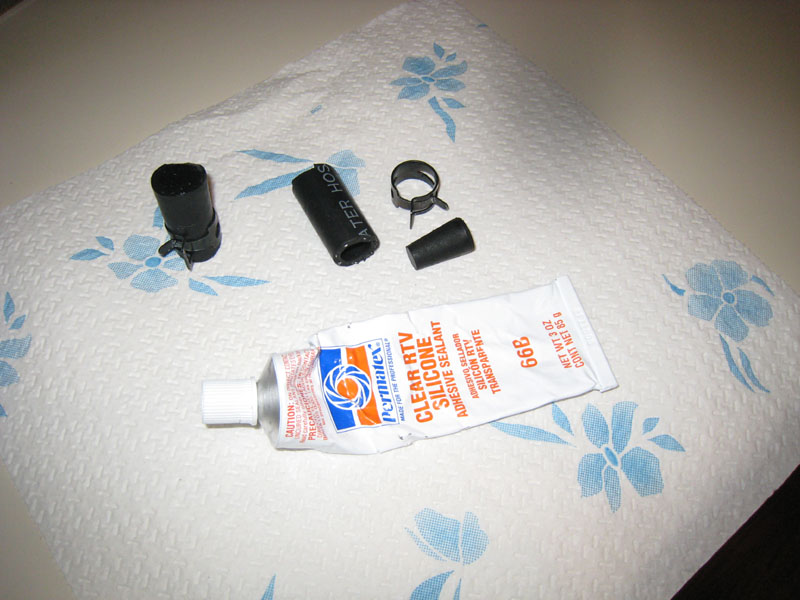
Cut the hose to a length such that they will hold the stopper in the hole like this:
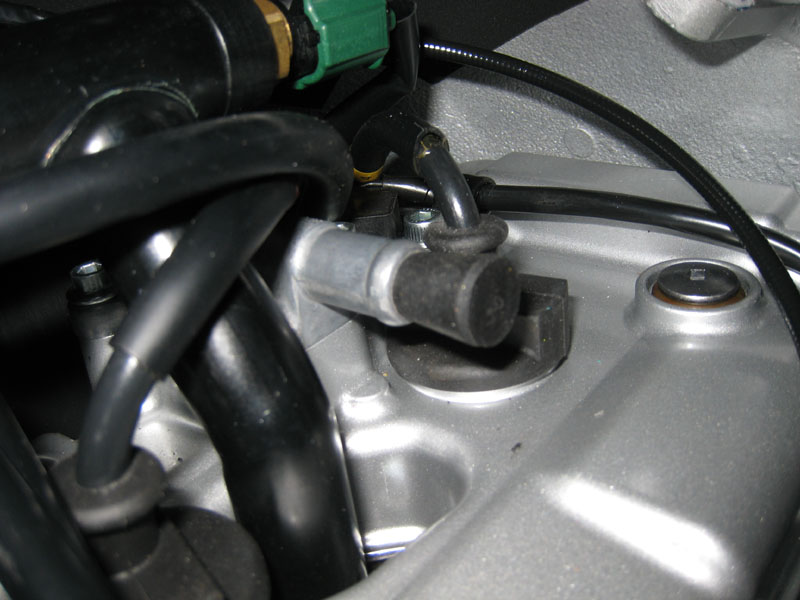
The end result:
Now for the AFR Tuner itself. Here's a preview of what it'll look like when you're done:
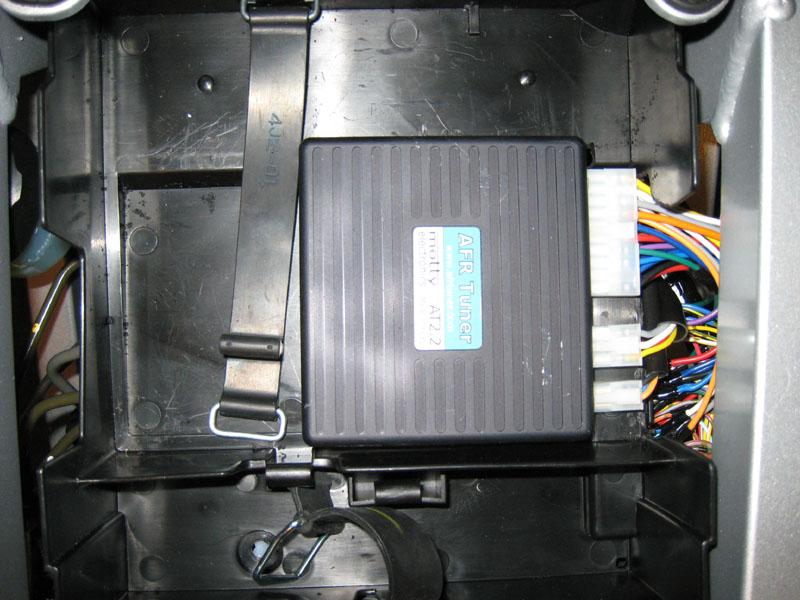
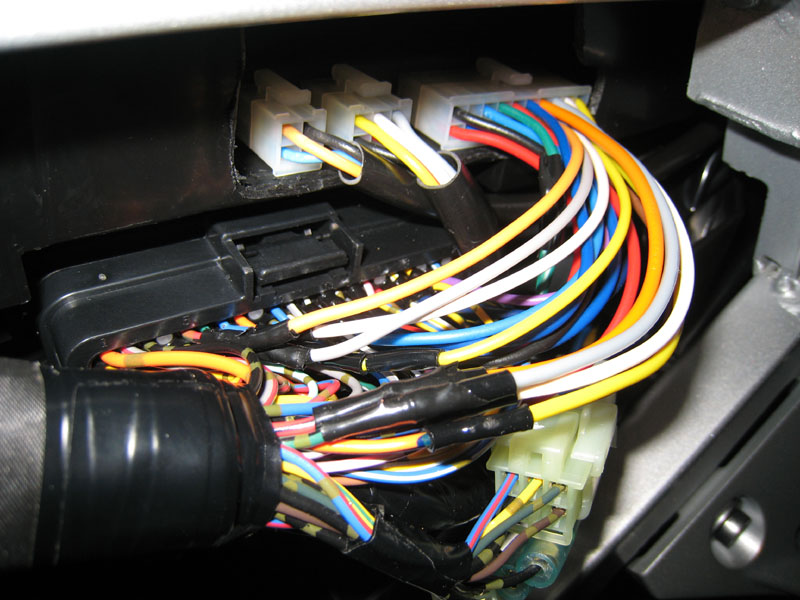
You'll want to remove the tool tray from under the seat so that you can trim a few areas so the AFR Tuner will sit nicely. I don't know if it is possible to remove the tray without removing the gas tank hinge bracket. Just take the extra time to remove it and life will be easy. Remember that the ECU is mounted to the bottom of the tray, so you'll have to unplug the harness before removing the tray. Unplugging the ECU harness will require that you remove the left side panel and the black plastic cover that is behind that panel. While you're at it, you might as well remove the right side panel. You'll need it removed later anyway.
Here's what the trimmed tray looks like:
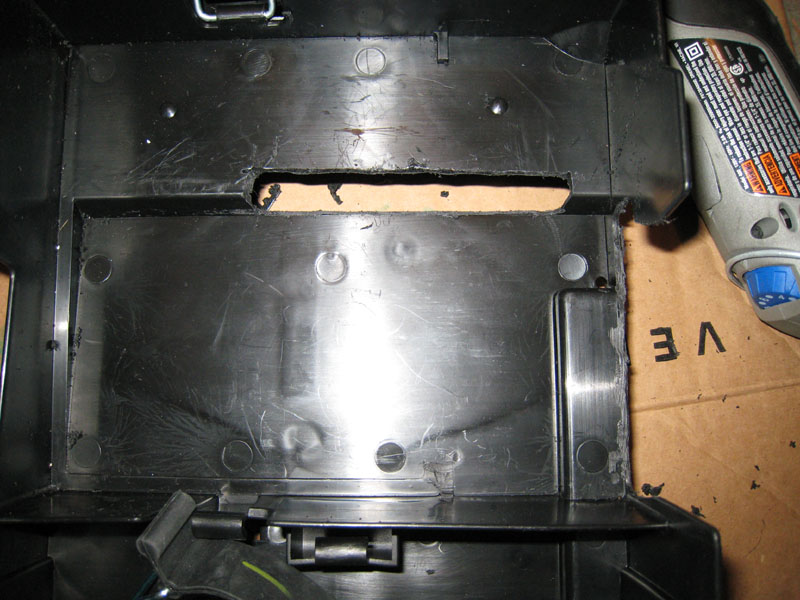
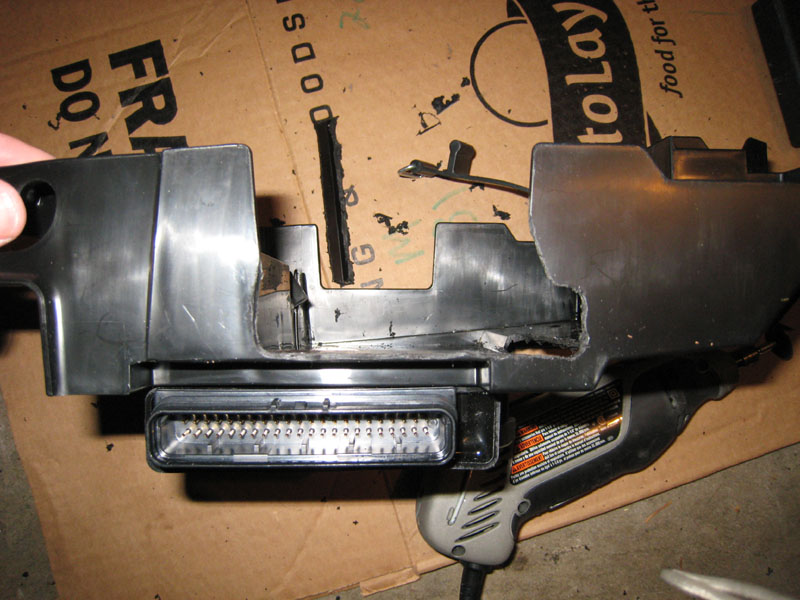
Once you trim the tray so the AFR Tuner sits nicely with all connectors accessible through the side, you can add some velcro strips to secure it to the tray (I like this kind of velcro better than what was supplied with the AFR Tuner):
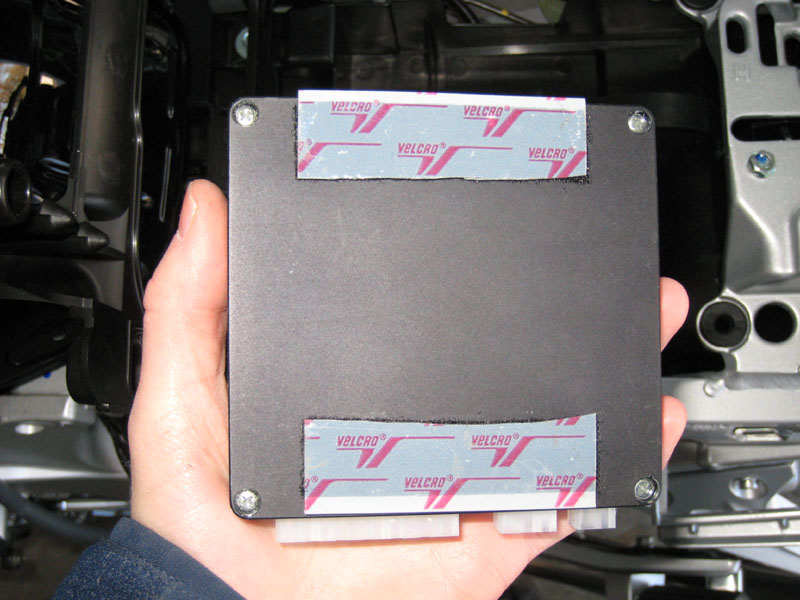
Reinstall the tray on the bike and velcro the AFR Tuner in place. It's time to wire it up. The manual includes wiring tables for various bikes, including the FJR, that tell you exactly which wire from the AFR Tuner needs to be spliced into which wire from the ECU harness. Just take your time and double check before cutting and/or stripping any wires. The wiring harness supplied with the AFR Tuner has very long wires with a protective sleeve. Since the mounting location is so close to the ECU, I did away with the protective sleeve and cut each wire to length as I connected it.
Here's some tips for the wiring:
Again, it should look something like this when you're done:

Mine's a little sloppy due to some shrink tube mistakes that required additional shrink tube and/or electrical table to fully insulate the soldered connections.
When the wiring is complete, you can follow the manuals instructions for testing. It involves first plugging an adapter into the wiring harness that should result in stock wiring pathways and making sure the bike runs normally. Then there's several things you can check with a multimeter.
Before worrying about installing the O2 sensor, you might as well hook the AFR Tuner up to your computer (with bike ignition on, kill switch in kill position) and go through the various calibrations as specified in the manual. The O2 sensor must be calibrated while it is out in the open, so no sense installing it yet.
Now for the final step: the O2 sensor. I hope you kept the gas tank off the bike, cuz you'll need to get under there to disconnect the stock O2 sensor and to route wiring for the new sensor. You'll also need to remove the right-side lower fairing. Here's the routing of both the stock and new O2 sensor wires (this is actually the new sensor in the picture):
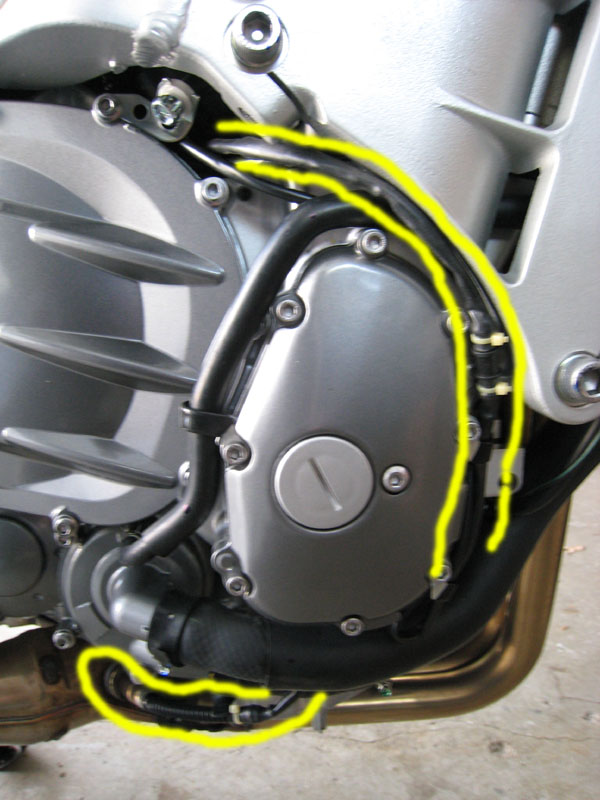
You'll have to remove 2 bolts that are holding wire guides along the side of the engine. just follow the wire up to find the connector for the stock sensor. The wire should be disconnected before removing the sensor so you don't twist and damage the wiring.
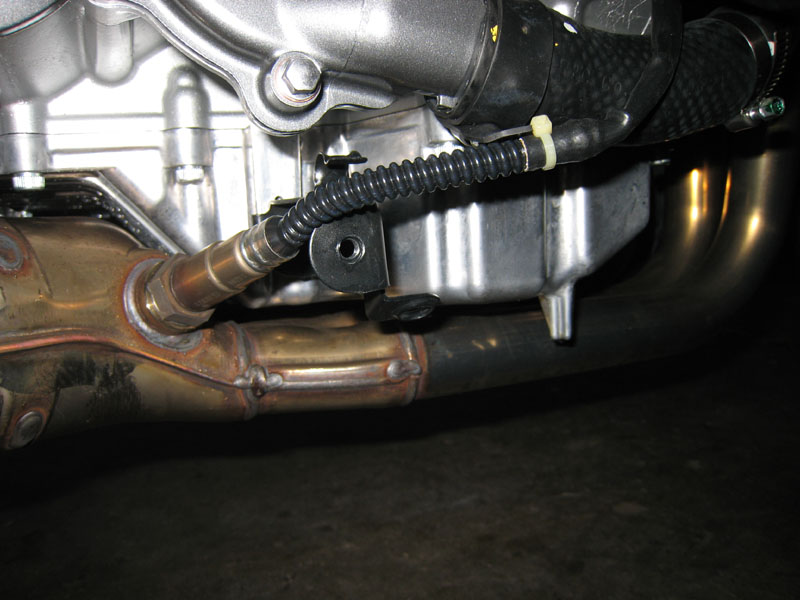
When installing the new O2 sensor, you'll need to remove the nearby fairing mount bracket to get a straight shot to the sensor bung. Here's the new sensor installed with a very tight fit against the fairing bracket:
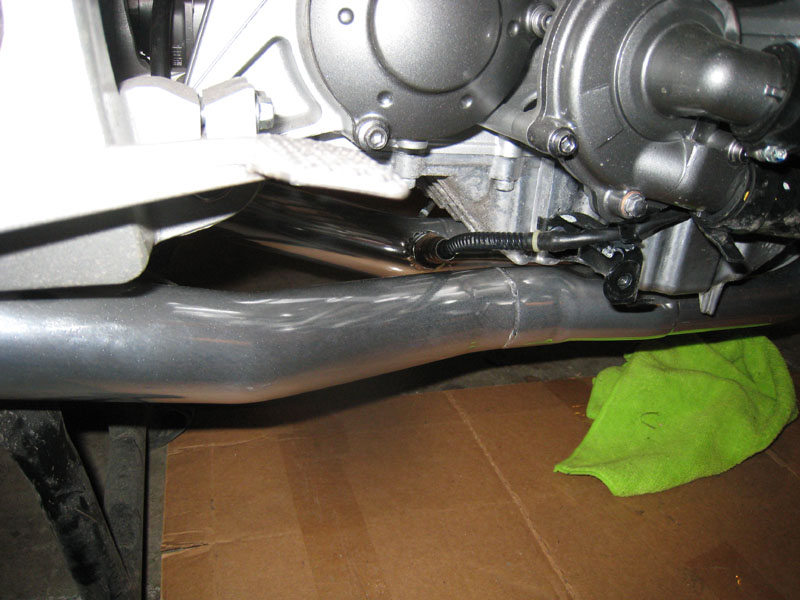
If you have Holeshot headers, then you need to get an O2 sensor bung welded to it. I placed mine here, and it doesn't affect how the O2 sensor cable is routed. Note that with an O2 sensor here, the Motty will be tuning all 4 cylinders based on the average AFR of only 2 cylinders, rather than an average AFR of all 4 cylinders with the stock header. This is not expected to be a problem.
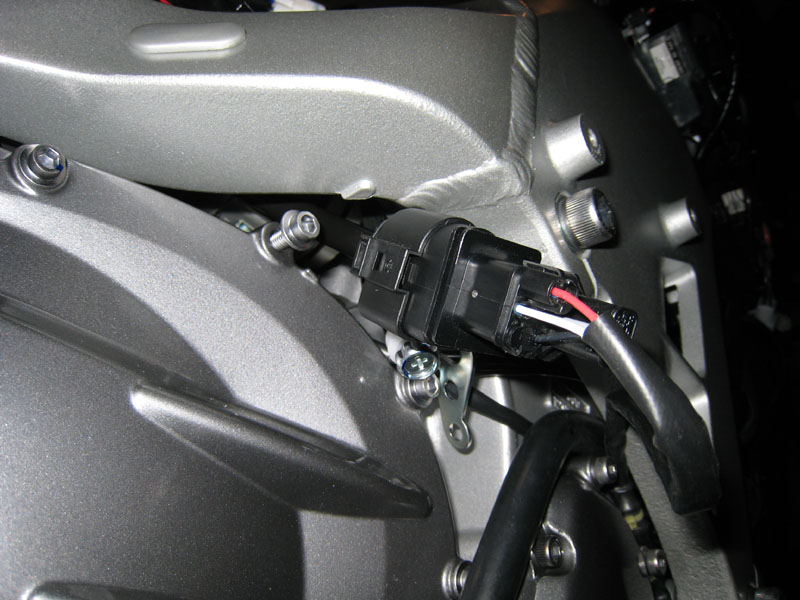
The connector for the new sensor is huge. Luckily, it'll fit right above the idle adjustment knob. You'll have to remove the the idle adjustment knob to get the connector in there. You'll also have to feed the AFR tuner's O2 sensor wire in from this point back to the device, because the large connector will can only enter into this space from one direction:
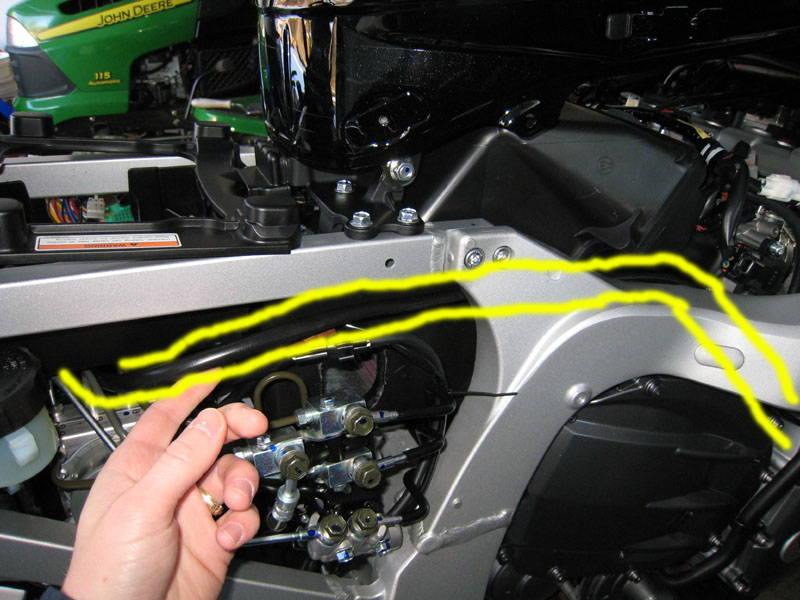
The AFR Tuner's O2 sensor wire goes along the right side of the bike, then across to the left side under the tool tray where it plugs into the device:
Note: The new O2 sensor connects to the AFR Tuner only. Just tuck the empty connector for the stock O2 sensor somewhere. The bike will operate just fine with no error codes.
That wasn't so bad, was it? Just put your bike back together, double check the configuration and calibrations of the AFR Tuner, then go for a ride. Be sure to read the manual and fully understand how to operate the AFR tuner. For example, data logging is off by default. When you turn the ignition on, but before starting the engine, you can hold the throttle open 100% for about 1 second to turn data logging on. It's also important to understand under what conditions self-mapping will actually happen (restricted by engine temp, throttle/gear combination, etc; all configurable). You also have to shut the bike down in a specific manner if you want to save the self-mapping adjustments from the ride (use kill switch, then wait a few seconds before turning ignition off). Understand how it works, or else you could find yourself frustrated and believing that it's not working as advertised.
Stay tuned for a separate post in the future about how to use the data logger as a guide to adjust the AFR table for cruising fuel economy. I won't post that until I have some experience doing it myself, which could be a while due to the cold and snow here.
The short answer is that it's kinda like a Power Commander, except that it can continuously remap itself to achieve the desired air/fuel ratios. A Power Commander uses a lookup table of fuel injection adjustment values for combinations of throttle position and engine RPM. It intercepts the fuel injection signal from the ECU, looks up the adjustment value based on the current throttle position and RPMs, then adjusts the signal by the desired amount. Since the "map" on a Power Commander contains adjustment values that are to be applied to stock fuel injection signals, it's not something that you can just mess around with safely. To get a good map, you have to get your bike tuned on a Dyno. Unfortunately, the resulting map will only be 100% in tune for the exact conditions under which your bike was tuned. If you alter anything in the air intake, exhaust or the engine itself, you'll need to get a new map tuned for your bike. Even more subtle changes such as your air filter getting dirty or changes in temperature and humidity can cause the map to be out of tune.
The Motty uses a fuel injection map at its core like a Power Commander, but it also has a corresponding target air/fuel ratio (AFR) map. It uses a wideband O2 sensor in the exhaust to measure the actual AFR, then adjusts its injection map to get closer to the target AFR. Air/fuel ratio is a much more meaningful value than fuel injection adjustment values. AFR values for specific goals (max power, max fuel economy, etc) are well discussed (google it), so you can safely make your own adjustments to the AFR map and let the Motty take care of the rest. With the Motty, your bike is continuously being re-tuned to stay 100% in tune with the desired AFRs. It can handle changes in weather, exhaust, intake, etc.
The Motty also has a built-in data logger, which is most useful for pinpointing the parts of the map that are in use for your common cruising speeds. You can then adjust those portions of the AFR map to use AFR values for better fuel economy.
Before you get started, here's most of what you'll need:
- The Motty AFR Tuner (~$600 when I bought mine; fluctuates with exchange rates).
- A computer (preferably a laptop) for configuring the AFR Tuner.
- If your computer does not have a serial port, then you'll need a USB to serial adapter.
- A Bosch wideband O2 sensor. Here's a good price on one.
- Wire cutters/strippers, exacto knife or razor blade, soldering iron, solder, shrink tube and/or electrical tape.
- A Dremel for trimming the tool tray.
- Basic tools for removing stuff from the bike.
- Service manual recommended to aid in removal/installation of panels, etc.
- Read the Motty AFR Tuner Manual thoroughly. There's good info in there.
Note that my installation was on a 2008 FJR A. I know that a Motty has been successfully installed on a non-ABS Gen I FJR (2005 and prior years). It was originally believed that the Motty could not be installed on any FJR with ABS due to the lack of VSS (speed signal) input to the ECU. I took the risk and verified that the wire that is in the same place as the VSS wire from the non-ABS Gen I bikes does indeed carry the same speed signal on the Gen II bikes, even though the wire is now coming from the ABS controller (speed signal is probably generated by the ABS controller from the signals of the ABS sensors on the wheels). The tips/instructions here should be valid for all 2006-2009 FJRs and they still may be helpful for 2005 and prior FJRs.
A good first step is to remove the air injection system from the engine. This system allows fresh air to enter the exhaust in some situations to allow unburned fuel to burn. This introduction of fresh air in the exhaust will give false readings to the O2 sensor, which will cause the Motty to tune your bike incorrectly. This is also the source of deceleration popping with aftermarket exhaust.
You'll have to at least lift the gas tank and prop it up, but I suggest removing it completely. Remove the T bar and heat shield, then you'll see this monstrosity (sorry; don't have a picture of it still on the bike):

You'll need some way of plugging up the 5 holes that are left behind. I used some rubber caps that are sold as "bypass caps" in a variety pack that I found at Autozone (the pictured package actually contains some leftovers from multiple packages after I had used what I needed):

The final result is a very clean engine compartment:

If you want to remove the metal wire that holds the reed valve solenoid thingy in place, be aware that the screw is very tight and easily damaged. I used an impact driver to loosen the screw.
!!! UPDATE - WARNING - PAY ATTENTION !!!
The above method of capping off the 4 air injection inlets has been proven to be faulty: https://www.fjrforum.com/forum//index.php?showtopic=114689
The bypass caps have failed for a few people (including myself) by splitting. The larger bypass cap used on the air box seems much sturdier and further away from extreme heat, so it's probably OK. I have replaced the 4 smaller caps with custom caps made out of 1/2" heater hose (from an auto parts store) and small rubber stoppers (found at a hardware store). The fat end of the stopper is glued to the inside of the hose with silicone adhesive. The original hose clamps from the stock hoses are re-used to secure the short lengths of hose in place:

Cut the hose to a length such that they will hold the stopper in the hole like this:

The end result:

Now for the AFR Tuner itself. Here's a preview of what it'll look like when you're done:


You'll want to remove the tool tray from under the seat so that you can trim a few areas so the AFR Tuner will sit nicely. I don't know if it is possible to remove the tray without removing the gas tank hinge bracket. Just take the extra time to remove it and life will be easy. Remember that the ECU is mounted to the bottom of the tray, so you'll have to unplug the harness before removing the tray. Unplugging the ECU harness will require that you remove the left side panel and the black plastic cover that is behind that panel. While you're at it, you might as well remove the right side panel. You'll need it removed later anyway.
Here's what the trimmed tray looks like:


Once you trim the tray so the AFR Tuner sits nicely with all connectors accessible through the side, you can add some velcro strips to secure it to the tray (I like this kind of velcro better than what was supplied with the AFR Tuner):

Reinstall the tray on the bike and velcro the AFR Tuner in place. It's time to wire it up. The manual includes wiring tables for various bikes, including the FJR, that tell you exactly which wire from the AFR Tuner needs to be spliced into which wire from the ECU harness. Just take your time and double check before cutting and/or stripping any wires. The wiring harness supplied with the AFR Tuner has very long wires with a protective sleeve. Since the mounting location is so close to the ECU, I did away with the protective sleeve and cut each wire to length as I connected it.
Here's some tips for the wiring:
- There's 3 white bars on one side of the ECU harness. Pushing them all in will releas the pins so that the wires can be removed. More details on that can be found in a Barbarian Mod article.
- Remove only one wire at a time from the ECU harness so you are sure to put it back in the right place.
- You won't be stripping the ends of the ECU harness wires, but a section away from the end. My technique was to use wire strippers to just cut the insulation at the beginning and end of the section that I wanted to strip. I then used an exacto knife to carefully shave the insulation down to the wire on one side along the entire section. Then I could just peel the rest off.
- Be sure to splice into the ECU wires far enough away from the pins so that the pins can be fully inserted back into the harness.
- These connections are very important, so solder them. Don't try to get lazy and use those plastic snap-on splicers.
- These connections are very important, so use shrink tube to insulate them.
Again, it should look something like this when you're done:

Mine's a little sloppy due to some shrink tube mistakes that required additional shrink tube and/or electrical table to fully insulate the soldered connections.
When the wiring is complete, you can follow the manuals instructions for testing. It involves first plugging an adapter into the wiring harness that should result in stock wiring pathways and making sure the bike runs normally. Then there's several things you can check with a multimeter.
Before worrying about installing the O2 sensor, you might as well hook the AFR Tuner up to your computer (with bike ignition on, kill switch in kill position) and go through the various calibrations as specified in the manual. The O2 sensor must be calibrated while it is out in the open, so no sense installing it yet.
Now for the final step: the O2 sensor. I hope you kept the gas tank off the bike, cuz you'll need to get under there to disconnect the stock O2 sensor and to route wiring for the new sensor. You'll also need to remove the right-side lower fairing. Here's the routing of both the stock and new O2 sensor wires (this is actually the new sensor in the picture):

You'll have to remove 2 bolts that are holding wire guides along the side of the engine. just follow the wire up to find the connector for the stock sensor. The wire should be disconnected before removing the sensor so you don't twist and damage the wiring.
When installing the new O2 sensor, you'll need to remove the nearby fairing mount bracket to get a straight shot to the sensor bung. Here's the new sensor installed with a very tight fit against the fairing bracket:

If you have Holeshot headers, then you need to get an O2 sensor bung welded to it. I placed mine here, and it doesn't affect how the O2 sensor cable is routed. Note that with an O2 sensor here, the Motty will be tuning all 4 cylinders based on the average AFR of only 2 cylinders, rather than an average AFR of all 4 cylinders with the stock header. This is not expected to be a problem.

The connector for the new sensor is huge. Luckily, it'll fit right above the idle adjustment knob. You'll have to remove the the idle adjustment knob to get the connector in there. You'll also have to feed the AFR tuner's O2 sensor wire in from this point back to the device, because the large connector will can only enter into this space from one direction:

The AFR Tuner's O2 sensor wire goes along the right side of the bike, then across to the left side under the tool tray where it plugs into the device:

Note: The new O2 sensor connects to the AFR Tuner only. Just tuck the empty connector for the stock O2 sensor somewhere. The bike will operate just fine with no error codes.
That wasn't so bad, was it? Just put your bike back together, double check the configuration and calibrations of the AFR Tuner, then go for a ride. Be sure to read the manual and fully understand how to operate the AFR tuner. For example, data logging is off by default. When you turn the ignition on, but before starting the engine, you can hold the throttle open 100% for about 1 second to turn data logging on. It's also important to understand under what conditions self-mapping will actually happen (restricted by engine temp, throttle/gear combination, etc; all configurable). You also have to shut the bike down in a specific manner if you want to save the self-mapping adjustments from the ride (use kill switch, then wait a few seconds before turning ignition off). Understand how it works, or else you could find yourself frustrated and believing that it's not working as advertised.
Stay tuned for a separate post in the future about how to use the data logger as a guide to adjust the AFR table for cruising fuel economy. I won't post that until I have some experience doing it myself, which could be a while due to the cold and snow here.
Last edited by a moderator:


