Engine mount re-torque

Yamaha FJR Motorcycle Forum

Help Support Yamaha FJR Motorcycle Forum:

This site may earn a commission from merchant affiliate links, including eBay, Amazon, and others.

bigtallguy

Well-known member
Joined
Nov 11, 2009
Messages
113
Reaction score
2
Location
Jackson, MS
So I've been having some buzzing in my handlebars. I thought it was normal but recently rented a klr for a day and discovered that it was as bad if not worse than the klr. I've changed spark plugs, done a tbs, have grip puppies, have a set of salamander bar end weights installed and am wanting to re-torque the engine mount bolts next.

I've searched but can't find a how-to with pics going through the whole process. I have a service manual but it isn't particularly clear cut to me going from the pic in the book to the actual bolts on the bike.

As far as the buzz goes, it comes on just past 4k rpm and generally gets worse from there. I can also feel it in the foot pegs. I'm thinking it's the motor mounts because it goes away when I hit dips in the road. Any help is appreciated.

 
It is really pretty simple.

You should only have to worry about the two lower front mount bolts. You will have to remove the lower fairings to get to them unless your fairings have been cut for frame sliders. If they have then the bolts for the frame slider are the engine mount bolts. Torque the left side first then the right side. The left is a stationary mount point and the right has a sleeve that can be adjusted to take up any slack between the frame and engine. There is a pinch bolt that hods that sleeve in position.

 
Ok, so just the two bolts, that's a lot easier than I was thinking. In all my reading I thought there were like 10 that had to be re-torqued. So loosen both and tighten left to right should do the trick. Thanks!

 
Suggested reading on proper engine mount torque sequence.

And Geezer's earlier post

The left is a stationary mount point and the right has a sleeve that can be adjusted to take up any slack between the frame and engine. There is a pinch bolt that hods that sleeve in position.
is a bit misleading. The spacers on the two BIG engine mounts on the right main frame spare are not for taking up slack...the pinch bolts are to be loosened, the right side bolts torqued to the motor through the spacers, THEN the pinch bolts tightened. Same for the rear/lower mount. Loosen the pinch bolts, torque the nut/bolt assembly, then tighten the pinch bolts.

 
Last edited by a moderator:
Got it done, it made a small improvement in the vibes that I can feel but not drastic. The mirrors aren't as fuzzy when high speed cruising also. Once you get the plastic off it is pretty easy and for me was worth the effort.

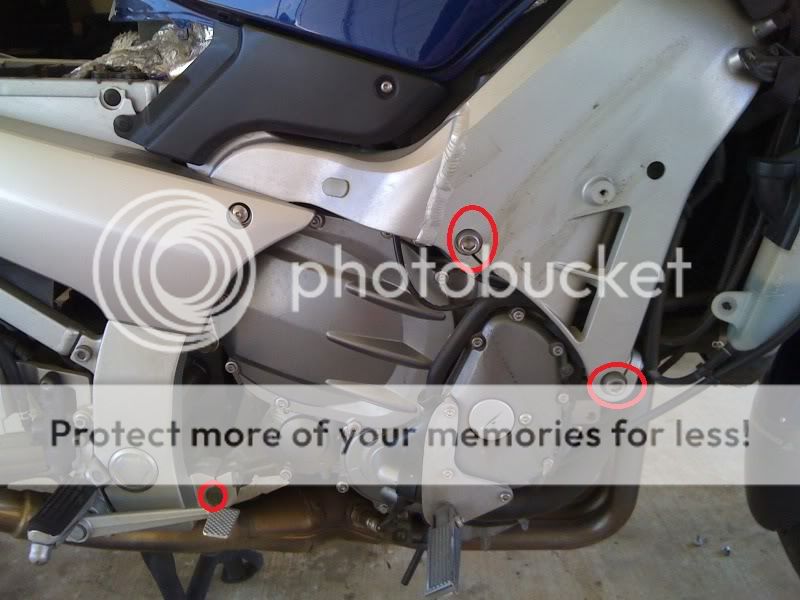
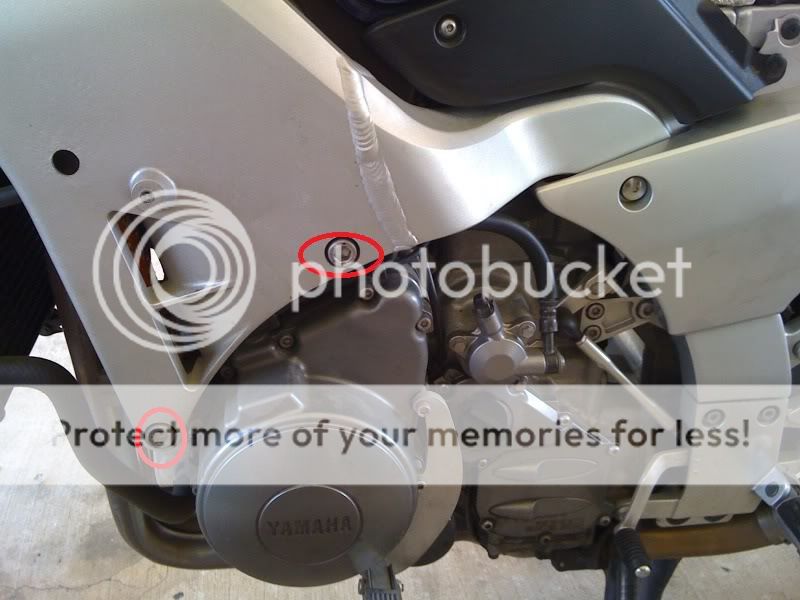
Here are the ones I re-torqued, I loosened the four upper mounts, then torqued the left side then right. You can see the pinch bolts in the right hand side picture that have to be loosened. Then I did the lower mount on the right side. Getting the plastic off was the hardest thing I did on this one.

moto2.jpg


moto1.jpg


Top