'06 Front Wheel Removal

Yamaha FJR Motorcycle Forum

Help Support Yamaha FJR Motorcycle Forum:

This site may earn a commission from merchant affiliate links, including eBay, Amazon, and others.
I just did a search but can't find a gem of an idea from FJRPierre, perhaps his article and pixs were lost in the First Great Hack Attack. Basically FJRPierre used a piece of lumber to create a bridge that runs perpendicular to the headers with blocks on each end that rest on the frame, you jack up using the bridging lumber. Picture a U with the bottom of the U the same width as the frame. Err, :blink: like I said, ping FJRPierre for the straight stuff and pixs.

Admin(s)? Can you find this posting?

Edited to add this poor man's sketch:
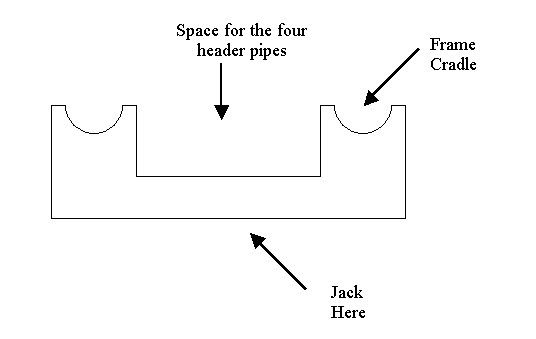
JackFrame.jpg


Last edited by a moderator:
I just did a search but can't find a gem of an idea from FJRPierre, perhaps his article and pixs were lost in the First Great Hack Attack. Basically FJRPierre used a piece of lumber to create a bridge that runs perpendicular to the headers with blocks on each end that rest on the frame, you jack up using the bridging lumber. Picture a U with the bottom of the U the same width as the frame. Err, :blink: like I said, ping FJRPierre for the straight stuff and pixs.
Admin(s)? Can you find this posting?

Edited to add this poor man's sketch:
I believe you are remembering this: Lifting FJR to change both tires, Please remind me of your stand/technique

If one is planning on using this method to support the entire weight of the bike (no center stand). Please make sure to have a DVD camcorder recording the attempt. I'm sure I could learn a lot.

 
Yup Joe2Lmaker, FJRPierre's page here is what I was looking for. Thanks! :thumbsup:

In this one thread sierrabus wanted to just lift his front wheel, mindtrip wanted to do a whole bike lift. The common theme for the two of them was the frame cradle for jacking the bike. Good for sierrabus, bad for mindtrip. The frame jack that I showed is only intended to prevent jacking on the headers, not as a whole bike lift. To that end -- DO NOT TRY TO LIFT THE WHOLE BIKE USING JUST THE FRAME CRADLE B) FJRPierre refers to it as

my new hi tech front end lifting device
For the whole bike lifters there are plans for pipe frames, sky hooks, a pair of pit jacks, etc. Then there is the pretty good value/function Sears lift which is a true whole bike lifter. Some people that have gotten long term use of the Sears lift have ended up with a leaky lift cylinder. You would have to use the lift a lot to wear it out!

 
Last edited by a moderator:
Just thinking ahead about tire changes. Noticed that up on the center stand the front wheel/tire rests firmly on the floor.
Being unfamiliar with center stands, wonder what best method would be to get the front end sufficiently off the floor to remove wheel.

Would appreciate any thoughts. And if this has been already covered, my apologies.
 
Last edited by a moderator:
I use the front stand from this package https://www.handyindustries.com/shop/produc...&D=0&S=

They sell the front stand by itself for $99 - not sure why the sell both for $89. The one in the $99 package is adjustable (width), but, the one in the $89 package is adjustable by putting it on the ground flat and yanking up on one of the sides until it fits under the fork legs.

If I'm removing both wheels, I put it on the center stand, remove the rear wheel, then do the front. If you try to do the front first, it actually puts the back tire on the ground and you won't be able to remove it ('03-'05 only - not sure about '06). This stand comes in handy (no pun intended) when washing the bike - put it under the front wheel and it's easier to wash the front wheel when it's off the ground instead of wash, spin, wash, spin, etc.

 
Try this.

https://www.fjr1300.info/howto/bikestand.html

I just did a search but can't find a gem of an idea from FJRPierre, perhaps his article and pixs were lost in the First Great Hack Attack. Basically FJRPierre used a piece of lumber to create a bridge that runs perpendicular to the headers with blocks on each end that rest on the frame, you jack up using the bridging lumber. Picture a U with the bottom of the U the same width as the frame. Err, :blink: like I said, ping FJRPierre for the straight stuff and pixs.
Admin(s)? Can you find this posting?

Edited to add this poor man's sketch:

JackFrame.jpg
 
Try this.
JackFrame.jpg
I built one, and used it for a while... problem was that the actual engagement spots on the bottom of the engine on my '05 aren't nice big flat areas that scream "Use Me!", but rather small non-perpendicular irregularly shaped spaces that have protrusions. I'd spend more time trying to line up the "prongs" on the wooden support, then getting the jack in place than it was worth. Now I just use a 2x4, a cloth (if I'm feeling particularly careful), and just jack it up with the 2x4 on the pipes. I've had it like that for over a week at a time in the past, with no ill effect. It also seems a lot less likely to tip over/become unbalanced if the wood in one of your "prongs" has a defect and splits under the weight...

 
Top