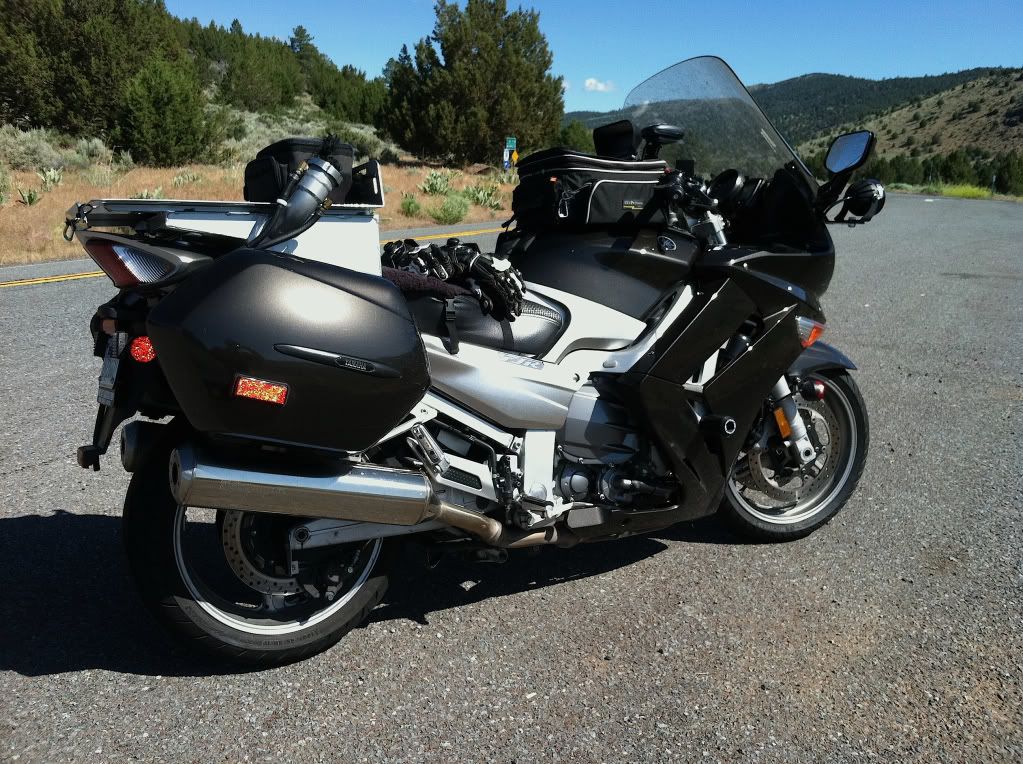
Anybody looking for a Tanji-style aux tank?

Yamaha FJR Motorcycle Forum

Help Support Yamaha FJR Motorcycle Forum:

This site may earn a commission from merchant affiliate links, including eBay, Amazon, and others.

alanrider

Member
Joined
Dec 17, 2011
Messages
8
Reaction score
0
Location
Redding, CA
Hi All-

One of the biggest lessons I took away from riding in the inaugural 10-n-10 Rally a couple of summers ago was that the stock FJR's range was just WAY too short! I wound up stopping to top-off far too many times because, in the BFE places I was riding through, I was never quite sure when I'd find an open gas station again. The second lesson I took away from the experience was that schlepping multiple bags (saddlebag liner, tank bag etc) in and out of motel rooms was a major time-waster and general PITA!

Not surprisingly, as soon as I saw the design of the Tanji-style tank I knew it'd be an ideal solution to both these problems. When I discovered they weren't being made anymore, I hooked up w/ a retired LD-riding friend of mine with some CAD design and welding skills and had him build one for my '09 FJR AE. After using it for the past six months, I can tell you it's the bomb. It holds ~ 4.5 gallons which puts me under the IBA maximum of 11.5 gallons and increases the bike's range to 400+ miles. It's well-designed and solidly built and holds a Pelican 1510 laptop overnight case so all I have to do is pop it off the cargo deck, grab my tankbag and roll it all into the motel room. Sweet...

HERE'S THE POINT: My friend used my bike for a prototype and is now building copies for other people. So if you've got a Gen 2 FJR and have lusted after this style of aux tank, here's your chance...

I'm not making a dime on this deal, just trying to help out other FJR owners who were in the same spot I was 6 months ago. If you're interested in finding out more about it (I'm not even sure what he's selling them for), email or PM me and I'll put you in touch with him...

HTH

Alan

PS: Can't figure out how to post photos here but will be happy to email one if you're interested!

 
Photo assist.........

TanjiKnock-off.jpg


Nice...VERY nice looking tank! :clapping:

Hopefully these will sell very well.

As one who has an auxiliary tank, let me opine that one does not have to be an Iron Butt or "rally rider" to appreciate the benefits of the extended range.

They're great for stopping when you want, not because you need to.
You are SOOOOOOOO right on that point...mostly I love it because I hate stopping for gas!

Alan

 
Price?

Is he willing/able to make them with a larger capacity?

I'm not concerned about rally rules, and would like one that holds 6-7 gallons.

John Ryan

 
Last edited by a moderator:
Price?

Is he willing/able to make them with a larger capacity?

I'm not concerned about rally rules, and would like one that holds 6-7 gallons.

John Ryan
Hi John --

Mike has both the capability and willingness to design and weld up whatever you're interested in. Last time I talked to him he was building a tank for a guy w/ a sidecar rig. He might even be able to modify my flat-top aux tank design to raise the capacity to 6-7 gallons and still get you the cargo platform if that's what you're looking for.

As for what he'd charge, it kinda depends what you're after -- i.e.: he can supply a complete turnkey package with fuel lines, fittings etc., just the tank itself or anything in between. Since he's retired, my guess is it'd be a lot cheaper than going to your local welding shop and his work is top quality...

If you need his contact info let me know...

Alan

 
Price is the question of the day.

*interested*...

-MD

Okay, since there seems to be some renewed interest here, I guess I may as well post Mike's contact info here:

Mike Langford

ibpete at gmail dot com

Tell him Alan sent you so he'll know who to be pissed at for putting his email up on the internet! ;-)

Again, price will vary based on exactly what you're looking for, but I think it's fair to say it's competitive (and higher quality) with many DIY approaches...

Good luck!

Alan

 
Mike has both the capability and willingness to design and weld up whatever you're interested in. Last time I talked to him he was building a tank for a guy w/ a sidecar rig. He might even be able to modify my flat-top aux tank design to raise the capacity to 6-7 gallons and still get you the cargo platform if that's what you're looking for.
That is exactly what I'm looking for, yes. I see you've posted his email. Mike and I met recently in Deming, I'll drop him a note.

Thanks,

John Ryan

 
Need photos and pricing - very interested.

The only good photo I have is above, but if shoot me an email if I can answer any specific questions for you. I think Mike can also supply pics as well. You'll find his email address a couple of posts back in this thread...

And as I said above, I have no idea what he's charging, partly because he can supply you with everything from a full turnkey set-up to just the tank or something in between. I can say it was money well spent for me as I HATE stopping for gas every 200 miles and/or wondering whether I'll find an open station in BFE in the middle of the night. Completely transformed the riding experience for me. And the large cargo platform makes loading the bike for a roadtrip a snap. In short, I couldn't be more pleased...

Good luck!

 
I like it.

It looks like it's anchored to the bike with a screw in the back and the seat latch in the front. Is that right?

Also, it looks like your fuel lines are routed from a bung in the bottom of the tank, to a valve, to tee from the vent, to the auxiliary fuel pump, to the man tank. Is that right?

Why is the vent tee in that line?

Last question. It looks like the auxiliary fuel pump is turned on using a push button mounted next to the tank. Is that right? I like the idea of a push button so the pump can't be left on inadvertently. I'm wondering what the advantage is of mounting it there instead of the handlebars.

Edit: One more question. How did Mike make those square holes for the tie down straps? All those holes using A jig saw would be tedious and a scroll saw would need a helluva deep throat. Nice job though. The sure are even! :scratching head smiley:

 
Last edited by a moderator:
I like it.

It looks like it's anchored to the bike with a screw in the back and the seat latch in the front. Is that right?

Also, it looks like your fuel lines are routed from a bung in the bottom of the tank, to a valve, to tee from the vent, to the auxiliary fuel pump, to the man tank. Is that right?

Why is the vent tee in that line?

Last question. It looks like the auxiliary fuel pump is turned on using a push button mounted next to the tank. Is that right? I like the idea of a push button so the pump can't be left on inadvertently. I'm wondering what the advantage is of mounting it there instead of the handlebars.

Edit: One more question. How did Mike make those square holes for the tie down straps? All those holes using A jig saw would be tedious and a scroll saw would need a helluva deep throat. Nice job though. The sure are even! :scratching head smiley:

Hi Joe --

Umm, I'm afraid you're asking these questions of the wrong guy -- if I knew all those answers I woulda just built the thing myself ;-)

Seriously, I'm more than a little mechanically-challenged, so your best bet is to ask Mike directly via the email address above. A few simple questions I can answer:

-- Yes, you're mounting assumptions are essentially correct. There are also a couple of adjustable shims that eliminate side-to-side movement.

-- Yes the momentary fuel pump switch was a fine idea for the reasons you state. The location is actually very convenient as I can simply open the valve and hold the button down if I want to speed up transfer (gravity feed alone takes approx. 30-40 minutes, which is not bad). Mike has improved this design even further by creating an adjustable timed switch which allows you to press the button once and the fuel pump will run for X minutes before shutting off. Based on my experience w/ this setup, I'm not sure what benefit mounting the switch on the handlebars would offer...

-- As for making those slots, I believe he gnawed them w/ his teeth! ;-) (actually I have no idea)

Other than that, all I know is that it works and I'm extremely happy with it!

Best,

Alan
Since Alan kicked this off I guess it would be okay to respond. I have mostly been a lurker because, not being an FJR owner, I didn't want to appear to just be a spammer. I love the bike and if my K1200LT gives up the ghost before I do the FJR is certainly high on my next bike list. Please let me give you a little background on this tank. I put my first cell on my K1200LT. Since a turnkey solution was WAY pricey for me at the time I thought I could do it for less and went with a $100 4Ga Jaz/RCI racing cell. Well, by the time I had figured out how to mount it and jury rigged a solution, I was thinking that if my time was worth $1/hour I would have been better off with the $600 custom cell. The stupid JAZ would only hold 3.4ga and I was always spilling gas with the top mounted, flat filler. When I was selected for the '07 IBR moving to 11.5ga was a priority and I custom made my own cell which is still in use. Retiring a bit over 2 years ago I was able to get serious about my plans to have a paying hobby. I've managed to build up a pretty fair machine shop in my garage and have access to a shop with some really serious sheet metal fabrication equipment (like a punch press that makes rectangular holes) :) . Nothing is outside of my capability now. I've built two more cells for the K1200LT and knew there was demand for the FJR Tanji style cell so when Alan contacted me about making one I was more than excited to take on this engineering challenge.

Based on my experiences with my cells I separated the deck from the cell so you can make customizations (like drilling new holes).

Here are some more gory details:

You can find the price list at https://employees.org/~mlangfor/stuff/FJR2_Price_List.pdf. Items are separated to give you the option of some 'do it yourself' in case you want to try to spend some time instead of some money. I have a small markup to cover my expense of going to the hardware store and floating the cost of the inventory. You can probably get these items for less but certainly not as conveniently ;) ;-)

Now that I am wrapping up the second, I have a better handle on time and materials so there will probably be some upward adjustment. The cell itself isn't too expensive but I have to manufacture all of mounting hardware for the quick release mechanism and it took me longer than I expected. I expect this to go up closer to $150.

Here are some pictures in case you haven't seen them. <a

href="https://picasaweb.google.com/107830667926908438954/Fjr_gen2_public#">

There are a couple of things I'd like to point out. Everything I've seen on the FJR says you need a fuel pump. While I hate adding complexity, this is true if you want to keep the bottom of the cell as low as possible. The bottom of the stock tank is so high you can't get a good gravity feed unless you mount a cell at least 2" higher. At the time I made Alan's I didn't know I was going to have to have a fuel pump until it was all done. Based on this new knowledge the most recent build is a totally integrated unit--the cell, wiring, fuel pump are one assembly. All you need to remove it is to:

  1. remove the center bolt in the rear
  2. release the pillion seat latch
  3. disconnect the power (SAE connector)
  4. disconnect the fuel quick connector


If you don't want a fuel pump I will be happy to modify the cell to raise the bottom up 2" which will move the top up less than 3/4".

Since I didn't seem to have mentioned it anywhere else this is a 4.5 gallon tank which I certify to pass IBA rules for tech inspection.

Also, when you look at the pictures I am no longer doing the double vent line system (overflow back to main tank) it was too complicated and didn't seem to work too well. Also, I am no longer using the plastic quick connect, it is now a brass unit.

Alan's cell is powder coated. You can't tell to well from the pics but it's a high gloss metallic silver. I'm strongly recommending the powder coating, It stands up well to the abuse and we can get a wide range of colors (including metallic). The unfinished aluminum will be pretty rough looking so it needs some kind of finish. You can have it done locally if you want. I'm not pushing for the $, but what I see as the nicest finished product. Basically, I'm passing the powder coating on at cost plus a slight markup for my time and mileage to/from the painter. Here is what it looks like when I finish it up.

unfinished_cell.jpg


In the next few days I'll have the pictures pictures of the integrated build which will be more representative.

Thank you for the ear and allowing me to post.

Best regards,

Mike [ibpete]

 
I have mostly been a lurker because, not being an FJR owner, I didn't want to appear to just be a spammer.
Mike/Pete,

This is just my opinion, but you aren't even close to being a spammer. I wish you and Alan would have gone into a lot more detail about what you had cooking and then posted some sort of group buy.

I post nearly every thought I have about FJR auxiliary cells <Link>. I even have links in my 'About Me' tab of my profile. So, speaking as someone who obsesses over the subject, I believe I am qualified to state with certainty that you fall well short of the 'spammer' label you are worried about.

Details man! We want details! It's the middle of the freaking winter. What the hell else is there to do but hang around here and see what people are working on?

While we're on the subject of spamming, ... Follow my lead as I spam the hell out of the st-owners.com because I believe I have a cool tank that would work well for them.

-Joe
Joe,

Thanks for the comment. I guess my reluctance is from the ldrider list where you can get pretty roughed up for crossing that line.

I've finished my second cell and played around with shooting a video in the hopes it would give a better view of what I'm up to.

Please take a look https://www.youtube.com/watch?v=BaYmBh6nuLE

Feedback is more than welcome.

 
Top