Audiovox Cruise Control Pad & Waterproofing

Yamaha FJR Motorcycle Forum

Help Support Yamaha FJR Motorcycle Forum:

This site may earn a commission from merchant affiliate links, including eBay, Amazon, and others.

Brian T

Member
Joined
Oct 30, 2006
Messages
8
Reaction score
0
Location
Denver, CO
I've recently installed an audiovox cruise and the Skyway control mount (looks and controls great). I placed some clear silcon sealant around the back of the control pad (wires and the back edges). Can anyone tell me if there is anything else that I should do to the front buttons on the pad so that I do not need to worry about rain?

Thanks,

Brian in Denver

 
I've recently installed an audiovox cruise and the Skyway control mount (looks and controls great). I placed some clear silcon sealant around the back of the control pad (wires and the back edges). Can anyone tell me if there is anything else that I should do to the front buttons on the pad so that I do not need to worry about rain?
Thanks,

Brian in Denver
Brian T -

There's some info regarding waterproofing the pad in this post:

Clicky

 
[Pre-Edit -- FU Photobucket, to view the photos you will need to install one of these addons Firefox fix Chrome fix ]

This is an alternate and less involved way to seal the switch pad. All pictures have been ripped off from kaitsdad, to which I've added the white text boxes. K’dad, let me know where to send the royalties. The following text is excerpted from one of my previous posts, repackaged (none too smoothly) here with k’dad’s pixs.

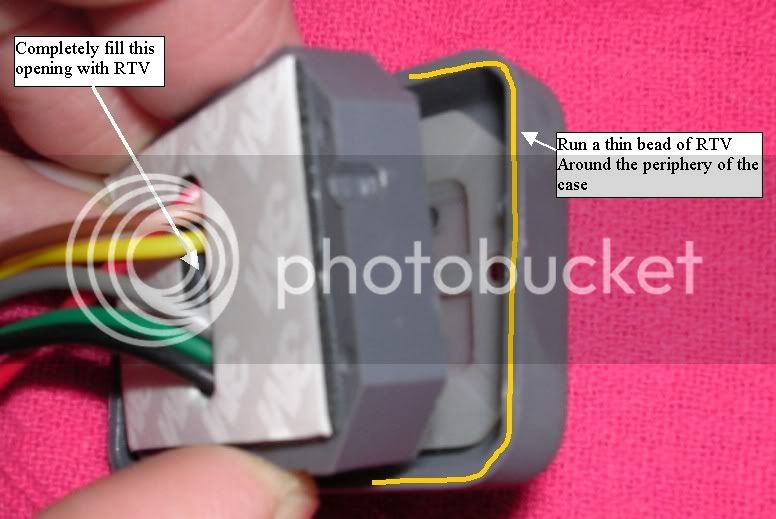
Split case. I ran a very small bead of RTV around the lip of the case so that it would make a sealing ring when snapped back together.

CaseRTV.jpg


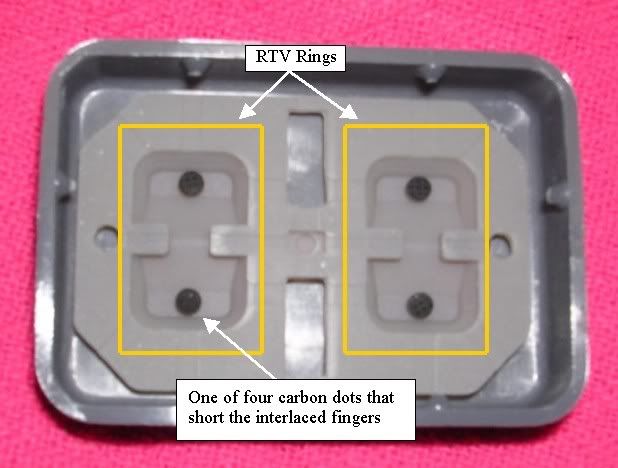
Sealing the opening on back of the pad is necessary but it is also very necessary (IMO) to seal around the edge of the case and the 'switches' on the front panel. Remove this rubber membrane, then using something like a toothpick draw rings of RTV as depicted. This isn’t structural; it only takes a very small amount of RTV to make a solid seal. Replace the rubber membrane, making sure it is right side up in the case!

RTVRings.jpg


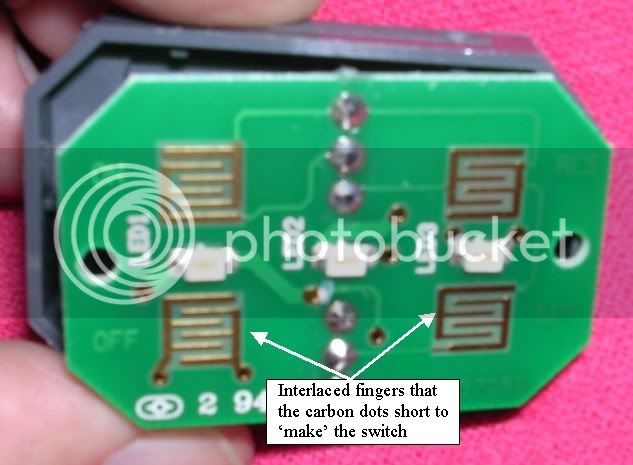
The ‘switches’ are actually the little carbon dots on the back side of the membrane that short together the interlaced conductors completing the switch.

InterlacedFingers.jpg


A water drop will do the same thing as the carbon dots, especially if it isn't clean water such as wash water. If water gets on the ON button, the CC will turn on and you won't be able to turn it off. If the CC is on and you are going around a corner and water unexpectedly makes the ACCELERATE circuit turn on, your life could become an adventure PDQ
ohmy.gif

Thanks for the great pictures kaitsdad!

 
Last edited by a moderator:
Thanks for the great pictures kaitsdad!

Cool !! My fingers are in pictures with Ionbeams' comments ........ ahhh...... wait a minute here............ :huh:

Ionbeam, anytime you want to plagiarize my pics, go right ahead sir !!! And your technique is certainly cleaner than mine ..

 
I have found clear RTV is a great Idea and Dow Corning makes a cool flowable.... DC 734.

Just lay that sucker face down and put RTV in the crack. It runs down inside the crack and becomes flush with the edges ....Worked really good.

Timalan

 
I have found clear RTV is a great Idea and Dow Corning makes a cool flowable.... DC 734.Just lay that sucker face down and put RTV in the crack. It runs down inside the crack and becomes flush with the edges ....Worked really good.

Timalan

Just be careful that the RTV being used is not aggressive towards copper - or the long term effects can be most undesirable.

 
Top