Audiovox install a real pain

Yamaha FJR Motorcycle Forum

Help Support Yamaha FJR Motorcycle Forum:

This site may earn a commission from merchant affiliate links, including eBay, Amazon, and others.

Roadstar

Well-known member
Joined
Nov 17, 2008
Messages
374
Reaction score
-1
Location
Lancaster PA
To my back that is :blink: Well i figured i stalled enough on the install of the AVCC i purchased from Fred W & starting to get into it & had the tank off & t-bar . When i must have turned just a little wrong & BAM , i got this shooting pain from my butt to my upper back. So being a trooper i thought i could work thru it. So i take off the fuel rail & drill the stop & get that back together & BAM (agian). So now my poor FJR is still topless & didn`t finish the job & sure won`t untill i feel a little better.

My point is be very carefull while working on the bike or it sure will hurt you.

 
I installed mine a couple of weeks ago. Its in pain the ass (er.. back in your case), but very worth the effort!

 
Damn. That sucks Roadstar. Sorry to hear about your back.

But I've been there, done that (though not while installing an AVCC), and got the physical therapy receipts to prove it.

 
Thanks guy`s

Well i decided to grab the walker & shuffle out to the garage (hard to breath it hurt so much) but my bike looked so sad sitting there stripped. Well got it all hooked up , started the bike & while it was warming up it hit the button to see if i have power to the cruise control switch (which it does) but i noticed the idle is a little high (1500rpm) but thought when it warmed up it would go down (it didn`t) So i went to the idle adjustment & unscrewed pretty far & still at 1500rpm. So off with the tank to check if the cable is too tight for the cruise , but there is plenty of slack & nothing hitting. So i check everything else & put just a pinch more slack on the cruise cable & put it all together (and same result), i decided to take it out for a ride anyway (i looked like a guy first time getting on a horse) Well i get it to 5th gear & put the power on the cruise switch & the little light, lights up so i figure cool it`s on. Well it hit the set button & nothing (it don`t work) So i decided to do it again & hold the set button a little more & nothing. I hooked the blue wire to the orange wire at the computer & tried switch 7 on , then off & still nothing. I also hooked the purple & red wires to the brake light wires & hooked the red wire from the control pad straight to the battery (with fuse). Now the pad wires had a black & a gray wire , so i hooked the black to ground & just couldn`t get to the left turn signal (as instructions say to (but figured it was just for the lighting (or is it a power wire that need to be hooked up)

Well let me know what you guys think ???

 
Well got it all hooked up , started the bike & while it was warming up it hit the button to see if i have power to the cruise control switch (which it does) but i noticed the idle is a little high (1500rpm) but thought when it warmed up it would go down (it didn`t) So i went to the idle adjustment & unscrewed pretty far & still at 1500rpm.
Sounds like you have a vacuum leak. Double check the hoses!

 
Yeah, that was my thought too. That would explain the high idle and no workie.

Also, make sure that you have the hoses on the vacuum reservoir attached correctly. That reservoir has the check valve built into it so you have to have the goesinta and the goesoutta correct. They are labeled on the reservoir with some sort of a cryptic 3 letter code as I recall.

And you don't need (or want) all that much slack in the beaded chain when the throttle is closed. That is just more cable the servo will have to pull in when you engage the cruise and will delay setting the speed.

 
Last edited by a moderator:
Just put one on my new to me 2006. The install is hard on your back, but great on your right wrist after your done. I am a bit rusty, took my almost three hours :rolleyes: to put that sucker on....

Smitty :yahoo:

 
Didja tap one of the vacuum ports or all 4? With all 4 you MUST use check valves, and they MUST point the right way, to keep the ports separate from each other.

If you used all 4, remove all that stuff and tap just one, just for troubleshooting if nothing else. You won't need any plumbing other than one tube from the port to the control unit, it has a check valve built in to its port. Be sure and cap the other ports!

 
He bought my used cruise control after I uninstalled it.

I tapped into only #1 and #4 as #2 and #3 ports are already in use on my 1st gen for something (forget what exactly). I sent him the hoses I used with the tee fittings, so I assume that he used them as I did. The only check valve is at the suction side of the Murph's kits vacuum reservoir. It works just fine that way.

And no, you do not have to put check valves between the vacuum ports. The stock hoses going to #2 and #3 are tied together without any check valves. You have to disconnect them when you do a TBS, but how else would you get the mercury sticks on?

 
Last edited by a moderator:
Mine has nothing on these ports stock. They're capped.

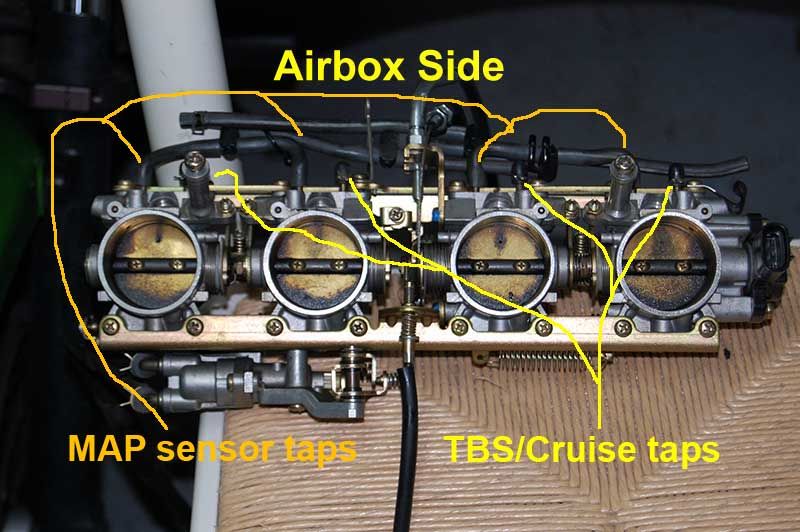
You may be thinking about the hoses going to the MAP sensor, which are on different ports, and shouldn't be used for the cruise, and are tapped at all four cylinders.

Stole RadioHowie's throttle body pic to illustrate:

gunk_01.jpg


You may be right. I may have been thinking of those.

But they are still vacuum ports and they are still tied together with no check valves, right?

In any case, I ran my bike with the #1 and #4 vacuum ports tied together for over a year with no problems.

 
He bought my used cruise control after I uninstalled it.
I tapped into only #1 and #4 as #2 and #3 ports are already in use on my 1st gen for something (forget what exactly). I sent him the hoses I used with the tee fittings, so I assume that he used them as I did. The only check valve is at the suction side of the Murph's kits vacuum reservoir. It works just fine that way.

And no, you do not have to put check valves between the vacuum ports. The stock hoses going to #2 and #3 are tied together without any check valves. You have to disconnect them when you do a TBS, but how else would you get the mercury sticks on?
Yup ! i`m using it the exact way i got it from you , & took off the little rubber caps on #1 & #4 & used them ports. Maybe in the morning before work i`ll get the tank back off & check for loose or not connected vacuum hose. Better to see things in daylight anyways.

 
Just put one on my new to me 2006. The install is hard on your back, but great on your right wrist after your done. I am a bit rusty, took my almost three hours :rolleyes: to put that sucker on....
Smitty :yahoo:
Show off :yahoo: & no pics & how too`s from the master :glare: Now was it installed in front of coolent pipe or under seat. I was thinking of installing it over the winter where V45 did his behind engine. I was going to do that first , but after seeing what i would have to remove to install, i thought better to leave that for a non riding month.

 
Well i got the chance to take it all apart today & found my problem. The little piece that the chain connects too, that bolts to the throttle body cable setup, was just a hair sticking down & stopped the throttle shaft from coming down (so now it idles perfect at 1 K rpm`s). I`m moving the vacuum can under the passenger seat so i`ll need some more vacuum line for this & it`s too late now to try it out too see if it works. (at least the bike runs & idles now)

 
Well i got the chance to take it all apart today & found my problem. The little piece that the chain connects too, that bolts to the throttle body cable setup, was just a hair sticking down & stopped the throttle shaft from coming down (so now it idles perfect at 1 K rpm`s). I`m moving the vacuum can under the passenger seat so i`ll need some more vacuum line for this & it`s too late now to try it out too see if it works. (at least the bike runs & idles now)
Glad you found the pblm RoadStar.... Also, hope you get to feeling better - a 'tweaked' back is not fun...

Hope the rest of you guys are aorund the 1st week of November when I attempt to install mine - I haven't read this much since school!

 
Well i got the chance to take it all apart today & found my problem. The little piece that the chain connects too, that bolts to the throttle body cable setup, was just a hair sticking down & stopped the throttle shaft from coming down (so now it idles perfect at 1 K rpm`s). I`m moving the vacuum can under the passenger seat so i`ll need some more vacuum line for this & it`s too late now to try it out too see if it works. (at least the bike runs & idles now)
I should have explained to you more about that connection. I believe that I sent you a picture of how I fastened the beaded chain to the tang on the throttle, didn't I? If not, here it is:

2173217730098858932S600x600Q85.jpg


There were 3 nuts on that tiny button-head allen screw. The idea was to run the first nut (top nut in picture) up tight to hold the screw on the tang. Then loop the end ring of the beaded chain on the screw, next fit a nut very loosely so the end ring has some float. The last nut is a back-nut to tightened against the prior one so it won't move and bind it up. You want the end ring to be able to rotate freely on the screw so you don't get any binding, and so it doesn't loosen any of the hardware. Loctite blue on all nuts is a good idea.

Also, the reservoir (and servo) were previously located under the drivers seat on my 1st gen, so there should have been enough vacuum line if you ran it along the left side frame rail to behind the tank, unless you can't follow the same route on a 2nd gen.

Anyway, glad you got the high idle mystery resolved. Now to get that cruise control cruisin'! (or controllin'... :unsure: )

 
Thanks for the pic & yes you did send a pic , but i tightend the whole thing up (my mistake & will go back into it during the winter when i try & locate it where V65 has his (behind the transmission) I didn`t get a chance to go to the auto parts store , as i do need more hose , because on the gen 2 doesn`t have that much room to handle the control unit & that perticular vacuum cylinder (guess if i made my own from PVC it would) . So i`m locating it all the way to under the far back of the passenger seat, under the tail piece. (for now)

Thanks

 
Top