Audovox throttle connection and reservoir size

Yamaha FJR Motorcycle Forum

Help Support Yamaha FJR Motorcycle Forum:

This site may earn a commission from merchant affiliate links, including eBay, Amazon, and others.
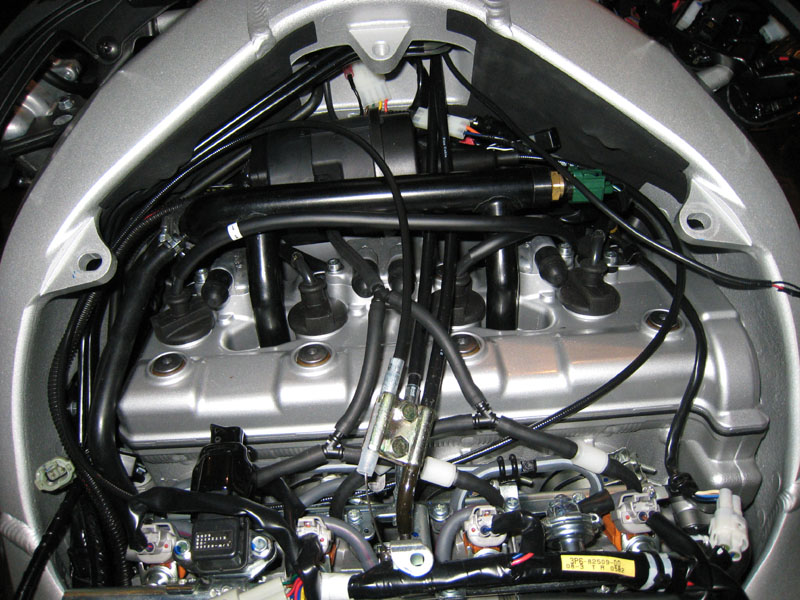
My current plan is to connect through check values and Ys the 4 cylinders into a reservior 1-1/2" by the width of the tool box pan. Does that length/side sound "right"?
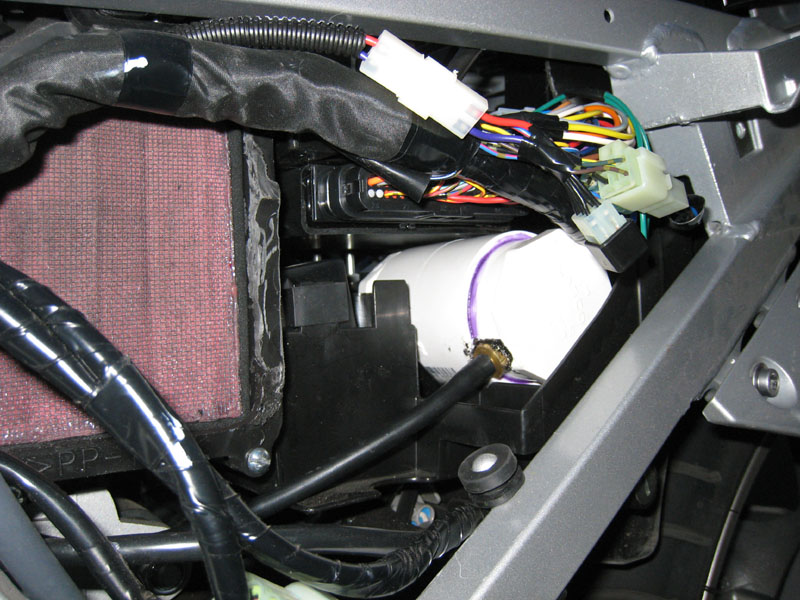
I'm not sure about the 2007, but I found this nice place for a reservoir on my 2008:

vacuum_reserve_canister.jpg


And I'm also connecting to all 4 cylinders with 4 check valves and a couple Y connectors:
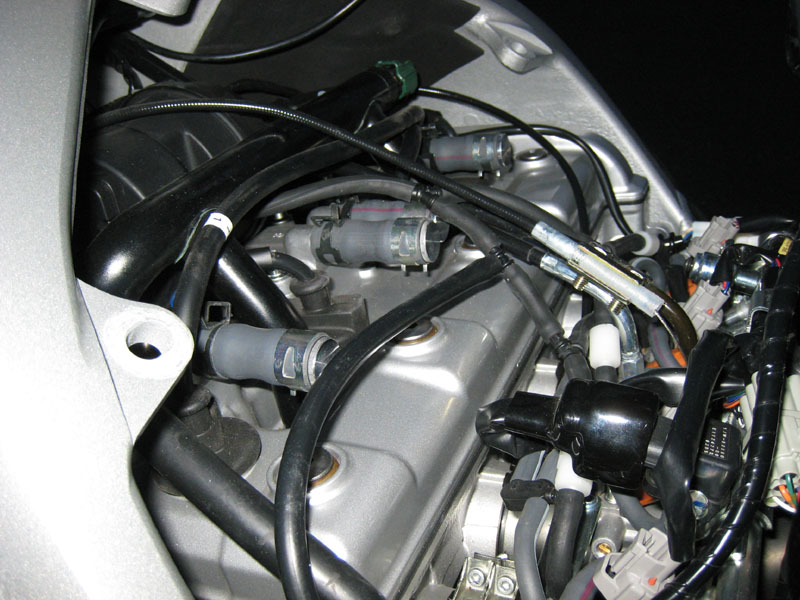
vacuum_reserve_line.jpg


It seems to work great!

Full details here: https://www.fjrforum.com/forum//index.php?showtopic=114094

 
I'm not sure about the 2007, but I found this nice place for a reservoir on my 2008:
And I'm also connecting to all 4 cylinders with 4 check valves and a couple Y connectors:

vacuum_reserve_line.jpg


It seems to work great!

Full details here: https://www.fjrforum.com/forum//index.php?showtopic=114094
UP,

That's under and behind the ECU? I'll have to pull the side cover and look.

I was planing on using the same 4 connections like you did to the engine (saw your post several weeks ago). Do you recall what the ID of the vacuum ports off the engine are?

Thanks for the great tip,

Roy

 
UP,That's under and behind the ECU? I'll have to pull the side cover and look.

I was planing on using the same 4 connections like you did to the engine (saw your post several weeks ago). Do you recall what the ID of the vacuum ports off the engine are?

Thanks for the great tip,

Roy
I'd say it's just under the ECU; not behind it. The length of the reservoir runs about half the width of the tool tray. You just need to remove the side panel and the air intake/ecu wire harness cover to check if that space is open on your bike. My reservoir is made of a 2" PVC coupler and 2 plugs, so you could buy the parts, test fit, and return them if it doesn't work out for you because it doesn't involve getting any PVC pipe cut to length. You'll have to remove the tool tray to actually get it in there, but that's pretty easy (2 bolts and 3 phillips head screws; unplug the ECU harness).

I don't know the actual measurements of the vacuum ports, but the rubber hose that comes with the Audiovox fits on them. All the connectors I bought are for 3/16" inner diameter hose. When I needed more hose, I just took a sample of what came with the Audiovox to an auto parts store and asked for some hose like it.

My install thread has links to exact parts I ordered for the Y connectors and check valves.

Where are you planning to put the servo? Are you feeling brave enough to go for the behind-the-coolant-pipe installation so you don't use up any valuable under-seat storage space on the bike?

 
Where are you planning to put the servo? Are you feeling brave enough to go for the behind-the-coolant-pipe installation so you don't use up any valuable under-seat storage space on the bike?
UP, thanks again.

I'm going under the seat. Hate to lose the space but I'm concerned about the heat under tank and servo. I run with my bags all the time so the tire plugger and compressor can go there.

Roy

(finally figure out how to make an attachment to hold the servo cable end on my wife's Vstar 1300, so now I can get on with getting it installed and move on to my FJR.....)

 
Some people also added a second power switch that will kill disengage the AVCC no matter what.
I have one of those switches on my FJR. It's similar to the one on the right: :rolleyes:
Ya know, I can think of quite a few situations where that wouldn't be an optimal solution.
I was thinking the same thing. Like when riding along at ~80 mph on the Interstate with BSTs* bearing down on you.

* Big Scary Trucks
I agree fully (hence the smiley with my photo). But if my AVCC went beserk, then the kill switch will come in handy because I'd rather lose power than continue down the road with uncommanded WOT. :stun:

In any case it's highly unlikely I'll have a problem with my control pad because it's VERY well sealed. The circuit card is coated with Humi-seal (except for the switch contacts), the switch membrane is sealed on both sides and the whole assy is sealed into the beautiful Skyway housing. I constantly ride in the rain (I do live in Seattle) and no problems yet.

 
Last edited by a moderator:
"Removing the servo cable end takes 5 hands or some clever work."

6 pieces of the cut off ends from medium sized plastic cable ties forced into each tab slot with needle nose pliers gits her done.

I'd make a mark on the bell housing with a sharpie before disassembly to reorient the pieces to the original position and be careful that the diaphragm is seated properly before popping it back together....DAMHIK.

Taking the thing apart once it's in that space requires contact with a power greater than yourself and the dexterity of small mitts.

 
Last edited by a moderator:
"Removing the servo cable end takes 5 hands or some clever work."
6 pieces of the cut off ends from medium sized plastic cable ties forced into each tab slot with needle nose pliers gits her done.

I'd make a mark on the bell housing with a sharpie before disassembly to reorient the pieces to the original position and be careful that the diaphragm is seated properly before popping it back together....DAMHIK.

Taking the thing apart once it's in that space requires contact with a power greater than yourself and the dexterity of small mitts.
This all sounds more complicated and risky than just draining some coolant (loosen 1 bolt), removing the coolant cross-over pipe (2 bolts and 2 hose clamps) and putting the servo here where it is 100% completely hidden from view:

servo_and_vacuum_lines_redone.jpg


I don't remember there being that much space up front there on a 1st gen.

It's definitely not that clean and shiny! ;)

 
Last edited by a moderator:
I don't remember there being that much space up front there on a 1st gen.
It's definitely not that clean and shiny! ;)
Luckily, the bike scheduled for surgery is a 2007, so it is an option.

Don't judge me on the cleanliness of my bike :glare: ... it was a brand new bike with only 80 miles on it when I did all my major farkling. It sure was nice to work on such a clean bike :) .

Hey, no judgment here. I wish mine was that clean.

Funny, it doesn't seem to get there by itself... ;)

 
I don't remember there being that much space up front there on a 1st gen.
Definitely NOT a Gen I option.

Every friggin' wire that runs from head to tail on a Gen I runs right through the spot where that AVCC unit is sitting...

PLUS, the thermostat housing and the 2" hose going to the radiator! :dribble:

Where in hell is the thermostat on a Gen II?

 
Last edited by a moderator:
Here it be. Removing the servo cable end takes 5 hands or some clever work.
Thanks for the pics - yep, it does look like a beyatch to take apart.

This all sounds more complicated and risky than just draining some coolant (loosen 1 bolt), removing the coolant cross-over pipe (2 bolts and 2 hose clamps) and putting the servo here where it is 100% completely hidden from view:
I'm going to agree with UP here - but then again I'll almost opt for a little more time for a lot easier work. :)

 
Top