Changing Springs (Gen I) Question

Yamaha FJR Motorcycle Forum

Help Support Yamaha FJR Motorcycle Forum:

This site may earn a commission from merchant affiliate links, including eBay, Amazon, and others.

TomInPA

Well-known member
Joined
Nov 30, 2010
Messages
3,471
Reaction score
1,262
Location
Valrico, FL
I pulled the forks and removed the cap and plunger with no problem. I understood that the springs could just slip over the rod, but that doesn't seem to be happening. All I want to do is replace the springs and refill the oil without replacing slides and seals.

Do I need to remove that bottom allen bolt with an impact driver, or can Ieave that alone and use some trick to hook the springs and pull them?

 
No you can leave the forks intact, cartridge stays in . I'll assume you've dumped the old oil....... Just be sure the diameter of the new springs is same as the old on the end that goes down....... oops just noticed you have Gen 1...... which means the "washer" on top of the cartridge should be big enough for the spring. On the upper end, depending on what kit you are trying to install, they may have supplied you washers or maybe not, if you need one. Next, you calculate length of spacer needed and cut your spacers. Now you take the springs out, add oil to the required level, etc.

 
Okay, springs are out. I just needed to remove the bolt over the spacer rod. Now the new GP springs have a spring guide and brass spring washers. If anyone knows, I think this is the direction everything gets re-inserted. The spacer replaces the original thin tube spacer?

Or does it insert into the bottom of the spring? GP didn't send any instructions. (EDIT: They appear to insert on the bottom based on this thread https://www.fjrforum.com/forum/index.php?showtopic=143347 )

9092A330-0028-40ED-A37C-0108A9713CD0.jpg


Last edited by a moderator:
It looks like Fred might have my answer https://www.fjrforum.com/forum//index.php/topic/143347-race-tech-spring-guide/?do=findComment&comment=1082537

Just went through this today on BigOgre's bike (an '04 1st gen). He had a Yamaha shop install Race Tech Springs (1.0kg/mm) when they were also replacing the oil seals. After they did the work he immediately began to notice clicking metallic noises when the forks were even slightly compressed, worse when on the real roads, that appeared to be coming from the forks. At CFR a couple of us listened to them and agreed the sound seemed to be coming from inside the fork legs. We made plans then to dig into them later.
Today we (finally) had a chance to pull off the fork legs and found most of the parts seen in the above quoted post. He had no washers underneath the springs, but had the funny torpedo shaped black delrin spacer thingee on the damper shaft with the spring over it. The bronze stepped washer was on the top of the spring with a steel washer over that.

One problem that we immediately found was that the shop had installed the stock length top spacers back into the forks which put about 50mm of preload on the new Race Tech springs. This was made apparent when the lock nut shot across my garage when we released the tension.

I'm pretty sure that what making the noise was that the black delrin torpedo spacers, which are free to slide up and down the damper shaft, probably worked their way up the shaft and then the spring was allowed to work off to one side on the bottom, where it sits on top of the (flat) cartridge top. Once the spring is off center the black spacer would no longer be able to drop down anymore (as far) to help in maintaining the spring centering. Seems like a bad design to me.

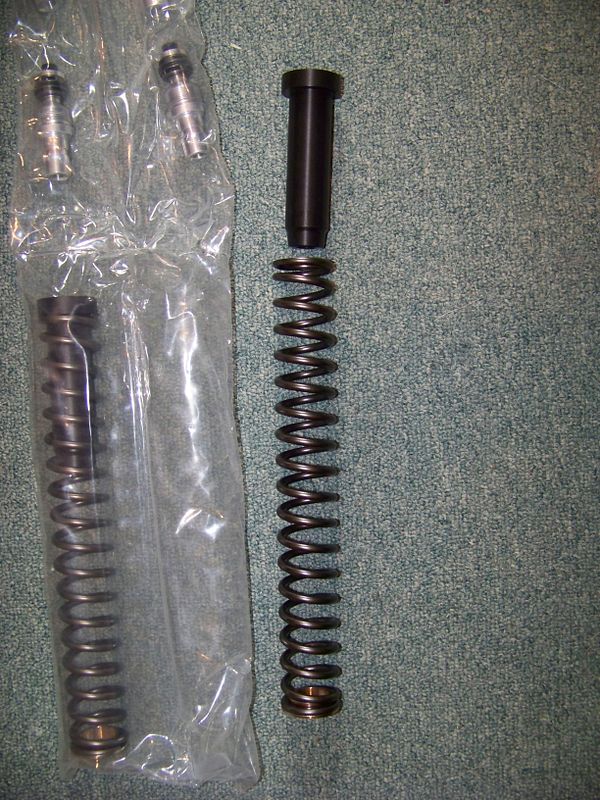
To fix the problem we decided to put the brass lipped washer on the bottom of the spring, to hold the spring centered and also protect the top of the cartridge. Then we installed the springs with a pair of GP Suspension spring buffers (I had on hand waiting to go into my own forks) on the top of the springs to perform the same centering duties up there. They look like this:

100_4017.jpg


It's the black thingee in the picture above.

By installing these spring buffers it holds the spring concentrically centered on the damper shaft, so the spring cannot work its way off center and rub on the inside of the fork legs. But, also being captured at the top of the spring stack, it means that the damper shaft does not ride up and down inside of that soft spacer and potentially wear it.

The above damper adds 10mm to the spring stack-up dimension, so you do need to account for that when you measure and cut your top spacers. Before the change, using only the Race Tech supplied parts, we had a 99mm space between the installed spring stack-up and the lock-nut underneath the fork cap (with the cap installed and the nut locked up). After installing the GP buffers that space decreased to ~ 89 mm. We ended up cutting those spacers a lot.

Some new fork oil and these components re-installed, we made some sag measurements on the bike and got ~25mm of static sag (just the bike weight) and 35mm of dynamic sag (rider weight on the bike). My experience says that this will still be on the sporty/stiff side of the suspension compromise. These are the sags that I have been running on my bike for the past several years and I might want to go a bit softer sprung for dealing with real world roads. But it's bound to be **** ton better than the way that they were installed previously.

I wish we had done sag measurement before, but I'm guessing we had zero static sag and just a little dynamic sag with all of that preload. I'll wait to hear from Mike (BigOgre) on what the results were, but I'm guessing he will be very pleased.
 
Last edited by a moderator:
No you can leave the forks intact, cartridge stays in . I'll assume you've dumped the old oil....... Just be sure the diameter of the new springs is same as the old on the end that goes down....... oops just noticed you have Gen 1...... which means the "washer" on top of the cartridge should be big enough for the spring. On the upper end, depending on what kit you are trying to install, they may have supplied you washers or maybe not, if you need one. Next, you calculate length of spacer needed and cut your spacers. Now you take the springs out, add oil to the required level, etc.
Ray, thanks for posting. I'm going to flush these with ATF and assemble tomorrow. Do you have any tips on setting the length of the spacer/ preload?

 
I will dig up an instruction sheet from RaceTech..... it's all the same idea for spacer length and preload. Your plastic guides likely go in the top of the springs, with OEM flat washer on top of that, then the spacers..... you will have to cut them off. Back out the preload on the fork caps so the surface is flush with the bottom of the cap, and measure to that surface..... Essentially, you want 15mm of preload, meaning you have to compress the springs 15mm to get the fork caps threaded back on....... anyway, stay tuned.

 
Ray, I told Tom that you are the man, when it comes to fork rebuilds...glad to see that you didn't disappoint.

 
Last edited by a moderator:
I will dig up an instruction sheet from RaceTech..... it's all the same idea for spacer length and preload. Your plastic guides likely go in the top of the springs, with OEM flat washer on top of that, then the spacers..... you will have to cut them off. Back out the preload on the fork caps so the surface is flush with the bottom of the cap, and measure to that surface..... Essentially, you want 15mm of preload, meaning you have to compress the springs 15mm to get the fork caps threaded back on....... anyway, stay tuned.
Email sent. When I took off the fork caps there was no noticeable compression. The cap uncrewed and did not jump into my hands. The fork oil seemed low to me and the top of the springs were visible. I removed the spacer and dumped the oil and caught the spring and washer. The plan is to rinse the forks with ATF and reassemble tomorrow...hopefully the right way.

Thanks for replying! I got nothing but the parts from GP.

 
Last edited by a moderator:
Looks like you figured it out Tom. My install was using Race Tech components, that's why the spring guide is different.

Follow Fred's pic's with the brass guide at the bottom and the HDPE spring guide inserted in the top. For preload adjustment, I stacked up the OE spring plus all the OE components and compared overall length with the stacked up aftermarket stuff. Main differences will be spring length and IIRC, 1/4" extra from the top spring guide thickness, don't forget to include any extra washers you're using. I used a tubing cutter for a nice square cut of the OE spacer.

Measure twice and cut once!

--G

 
Last edited by a moderator:
I also heard from RaYzerman. Pretty much agrees with you. It took a while, but I did find your thread and Fred's explanation that put me on the right track. Getting confirming information on this makes it a lot easier. Maybe this thread will help out another owner in the future.

Got this from Ray

https://www.traxxion.com/Fork-Spring-Installation-Instructions/
I dug up the RaceTech instructions for my V-Strom, but those forks don’t have cartridges…….. maybe use Traxxions…..

The Delrin thing is to keep the springs centered so they don’t (a) get off the brass nut/washer on the top of the cartridge (which I think is big enough for the diameter of the springs anyway), (
cool.png
keep the springs centered inside the tube, can be top or bottom. You put it where you think it will do the most good. Sometimes they give you a flanged washer, which will do the same thing. NOTE, your originals had nothing, and the earlier spring kits had nothing……. They relied on the ID of the tube to keep things in there, and there was a small end to the spring which could never fall off the brass nut/washer on the cartridge….. anyway, just sayin’, whatever looks good to you based on the springs you have. I think RaceTech’s go on the bottom also.

So, assuming it goes on the bottom, Delrin damper inside the spring, temporarily install onto the cartridge. Measure thickness of top washer (OEM) that sits on top of the spring. Extend fork tube, measure top lip of fork tube to top of spring. Deduct thickness of top washer. This is your first number.

On fork cap, back out preload adjuster so the bottom of it is flush with the bottom of the fork cap (if you wind it out all the way, it will be up inside the fork cap somewhat). Measure fork cap, bottom surface to bottom of top flange that becomes the fork tube cap. Subtract this number from the first number. Add 15mm because we want 15mm of preload when you finally assemble the forks (You will have to push down on the fork cap to get it to start threading in…….). Now, your final number is the length of the spacer you need. Mark with a tube cutter, then carefully hack saw it off….. or maybe you can use the tube cutter (I never have). File off any burrs.

Now, test fit. With everything together, top cap screwed on, raise fork tube and there should be a 15mm gap to the bottom of the fork cap or near enough. You can always compensate with a washer if something isn’t quite right, but don’t worry about being perfect to 1 mm or two either…..

If all OK, disassemble, pull spring and leave the delrin thing in the fork (so we don’t have to guess how much volume it takes up). Fill with oil, OEM spec says 98-100 mm below the top of the (collapsed) fork tube with springs out. Perhaps make that a little more (RaceTech says 110). Just means a little more air cushion, nothing you’ll notice much…… OK, put it all together, you’re done.

On the bike, check your sag, adjust preload to suit….. or, just screw in the preload until 3 bars are showing and go ride. Set rebound to 6-8 clicks out, compression same. Unless you already know what your dialed in previous settings were…… maybe back out one click more since you have better springs now.
 
Last edited by a moderator:
I forked up on the oil level......... the fork tube should be collapsed, not extended..... brain was not in gear while typing.

 
Last edited by a moderator:
I got the forks flushed, and am getting ready to reassemble. It appears the brass washer faces down to the damping mechanism and the Delrin spring guide then inserts into the springs, followed by the washer and spacer. In my case, one of the Delrin guides was a perfect fit, and the other was binding on the damping rod threads. I reamed it to 13/32" which is a perfect fit and slides over the rod.

I'm cutting spacers to set up the preload now, then will refill with oil. It seems the Delrin spacer might occupy some volume in the oil? Anyway that should be minimal with the spring guide on top. I think I'll follow the RaceTech oil level of 110 mm, Ray mentioned above due to possible displacement by the spring guide.

My spring+guide+washer set in the extended fork are 175.5 mm below the top lip. The cap/preload height is 40.5 mm, so to get 15mm preload, I'm gong to cut the tube to 150.0 mm. Digital calipers are nice for this job. Now explain how my stock spacers were 150 mm and the springs I put in are 10mm taller?. I think I mentioned in the first post these had no apparent preload when I removed the cap, and I rode it for years with the preload cranked all the way down.

 
Last edited by a moderator:
I think Sonic and RaceTech typically have significantly longer springs than the originals, thus I have always have had to cut spacers...... looks like GP's are similar length to the originals, thus it worked out you didn't have to cut your spacers...... it's all good, glad you got this all back together. You will wonder where this new bike came from................

 
It all worked out. Thanks to Ray and some posts on the forum. The spring guide threw me off, and the fact my original springs only had 5 mm of preload was a surprise. Could the springs have compressed that much in 10 years? I rebuilt the forks with new slides and seals 4-5 years ago, but let the dealer do the work. It was a soft setup,even on max preload and high rebound and compression damping settings. I'm looking forward to a performance boost.

Anyone that has not changed out the springs in a Gen I and most Gen II bikes, would be amazed once you get into it, how the original setup may not meet specifications.

 
Last edited by a moderator:
Chiming in a little late here.

Looks like you figured out the orientation of the delrin spring guide that goes at the top. It's job is to keep the spring centered on the damper rod and helps to keep it from bowing one way or the other during compression, which would result in the spring hitting the inside of the inner fork leg and creating friction and noise.

That lower collar goes on the bottom of the spring as a new "seat" for the lowest spring coil. The collar is supposed to fit directly over the brass end of the top of the damper cartridge after you have removed the big flat washer pressed on top (on 1st Gens). Second Gens do not have that flat washer as the stock spring is sized to fit directly over that seat on the cartridge top.

Hopefully you removed that washer, otherwise there is nothing keeping the large inside diameter of the spring and flange centered at at the bottom and it will eventually shift and start dragging on the inside of the fork tube.

I also have some more info on setting the preload spacer length if you are interested.

 
Last edited by a moderator:
Well, I didn't remove that washer, but I saw it when the forks were rebuilt. I don't now how that could be removed without pulling the entire assembly apart including slides and seals. I suppose it's possible when the dealer rebuilt the forks they didn't put that washer back in. The old one was badly damaged and came back in the parts bag, and I didn't supply a replacement.

Everything is reassembled at this point. As far as spacer length, I was perplexed that even though the stack height was greater with the new springs and Delrin insert, I needed 150 mm of spacer, which is what the stock spacer was that I took out. I might have this completely wrong, but it seems that whatever the stock spring was sitting on should work for the new one. The progressive spring has a similar size end-opening as the straight spring with the brass bushing. This image shows the new and old side-by-side (yeah the spring guide is pointing at the wrong end here).

9092A330-0028-40ED-A37C-0108A9713CD0.jpg


Last edited by a moderator:
You can get the big washer off the top of the cartridges without removing them. Just hook under it with a bent piece of coat hanger or the like and pull up on one side at a time. It is just pressed onto the top and it's not that tight of a press fit.

The reason the stock spacer may have worked for you is that the replacement spring's free length may be shorter than the stock spring.

 
Top