Changing the dog bones

Yamaha FJR Motorcycle Forum

Help Support Yamaha FJR Motorcycle Forum:

This site may earn a commission from merchant affiliate links, including eBay, Amazon, and others.

MarFJR

URGNT
Joined
May 25, 2011
Messages
249
Reaction score
1
Location
Manchester, NH USA
2 Simple bolts that are an absolute PITA to get off and on. Between the center stand and getting the holes to line up with the new ones…

This is my improvised fix for getting the back end off the ground. With this litte set up and a car jack I was able to get this done myself.
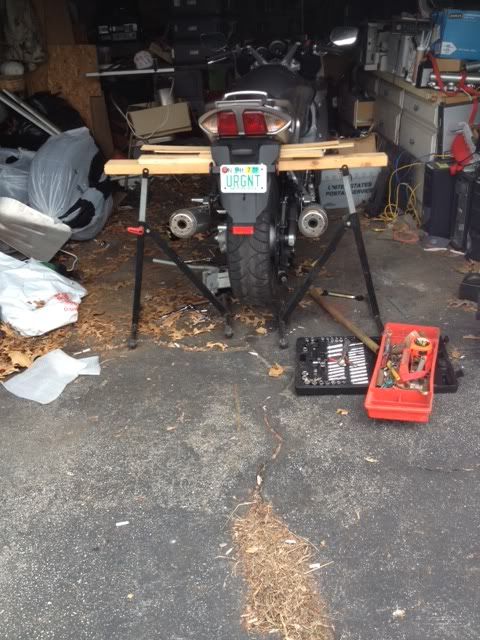
Bikejack.jpg


And it is off the center stand so I could move that around freely.

 
I just used the center stand and a floor jack under the swingarm. I used ULEWZ method, very easy.

No front stand required or jacking under the engine.

Put bike on center stand.

Place floor jack under back rear of the right swingarm.

Loosen all dogbone nuts and bolts.

Raise swingarm slightly until the upper dogbone bolt can be easily removed.

Remove lower shock mount nut and bolt.

Rotate lower shock mount until lower dogbone bolt can be removed.

Install new dogbones and lower mount nut/bolt.

Install lower shock mount bolt/nut.

Raise swingarm using floorjack until the upper dogbone mount bolt/nut can be installed.

Lower floorjack.

This job took me 15 minutes and is easy weasy, except I raised the rear but same job.
If this is true, this info should be pinned somewhere for posterity.

 
2 Simple bolts that are an absolute PITA to get off and on. Between the center stand and getting the holes to line up with the new ones…

This is my improvised fix for getting the back end off the ground. With this litte set up and a car jack I was able to get this done myself.

Bikejack.jpg


And it is off the center stand so I could move that around freely.
This looks to me like a really bad idea. There are multitudes of posts regarding cracked rear subframes due to overloading a topcase (20 - 30 lbs of weight). This picture looks like your lifting the rear of the bike by this subframe?

 
This looks to me like a really bad idea. There are multitudes of posts regarding cracked rear subframes due to overloading a topcase (20 - 30 lbs of weight). This picture looks like your lifting the rear of the bike by this subframe?
I don't think it was the actual subframe that was breaking but rather the OEM rear carrier bracket which is plastic. This is why most folks install something like the Givi SR357 carrier which replaces the plastic bracket.
Bill, pretty sure that it was the actual sub-frame that broke on quite a few bikes.. not to say that there wasn't issues with carrier bracket. I remember seeing pics posted of the sub-frame problem.
My recollection is the same. I would not put any loads on that rear sub-frame.

 
The subframe cracks from overloading top cases result from a torque moment applied to the rear bulkhead. The top case, behind behind the rear bulkhead, wants to fall, and twists the rear bulkhead out at the top.

Hanging the bike puts the subframe struts themselves in tension, and doesn't really affect the bulkhead that's been the center of the cracking issue. Different situation, although I'm still not sure it's a good idea. If I had to hang the bike, I'd probably use a strap where the rear subframe arms meet under the seat.

 
Last edited by a moderator:
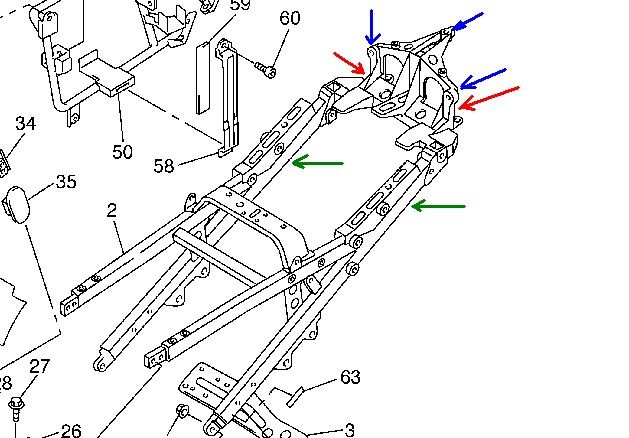
As for the cracking subframes, refer to the below 1st gen frame picture. The rear sub-frames that were cracking are the rear most cast piece that supports the rear rack. The rear rack is supported primarily at the three blue arrows. As you can see this is way out on the end of the subframe. The cracks would develop at the red arrows.

The part of the subframe that the green arrows point to are square steel tubing and are pretty unlikely to crack. I have used this part of the subframe to hook my lift straps up to. I think that Tony's lumber lift is supporting under there too.

RearSubframeCracks.jpg


That said, I'm not sure why the dog-bones can't be removed and replaced with the center stand deployed. :unsure:
You may be right about where he's lifting from. Hard to tell form the picture, but his lumber looks pretty far aft.

(That should start some jokes....lumber....aft?)

 
You guys know there is a world of difference between lifting something to hold it in position, and weighting someting and then bouncing it around which changes the type of load being experienced...Right? :huh:

So, if something fails because 10lbs hanging from it is being bounced around constantly for, say, 10k miles, I would bet that same part would be just fine if 10lbs was hung from it and it never moved. Two totally different kinds of loads.

I would bet those boards above the wheel would not cause any undo stress or crack anything. Besides...After the jury-rigging jobs I have seen around here, I think his idea was pretty tame and let him get the job done. :eek:

 
That said, I'm not sure why the dog-bones can't be removed and replaced with the center stand deployed. :unsure:

Me reither Fred.. Granted the c stand is a bit in the way, the time it takes to jump through hoops is way too much trouble. Maybe 15 minutes to remove the bolt and change the dogbone.

 
So, if something fails because 10lbs hanging from it is being bounced around constantly for, say, 10k miles, I would bet that same part would be just fine if 10lbs was hung from it and it never moved.
So...how many pounds do you think his subframe is carrying there Zilla? 10 lbs? :)

Two totally different kinds of loads.
Agreed. Dynamic loads with fatigue effects vs a static load.

 
So, if something fails because 10lbs hanging from it is being bounced around constantly for, say, 10k miles, I would bet that same part would be just fine if 10lbs was hung from it and it never moved.
So...how many pounds do you think his subframe is carrying there Zilla? 10 lbs? :)

**** man, I donno. What's half of 640?? :lol: I was just using 10 lbs as a number off the top of my head. I coulda used 30 or 40, but I didn't wanna get into higher math and confuse anyone. :p

 
Last edited by a moderator:
The center stand was blocking the upper bolt. I figured that the weight load on the 2 steel tubes Green arrows on Fred’s diagram about 250 lbs.As the back end goes higher the weight would be shifted to the front of the bike a bit.

I am 200 So if The bike can’t handle me sitting as a passenger without cracking I would have seen it on the news by now! If I had a helper I may have had them balance the bike as I worked on it as I have seen other folks talk about here.

I came up with a few other ideas..

All of them had me building a lift connected to the rafters or a A-frame type of thing. In the end I went Yankee “Cheap” and made due with what was hanging around the house. .

PS.

I really like the extra height. I finally stopped hitting my boots, center stand and muffler on the pavement!

 
The center stand was blocking the upper bolt.
Actually it blocks the lower dog bone bolt (at least on mine which should be no different than yours). This is why you remove the lower shock bolt (next to the lower dog bone bolt that secures the lower part of the shock to the pivot assembly). It is easily accessible and will allow you to rotate the lower shock mount (dog bone attaches to this mount) to where you can just slide the once interfered bolt out. I guess I should make a video. This is a 15 minute job max using my method. No stands necessary. :clapping:
 
Corrected.

Now come over and be my personal Mechanic

Can’t you tell I am dangerous with a wench!
Prior to reading this thread, the whole operation was clear as mud to me. What with ULEWZ explaining the twisting of the shock, it cleared up the situation for me. Now perhaps I will go ahead and install the new bones I bought a year ago.

So Thanks for your post. :)

 
Last edited by a moderator:
Top