Cruise Control Not Working- 2014 A

Yamaha FJR Motorcycle Forum

Help Support Yamaha FJR Motorcycle Forum:

This site may earn a commission from merchant affiliate links, including eBay, Amazon, and others.
Yep. The switch wasn't seated properly, which had the effect of increasing the amount of distance between the switch and the brake lever. It was very slightly out of place (not hard to happen once you see how fragile the switch/bracket relationship is). This mimicked the effect of a slight pull on the lever, which put the sensor in no-man's land between fully released and depressed, resulting in a computer that saw lever as being pressed, but not far enough to trigger the brake light, or to actually affect the brakes, for that matter. We're talking a millimeter max. I just grabbed it and tugged it down. Problem solved. The switch is super sensitive. It doesn't take a visually conspicuous amount of movement for it to decide that the brake pedal is depressed. I'd have tried to get a picture of the displacement, but it was difficult to see with the naked eye, and I was one step away from dousing it with 87 octane and sending it to Valhalla at that point anyway.

 
smile.png


Trust the diagnostics...

 
Glad you got it sorted and made the mistake for all the rest of us. ;)

As an aside, I did not see anyone suggesting to check the clutch switch, which could also have caused these same CC shenanigans. Just thought I would blurt that out after the fact in case someone stumbles across this thread in the future in need of that info.

 
Last edited by a moderator:
Excellent advice, as always. Anything that can go wrong will go wrong for me during maintenance that requires more than changing the oil and FD fluid, so since this was the first time I was disassembling and lubing these parts, well, apart, I had an excellent video, and took pictures of the parts in their original position and orientation, just in case. I disassembled and reassembled this POS 4 times yesterday afternoon. I initially focused on the switch spring, as it easily galls and binds where it engages the switch and the brake pedal. My first repair efforts were to tweak the spring to make sure it had full extension, wasn't bent, etc. This did not produce reliably positive results. Finally resorting to using the FSM and code 82 (because why would I do the obvious until all other means of wasting time had been exhausted?), I slowly determined that the switch itself is either soft or not particularly well mated to its' "holder". It was slightly askew. Rather than pushing up, I twisted and pulled down, which brought it fully into contact with the collar it rides in. This resulted in happy-82-diag and rejoicing. So confident was I (and so late was it) in steve_g's guidance and my personally reproducible 82 funtime, I buttoned it up and did not test last night. Brake lights continue to function properly, and full cruise functionality is restored, as confirmed this morning. K- check your spring and your switch as the guys have noted here. Diag makes it easy to fiddle with without having to ride it to test it.
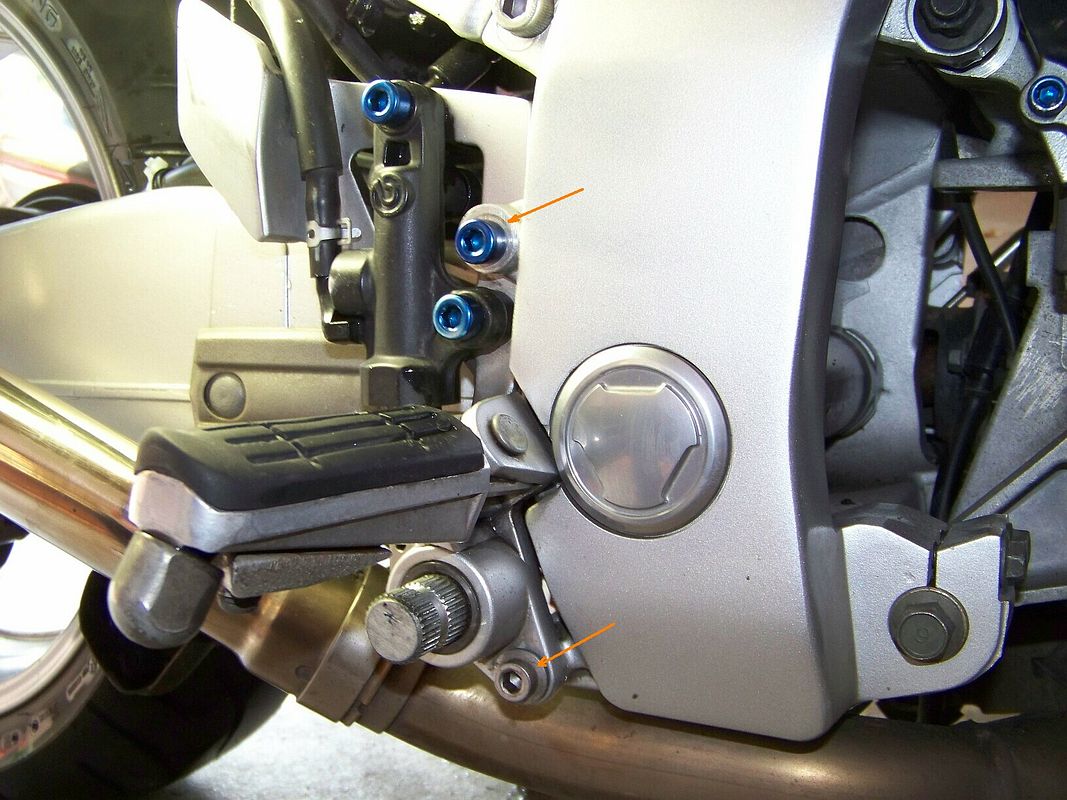
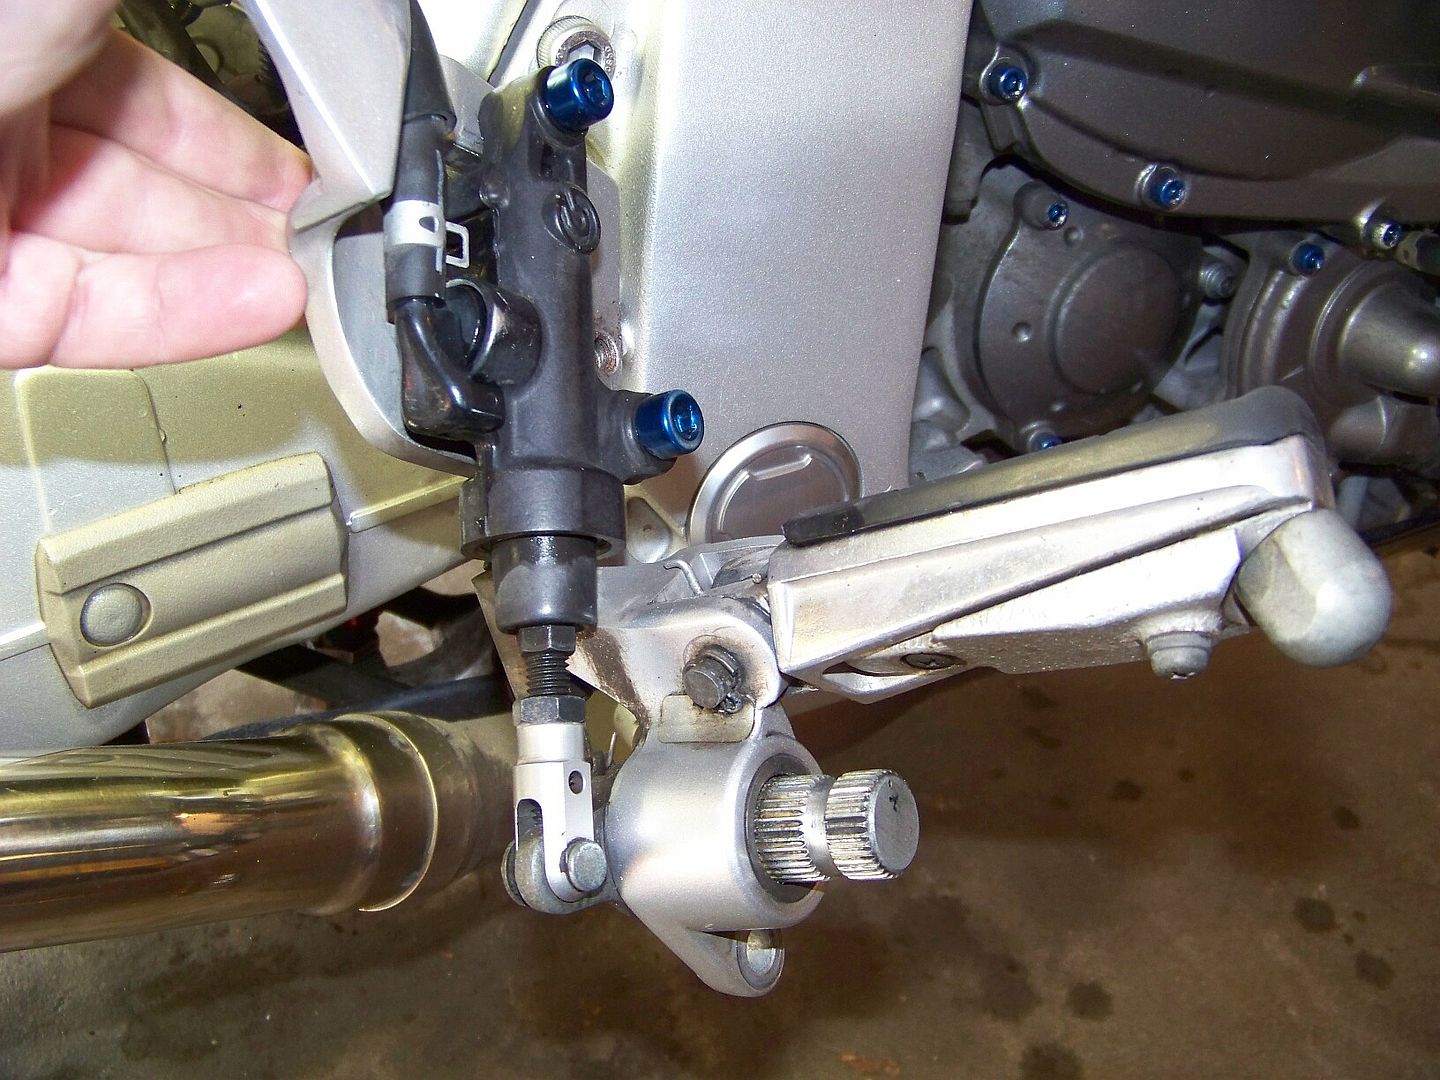
Just started having the same issue. Installed the MV Motorad riser plate and a new set of plugs over the weekend so not quite sure what I've disturbed. And, since I don't use the cruise much locally, I'm not positive when it stopped working, could have been prior to the riser plate/plug install.

Anywho, I have been trying to go through FSM and figure things out. Code 82 shows ON all the time, so my question for Bill, after playing with the rear brake switch and return spring, were you able to finally get an OFF with Code 82? I've checked Code 83 for the front and rear brakes and get proper ON/OFF responses.

Second question for anyone, when I go to Code 61 for Malfunction History, it shows Data: 19.

Does this mean I've got 19 events, and if so, how do I see them?

And in Code 62, it shows 01, do I need to clear this, if so, how?

I've had no active codes pop up on the dash since owning the bike from new. Have also checked for function of the RESUME/SET switch and gotten proper ON/OFF responses, clutch, front and rear lever pivot points have been cleaned/greased so no binding there.

 
Last edited by a moderator:
Success.
smile.png


Cleaned the front brake switch by dismounting it from the brake assembly. For future reference, it is held on to the brake assembly with a single Phillips screw, once removed there are four tabs that hold the assembly together along with a zip-ty hold the wires in place. Very gently pry out the tabs, remove the zip-ty and it allows you to spread the two halves apart just enough to spray in some CRC electrical cleaner, pop it back together and remount it.

Also dismounted the foot peg/brake pedal assembly, took out the brake pivot, greased it, checked the switch for free movement and re-assembled.

Not completely sure which one did it but I suspect it was the front switch since I had previously checked the rear brake pedal for free movement and it looked okay. Rechecked Code 82 and it was now reading OFF, as it should.

Last thing was clearing out the codes in 62 by going to that heading, toggled the Start button from OFF to ON (don't go all the way to START).

So my remaining question is: in the Code 61 section, Data showed 19, looks like this was this the number of faults or attempts to engage that were unsuccessful (I noticed in the course of trial runs this the number had increased from 15 to 19), but how does one get it to show what the faults were?

 
Last edited by a moderator:
Diag 61 stores the fault code(s). If more then one fault is stored, it will flash each code every 2 seconds.

Fault 19 is a disconnect of the black/red wire from the side stand.

 
Awesome! On the other hand, I'm impressed by the built-in diagnostic. The BMW guys have to pay $500 for a 3rd party tool to read and reset their codes on their bikes! :)

 
Diag 61 stores the fault code(s). If more then one fault is stored, it will flash each code every 2 seconds. Fault 19 is a disconnect of the black/red wire from the side stand.
Interesting. Wonder why it went from 15 to 19 when I did test rides. I thought it was keeping track of the number of times (history) I attempted to engage the cruise but was stopped due to a fault, in this case the front brake switch.

 
I'm planning to lubricate my rear brake pedal shaft tomorrow. I've read through this thread twice and of course, I'm concerned about f-ing something up. I have seen both springs from underneath the bike and behind the pedal shaft. One is for the light and one is for the cruise control.

If I remove the brake pedal, then disconnect the master cylinder clevis (sp??), will the pedal shaft just push inward (toward the center of the bike) and give me enough access to put some grease on it WITHOUT disrupting the switches?

What concerns me is that I can't see where the switches go and thus, I can't see how they are supposed to be positioned.

 
Pants- Just look at the spring orientation and shape, and look at the position of the switch when it's seated. I'm dumber than most. You should have no problem. Even without diag, if your brake is off but your cruise thinks it's on, you know which spring or switch needs a little slack. The springs and switch housing are not, shall we say, robust. That's the only thing that makes it a little delicate. I would do mine again, but after doing mine. I realize that regular lining was doing a pretty good job of keeping grit out and keeping things greasy. Good luck.

 
My method for servicing the rear brake pivot is to remove the entire bracket that the brake pedal and right side footpeg are mounted to. This will give you good access to all springs and the switch before removing the pedal to lubricate it.

To remove that bracket is just two Allen head bolts, one above, and one below the footpeg. Here's a picture of these bolts on my'05 (the PO put those snazzy blue alloy bolts on it). The blue ones at the top and the other one on the bottom (indicated by arrows) and the whole assembly comes away in your hand.

100_3682M.jpg


100_3683.jpg


My master cylinder was not weeping. I had just washed the bike before beginning work on it.
wink.png


Now, if you remove the brake pedal pivot you can tap the back side of the shaft and insert a zerk grease fitting in there and drill a couple of small grease holes in the shaft to make future maintenance easier.

There's an entire thread on here (somewhere) about doing that.

 
Last edited by a moderator:
Awesome! On the other hand, I'm impressed by the built-in diagnostic. The BMW guys have to pay $500 for a 3rd party tool to read and reset their codes on their bikes! :)
And looks like 2016 owners will have to do the same unfortunately.
Whatchu mean Willis?
Mikerider is right. If you have fault codes show up on a 2016, the only way to clear them is to take it to the dealer or buy your own diagnostic tool.

 
Bill - thanks for your reply. In order to ensure the switches were positioned correctly, I am assuming that you resorted to Fred's method for access and to see what you were doing?

Fred - thanks for the assistance. Can you confirm that the Gen III would work that way with the cruise switch and wiring? Also, do you know the torque spec for the bracket to the frame bolts?

 
I do not believe that there is a second switch, just a second set of contacts in the one switch, with the cruise contacts activating before the brake light contacts do, same as on the front brake switch, but I honestly have not been in there yet. The mounting method for the master cylinder and foot peg appears identical to prior years so I have to assume it will work the same.

 
I used Fred's method. IIRC, it was just the one switch. DIaG made it easier to find the sweet spot, but once I figured out the switch wasn't seated fully, it was an easy fix. Not a high level job. Only someone as ignorant as me could have a problem, and even that was a fairly straightforward fix.

 
Top