hppants
Well-known member
Excellent information - thanks again.We were able to remove, and later re-install, the lower cap screw by using the spring force to hold the internal damper assy.

Excellent information - thanks again.We were able to remove, and later re-install, the lower cap screw by using the spring force to hold the internal damper assy.
First of all Jeff is right.. Ya don't need that tool.Well, I'm totally frustrated. My bike is a 2005 non-abs.
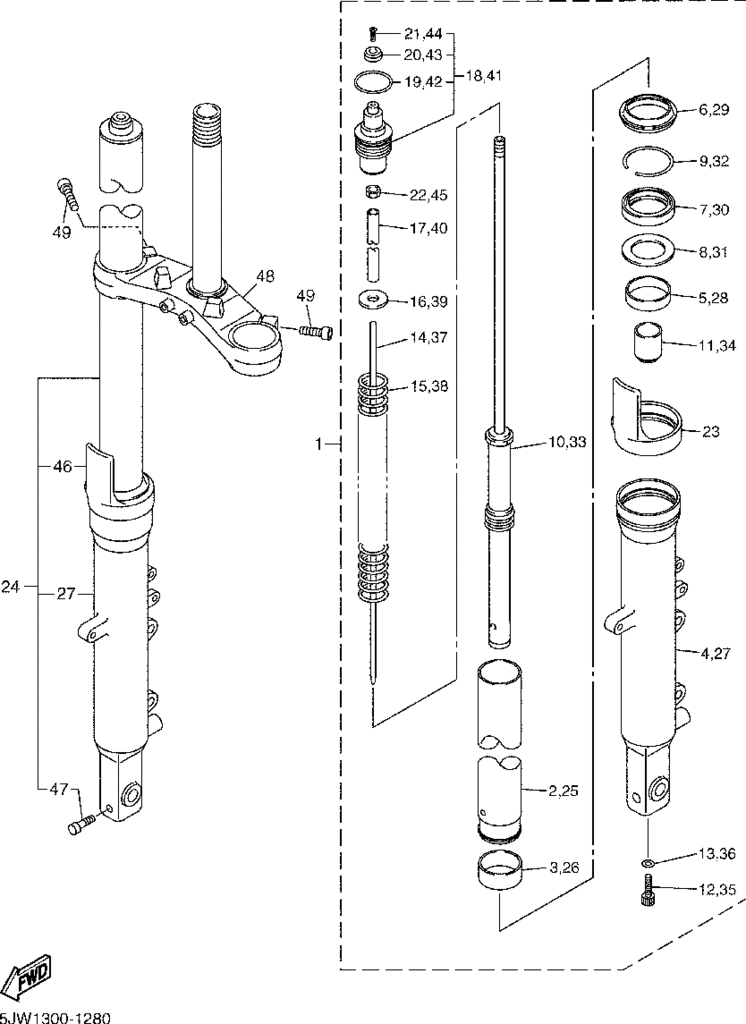
FJR guy is correct, on the 2005 Gen I forks, the tool referenced by FJRRed will not work. Like FJR Guy, I used my impact wrench to get the lower bolt out. Then I pulled the entire rod, spring, and piston assy out. Of course, the lower spacer came out as well. I replace both bushings, the seal, circlip and dust cover - no problem. Then, for the next 2 hours, I have been trying to get the spring/rod/piston assy back into the lower fork. If I eliminate the lower spacer, I can slip it in, and tighten it up with the lower bolt. But if I use the spacer (which of course I know I must), I simply cannot line up all of the parts to install the lower bolt.
I could disassemble the piston from the rod, but after I install the piston, I have no idea how I can get the springs installed. I know I'm supposed to fill the fork without the springs in, but I have no idea how this will be possible.
Any help would be appreciated - thanks.


Did you use that modified exhaust pipe to set the bushings?Rode the bike 200 miles yesterday. A new front PR3, and new fork seals/oil makes it feel like a whole new bike!!! I went with the Honda Showa 5wt, 650 cc in each tube. The bike feels fantastic - it really improved the dampening effect. Once scrubbed in, the PR3 is very grippy.
As a matter of practice, before leaving for my day trip yesterday, I rode the bike 5 miles to gas up and returned home to check all fasteners with my torque wrench. Not surprising, I found 2 that were a tad loose. Just wanted to throw that out there to remind us all to go over everything and make sure the bike is safe.
Is anybody aware of a COMPLETE write up for a Gen II fork rebuild with Race Tech valve installation? I've been looking for this for some time searching the fjrforum and the internet.I used a piece of 2" schedule 40 PVC as my driver. For the bushing, I used the old washer (#8) under my pvc pipe to drive the upper bushing. The pipe by itself worked perfect for the seal.
Your list is good to go. All you need is 3 pints of fork oil.
In case you still haven't done the install, here ya go.Is anybody aware of a COMPLETE write up for a Gen II fork rebuild with Race Tech valve installation? I've been looking for this for some time searching the fjrforum and the internet.I used a piece of 2" schedule 40 PVC as my driver. For the bushing, I used the old washer (#8) under my pvc pipe to drive the upper bushing. The pipe by itself worked perfect for the seal.
Your list is good to go. All you need is 3 pints of fork oil.
Something with pictures would be awesome.
Thanks,
j
Use an impact wrench.In the process of rebuilding the forks on 2006 FJR. Got the cap off, drained oil, removed dust seal, small clip, now on to the bolt at the bottom of the fork. The bolt will not come out. Keeps on turning.
What am I doing wrong? I must have turned the bottom bolt fifty times and it's not coming out. See picture