Fuse block from Japan, Eastern Beaver PC-8 install

Yamaha FJR Motorcycle Forum

Help Support Yamaha FJR Motorcycle Forum:

This site may earn a commission from merchant affiliate links, including eBay, Amazon, and others.

keithq

Well-known member
Joined
Aug 31, 2022
Messages
185
Reaction score
186
Location
DFW area
I have spent the past couple of weekends taking my 'new' 2019 apart or at least uncovering so I could get to the battery and appropriate locations to wire in a new power center, PC-8 from a company based in Japan called Eastern Beaver. They sell fuse blocks, wiring harnesses that are bike-specific among other electrical things. Good email communication though they did not have a PDF guide to doing the install. Since I have had these on previous bikes, including an older FJR, I was not at a total loss however there were some key tips I got via email support, like which mainline fuse went where (there are two)!

The biggest issue for many will be routing wires up and around the gas tank and then around the right side of the battery to tap into power. They provided a clever bit of connectivity that allowed to connect into the cable that powers the license plate light as a trigger. Their male and female links worked perfectly, even if it was a close fit.

I recorded multiple short clips to show what all I went through and then spliced them together in what I hope is a helpful bit of a walk-through. It is a bit over 500MB so not even sure if I will be allowed to upload here... And I was not. So I split it into two separate videos, MP4. And I cannot upload that either. OK, will keep trying. Maybe I can break it into 3 different videos... dang.

Was able to grab some pix to show parts of the install however.

Keith Quigley
2019 FJR1300
2020 XMax
 

Attachments

  • pic1.jpg
    pic1.jpg
    138.8 KB
  • pic2.jpg
    pic2.jpg
    156.9 KB
  • pic3.jpg
    pic3.jpg
    111.2 KB
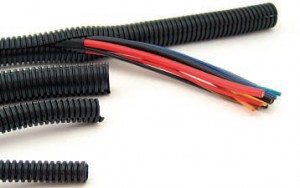
When I have run wires from the front to the back of the bike for purpose such as this one and other accessories, I have always sleeved the the wires for additional protection. It is a good idea to do that to avoid direct friction with the wires and it looks cleaner. I would recommend (if you haven't completed the job yet) using a sleeve to run all your wires through from the front to the back. It also allows you to run them in places where you otherwise would not run and unprotected wire. And in those sleeves I usually add an additional wire, or maybe two, that I can have for future use in case I need to add something later.
 
When I have run wires from the front to the back of the bike for purpose such as this one and other accessories, I have always sleeved the the wires for additional protection. It is a good idea to do that to avoid direct friction with the wires and it looks cleaner. I would recommend (if you haven't completed the job yet) using a sleeve to run all your wires through from the front to the back. It also allows you to run them in places where you otherwise would not run and unprotected wire. And in those sleeves I usually add an additional wire, or maybe two, that I can have for future use in case I need to add something later.
I did the same with my FZ-1 install. Cleaner and makes it easier to identify. Lots of good devices out there.
 
The ones from Eastern Beaver are pretty heavily shielded anyway. But I agree, other 'stuff' could benefit from that tactic. I could not get my direct wiring for the radar detector to work at all so resorted to using the 12volt plug. Now, if I wanted to direct wore it, I see I would have to unbutton everything again... dang.
 
I have spent the past couple of weekends taking my 'new' 2019 apart or at least uncovering so I could get to the battery and appropriate locations to wire in a new power center, PC-8 from a company based in Japan called Eastern Beaver. They sell fuse blocks, wiring harnesses that are bike-specific among other electrical things. Good email communication though they did not have a PDF guide to doing the install. Since I have had these on previous bikes, including an older FJR, I was not at a total loss however there were some key tips I got via email support, like which mainline fuse went where (there are two)!

The biggest issue for many will be routing wires up and around the gas tank and then around the right side of the battery to tap into power. They provided a clever bit of connectivity that allowed to connect into the cable that powers the license plate light as a trigger. Their male and female links worked perfectly, even if it was a close fit.

I recorded multiple short clips to show what all I went through and then spliced them together in what I hope is a helpful bit of a walk-through. It is a bit over 500MB so not even sure if I will be allowed to upload here... And I was not. So I split it into two separate videos, MP4. And I cannot upload that either. OK, will keep trying. Maybe I can break it into 3 different videos... dang.

Was able to grab some pix to show parts of the install however.

Keith Quigley
2019 FJR1300
2020 XMax
Which length kit did you buy? If I remember, they offer a long (like 70" or something) kit.
 
You order based on your model. So if you are on an FJR, you will get a long set of power cables in the harness that will reach the battery, way up front! And the newly designed rig will also provide a way to plug between the read cable going to the license plate light as a trigger. Worked great.
 
When I have run wires from the front to the back of the bike for purpose such as this one and other accessories, I have always sleeved the the wires for additional protection. It is a good idea to do that to avoid direct friction with the wires and it looks cleaner. I would recommend (if you haven't completed the job yet) using a sleeve to run all your wires through from the front to the back.
I agree, but I would add that it is never too late to defend your wiring. You can get split-sheathing, which can easily cover existing wire runs. Choose a size that overlaps itself by half a turn, when holding the wires. You can also get spiral-wrap, to gather and protect wires in bundles. Choose a size of spiral-wrap that is slightly smaller than your wire bundles.

They make all sizes of each item. Amazon has all kinds. Spiral wrap over split sheathing is a very good combination. While not as weatherproof as regular (tubular) sheathing, your existing wiring will be well protected, and the usual wire insulation should be enough weatherproofing, if the new wires are protected first. Avoid the braided type sheathing; it is too thin and porous. The first image shows spiral-wrap being applied; you just wind it around and around, onto the wiring.. It would be better if the wires were placed in split-sheathing first. The second image shows split-sheathing being applied; you just stuff the existing wiring into the split-sheathing as you go.
My US$ .02 worth . . .
iu

.
422-300x188.jpg
 
Agreed. Used to call that wire loom when I was selling large home theater systems! I use it now for all the wiring behind my stereo and TV. Had not thought to use it on the bike. Good idea.
 
Excellent post infrared! I have used the split sheathing before, but not large enough to overlap. I like that idea. Do you have any recommendations for some type of tubular sheathing?
 
SkooterG,

Almost any tubular sheathing is good, when installing on new wiring runs. I'm not a big fan of that stuff, unless it fits the wire bundle fairly well, and then you will need compressed air (and maybe baby powder) to get the wires inside. Even then, the ends of the sheath should have some weatherproofing, such as a slug of RTV in each end, with a TyWrap to hold the sheathing shut. Braided or porous sheathing is a waste of time and money, IMHO.
_________________
! IMPORTANT ! Wire bundles with all wires running in straight parallel lines will not flex, and broken wires may be the result. Give that entire bundle a spiral twist or two (per foot of length), and the cable can flex enough to protect itself from the stress of bending or vibrations.
 
You order based on your model. So if you are on an FJR, you will get a long set of power cables in the harness that will reach the battery, way up front! And the newly designed rig will also provide a way to plug between the read cable going to the license plate light as a trigger. Worked great.
Okay thanks. I'll check it out. Last time I was on their site looking at that PC-8 was a year ago, and I seem to recall you can get the pre made kit or specify your power cable lengths, based on placement.
 
I wish that I knew about the PC-8 before I got my AmpLink module. The PC-8 would have done what I needed just fine. Don’t get me wrong, I am happy with the AmpLink, as it offers some very nice features over the PC-8, but at a proportionally higher price and without the pre-made power harness.
 
Last edited:
Okay thanks. I'll check it out. Last time I was on their site looking at that PC-8 was a year ago, and I seem to recall you can get the pre made kit or specify your power cable lengths, based on placement.
I would go with the one they made for me. It all fit perfectly, with one caveat. The PC-8 block itself can only be turned one way under the seat in order for the trigger wire to the rear license plate light will reach, as of today. They told me, based on my comments, they would make that one slightly longer so you can orient the box any direction. Not a huge impediment but took me a few minutes to figure it out!
 

Attachments

  • pic3.jpg
    pic3.jpg
    111.2 KB
I received my PC-8 this weekend I hope to install it on my 2022 soon. They had two options for cable length: one for placement under the riders seat the other for placement under the passenger seat. I opted for the passenger seat version as I figured the extra length may make installing it a bit easier. I was researching the installation looking for tips for wire routing and box placement when I found this thread.
My FJR is bone stock so this is my first time adding anything to it or taking anything apart for that matter. Once the PC-8 is installed I'm installing my Garmin Zumo an alarm and maybe an air horn if I can find a spot for it. I need to do some more searching for installing them as well.
Old thread but valid points! I actually recorded an install video for Eastern Beaver while I was doing the PC-8 work. Their stuff is well made. I would definitely put my fuse block under the driver seat. It fits perfectly down there, at least for me. Hopefully they still have the video somewhere.
 
Top