• If you have bought, sold or gained information from our Classifieds, please donate to FJRForum and give back.

    You can become a Supporting Member or just click here to donate.

Gen1 Subframe Stiffener Kit

Yamaha FJR Motorcycle Forum

Help Support Yamaha FJR Motorcycle Forum:

This site may earn a commission from merchant affiliate links, including eBay, Amazon, and others.
I luv the Gen2 and even the Gen3 riders almost as much as the Gen1ers..
rolleyes.gif


I've gotten headaches trying to come up with a reasonable method to strengthen the Gen2 and 3 subframes w/o any mods. I'm still pondering and will get the word out if I come up with a package.

 
First of all - this is an awesome idea. I think it will add considerable strength to the rear subframe under load. However - I love to make things more complicated and suggest additional work for other people (I've made a career out of it for 25 years so far).

I think you could make it even stiffer by adding triangular gussets to each side of the plate. There would be an extremely low tendency for the stiffener plate to bend under high load conditions.

Something like this (sorry about the quality - too much caffeine this morning):

gussettedplate_zps454637ef.jpg


Or this (from Grainger):

Gussetcorner2_zpsa77752d2.jpg


Or this from Amazon Supply

Gussetcorner_zps83fec059.jpg


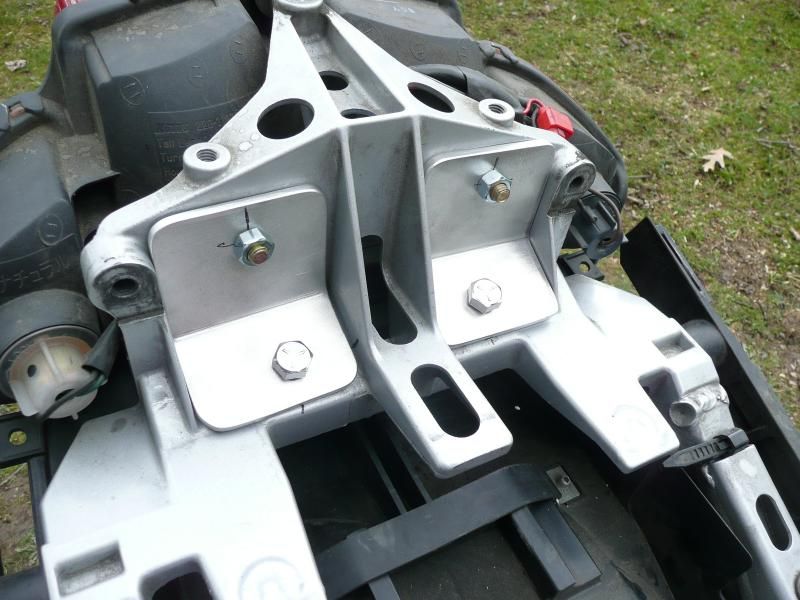
Just a heads up. If you use the Premier Cycle Accessories top box mounts (instead of the Givi's), you will find that the bolts/nuts on the rack mounting plates that screw into the threaded bosses in the sub-frame interfere with the proper alignment of the long backing plate of the Gaurald kit. At least mine do. You can see the bosses in this pic. Directly above/behind the uppermost mounts of the stiffener kit.

P1020398_zps13d812c7.jpg


I haven't got back to it yet, but I think some simple clearancing with a grinder on the backing plate will buy you enough room for proper alignment. I'm sure the backing plate is stout enough to not be weakened by the grinding.

 
P1020398_zps13d812c7.jpg

I haven't got back to it yet, but I think some simple clearancing with a grinder on the backing plate will buy you enough room for proper alignment. I'm sure the backing plate is stout enough to not be weakened by the grinding.
Theoretically (which I almost always say), any of the material above the upper bolt isn't doing much to prevent the downward movement of the rear subframe.

Is that the area you intended to trim?

 
Last edited by a moderator:
Is that the area you intended to trim?
I'm intending to notch the supplied backing plate (the long piece) to clear the bolt/nuts that are used to mount the top box mount.

The majority of the additional strength provided by the kit comes from the angled brackets. The long backing plate just gives you something to mount them to.

I can't see it being more than 3/16" of radiusing would be required as it 'almost' clears it now.

 
I had the same issue with the rack mounting bolts contacting the backing plate. These bolts protrude through the threaded boss enough to make contact and possibly add a little stress to the subframe. I simply removed the offending bolts and trimmed them back so when installed they are flush at the bottom of the threaded boss, clearing the backing plate.

 
I had the same issue with the rack mounting bolts contacting the backing plate. These bolts protrude through the threaded boss enough to make contact and possibly add a little stress to the subframe. I simply removed the offending bolts and trimmed them back so when installed they are flush at the bottom of the threaded boss, clearing the backing plate.
Mine have some Nylock nuts on them. Their basically jam nuts because the boss is threaded. I always thought the Nylocks were overkill.

 
I had the same issue with the rack mounting bolts contacting the backing plate. These bolts protrude through the threaded boss enough to make contact and possibly add a little stress to the subframe. I simply removed the offending bolts and trimmed them back so when installed they are flush at the bottom of the threaded boss, clearing the backing plate.
+1

 
I thought about adding gussets, but the angled plates are 3/16" thick and the total width is 5" making a cross-sectional area = almost 1" sq. That will take quite a bit of load (>200#) to bend. And don't forget that original subframe material.
rolleyes.gif


Okay, time to eat some crow.

I went back and re-tried the installation again. Apparently, I was using the long bar in the vertical postion directly in front of the taillight sockets. Hence, no fit. I tried the same install again and couldn't even get the bar back there. WTF!

Did the install with the bar underneath the subframe closest to the fender liner, and the two studded pieces in front of the taillight sockets. I still ran into some interference with the mentioned mounts for my top case, but it was easy enough to rotate the plates and get them in place while still allowing all the bolt holes to line up.

I had ran wiring for my Admore kit and brake flasher through the access hole for the taillight sockets. It took longer to relocate those than it did to install the kit.

So, long story short, the kit installs as advertised so long as you actually read them :D

Nice job Gaurald!

 
Garauld, I scored the sub-frame reinforcement kit you donated to CFO - many thanks. I puzzled for a while on how to fit it to my USA Bike (08) then decided I was probably for a gen 1. All is good. I'll take it back to Australia an fi I to my Gen 1 back home. If you ever do develop a Gen2 kit I'll be a buyer. Many thanks. David

 
Garauld, I scored the sub-frame reinforcement kit you donated to CFO - many thanks. I puzzled for a while on how to fit it to my USA Bike (08) then decided I was probably for a gen 1. All is good. I'll take it back to Australia an fi I to my Gen 1 back home. If you ever do develop a Gen2 kit I'll be a buyer. Many thanks. David
Omitted to mention in the post that we had no internet connection on he road when I tried to fi them, which explains why I didn't know they were for Gen1

 
Top