You are using an out of date browser. It may not display this or other websites correctly.
You should upgrade or use an alternative browser.
You should upgrade or use an alternative browser.
GEN3 battery access made easier !
- Thread starter odexplorer
- Start date


Help Support Yamaha FJR Motorcycle Forum:
This site may earn a commission from merchant affiliate
links, including eBay, Amazon, and others.
JamesW
JamesW
Starting with late 2013 model year production, the right side cowling inner panel was
changed to allow improved access to the electrical components beneath this
panel.... This is straight from Yamaha's Tech Exchange.
With this new right side cowling inner panel, you will no longer need to remove the
CENTER cowling inner panel. Those with the old style can replace it with this
new style... of course, you have to pay for it.
The Yamaha part number for this new panel is: 1MC-2836N-01-00
Anyone have one of these late 2013 model year production FJRs ?
If so, Is the access to the battery easier ?
It would be most nice if Yamaha would publish affected vin numbers.
SkooterG
Purveyor of Crooked Facts
Cool. Thanks for the photos.
MCRIDER007
Well-known member
+1.....but after seeing the photos I'm glad I didn't buy the new part, modifying the old part was only a 15 minute job and most of that was figuring out what really needed to be removed on Tab A.Cool. Thanks for the photos.
JamesW
JamesW
What is the last four numbers of your vin.?I must have a late model 13, can access the battery in 30 seconds; remove one screw.
@rjen
Well-known member
Any change you can hint on what modification on the old panel (s) is needed?+1.....but after seeing the photos I'm glad I didn't buy the new part, modifying the old part was only a 15 minute job and most of that was figuring out what really needed to be removed on Tab A.Cool. Thanks for the photos.
I have a '13 with the old setup. Checked with Yamaha and the new panel would cost me 117 euro

Last edited by a moderator:


$24.37
Fuel Tank Sticker Motorcycle Stickers for Yam&aha FJR1300 FJR 1300 Tank Pad Protector Decal Emblem Side Fairing Symbol Adventure
nanyangshixianpushangmaohanggerenduzi

$16.99
$19.99
FIORETTO Mens Mountain Bike Gloves with 5MM Padded Knuckle Guard Touchscreen Cycling Gloves for MTB Racing Dirtbike Motocross Motorcycle Black Medium
Fioretto Creations


$46.95
Harley Davidson Logo Sport Duffel (Tail of The Dragon), Black, One Size
Wisconsin Harley-Davidson


$7.99
$10.99
AstroAI Ski Mask Windproof Balaclava for Cold Weather, Winter Face Mask Breathable Stretchable for Skiing, Snowboarding, Black
AstroAI Direct


$82.95
$89.95
Mens Armored Checkered Flannel Biker Shirt, Multiple Waterproof Storage Pockets CE Approved Armor Reinforced Water Resistant (Grey, L)
Vance Leather Inc


$159.99
$199.00
FLAVOR Men Brown Leather Motorcycle Jacket with Removable Hood (Large (US standard), Brown)
FLAVOR Leather


$44.99
Real Time Industries Reflective Decals for Yamaha FJR1300 Gen 2 Fairing (Black - Silver Print)
Real Time Industries


AKjitsu
Well-known member
At least Yamaha listens. What they've done is what I did to mine about ten months ago: Lop off that useless tab on the forward edge of the battery cover so that you don't have to pull the instrument panel to get to it.
MCRIDER007
Well-known member
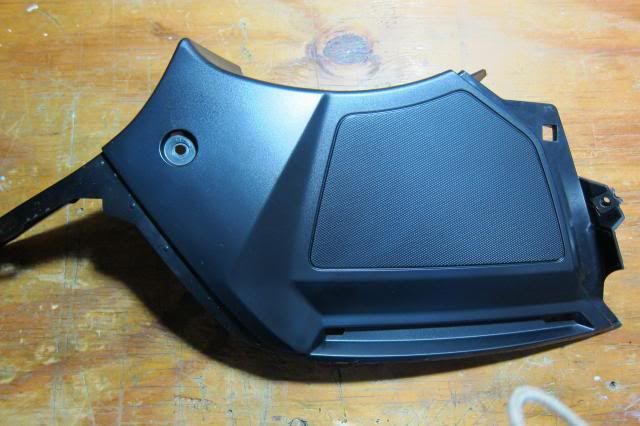
All three changes are on the front edge of the panel and involve removing plastic. You can see 2 of the changes on the above photo, the mounting screw on the right forward edge has been removed as well as the hole on the left forward edge (which used to interlock with the center panel). The third modification can't be seen in the photo but it involves removing the plastic above the forward hole (on the side of the panel) that is used to interlock with the center panel via a plastic rivet. The plastic that needs to be removed does not interlock with the center panel, it is just in the way and prevents installation. If you remove the first 2 pieces and try to install the panel you will see what needs to be removed.Any change you can hint on what modification on the old panel (s) is needed?+1.....but after seeing the photos I'm glad I didn't buy the new part, modifying the old part was only a 15 minute job and most of that was figuring out what really needed to be removed on Tab A.Cool. Thanks for the photos.
I have a '13 with the old setup. Checked with Yamaha and the new panel would cost me 117 euro
Last edited by a moderator:
Warpdrv
Well-known member
Gen 1 for the win.... access to battery in 2 mins.....
Other electrical stuff, yeah not so much.... haha
Other electrical stuff, yeah not so much.... haha
@rjen
Well-known member
Ok, is see the first two differences, should not be too hard to do manually, number three not so clear yet, but I am sure I can manage... thanks!

vabrzn
Well-known member
1310What is the last four numbers of your vin.?I must have a late model 13, can access the battery in 30 seconds; remove one screw.
MCRIDER007
Well-known member
If you look at the photo of the new panel, there are holes for 2 metal screw/bolts on top and I suspect there are also holes for 2 plastic quick fasteners on the side. You will also have to unhook the plastic tabs on the right edge that connect the panel to the faring (this assumes you have the new part).I just tried to remove only the battery panel by removing the single screw and the quick fastener. Seems like it didn't want to budge. Perhaps I have the old style.
My FJR is number 1133.
Ray
When you will manage manual mods (if you will) please post some pictures. By the way, good info here - I did not know about new part Nr's.Ok, is see the first two differences, should not be too hard to do manually, number three not so clear yet, but I am sure I can manage... thanks!
SkooterG
Purveyor of Crooked Facts
Well, as much as I hate to admit it, I observed Her Majesty's loyal subject get to the battery in less than 5 minutes.
All I can add? His poor wife!
All I can add? His poor wife!
MCRIDER007
Well-known member
Did he completely remove the center panel or just pull out the right side far enough to get access to the screw behind it........or was the screw behind the center panel already removed?Well, as much as I hate to admit it, I observed Her Majesty's loyal subject get to the battery in less than 5 minutes.
All I can add? His poor wife!
Last edited by a moderator:
Finally got around to taking the panels off today. Was afraid that I would break something trying to separate the panels.
Turns out I have the older style. I noticed that the screw behind the center panel was missing though.
And like a dummy, I lost one of the center panel screws - one fell down into the triple tree area. Looks like I'll need to do some fishing. I'm tempted to leave it but I don't know where it could have gone or what it's possibly sitting on.
Glad to finally get the battery tender pigtail connected and routed - it's not very long so I routed it to the right side cowling vent.
JamesW
JamesW
Drat! Mine is 0484. Have a feeling I am SOL. Dealer has the bulletin, claims it only gives the new pn. and no info on modifying.1310What is the last four numbers of your vin.?I must have a late model 13, can access the battery in 30 seconds; remove one screw.
SkooterG
Purveyor of Crooked Facts
Did he completely remove the center panel or just pull out the right side far enough to get access to the screw behind it........or was the screw behind the center panel already removed?Well, as much as I hate to admit it, I observed Her Majesty's loyal subject get to the battery in less than 5 minutes.
All I can add? His poor wife!
Completely removed the center panel. And the screw behind right side of center panel was still there. He's done it so many times he is good at it. We video'd the procedure. Perhaps the tosser will post it up.
Similar threads
- Replies
- 18
- Views
- 2K
- Replies
- 3
- Views
- 390
- Replies
- 13
- Views
- 1K