GPS mounting on 2013 FJR

Yamaha FJR Motorcycle Forum

Help Support Yamaha FJR Motorcycle Forum:

This site may earn a commission from merchant affiliate links, including eBay, Amazon, and others.

Dave_bris

Member
Joined
Jul 20, 2010
Messages
13
Reaction score
2
Location
Brisbane, Australia
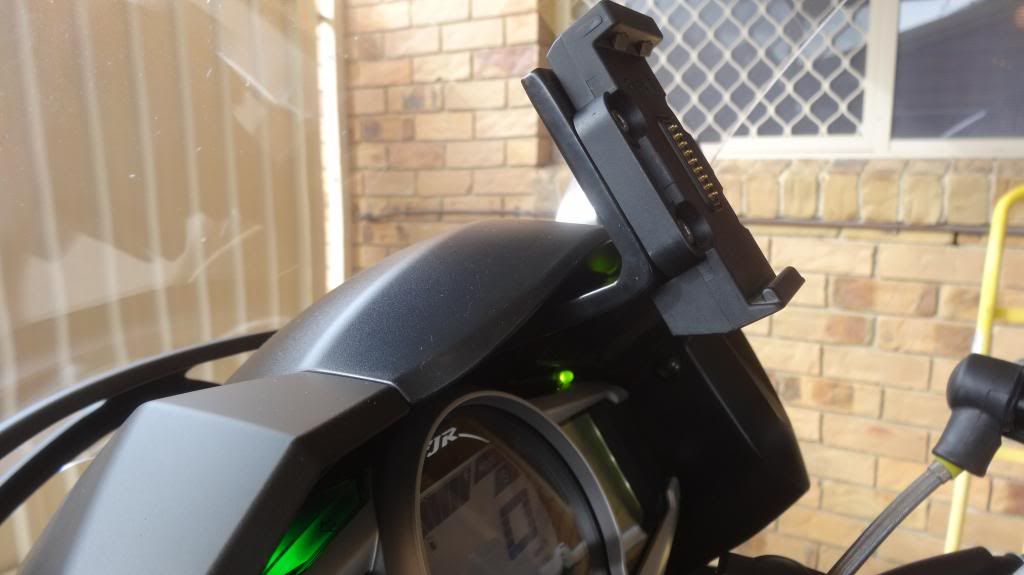
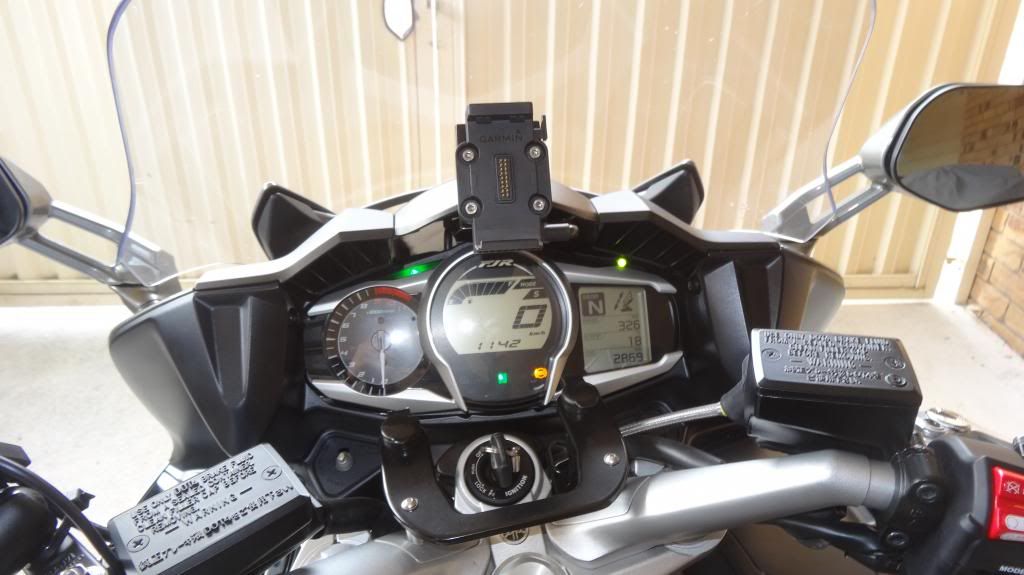
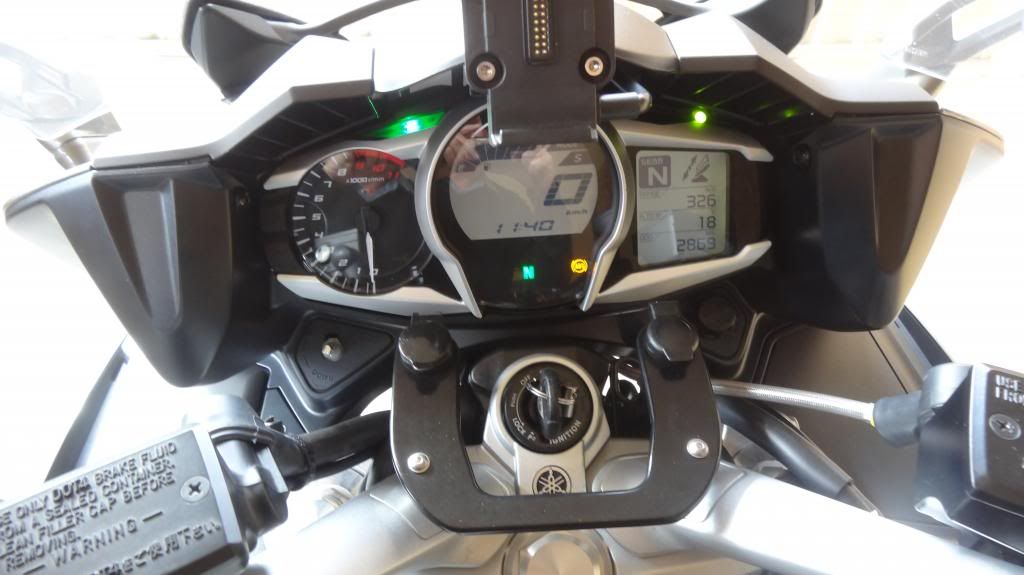
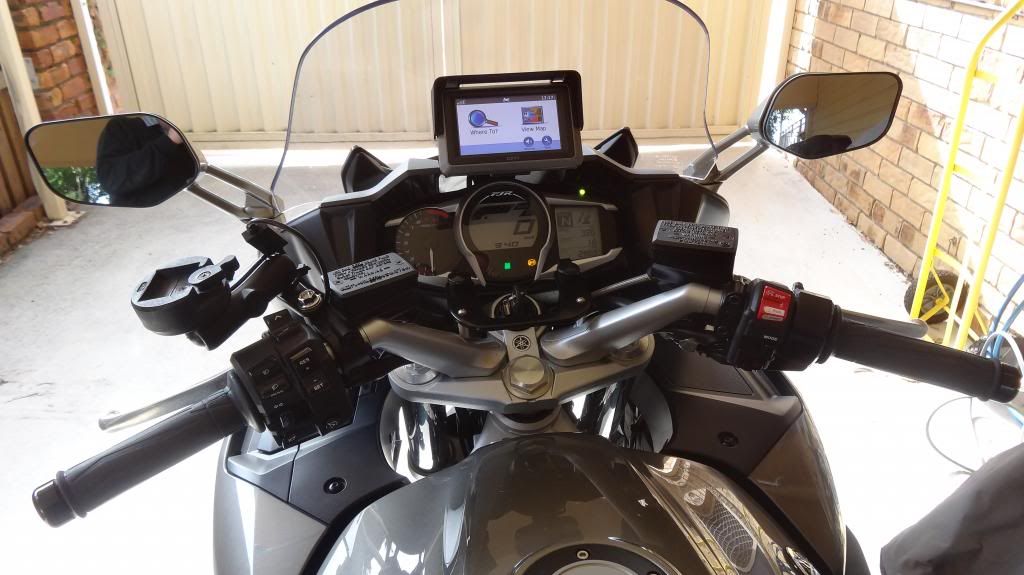
Here are some pictures of the mount I had made up for my Zumo 660.

I wanted to have the GPS in my field of view when looking at the road rather than down between the handlebars where I had it on my Gen 2.

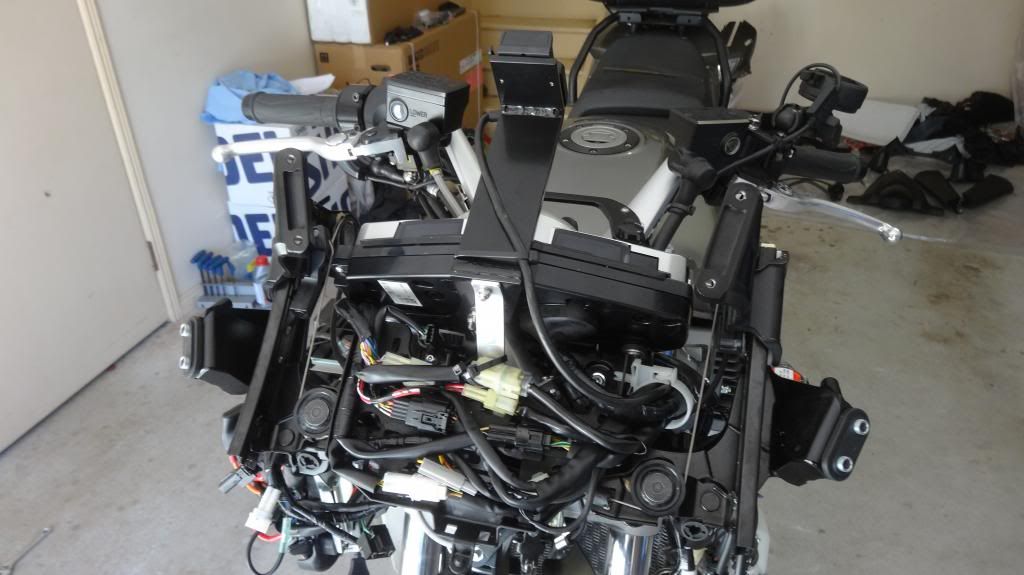
The GPS bracket attaches to the cast aluminium plate behind the speedo. Initially I had a problem with the unit vibrating so I had to add the silver aluminium supporting bracket you can see in the last photo. Now it is completely stable.

The standard Zumo fitting attaches to the bracket by 4 allen head screws into 4 tapped M4 holes in the aluminium bracket.

The bracket is made from 6mm aluminium and then powdercoated. The three pieces were cut out on a CNC milling machine and then welded but that is right outside my area of knowledge.

The bracket is largely out of sight as it sits in the large air channel above the instruments.

Please don't ask me to supply the bracket as I had to go to a fabricator (here in Brisbane, Australia) to have it made up. It cost me $150 for this and another small bracket to be made up but it did take many hours to remove all the fairings and nose piece to get access behind the instruments. I do have drawings for the bracket if anyone wants to get one made up.

When I sit on the bike the bottom of the GPS lines up with the bottom of the FJR logo above the speedo. The only negative is that the GPS blocks my sight to the green flasher lights.

The green LED you can see to the right of the GPS is a Clearwater Voltage Sentry.

Dave
DSC05372_zpsa0214a9d.jpg
DSC05379_zps3a1a9f99.jpg
DSC05378_zpsbd810d21.jpg
DSC05350_zps45cc7ceb.jpg


I have also had a bracket made up for my intercom and power outlets.

The bracket was based on a Touratech FJR bracket which has a power outlet on the left side but I had a fabricator build a new one with the arm on both sides so that I could have the outlet for the Starcom intercom on one side and a power outlet on the other. It is made from 6mm aluminium and uses the Touratech mounting screws and spacers (I had 5mm shaved off the spacers to allow for the thicker bracket).

It now means that I can sit on the bike and see to plug in the intercom or heated jacket.

I am sure there are plenty of other items that could be fitted to this style of bracket.
DSC05374_zps301ca739.jpg


Ahem - I REALLY like this setup. The bracket with the GPS can be adpated for any number of things and is still much "lighter" than the full N/Line Dash solution. The position is front and center and still allows a clear view of all the instruments.

The double arm mount on the handle bars can be utilized for several things as well. I have the touratech mount with a single arm and used it for mounting my Clearwater Erica switch and volume control. With this setup you have twice the footprint! Looks like it could be easily adapted to fit different riser setups as well.

Kudos to Dave for an excellent mod!

Dave - So whats up with the stainless steel brake line
smile.png
?

 
Last edited by a moderator:
The stainless brake line is part of a mod I did to eliminate the linked brakes and at the same time have end to end braided lines on the front brakes.

I blocked the linked brake line at the abs unit with a stainless plug (p/n LSSPINGRUB from Pro-Bolt) and then ran a piggy back braided line from the left calliper banjo over the mudguard to the lower right calliper banjo fitting that was previously for the linked brake line from the ABS.

I then blocked off both ends of the now unused linked brake line with 10mm bolts through the banjo and closed off with a crown nut just so that there could not be any brake fluid leak out. This unused line remains in situ but is zip tied out of the way at both the brake calliper end and the abs end. The ABS outlet to the linked brakes is blocked off and the pair of pistons previously actuated by the linked brake line is now fed from the front brake lever, via the left calliper.

I have also run the braided line direct from the front master cylinder to the ABS as part of the plan to have end to end braided lines.

I will post some photos soon.

PS: I still need to run a stainless line to the left calliper so that I have braided lines end to end but I needed to rethink how I do this through the section behind the headlight as the existing fittings have all kindly been glued together by Yamaha.

 
Last edited by a moderator:
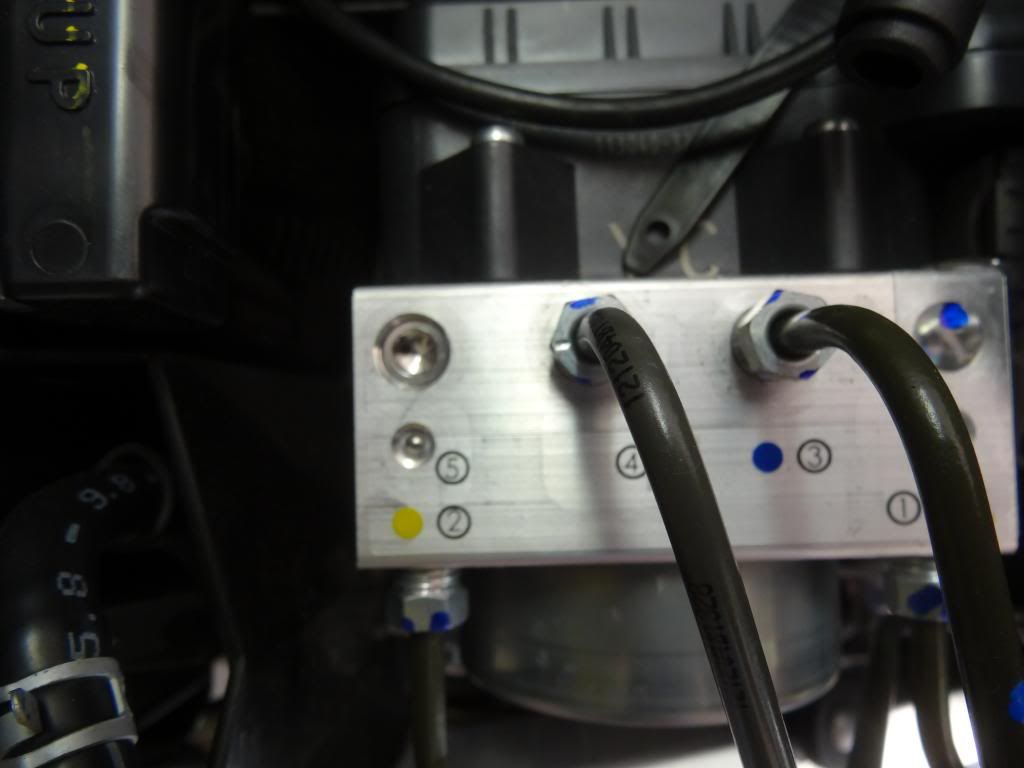
This photo shows the ABS unit on the Gen 3 with the outlet for the linked brake line (top left of photo) blocked of with a stainless plug from Pro-bolt (p/n LSSPINGRUB)

I then removed the short metal line that ran from the ABS unit to the proportioning valve nearby and blocked off the proportioning valve with a 10mm bolt so that no brake fluid could leak out. The other end of this line at the lower right front calliper is blocked off with a 10mm bolt and crown nut and zip tied out of the way. If a standard nut is used brake fluid will work down the thread. There is now no hydraulic pressure in this line.

The lower right calliper fitting is then connected by a short line over to the left caliper banjo using a double length banjo bolt for the two banjo fittings now on the left side.

Now the brakes are completely independent and the ABS remains operational. When the front brake is applied 4 pairs of pistons are now actuated rather than three with the standard setup. The 4th pair was previously actuated by the rear brake pedal through a proportioning valve intended to limit the pressure applied to the front 4th pair by the rear pedal.

Dave

DSC05235_zpsf735bbc1.jpg
blocked off a stainless plug (p/n LSSPINGRUB from Pro-Bolt)

 
What a nice location!!I like it very much!!

It looks great in the bike!!
good.gif


Last edited by a moderator:
IMO any customization should look as if it belonged there in the first place. Yours does it perfectly. Great job!

 
Great idea on the linked brakes removal...

I think that may need to be in a separate thread which stands out a bit better....

Not that I have an issue with my 05, but in the future I wouldn't mind doing this if I trade up down the line...

 
Nice job with the brackets Dave!

So you'll share the sketches / drawings with interested parties? I don't have a GEN III yet but you never know...
coolsmiley02.gif


--G

 
Great idea on the linked brakes removal...
I think that may need to be in a separate thread which stands out a bit better....

Not that I have an issue with my 05, but in the future I wouldn't mind doing this if I trade up down the line...
+1 - a seperate thread on linked brake removal would be great. It seems I've read where some people liked ABS but didn't like Yamaha's linked implementation. This is a great solution to the problem.

 
Yesterday, me and a fellow FJR rider took your example and made our version of it. He has already made his version, which works fine for him, but instead of the 'fixed' mount I wanted to use a RAM ball mount. I have been using several mount positions for my GPS before, but this on (over the dash) has always been my desired solution.

The setup is quite sturdy: I tested it on one ride only so far, but there is no vibration in the gps up to speeds of 100mph. Haven't tried faster yet, but will take the FJR to Germany some time to test...

Using the Ram ball forced me to make a hole in the black cover over the front. With a nicely fitting rubber ring the 'damage' is out of sight though.

Credits to the first idea, so I decided to share my installation report with you guys as well..

Find my story in pictures below...

Preparations:

1. I first created a power cable with a connector I am already using for the GPS. This is a simple male-female connector commonly used for battery chargers.

harry_special_0001.jpg


2. We used a Ram ball (RAM-B-273-M6) and a rubber grommet we found in a spare parts bin at the BMW (car) dealer

harry_special_0002.jpg


3. The mount has been created from aluminium and welded for extra strength.

harry_special_0003.jpg


So, let's get to work:

4. First the windscreen needs to be removed al well as the metal bracket and the black plastic parts of the front cowling..

harry_special_0004.jpg


5. Then we needed to cut a hole in the plastic bracket behind the dash to make room for the diagonal 'bar construction'

harry_special_0006.jpg


6. Jsut take care when cutting and drilling to make sure no wires are left in the 'construction area'.

harry_special_0007.jpg


7. The we remove the bolt below, thsi will be the base for the diagonal bar.

harry_special_0008.jpg


8. Then that's whats left of your beautiful machine... well cosmetic surgery is probably also not pretty halfway through...

harry_special_0009.jpg


9. The mount fits nicely.

harry_special_0010.jpg


10. Then we need to drill some holes to bolt the mount to the bracket.

harry_special_0011.jpg


11. Measuring, testing, and measuring again...

harry_special_0012.jpg


12. And this is how the mount will fit under the plastic. Nicely concealed...

harry_special_0013.jpg


13. It just needs a little cutting to make enough room for the square mount to fit under it.

harry_special_0014.jpg


14. We found a way to find the exacte spot for drilling the hole in the plastic

harry_special_0016.jpg


15. In which the grommet is nicely fitted.

harry_special_0018.jpg


16. Putting the mount back up.

harry_special_0019.jpg


17. And the end result is starting to show...

harry_special_0021.jpg


18. We just wanted to make sure the GPS would not block the view on the indicator lights.

harry_special_0023.jpg


19. This is starting to look great. I brought three different sizes of Ram - clamps. The shortest fits nicely. This way there is as little 'arm' as possible. So the risk of vibrations is minimal.

harry_special_0024.jpg


20. Now we only need to attach the diagonal strengthening 'beam'.

harry_special_0025.jpg


21. And all is in place, just a minor detail missing...

harry_special_0026.jpg


22. My friend insists we make the mount black

harry_special_0029.jpg


23. While the paint dries I can connet the power. Mmmm, it may be time to consider installing a Fuse-block...

harry_special_0028.jpg


24. Then it is time to put is all together and secure all the nuts and bolts with Locktite...

harry_special_0030.jpg


25. The connecter is tucked away under the mount, and we secured it with a tie-wrap.

harry_special_0031.jpg


26. And that's it!.

harry_special_0033.jpg


27. All done and ready to ride....

harry_special_0034.jpg


harry_special_0036.jpg


harry_special_0037.jpg


harry_special_0039.jpg


And my first impression is quite good.

Regarding position: I've heard from others that they only use the voice instructions while riding. For me that does not work: I want to see how the situation looks like ahead of me. I had to always look down with the navigation on the old mounts I used.

Now the location of the GPS is optimal with regard to the viewing direction.

Operating the GPS on the road. Some say the GPS is too far away to be able to operate is properly. I tried it yesterday, and I can still operate the device without problems.

Cheers...

 
I am going to make a dash/shelf for the Gen 3.

Stand by....it's under development with help from a fellow Gen3 owner.

 
Guys,

I like your solutions! The position of GPS above cluster is exactly where I would like to have it. Good inspiration for winter project.

Just a question related to control during riding (i quite often changing songs or looking for route alternatives while riding - now I do have GPS on Stem mount) - can you reach the touch screen while riding?

 
Top