"How To" for make Carbon Fiber parts

Yamaha FJR Motorcycle Forum

Help Support Yamaha FJR Motorcycle Forum:

This site may earn a commission from merchant affiliate links, including eBay, Amazon, and others.

quicksilver

So.., how fast does that thing go?
Joined
Jun 26, 2005
Messages
562
Reaction score
0
Location
Nashville, IN
I found this link:

webikeworld

But thats about it.

Does anyone have any detailed guides for creating custom CF parts?

recommended materials, one-off mold making techniques, tools?

Photo guided instructions?

Perhaps laminating thin aluminum structures with CF?

Adding structure to CF for fasteners?

It looks more like art than rocket science.

The tricks seem to be about making it look good (professional)

Making hidden, just functional parts (not bling), looks pretty simple.

A little like paper-meshe except with fumes and fibers.

Although bling is good to.

For the crazy prices out there, this could be a fun hobby.

Maybe start with hidden pieces like gage tree, battery rack type stuff.

Then graduate to bigger more visual pieces:

CF front fender, sidepanels, undertail fender, rear subframe.....

oh the possibilities.....

 
Here are some reference books on how to do it:

https://www.aircraftspruce.com/menus/bv/vid...nstruction.html

It's not hard, it just takes gobs of patience and practice. If you want to show your carbon weave and fiber control (the real art) rather than painting the part, you need to use female molds and vacuum bag. Just be warned that making any mold and especially if using female molds, making the molds can be extremely time-consuming.

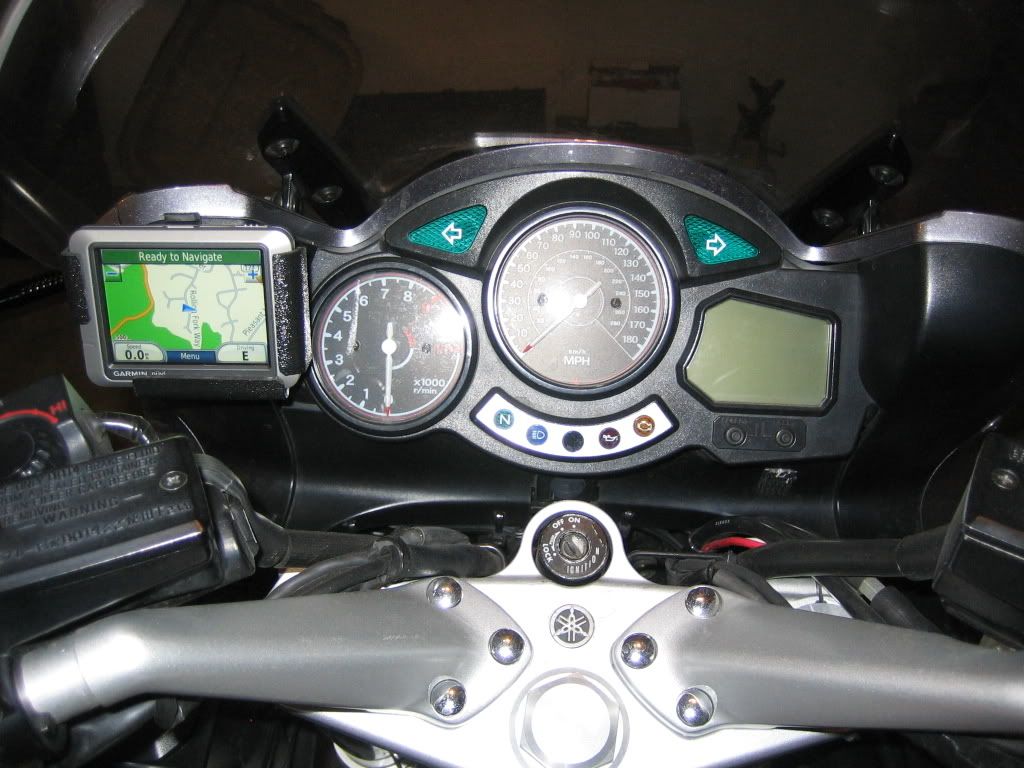
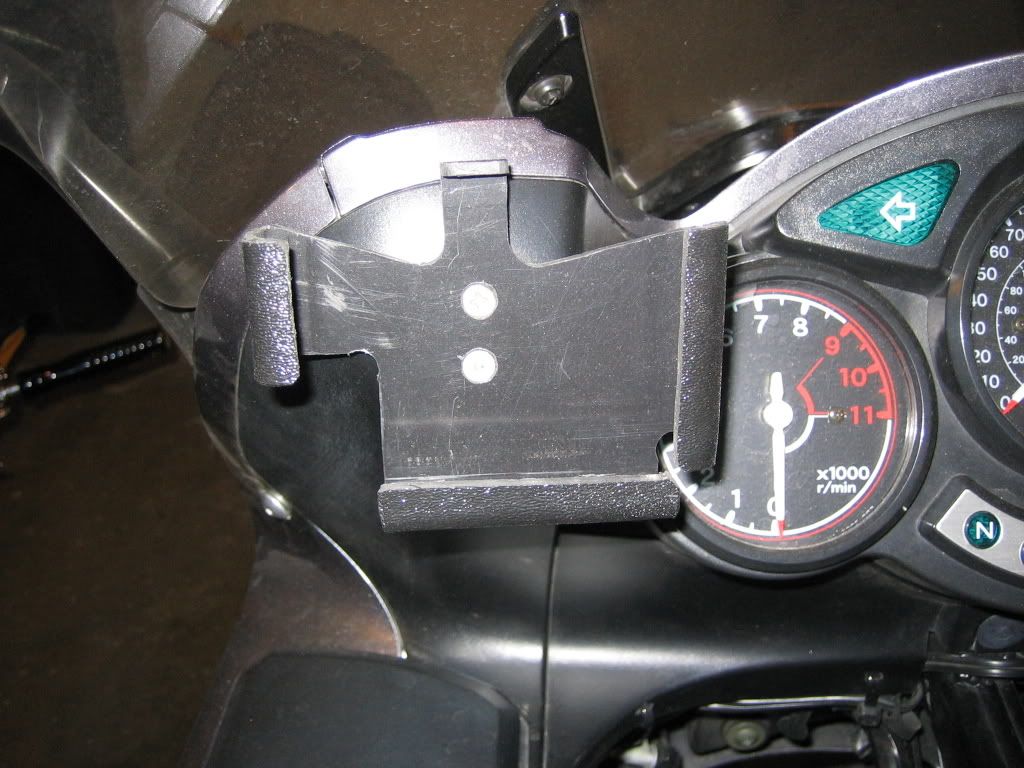
For bikes, I've learned that I can make soft-pine molds and pull a plastic part in far less time. Here's the bracket that I made for the Garmin Nuvi 200 after EOM. It's not my prettiest work, but I had a trip to make and this only took slightly over an hour to fab & intall:

IMG_4325.jpg


IMG_4319.jpg


Bob

 
I found this link:webikeworld

But thats about it.

Does anyone have any detailed guides for creating custom CF parts?

recommended materials, one-off mold making techniques, tools?

Photo guided instructions?

Perhaps laminating thin aluminum structures with CF?

Adding structure to CF for fasteners?

It looks more like art than rocket science.

The tricks seem to be about making it look good (professional)

Making hidden, just functional parts (not bling), looks pretty simple.

A little like paper-meshe except with fumes and fibers.

Although bling is good to.

For the crazy prices out there, this could be a fun hobby.

Maybe start with hidden pieces like gage tree, battery rack type stuff.

Then graduate to bigger more visual pieces:

CF front fender, sidepanels, undertail fender, rear subframe.....

oh the possibilities.....
This is what I do for a living. I work for a well known aerospace company in St. Louis, and to fab high quality carbon parts such as the ones you see on Ducati's, the tool or mold has to have a flawless surface if you expect a pretty part. It also has to have high vacuum integrity if you expect a good part. Usually it's time and cost prohibitive for 1 or 2 peices. If anyone is interested in further discussion feel free to drop me a line or exchange ph.#'s

 
It is something I would love to do as well, but it isn't a project that can be stepped into easily. Having had some experience with the stuff on aircraft structures myself, there are some safety and equipment concerns. Once you get past that, it is an art form when considering making a part that somebody could see.

A decent sized dedicated portion of a shop would be best. If all you wanted were flat panels that would then be cut to a shape, you could make do with minimal stuff, but to do real deal functional parts replacement fabrication, the molds would be your major task.

It isn't quite like patching a hole in a fiberglass boat, but when you work with it, and the part comes out right, it is pretty cool.

As much as it is starting to be used in the world, there is still a pretty large division of talent. You either know how to deal with the stuff, or you don't. At least in Aviation, that is the way it seems to go.

Hmmm, a well known Aerospace company in St. Louis. SUS or STL ?

Bryan

 
Hey Checks,

do you have any pics of the piece before you cut/trimmed it out?

Man I love that ****.

I was a prosthetic/orthotic tech for 25 yrs and learned all kinds of thermoplastic pulling ideas. But we never worked ABS plastic. I'm wondering how you got it to form back on itself. One reference pic will tell me the story.

 
Hey Checks,do you have any pics of the piece before you cut/trimmed it out?

Man I love that ****.

I was a prosthetic/orthotic tech for 25 yrs and learned all kinds of thermoplastic pulling ideas. But we never worked ABS plastic. I'm wondering how you got it to form back on itself. One reference pic will tell me the story.
No photos from the process. I was serious in saying that the GPS mount was a one-hour throw-together.

The process was first to cut a piece of 3/4" or 1" thick pine board and then sanding it to match the GPS + about a sixteenth.

Wrapped the board in aluminum foil and think I used a piece of tape to keep the foil tight.

I use pieces of shirt cardboard to play with how I'd cut the plastic. What I was really trying at this point was to minimize overlap in the corners of the front but it'll shrink so you have to add that when cutting the stock. The plastic covered nearly the full facial area when first pulled, coming in half-way from each side and cut diagonal from the front corners. I also put some paint-marker on the plastic for my first two bend lines.

Normally I'll heat ABS to about 385 in the oven and it pulls wonderfully. However, I wanted square corners and was in a hurry, so simply used the stove-top burner. Wearing thick leather gloves, I slowly moved the plastic high (a foot?) above the flame and watched real close for the surface and edges to start to transition. The plastic is too close to the flame if it curls, smokes, or flickers. When it hit transition (watch close and it looks like a light mist settles on the surface), I put the wood block against the paint-marker bend-line and pressed against a piece of foil on the top of the stove. Held it there till it cooled hard, then repeated for the other bends.

The wood block was seriously folded into the plastic at this point and the plastic was a bit bunched up at the front corners. I used a 3/8" drill for the corner radiuses and a dremel with a razor saw (Home Depot) and a steel ruler as a straight-edge to make the cut-outs in the plastic so it looked like the photos.

Because you want the finger over the top of the GPS to keep it from popping out at every pot-hole, the finger gets cut about a third of the way from the back to the front along the top edge. The rear slots next to the finger give enough spring to be able to press the finger out of the way. It turned out that I had to make another cutout in the lower left corner for the power plug. Between the power plug, how tight the plastic holds the GPS, and the top finger, the worst roads I've been on have never maked the GPS budge.

Hope this explains it well enough. Have fun with it.

Bob

 
It is something I would love to do as well, but it isn't a project that can be stepped into easily. Having had some experience with the stuff on aircraft structures myself, there are some safety and equipment concerns. Once you get past that, it is an art form when considering making a part that somebody could see.
A decent sized dedicated portion of a shop would be best. If all you wanted were flat panels that would then be cut to a shape, you could make do with minimal stuff, but to do real deal functional parts replacement fabrication, the molds would be your major task.

It isn't quite like patching a hole in a fiberglass boat, but when you work with it, and the part comes out right, it is pretty cool.

As much as it is starting to be used in the world, there is still a pretty large division of talent. You either know how to deal with the stuff, or you don't. At least in Aviation, that is the way it seems to go.

Hmmm, a well known Aerospace company in St. Louis. SUS or STL ?

Bryan
STL

 
Top