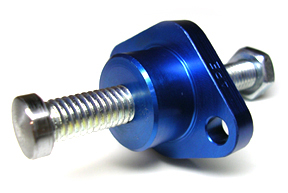
Manual Cam Chain Adjuster

Yamaha FJR Motorcycle Forum

Help Support Yamaha FJR Motorcycle Forum:

This site may earn a commission from merchant affiliate links, including eBay, Amazon, and others.

FJRay

Well-known member
Joined
Jun 25, 2005
Messages
5,513
Reaction score
2,866
Location
LaPine, OR
There seems to be some interest in this so I will put it out there for folks to do what they want to with it. I have yet to install it because mine only has a few miles on the new one in it so I am waiting for snow fall before I get into it. I am certain it will work just fine.
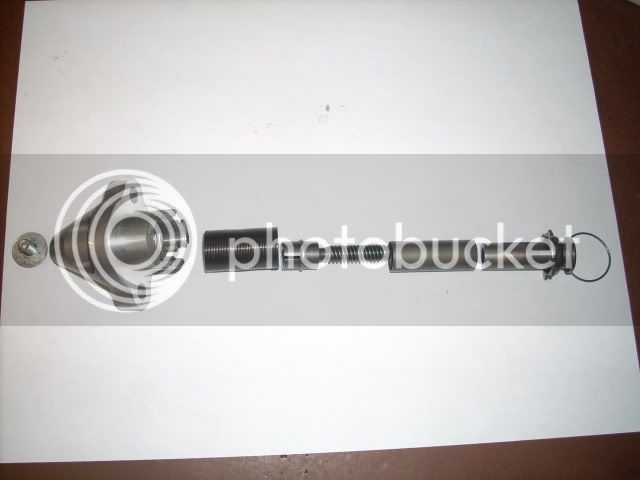
cct006.jpg


This shows the stock cct disasembled and in order of assembly.
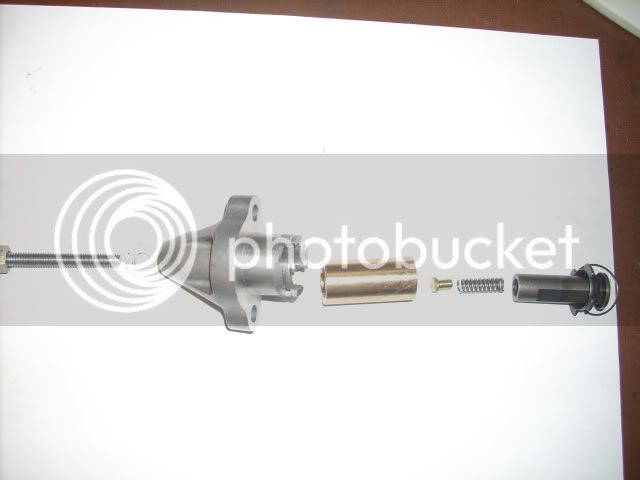
cct008.jpg


This shows the cct with the new parts in order of assembly.

cct010.jpg


This shows the parts that need to be made or purchased
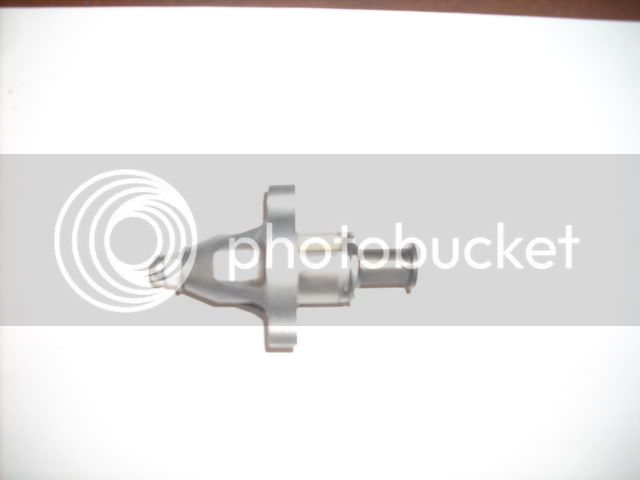
cct012.jpg


This shows it all together again.

The bushing that needs to be machined can be made out of most any material. I used bronze because I have lots from my boatyard days.

The OD is .711, the ID is .474 and the length is 1.460. All dimensions are +- .001

The spring came from Ace and is a .250 compression spring shortened to .750.

The small button goes in the end of the spring to servw as a base for the screw so it doesn't go into the spring. It is .250 on the big end and is .178 on the small end and is .330 long.

The screw is a standard 6mm x 55mm which is the same as the bolt in the end of the stock cct.

You need to run a 6mm tap through the cct body because the stock threads don't go all the way through. at this point clean up everything and get ready for assy.

I used some grease on the spring and button to keep them from falling out. Put the spring and button in the plunger from the cct. Assemble the plunger and the bushing into the cct housing and install the retainer clip. The original screw,sleve and spiral spring get discarded at this point.

The 6mm x 55mm screw along with the crush washer from the bolt go in the other end. Add a 6mm nut to the screw to act as a lock to hold adjustment.

Install in the engine as you would with the stock unit. If the screw is to long for assy then leave it out until the unit is installed and then put it in with a long screw driver.

For adjustment I would run the screw in until you feel a slight resistance and then go 1 turn to tension the spring. When I put mine in I will start the engine and slowly back out the adjuster until I get some noise and then in until it is quiet and then the 1 turn for tension.

I have no doubt that this will work just fine and require very little service.

If you want to wait until winter I will post up the results on mine.

 
Last edited by a moderator:
Ray, after the rash of cam chain tensioner failures and resulting engine damage posted on the forum you have perked my interest. My "07 doesn't have the mileage requiring a replacement CCT yet, but when that time comes this would be the way I would want to go. Hope to hear about how well your revised CCT works after your installation this winter.

 
Ray

I don't mean to sideline your work, but I've been in contact with the people at American Performance Engineering ( APE ) concerning their Manual Camchain Tensioner. They do not list the FJR in their product line, but have asked me to send my old unit so they could match it up with one of theirs. My old one will go out via UPS in the morning.

They probably already build a suitable unit, We should know within a week.

ytr6.jpg


Send it to us, and we will see if we have one that fits.https://www.aperaceparts.com/contact.html

Thanks

APE

===============================================

On Aug 27, 2009, at 11:05 PM, Brodie wrote:

Greetings

I own a 2006 Yamaha FJR1300AE motorcycle and have about 73k miles on it. I frequent the FJRForum and have learned that several members have had their engines wrecked due to cam chain issues. Typically it's been the unloading issue when the chain goes slack under quick decel and skips a tooth. However, more than one failure has been attributed to a broken clockwork spring allowing the tensioner to back off.

I have replaced my tensioner with an OEM unit 8k miles ago but would like to convert to a manual tensioner. I see you do not list one for the FJR1300, which one would you suggest? I still have my old unit, would it help if I send it to you so you could match it up with one of yours?

I plan to share what I do with the members on the FJRForum. If you have a bolt in solution, I think there will be quite a number of potential customers there.

Thank you

Brodie
 
I don't want to go to the hardware store, I'm lazy and don't want to buy the wrong shit.

I want to buy a kit.

Or a super sweet blingy blue anodized CCT :)

 
FJRay,

Thanks for "coming out" and showing us your design. As I said elsewhere, I think it's sharing stuff like this that makes this Forum so damn valuable to FJR owners. Hopefully you are open to discussion about your design?

Why did you opt to incorporate a compression spring at all? I assume that would be to provide some small amount of "self adjustment", or fudge factor in the tensioning, correct? But since your spring (also) doesn't have any anti-reverse mechanism, how does that prevent the chain from developing slack the same way the OEM one does? Or would you just run it to the point that the spring is fully compressed, essentially locking the plunger from retracting any further?

[edit] I thought that I recalled someone else doing a similar auto to manual conversion, but without the intermediate compression spring.

Brodie,

Looking forward to hearing which model APE tensioner fits. In addition to being another option for a manual tensioner, that may give us a direction on what other OE tensioners might fit too, by cross referencing APE's fitment chart.

 
Last edited by a moderator:
I've seen manual tensioners on various race bikes and my concern with the manual set-up is running too much pressure on the cam chain. How would these be adjusted properly? One of these options will be taling place on my FJR this winter so input is appreciated.

Canadian FJR

 
Brodie. No problem. If they can do something that helps people then go for it.

Fred. The first time I posted pidtures some time back it did not have the spring and it probably isn't required. I chose to add it to take up for any loose or tight spots in the chain. Most chain drives of any kind will have changes it tension as they rotate. By having the spring under compression ti will allow a slight amount of movement to cushion any changes in tension. It also will tend to lengthen service intervals.

If you want one without the spring then just substitute a piece of .250 x .750 round stock in place of the spring. Now you are down to one piece than needs to be fabricated.

 
On Aug 27, 2009, at 11:05 PM, Brodie wrote:
Greetings

I own a 2006 Yamaha FJR1300AE motorcycle and have about 73k miles on it. I frequent the FJRForum and have learned that several members have had their engines wrecked due to cam chain issues. Typically it's been the unloading issue when the chain goes slack under quick decel and skips a tooth. However, more than one failure has been attributed to a broken clockwork spring allowing the tensioner to back off.

I have replaced my tensioner with an OEM unit 8k miles ago but would like to convert to a manual tensioner. I see you do not list one for the FJR1300, which one would you suggest? I still have my old unit, would it help if I send it to you so you could match it up with one of yours?

I plan to share what I do with the members on the FJRForum. If you have a bolt in solution, I think there will be quite a number of potential customers there.

Thank you

Brodie
I'd be real interested if they can provide a CCT with the "ratchet" self adjustment. I'm not particularly in favor of the manual version as that's just one more thing I have to do when working on the bike. Maybe looking at it every 75,000 miles instead of every 25,000 or less. There are a large number of ratcheting types out there as OEM equipment that have worked very well for zillions of miles. Why can't we get something similar?

 
ALL chains stretch so when using ANY manual chain tensioner but sure and find the tight spot on the chain before adjusting the manual tensioner or the tensioner will put to much pressure on the tight spot of the chain and believe me that's NOT a good thing!

 
There seems to be some interest in this so I will put it out there for folks to do what they want to with it. I have yet to install it because mine only has a few miles on the new one in it so I am waiting for snow fall before I get into it. I am certain it will work just fine.
The bushing that needs to be machined can be made out of most any material. I used bronze because I have lots from my boatyard days.

The OD is .711, the ID is .474 and the length is 1.460. All dimensions are +- .001

The spring came from Ace and is a .250 compression spring shortened to .750.

The small button goes in the end of the spring to servw as a base for the screw so it doesn't go into the spring. It is .250 on the big end and is .178 on the small end and is .330 long.

The screw is a standard 6mm x 55mm which is the same as the bolt in the end of the stock cct.

You need to run a 6mm tap through the cct body because the stock threads don't go all the way through. at this point clean up everything and get ready for assy.

I used some grease on the spring and button to keep them from falling out. Put the spring and button in the plunger from the cct. Assemble the plunger and the bushing into the cct housing and install the retainer clip. The original screw,sleve and spiral spring get discarded at this point.

The 6mm x 55mm screw along with the crush washer from the bolt go in the other end. Add a 6mm nut to the screw to act as a lock to hold adjustment.

Install in the engine as you would with the stock unit. If the screw is to long for assy then leave it out until the unit is installed and then put it in with a long screw driver.

For adjustment I would run the screw in until you feel a slight resistance and then go 1 turn to tension the spring. When I put mine in I will start the engine and slowly back out the adjuster until I get some noise and then in until it is quiet and then the 1 turn for tension.

I have no doubt that this will work just fine and require very little service.

If you want to wait until winter I will post up the results on mine.
Nice job FJRay! Personally I'd use a heavier grade screw or bolt (Allen head?) than the hardware store version which I think is kinda soft? Don't know what grade bolt the stock one is but I'd at least try and match that or I presonally would go up one grade higher as I live by the word "BulletProof"!

 
Last edited by a moderator:
There seems to be some interest in this so I will put it out there for folks to do what they want to with it. I have yet to install it because mine only has a few miles on the new one in it so I am waiting for snow fall before I get into it. I am certain it will work just fine.
cct006.jpg


This shows the stock cct disasembled and in order of assembly.

cct008.jpg


This shows the cct with the new parts in order of assembly.

cct010.jpg


This shows the parts that need to be made or purchased

cct012.jpg


This shows it all together again.

The bushing that needs to be machined can be made out of most any material. I used bronze because I have lots from my boatyard days.

The OD is .711, the ID is .474 and the length is 1.460. All dimensions are +- .001

The spring came from Ace and is a .250 compression spring shortened to .750.

The small button goes in the end of the spring to servw as a base for the screw so it doesn't go into the spring. It is .250 on the big end and is .178 on the small end and is .330 long.

The screw is a standard 6mm x 55mm which is the same as the bolt in the end of the stock cct.

You need to run a 6mm tap through the cct body because the stock threads don't go all the way through. at this point clean up everything and get ready for assy.

I used some grease on the spring and button to keep them from falling out. Put the spring and button in the plunger from the cct. Assemble the plunger and the bushing into the cct housing and install the retainer clip. The original screw,sleve and spiral spring get discarded at this point.

The 6mm x 55mm screw along with the crush washer from the bolt go in the other end. Add a 6mm nut to the screw to act as a lock to hold adjustment.

Install in the engine as you would with the stock unit. If the screw is to long for assy then leave it out until the unit is installed and then put it in with a long screw driver.

For adjustment I would run the screw in until you feel a slight resistance and then go 1 turn to tension the spring. When I put mine in I will start the engine and slowly back out the adjuster until I get some noise and then in until it is quiet and then the 1 turn for tension.

I have no doubt that this will work just fine and require very little service.

If you want to wait until winter I will post up the results on mine.
Nice job FJRay! Personally I'd use a heavier grade screw or bolt (Allen head?) than the hardware store version which I think is kinda soft? Don't know what grade bolt the stock one is but I'd at least try and match that or I presonally would go up one grade higher as I live by the word "BulletProof"!
The screw is about a grade 5 so it is way stronger than the aluminum threads in the housing. The stock bolt is only a cork to fill the hole so strength is no issue. I agree a socket head would be nice but one was not avaliable at the time which means it wasn't in my bolt bin.

 
I've seen manual tensioners on various race bikes and my concern with the manual set-up is running too much pressure on the cam chain. How would these be adjusted properly? One of these options will be taling place on my FJR this winter so input is appreciated.
Canadian FJR

Canadian FJR, remove valve cover (good time to check valve adj. and overall condition of valve train, cam chain, etc.), install manual cam chain tensioner, adjust MCCT so it applies a little pressure, put bike in 5th gear and roll over engine (without plugs installed) in direction of engine rotation, watch chain, adjust MCCT for less pressure if chain gets to tight or add pressure if chain is sloppy all though its 360 degree rotation, find tight spot and make note of where it is (I think I'd use #1 cyl. timing mark reference), adjust to proper spec (to be determined for chain size and construction or just ask APE what they recommend for the ZX-14 engine) using cold or hot chain specs. Yes this is more labor intensive and would have to be done at certain intervals again to be determined (ask APE what they recommend for the ZX-14 engine). Hope this helped?

There may also be a way to cheat and find the tight spot in the cam chain without removing the valve cover but I'm not sure about this as I have limited experience with the FJRs engine design. Maybe with some homemade special tool (hard plastic rod?) through the cam chain adjuster hole? Any thoughts forum members on a cheating method? ?

 
FJRay said:

"The screw is about a grade 5 so it is way stronger than the aluminum threads in the housing. The stock bolt is only a cork to fill the hole so strength is no issue. I agree a socket head would be nice but one was not avaliable at the time which means it wasn't in my bolt bin."

Let me see if I've got this figured out correctly, the spring in your set-up holds the plunger against the CC and the long screw takes up the slack. The brass/bronze plug in your set-up is being used for the adj. screw end to ride against while the other end fits the spring ID. I would think that the brass/bronze plug would be to soft and may contaminate the engine with brass/bronze shaving? If this is possible then wouldn't a steel plug work better or is this part of the plunger assembly isolated from getting into the engine as it's sealed from the engine by the bushing? But even if the soft shavings from the plug can't get into the engine they can still score or implant themselves into the bronze bore making the plunger assembly bore not as smooth which could result in the plunger assembly dragging or sticking in the bore? If I have this figured out correctly the adj. screw/bolt in your set-up would have some pressure on it from the spring? If so I'd still have at least a grade 3 screw/bolt to account for the spring pressure. This might be "overkill" but that's just me as I don't trust the hardware store garden variety screw hardness. I guess I'm a little confused as the heading for this thread said "Manual CC Adjuster" when in reality it's a modified auto spring CC adjuster just like the stock unit?

After looking at the stock CCT pics it almost looks like a manual CCT with an adj. screw in the middle. So the thingy next to the housing must be a spring? So let me see if I've got this right? The stock CCT has an adj. screw that takes up all the free play in the CC and the spring then applies the correct pressure to keep the plunger seated against the CC loose spots? Also on the stock set-up I can see the small short screw that seals the hole for the CCT adj. screw mechanism. Just trying to understand the stock CCT and your up-graded one. No offense meant just trying to critique your set-up so if needed you can improve your design. And yes I've got the FSM just hadn't got around to the CCT yet.

 
Last edited by a moderator:
Top