Mounting Centech Fuse Block

Yamaha FJR Motorcycle Forum

Help Support Yamaha FJR Motorcycle Forum:

This site may earn a commission from merchant affiliate links, including eBay, Amazon, and others.

dasadab

Well-known member
Joined
Apr 10, 2009
Messages
60
Reaction score
0
Location
Southern California
Just got my '09 and am trying to be as thoughtful as possible about wiring aux. lighting (motolights) a Datel Voltmeter, Yamaha heated grips, and two powerlet outlets.

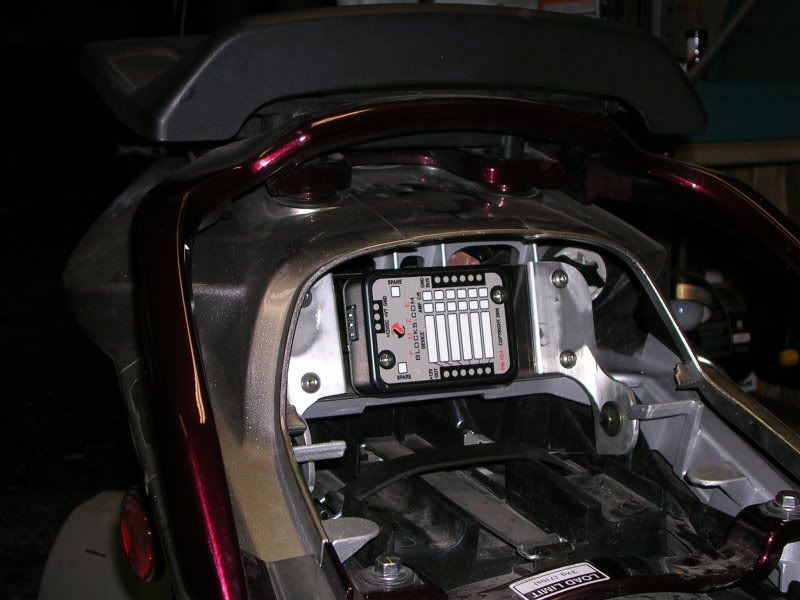
I am about to wire the Centech fuse block. The AP-2 which has switched and unswitched circuits: Link: https://www.cyclegadgets.com/Products/product.asp?Item=CEN

I also ordered the wiring harness. Anyone convinced they found the best mounting spot considering all the other spots occupied by the tool kit, possible future intercomm system like Autocom. I just want to do this right and put it in the correct place. Exactly how you mounted it would also be useful, i.e. dual lock, screws, etc.

Unrelated dumb question: I can's hook up a trickle charger through the power plug in the glove box can I? I think not because it is probably switched off when the bike is off.

Unrelated dumb question 2: With the Yamaha grips, I just ordered them. I assume that they have their own wiring harness and that I would not want to power them through the Centech fuse block.

Thanks. I have been reading a lot of threads, but I am trying to pin things down.

Dean

 
Unrelated dumb question 2: With the Yamaha grips, I just ordered them. I assume that they have their own wiring harness and that I would not want to power them through the Centech fuse block.
Thanks. I have been reading a lot of threads, but I am trying to pin things down.

Dean
Never a dumb question. The bike is pre-wired for the grips. The connectors are under the tupperware, forward of the glovebox. No need to power them thru the fuse block. The stock wiring circuit actually cuts power to the grips by 50% when speed is under 8 mph.

 
Here is a little bracket that I copied from someone here on the form.

DSCN1046.jpg


It keeps it up out of the way.

 
What good is that fuse block? It's got no wires going to it! ;)

Rome wasn't built in a day ya know. :rolleyes:

 
A little hard to be sure I see the bracket. It looks like a bent piece of stainless steel? I don't have any way to fabricate it unless I can just cut and bend with a vice?

 
I'll have to subscribe to this thread, I've got the exact same kit to install in the next couple of weeks. Mine's going either under the seat, or behind the left side panel (theirs actually some room in there). Downside of under the side panel is access requires some tools to get at the fuses (Of course, the same can be said for the stock fuse block!).

I believe I saw somebody also mount it under the tank. But it seems to me thats not the safest place. Gives new meaning to the term 'fuse'.

 
A little hard to be sure I see the bracket. It looks like a bent piece of stainless steel? I don't have any way to fabricate it unless I can just cut and bend with a vice?
Just two pieces of 1.5 X 3/16 aluminum angle and the back piece is 3/16 Lexan. All stuff that you can get at the local hardware store. If you loosen the two bolts it folds forward to get at the tail light bulbs.
Looks like a first class install. Do you have a template with dimensions you could post that you used for the plate?

FJJ'sR

 
I mounted under the rider's seat towards the right. Relocated the tools to the rear. Note the wiring harness coming in on the right from the battery, and going out to the front for all my gadgets. Eastern Beaver sold the harnesses, do a search and you will see my write up. The length of the harness will dictate in part where you install, unless you extend the wires. That's one benefit of ordering a custom harness and look from Eastern Beaver. I don't know, but would be surprised to find the standard centech harness reaches all the way to the tail of the bike.

P1000871.jpg


P1000872.jpg


Last edited by a moderator:
Looks like a first class install. Do you have a template with dimensions you could post that you used for the plate?

FJJ'sR

I could do a sketch as I'm going to make one for a friend. But I'm not sure how to post up something like that. I'll play around and see what I can do, as I certainly don't mind sharing.

Heck this wasn't even my idea, about a year and a half ago someone posted a picture of something like this and it stuck in my head!

I don't do any of that Cad stuff so it will take a bit.

Here's a few more pictures.

DSCN1047.jpg


DSCN1050.jpg


DSCN1051.jpg


Last edited by a moderator:
Mine is velcro'd under the seat. The relay is velcro'd right next to it.

Easy, secure, cheap and easily removed for any reason.

 
I could do a sketch as I'm going to make one for a friend. But I'm not sure how to post up something like that. I'll play around and see what I can do, as I certainly don't mind sharing.

Heck this wasn't even my idea, about a year and a half ago someone posted a picture of something like this and it stuck in my head!

I don't do any of that Cad stuff so it will take a bit.

Thanks Panman! I've got it now. Your add'l pics really clarified what the angle brackets were doing. From the first post with the mount installed, I thought the angle (L) bracket was bent behind the plexi. I couldn't figure out how you made the lower part bend back to make the pivot part. But now I can see it goes the other way. Looks easy now.

Thanks again for posting add'l pics.

FJJ'sR

 
Last edited by a moderator:
Installed my AP2 and Relay yesterday. Mounted under the passenger seat with room above to spare. I mounted the relay off a mount, for what I believe is the tip over switch, directly in front of the under seat cross bar.

The vast majority of time was spent running wires and building good tight connections. Took the switched power from the tail lights (blue wire). Tip: they don't give you battery connectors or a fusible link in the kit. So I had to stop right near the finish to go get some. From start to finish, about 3.5 hrs. Worked perfectly first try.

Now I have to wire up my GPS and electrical outlet to it.

I'll snap some pics if you want tomorrow.

 
I also mounted the AP-2 recently and installed it in the glovebox. I don't use the box anyway and all I had plugged in the stock cig plug was my Escort 50 which is now hardwired. I had read about mounting the AP-2 in the glovebox somewhere on the board. I don't know for sure but it might have been MM2. Anyway, I velcroed it inside the glovebox and I will have to use a regular grade of velcro as the industrial piece I used makes it too tough to get out. I just left rolled up an extra 8" or so of wires from the harness so you can take the box out without removing all the wires to change out a fuse.

I keep my compressor under the seat and like the idea of extra storage in the tail if needed and you don't have to run the longer wires if mounting in the tail not that that is a real problem. Also I have 2 battery-tender style plugs wired into the AP-2 with about 6" of pigtail, one for the battery tender and the other for running the tire compressor. Each amped with the proper fuse. And all you have to do is open the box lid when parked for the night and plug in the tender.

I installed FJRandy's horn harness with relay which is a quality piece with relay and the Stebel Magnum Blasters at the same time and also installed the AP-2 wire harness to fire everything to the fuse panel which can be found here. AP Harness . I then ran the wiring from the battery through the front nose for a close trip to the panel in the glovebox. This was the hardest part of the job and no plastic was removed from the nose.

I left the GPS, the pigtail for the compressor, and the pigtail for the tender always hot. And still have extra connections available for future lighting, electric clothing, grips, etc. I think really it comes down to one's personal preference for location of the panel. Hope this helped. PM. <>< :ph34r:

 
Last edited by a moderator:
Top