Toecutter
What would DoG do?
After much communication, contemplation, investigation & procrastination, I decided to put a plan into action.
I was hesitant to use aluminum can stock as I felt it may be a bit on the thin side, as well as the coating/paint meltoff/smoke stain factor once heat was applied. For much the same reason I didn't want to use solder or JB Weld, so I bought some .007 brass shim stock and located some 3/32" rivets to attach it to the existing "wings" of the bi-xenon mechanism.
These shutter extensions allowed me to cut the windows in the solid channel which was effectively blocking most of the output from the light capsule to the bottom half of the reflector.
I used EMS trauma shears to cut the brass, then an emery board to smooth the edges and fine shape the ends so they don't bind on the hinge pins or catch against the frame when swinging out or back in. Be sure to clamp them in place lightly (maybe with a paper clip) and check for smooth operation before riveting.
I'm not sure how good these will work, as I'm still without a bike to install them on, but I thought the stock high beams sucked moist *** cheese before anyway, and the HID's provide an awesome low beam pattern. All the credit has to go to FJRocket and Jestal, who worked out the hard stuff. I mostly posted this up here because Jestal's mod descriptions had no pictures.
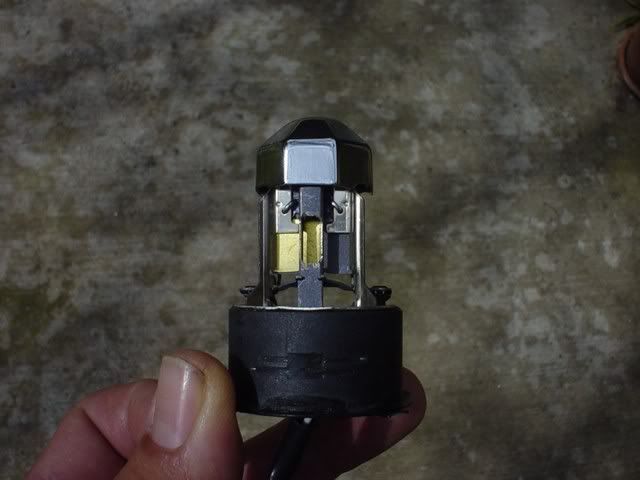
This shot shows how the shutter extension covers the window in the channel piece:

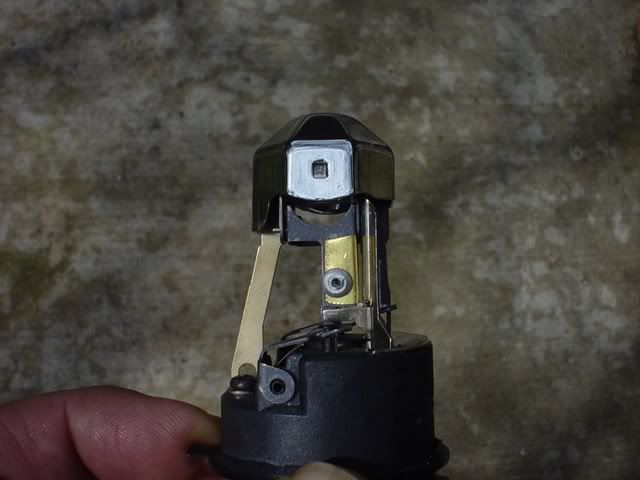
The next one illustrates the attachment rivet. I picked up a drill bit chuck at Home Depot for my Sears flexible shaft Dremel-type rotary tool, which allowed for more precision drilling. I held the brass piece in place with a hemostat clamp and drilled through both pieces, then popped the rivet in there:

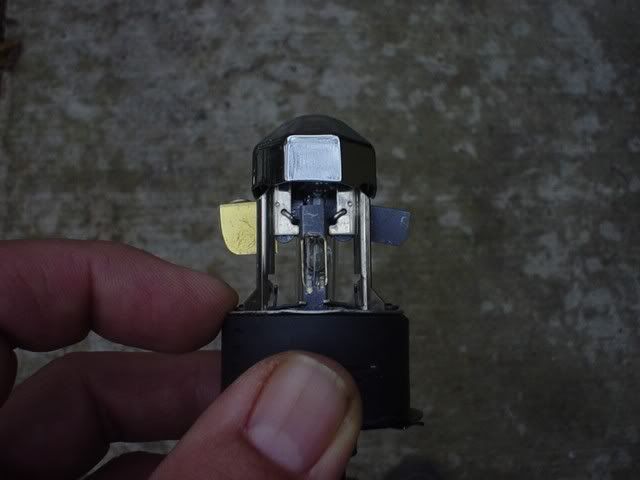
In this shot, the bulb capsule is back in place (rotated 180 degrees from stock to move the anode wire to the backside) and it is easy to see how much more light is going to be cast onto the lower half of the reflector:

Hopefully, with this setup, the high beams will be at least comparable to stock. I am resigned to the fact that auxiliary HID lights are the only way to dramatically increase nighttime road vision, but with this setup the high beams are still available and I have all the advantages of bright white headlights.
So, how can I help you, you ask? I have a bunch of leftover .007 brass shim stock that I haven't needed before in my life and will probably never need again. For only the cost of postage (you send me an SASE), I will send you a big enough piece to fashion your own shutter wing extensions. Click here and get in touch, if interested, to get my address. Along with these pictures, anyone with decent fabricating skills (it's about a two banana task) can do this. I'm not sure if anybody still has an unmodified Hi/Lo HID kit laying around but, if you do, now's your chance to bust it out and get busy farkling!
I was hesitant to use aluminum can stock as I felt it may be a bit on the thin side, as well as the coating/paint meltoff/smoke stain factor once heat was applied. For much the same reason I didn't want to use solder or JB Weld, so I bought some .007 brass shim stock and located some 3/32" rivets to attach it to the existing "wings" of the bi-xenon mechanism.
These shutter extensions allowed me to cut the windows in the solid channel which was effectively blocking most of the output from the light capsule to the bottom half of the reflector.
I used EMS trauma shears to cut the brass, then an emery board to smooth the edges and fine shape the ends so they don't bind on the hinge pins or catch against the frame when swinging out or back in. Be sure to clamp them in place lightly (maybe with a paper clip) and check for smooth operation before riveting.
I'm not sure how good these will work, as I'm still without a bike to install them on, but I thought the stock high beams sucked moist *** cheese before anyway, and the HID's provide an awesome low beam pattern. All the credit has to go to FJRocket and Jestal, who worked out the hard stuff. I mostly posted this up here because Jestal's mod descriptions had no pictures.
This shot shows how the shutter extension covers the window in the channel piece:

The next one illustrates the attachment rivet. I picked up a drill bit chuck at Home Depot for my Sears flexible shaft Dremel-type rotary tool, which allowed for more precision drilling. I held the brass piece in place with a hemostat clamp and drilled through both pieces, then popped the rivet in there:

In this shot, the bulb capsule is back in place (rotated 180 degrees from stock to move the anode wire to the backside) and it is easy to see how much more light is going to be cast onto the lower half of the reflector:

Hopefully, with this setup, the high beams will be at least comparable to stock. I am resigned to the fact that auxiliary HID lights are the only way to dramatically increase nighttime road vision, but with this setup the high beams are still available and I have all the advantages of bright white headlights.
So, how can I help you, you ask? I have a bunch of leftover .007 brass shim stock that I haven't needed before in my life and will probably never need again. For only the cost of postage (you send me an SASE), I will send you a big enough piece to fashion your own shutter wing extensions. Click here and get in touch, if interested, to get my address. Along with these pictures, anyone with decent fabricating skills (it's about a two banana task) can do this. I'm not sure if anybody still has an unmodified Hi/Lo HID kit laying around but, if you do, now's your chance to bust it out and get busy farkling!
Last edited by a moderator:


