


JimLor
Well-known member
Thought I would write this to encourage those folks who are thinking of doing this bit of work, but aren't sure they have the skills. BLUF - when you break this into its component parts it is a pretty easy task and well within the capabilities of someone with average wrenching skills.
I took the Total Control class in Jun (Tracy Martin//(3dogs) instructed) and learned about suspension particulars there and became interested in doing some upgrades. I wanted to start with the easiest and frankly, the cheapest step. That, to my mind, is new fork springs and it was time to change the fork oil anyway. I started by going to the Race Tech home page https://www.race-tech.com/ sport bike - spring rate search to find the correct spring rate. For me at 185 lbs neked , yes, neked (neked being w/o clothes for a reason!) the correct rate is 1.165. Now, here’s a switch, per Tracy the spring listed for the FJR on the site is actually too small (dia), 43mm vs 48mm. He gave me the correct part number (EDIT FRSP S4031 XX -XX is the spring rate) and I ordered the 1.1kg spring.
I followed the instructions given here: https://www.fjrtech.com/getdbitem.cfm?item=47 (FJR Tech) as well as these for taking off the front wheel (ABS): https://www.fjrtech.com/getdbitem.cfm?item=31 again, FJR Tech. Here’s a picture of the parts once the fork is apart:
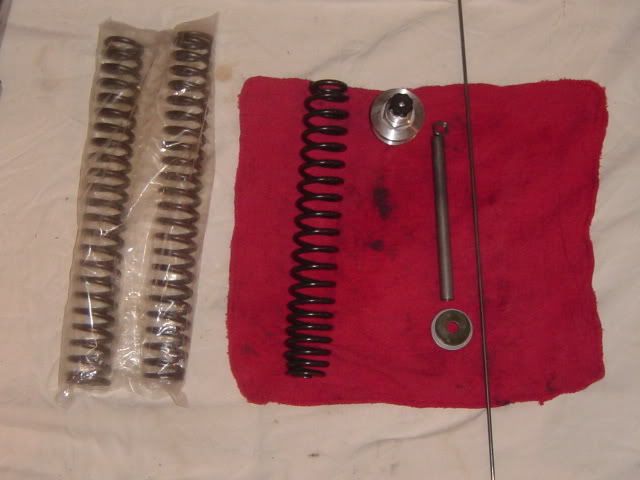
"New" springs are on the left and as you can see are around 2" longer than OEM. Fork Cap, then top to bottom the lock nut, spacer, washer (the silver washer if from the RT kit and I removed it as it was pinging against the side of the tube when I hit bumps - the darker washer is OEM and that's what's in the fork now). The thin rod on the right is the "plunger" and moves up/down when you turn the damping knob. Inside the fork is a rod threaded at the top - it is connected at the bottom and doesn't need to come out. You put the spring, washer, spacer, plunger over the rod - actually the plunger goes inside the rod. When you turn the preload knob that pushes the nut which pushes the spacer which pushes the washer which pushed the....yup, spring!
Since I was doing this after work and during the week of 100 degree wx and 300% humidity here in N. VA, I did this over 3 nights. Night 1 – remove front wheel/fender. Night 2 – remove forks and drain oil (I hung them overnight although this is overkill). Note: I bought 2 x qts of Bel Ray 5wt fork oil. I wasn’t sure how much I would end up using so I used probably 5 or 6 ounces to kinda flush the forks. Once done, I ended up with about 2/3 or so of a quart left. Night 3 – measured, figured, cut spacer and put the whole mess back together.
As to measuring, I was advised to start with 20mm of preload in the tube. So, (before adding oil and with the fork compressed) put the spring into the fork, washer on top of spring and measure from the top of the washer to the top of the fork (107mm for me); then measure that part of the fork cap (w/preload all the way out) that is inside the tube (53mm); subtract = 54mm and add the 20mm preload = 74mm. That’s what I used to cut the spacer (w/a hacksaw – sand and smooth inside and out). Luckily enough, the OEM spacer is 150mm so I just cut one in half. I put 130mm of oil in each fork (fork compressed w/o spring) and put the whole mess back together. No one was home so I couldn’t measure the sag. Up early and out the door Sat AM - could immediately feel the difference, more planted and actually more harsh. Back home and got Lorie and our daughter to help me measure the sag – 20mm! At the class in Jun it was measured at 58mm (too much) and now 20mm (too little). Adjusted the preload all the way out and only got to 23mm. Tracy recommended ~40mm of sag.
So, I clearly needed to cut the spacer more. Did some math and figured I could cut 20mm off to give me the 40mm sag – nope, it’s not a linear equation! Didn’t have to take everything apart this time – jacked up the front end to extend the forks, took the handlebars off – loosened the top fork pinch bolt and then loosened the fork cap, lowered the front end to push the fork cap and locking nut out so I could get to it.
Here's what it looks like with the fork cap clear of the tube:
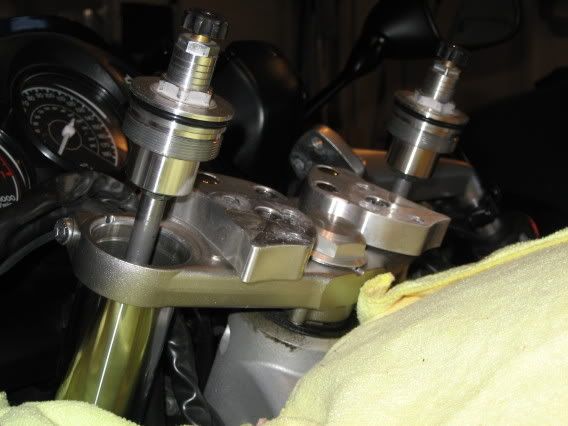
You can see the fork cap, the locking nut, and the spacer (you can tell from the top of the spacer it's been cut and sanded smooth.
Cut the spacer to 54mm – put it back together and measured sag again ----30mm, damn! Had enough at that point. Rode with the 30mm to work today and while not bad, I’ll go back and cut some more off of the spacer. Think I’ll probably cut it to about 25mm or less and hope it’ll get me to ~40mm of sag.
Notes:
1. One thing I did differently from the fork oil FJR Tech instruction – I did not remove any plastic. I hate removing plastic and I was able to do this whole evolution w/o any real problems. I used my Husky 3/8” drive and easily loosened the left side (all references are sitting on the bike looking forward) and the 1st of the 2 lower pinch bolts on the right side (there are 2 x lower pinch bolts). I removed the right horn and got the upper pinch bolt easily. I was concerned that I wouldn’t be able to get my torque wrench (snap on) in there to complete the job. As it turned out, the head on the torque wrench was not as deep as my regular socket wrench and it fit better and I didn’t have a problem – tight, but no problem.
2. Fork oil: Tracy recommended the next higher Yami oil as I was still using the stock valves. I used the chart here: https://www.peterverdonedesigns.com/lowspeed.htm . On the final chart I went down the left hand column and picked an oil next to the next Yami oil up from the 01 oil. Plus I could get the Bel Ray.
3. The springs do not rattle inside the forks. Apparently if you get the springs listed for the FJR they’re smaller and will rattle.
I hope this will convince those who would like to do this but are concerned that they aren’t able because they aren’t sure of their skill level to go ahead and git ‘er done! While I didn’t do these things, it’s a great time to also do: steering head maint//clean brake calipers//install new horns//drink beer!
Jim
I took the Total Control class in Jun (Tracy Martin//(3dogs) instructed) and learned about suspension particulars there and became interested in doing some upgrades. I wanted to start with the easiest and frankly, the cheapest step. That, to my mind, is new fork springs and it was time to change the fork oil anyway. I started by going to the Race Tech home page https://www.race-tech.com/ sport bike - spring rate search to find the correct spring rate. For me at 185 lbs neked , yes, neked (neked being w/o clothes for a reason!) the correct rate is 1.165. Now, here’s a switch, per Tracy the spring listed for the FJR on the site is actually too small (dia), 43mm vs 48mm. He gave me the correct part number (EDIT FRSP S4031 XX -XX is the spring rate) and I ordered the 1.1kg spring.
I followed the instructions given here: https://www.fjrtech.com/getdbitem.cfm?item=47 (FJR Tech) as well as these for taking off the front wheel (ABS): https://www.fjrtech.com/getdbitem.cfm?item=31 again, FJR Tech. Here’s a picture of the parts once the fork is apart:
"New" springs are on the left and as you can see are around 2" longer than OEM. Fork Cap, then top to bottom the lock nut, spacer, washer (the silver washer if from the RT kit and I removed it as it was pinging against the side of the tube when I hit bumps - the darker washer is OEM and that's what's in the fork now). The thin rod on the right is the "plunger" and moves up/down when you turn the damping knob. Inside the fork is a rod threaded at the top - it is connected at the bottom and doesn't need to come out. You put the spring, washer, spacer, plunger over the rod - actually the plunger goes inside the rod. When you turn the preload knob that pushes the nut which pushes the spacer which pushes the washer which pushed the....yup, spring!
Since I was doing this after work and during the week of 100 degree wx and 300% humidity here in N. VA, I did this over 3 nights. Night 1 – remove front wheel/fender. Night 2 – remove forks and drain oil (I hung them overnight although this is overkill). Note: I bought 2 x qts of Bel Ray 5wt fork oil. I wasn’t sure how much I would end up using so I used probably 5 or 6 ounces to kinda flush the forks. Once done, I ended up with about 2/3 or so of a quart left. Night 3 – measured, figured, cut spacer and put the whole mess back together.
As to measuring, I was advised to start with 20mm of preload in the tube. So, (before adding oil and with the fork compressed) put the spring into the fork, washer on top of spring and measure from the top of the washer to the top of the fork (107mm for me); then measure that part of the fork cap (w/preload all the way out) that is inside the tube (53mm); subtract = 54mm and add the 20mm preload = 74mm. That’s what I used to cut the spacer (w/a hacksaw – sand and smooth inside and out). Luckily enough, the OEM spacer is 150mm so I just cut one in half. I put 130mm of oil in each fork (fork compressed w/o spring) and put the whole mess back together. No one was home so I couldn’t measure the sag. Up early and out the door Sat AM - could immediately feel the difference, more planted and actually more harsh. Back home and got Lorie and our daughter to help me measure the sag – 20mm! At the class in Jun it was measured at 58mm (too much) and now 20mm (too little). Adjusted the preload all the way out and only got to 23mm. Tracy recommended ~40mm of sag.
So, I clearly needed to cut the spacer more. Did some math and figured I could cut 20mm off to give me the 40mm sag – nope, it’s not a linear equation! Didn’t have to take everything apart this time – jacked up the front end to extend the forks, took the handlebars off – loosened the top fork pinch bolt and then loosened the fork cap, lowered the front end to push the fork cap and locking nut out so I could get to it.
Here's what it looks like with the fork cap clear of the tube:
You can see the fork cap, the locking nut, and the spacer (you can tell from the top of the spacer it's been cut and sanded smooth.
Cut the spacer to 54mm – put it back together and measured sag again ----30mm, damn! Had enough at that point. Rode with the 30mm to work today and while not bad, I’ll go back and cut some more off of the spacer. Think I’ll probably cut it to about 25mm or less and hope it’ll get me to ~40mm of sag.
Notes:
1. One thing I did differently from the fork oil FJR Tech instruction – I did not remove any plastic. I hate removing plastic and I was able to do this whole evolution w/o any real problems. I used my Husky 3/8” drive and easily loosened the left side (all references are sitting on the bike looking forward) and the 1st of the 2 lower pinch bolts on the right side (there are 2 x lower pinch bolts). I removed the right horn and got the upper pinch bolt easily. I was concerned that I wouldn’t be able to get my torque wrench (snap on) in there to complete the job. As it turned out, the head on the torque wrench was not as deep as my regular socket wrench and it fit better and I didn’t have a problem – tight, but no problem.
2. Fork oil: Tracy recommended the next higher Yami oil as I was still using the stock valves. I used the chart here: https://www.peterverdonedesigns.com/lowspeed.htm . On the final chart I went down the left hand column and picked an oil next to the next Yami oil up from the 01 oil. Plus I could get the Bel Ray.
3. The springs do not rattle inside the forks. Apparently if you get the springs listed for the FJR they’re smaller and will rattle.
I hope this will convince those who would like to do this but are concerned that they aren’t able because they aren’t sure of their skill level to go ahead and git ‘er done! While I didn’t do these things, it’s a great time to also do: steering head maint//clean brake calipers//install new horns//drink beer!
Jim
Last edited by a moderator:
