Removing Panels

Yamaha FJR Motorcycle Forum

Help Support Yamaha FJR Motorcycle Forum:

This site may earn a commission from merchant affiliate links, including eBay, Amazon, and others.

Simo

Active member
Joined
Sep 18, 2013
Messages
29
Reaction score
1
Location
Melbourne Australia
Can anyone point me to where I can find out how to remove the Glove Compartment on a 2014? I need to get behind the 12 volt socket to take off a power source for a GPS?

John

 
I believe Haynes is the best manual!Much better from Yamaha manual!

I bought a Haynes manual for my other bike and it was very good!

If you buy it,please let us know if it worth..

 
Last edited by a moderator:
I've used Haynes for other bikes and they were okay. There have been one or two cases in which Haynes published bad info regarding torque values. It got real expensive for some Beemer owners. You should be able to get a Service Manual for under $95 at your dealer. I have one and I find it difficult to locate some topics and that it sometimes cross-references other topics that are time consuming to find as well. That will get better with more use and tabing the manual.

 
I cant advise you about your glove box problem. But, since you have a new bike why not get started on the right foot by installing a fuseblock. Toogle hat way you wont have to take your panels off every time you want to add electrical farkles. Its not a difficult thing to install but it very useful (recommended). Just Google it.

 
I have a 2013, I'll bet they're similar. I had to take off the panel behind the speedo before I could get to the side compartments, such as removing the battery to winterize, there's a bolt at the very back of the battery cover panel that you can't get to unless the above panel is removed, I'd bet the left side panel is similar. The interlocking tabs that hold the panels in place even after the cap screws are removed are a pain in the ass. A shop manual tells you what to remove but doesn't tell you how, or I missed where that was discussed.

 
The OWNERS manual will tell you how to remove the dash panels. The SERVICE manual will tell you how to get to the glove box. You can also use the Yamaha Parts Fiche Cowling 1 to show you how the parts fit together.

The Haynes manual covers all years FJRs but I believe the people that bought the manual found that it was lacking in some details and not as thorough as other Haynes manuals. Yes, the Yamaha manual for the FJR is not great, but it does cover everything in the bike even if it doesn't go into great detail about how to remove and install parts.

 
Last edited by a moderator:
Alternate take........ The '14 battery cover comes off pretty easy I'm told.

If you don't mind your GPS having constant power, why not just connect direct to the battery and save yourself a buch of trouble?

An extra set of ring terminals will fit just fine on top of the battery cables with the stock battery bolts.

 
I am starting to think that it might be better go straight to the battery to save all the hassle.

Thanks guys for all your input.

 
You need not worry about the glove box for tapping the power source. There is a disconnect that allows you to set the fairing containing the glove box off to the side while you do your install. You will want to tap the glove box wire for power on the bike side of that disconnect. Just leave the glove box screwed to the fairing panel and don't worry about it.

Here are detailed instructions for removing the fairing panels. https://www.fjrforum.com/forum//index.php/topic/153923-i-give-how-do-you-remove-the-fairing-side-panels-on-the-2013/

 
You need not worry about the glove box for tapping the power source. There is a disconnect that allows you to set the fairing containing the glove box off to the side while you do your install. You will want to tap the glove box wire for power on the bike side of that disconnect. Just leave the glove box screwed to the fairing panel and don't worry about it.
Here are detailed instructions for removing the fairing panels. https://www.fjrforum.com/forum//index.php/topic/153923-i-give-how-do-you-remove-the-fairing-side-panels-on-the-2013/
OK, So just so I am clear on this. You are saying that I don't need to remove the glove box, but I can access the 12 volt power source by removing the side panel - is that correct?

 
As mentioned above a Fuse block is the way to go. Several options on what sort to use. I used a Fuze Block brand because of the built in relay that offers both switched and unswitched circuits. Here is my installation on my 2013. Took a couple of hours and you do not need an electrical engineering degree.

I mounted mine in a Pelican Case to keep water and other debris out. The wiring enters through some small grommets I installed. That is a Battery Tender Pigtail on top of the box. I run my tender through the Fuze Block and also use the Pigtail for running an air pump. The circuits I run through the Fuze Block are: Two sets of Auxiliary lights, a Battery Bug, GPS, battery tender, heated gear. The wiring, including a fused power wire taken directly from the battery, fits neatly in one wire bundle under the right side fairing. I encased all the wiring in a heat resistant sheath for ease of use and pinch/chaffe protection. A little work up front makes for ease of use in the future.

IMG_0813_zpsfafb68bf.jpg


IMG_0811_zps7e0a8284.jpg


wow! This is what my install looked like in my mind - it didn't turn out that well. Nice looking install! The fuze block is the only way to fly.

 
+1 on the fuse block idea. It also gives you a convenient place to tie in for more farkles in the future. One day, you WILL thank yourself for not taking the glove box short cut now.

Gary

darksider #44

 
You need not worry about the glove box for tapping the power source. There is a disconnect that allows you to set the fairing containing the glove box off to the side while you do your install. You will want to tap the glove box wire for power on the bike side of that disconnect. Just leave the glove box screwed to the fairing panel and don't worry about it.
Here are detailed instructions for removing the fairing panels. https://www.fjrforum.com/forum//index.php/topic/153923-i-give-how-do-you-remove-the-fairing-side-panels-on-the-2013/
OK, So just so I am clear on this. You are saying that I don't need to remove the glove box, but I can access the 12 volt power source by removing the side panel - is that correct?
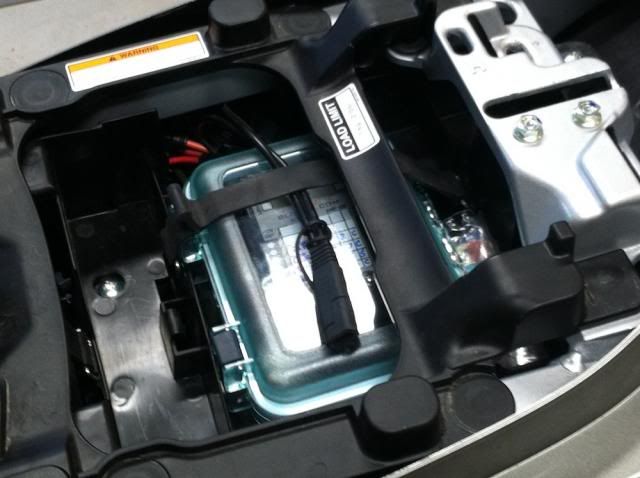
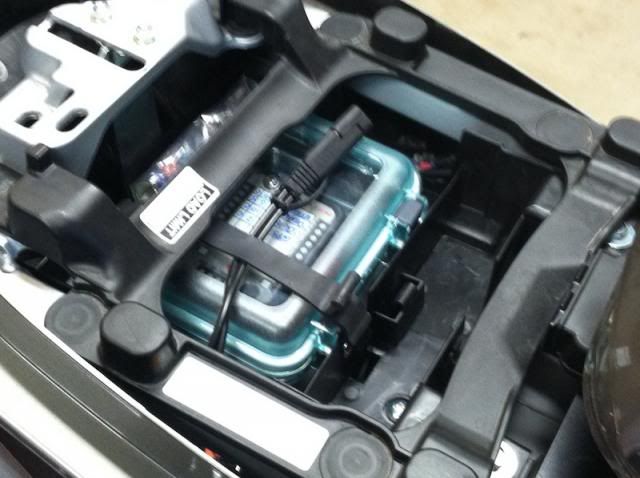
Your are correct. The glove box is screwed into the side panel. If you have dainty hands you may be able to access the wire you need to tap into by simply removing the Center and left side dash panels. For a nicely wired and routed job it's best to have as much room as possible. Remove the left side fairing panel. Then you have lots of room. You will see the connector for glovebox wire as you start to pull the panel away. There are two wires to disconnect as you drop the fairing away, the glovebox and turn signal. Disconnect it and make your connection the side that remains with the bike. Exactly how I wired my Zumo into my 2013.

In my case I never use the outlet in the glovebox. This option makes for a very nice short straight connection to your GPS protected by the fuse in the factory fuse block. If you are going to add additional electrical farkles then yes, I would encourage you to go the route of a fuse block.

 
Last edited by a moderator:
OK, Thanks guys. IT all looks fairly straight forward providing if it is not rushed.

I will need to remove the left side panel to do the job properly.

 
Top