Kevin Daly
YES I ran the fatty over!!
So because I was somewhat unsatisfied with the FJR suspension (too spongy and soft) I wanted to firm it up but I didnt want to spend big money. I had heard that the Gen 2 rear shock was more heavily sprung to accomodate the longer swing arm. Since the shocks are the same configuration the gen 1 and gen 2 shocks are interchagable. So what follows is a brief description of how to swap out the rear shock and a review of the new shocks performance on the Gen 1. Note that the FJR How To page provides instructions to swap the stock with the Ohlins shock. I based this page on their description but cut out the unnecessary stuff.
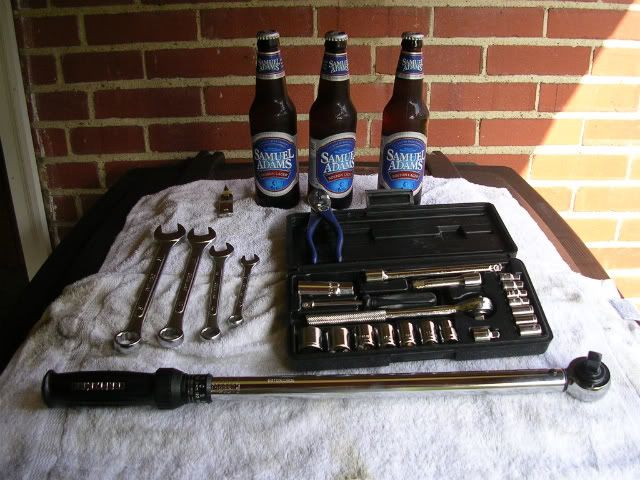
Below are most of the tools you will need. In addition to what you see you might also want a hammer to tap out the bolts holding the dogbones and shock. Finally it should only take about an hour or two if you take your time.
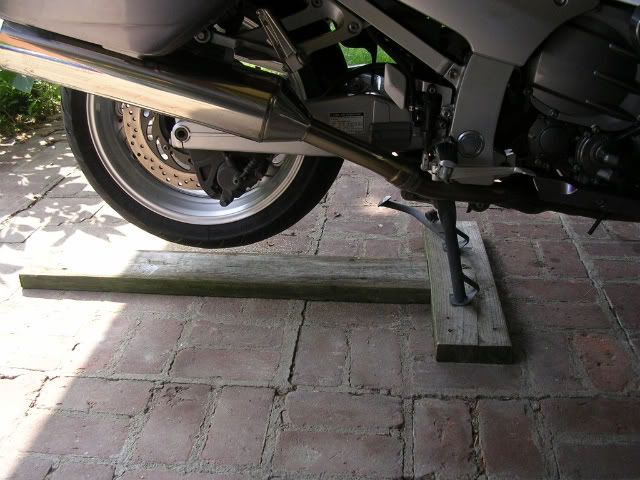
First, you need to get the rear end up high enough to allow the rear shock to slide down and out once loosened. I found 2 pieces of 2x6 ideal as eventually the one under the rear tire can be used to moce the rear tire/suspension to align the dogbones during reinstallation.
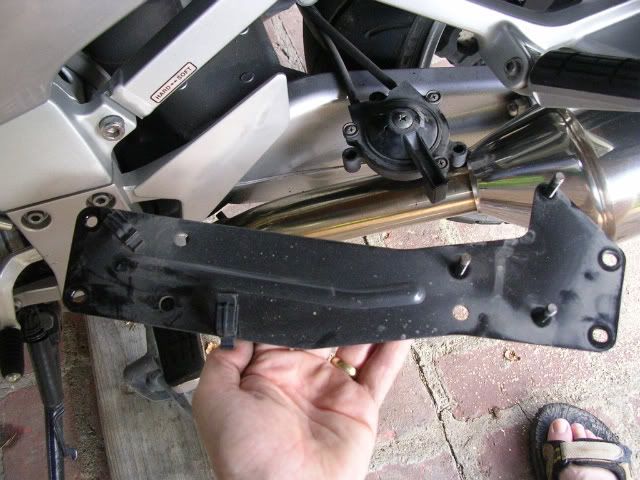
Next, loosen the spring preload adjuster by first removing the bracket that it is attached to and then remove the preload adjuster from the bracket. There are two allen bolts holding the bracket on each subframe rail. here the bracket is in my had and the preload adjuster is hanging loose above.
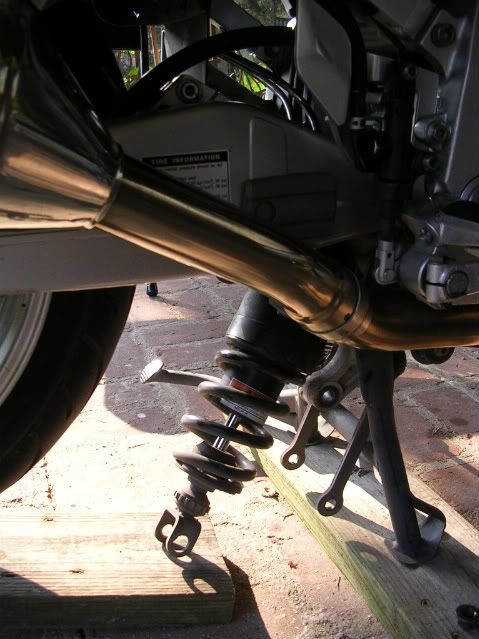
Next loosen and remove the upper dogbone bolt and allow them to drop down. you might have to tap the bolt through but its should pop loose. After they are free, you can then loosen and remove the lower bolt holding the shock. Finally remove the bolt holding the top of the shock and allow the shock to slide down and out the bottom of the swingarm as shown. Note that the holes on the bottom shock bracket are asymetric. the larger hole belongs on the throttle side (I believe). In either case keep an eye on that, it will matter.
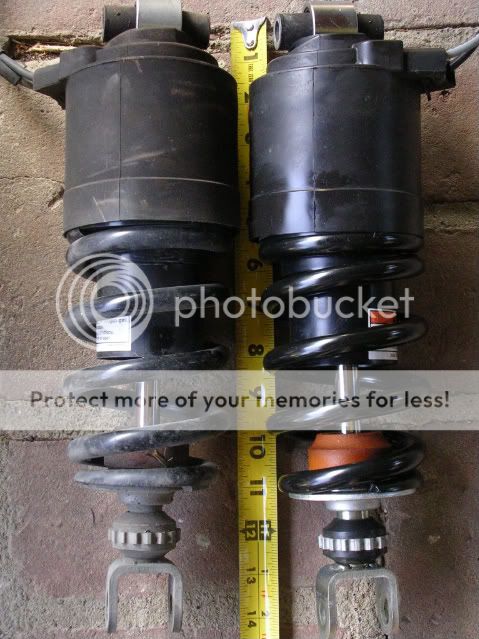
Note upon comparison, both shocks are identical in length:
To complete the process, simply put the new shock and reverse the process. note that there are specifice torque values for various bolts:
1 Upper shock bolt, 64 Nm (46 ft-lbs).
2 Lower shock bolt, 40 Nm (29 ft-lbs).
3 dogbone bolt, 48 Nm (35 ft-lbs).
Finally reattach the spring preload adjuster to the bracket and then the bracket to the subframe and your done!
PERFORMANCE REVIEW
Anyone who has also done this I would love to hear your comments. The main reason for doing this was to get rid of some of the sloshy sloppy feeling you get when you are leaned over in a corner and hit a bump; commonly described as being in a caddilac. FYI, I weigh about 170 and typically carry my bags with food water and tools everywhere I go. the Gen 2 shock has ~3000mi on it so it is essentially new. I bought it used for $175 from FZ/FJR Mike. Looked like new.
Ok I wipped off 500 miles today to give this new shock a working over. I started out with the dampening at 10 clicks (the range is 0- ~20 clicks). I also set the preload to firm. After about 100 miles the firm was just too much relative to the front forks. I also noted that the rebound dampening was insufficient given the firm setting. on a couple occasions a pothole or bum would bounce me a little out of the saddle. So I first switched to the soft setting and whipped off another 100 miles. It was much more appropriate but was still a little springy so I pulled over and added another 2 clicks and that seemed to more or less dial it in nicely.
Overall I think the rear shock swap was and excellent move; the overall function of the rearend is more appropriate for a more "sporty" ride. I definately think that the weakness of the front end becomes much more apparent once yo are running with a Gen 2 rear shock. I think the front can be dialed in a little more but my bet is that I will need to get some heaver springs to more appropriatly balance front and rear.
So anyone else have any comments or information to contribute?
Below are most of the tools you will need. In addition to what you see you might also want a hammer to tap out the bolts holding the dogbones and shock. Finally it should only take about an hour or two if you take your time.

First, you need to get the rear end up high enough to allow the rear shock to slide down and out once loosened. I found 2 pieces of 2x6 ideal as eventually the one under the rear tire can be used to moce the rear tire/suspension to align the dogbones during reinstallation.

Next, loosen the spring preload adjuster by first removing the bracket that it is attached to and then remove the preload adjuster from the bracket. There are two allen bolts holding the bracket on each subframe rail. here the bracket is in my had and the preload adjuster is hanging loose above.

Next loosen and remove the upper dogbone bolt and allow them to drop down. you might have to tap the bolt through but its should pop loose. After they are free, you can then loosen and remove the lower bolt holding the shock. Finally remove the bolt holding the top of the shock and allow the shock to slide down and out the bottom of the swingarm as shown. Note that the holes on the bottom shock bracket are asymetric. the larger hole belongs on the throttle side (I believe). In either case keep an eye on that, it will matter.

Note upon comparison, both shocks are identical in length:

To complete the process, simply put the new shock and reverse the process. note that there are specifice torque values for various bolts:
1 Upper shock bolt, 64 Nm (46 ft-lbs).
2 Lower shock bolt, 40 Nm (29 ft-lbs).
3 dogbone bolt, 48 Nm (35 ft-lbs).
Finally reattach the spring preload adjuster to the bracket and then the bracket to the subframe and your done!
PERFORMANCE REVIEW
Anyone who has also done this I would love to hear your comments. The main reason for doing this was to get rid of some of the sloshy sloppy feeling you get when you are leaned over in a corner and hit a bump; commonly described as being in a caddilac. FYI, I weigh about 170 and typically carry my bags with food water and tools everywhere I go. the Gen 2 shock has ~3000mi on it so it is essentially new. I bought it used for $175 from FZ/FJR Mike. Looked like new.
Ok I wipped off 500 miles today to give this new shock a working over. I started out with the dampening at 10 clicks (the range is 0- ~20 clicks). I also set the preload to firm. After about 100 miles the firm was just too much relative to the front forks. I also noted that the rebound dampening was insufficient given the firm setting. on a couple occasions a pothole or bum would bounce me a little out of the saddle. So I first switched to the soft setting and whipped off another 100 miles. It was much more appropriate but was still a little springy so I pulled over and added another 2 clicks and that seemed to more or less dial it in nicely.
Overall I think the rear shock swap was and excellent move; the overall function of the rearend is more appropriate for a more "sporty" ride. I definately think that the weakness of the front end becomes much more apparent once yo are running with a Gen 2 rear shock. I think the front can be dialed in a little more but my bet is that I will need to get some heaver springs to more appropriatly balance front and rear.
So anyone else have any comments or information to contribute?
Last edited by a moderator:


