Spanner Wrench for FJR

Yamaha FJR Motorcycle Forum

Help Support Yamaha FJR Motorcycle Forum:

This site may earn a commission from merchant affiliate links, including eBay, Amazon, and others.
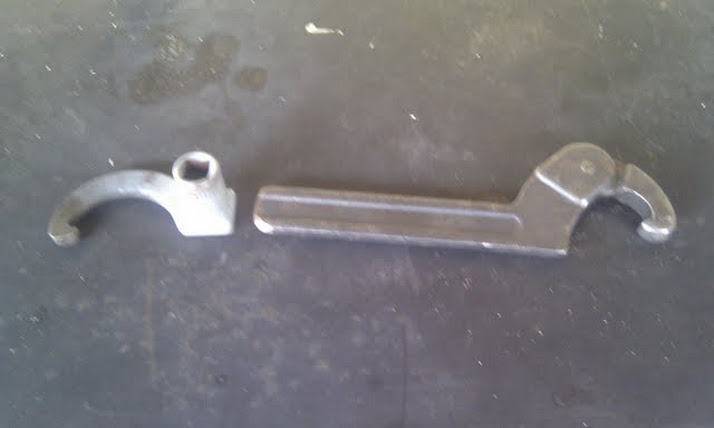
PM just Roy. He might be ready to do another run of that socket tool. I would be intested if he does.

PM sent. Got an error message that his inbox was full and cannot receive any more PM's. I'll try again late
His In Box has been full for a lloooonnnnggggg time and AFAIK hasn't responded to any email in that same length of time.
I don't think Roy is with us any longer - no reply back to email, and I know he was battling...

For those playing along at home, what this means, and why Ionbeam is mentioning it, is that if the tool is at an angle, it multiplies the torque value above what it would be in direct line. It can be argued about how much importance this is for this particular application and the relatively low values in play. ;)
Just to make this completely clear, you do want the torque wrench to be at an angle to the spanner. A 90 degree angle to be precise. You do not want it to be in-line.If you place the wrench in-line with the spanner, the torque being applied (and registered) by the wrench will be amplified by the ratio of the length of the spanner to the length of the wrench. IOW you will over torque the nut. But at the prescribed 90 degrees relationship the torque applied to the nut is the same as what is read by the torque wrench.This is clearly spelled out in the service manual.
Steering_Head_Bearing_Adjustment.jpg
<metrology hat on>

Correct

</metrology hat off>

 
Thanks for the correction/clarification Fred. I should have stated that differently to make it clear. The shop manual shows the prescribed manner, as you pictured. :clapping:

 
I went to Ebay and ordered the wrench yesterday. And, as of last week I've got the service manual (with the white cover) so once I get the wrench the only thing left to do is to just lube the bearings. Both types of torque wrenches are on the workbench so I will be able to follow the details of the instructions to the letter. Much appreciation to all that responded to my original post. This Forum makes owning such a great bike even more enjoyable. :yahoo:

Keep to shiny side up,

-Paul

 
Sorry to resurrect an old thread, but I can't seem to find this tool anywhere- ebay, amazon, etc. Would someone be willing to let me borrow theirs, or know of a good source for one?

 
Sorry to resurrect an old thread, but I can't seem to find this tool anywhere- ebay, amazon, etc. Would someone be willing to let me borrow theirs, or know of a good source for one?
From post #2 in this thread, the ebay tool appears to still be available for $32. Even though the tool isn't listed as being suitable for the FJR, the ad says it substitutes for Yamaha P/N YU-33975 which is what the FSM calls for. If you use this wrench go back to page 1 of this thread and review how to use this tool because the way the wrench attaches to the tool is different from the Yamaha tool.

 
Last edited by a moderator:
Sorry to resurrect an old thread, but I can't seem to find this tool anywhere- ebay, amazon, etc. Would someone be willing to let me borrow theirs, or know of a good source for one?

eBay assist

The Professor beat me to it. But at least my link still has some available!
bleh.gif


Last edited by a moderator:
The Professor beat me to it. But at least my link still has some available!
bleh.gif
Hmmm, the page I linked to also showed 3 different ads with available tools, dunno what happened to my copy/paste link and what shows up when you click my link now.

 
I made my own socket type by getting a cheap socket and then grinding until I had the proper "fingers" to fit in the slot of the nut. Works like a charm and I made it for a lot less than $30.

 
I made my own socket type by getting a cheap socket and then grinding until I had the proper "fingers" to fit in the slot of the nut. Works like a charm and I made it for a lot less than $30.
I made my socket out of a scrap piece of sched. 40 alum. pipe using hand tools for.... free. You could also make your own spanner from heavy plate stock for next to nothing as well. Yes I know, its easier to buy one but what fun is that?
mda.gif


Wow- apparently my notification feature isn't working that well. Didn't think anyone had responded! I bought a 1 1/4" extended socket to cut down because I read that would work, but now I lost the thread that someone sketched out the castle nut dimensions. Yamafitter, that might have been from your info.

Does anyone have one laying around they could post up? Thanks a ton!

thinking I will probably put in the All Balls bearings at the same time since the bike has almost 30k on it and definitely has the shimmy.

 
Last edited by a moderator:
To lazy to check the service interval right now but I would guess with 53K on the bike I am due. I get to make a new toy too.
Dave
Dave,

Best service interval for these bearings is to adjust them once (sometime after the bike has broken in), then leave them alone unless they feel too loose (easy to check) or until they fail. Unless you wash the grease out of them with a pressure washer or by zealously cleaning your bike too much (I know that you don't do either of those things) they are in a fairly well protected position up high on the bike and will last for > 100k miles easy.

You are far more apt to ruin your steering stem bearings by over-tightening them from not following (or understanding) the 2 step torque procedure. When they do eventually fail a set of tapered rollers put in there will last the remaining life of the bike and be essentially maintenance free.

This is my plan, and it's been good for 75k miles so far... YMMV

 
Some guy named Phil made a tutorial on making your own tool...
https://www.fjrforum.com/forum//index.php?showtopic=139053

If you do this, make sure to use a deep socket. CLICKY
Also, if you do this, check out my comment on how to orient the socket before beginning your cuts... here: CLICKY

In addition: something that didn't occur to me until just now, why not just use a 1- 7/16 - six point socket for this cut-em-up project? The distance across the flats is 1.4375.... perfect for the needed I.D. dimension. Look at the drawing. The O.D. of the socket doesn't matter, it'll just be hanging out in the breeze when you're using it.

Gary

darksider #44

NOTE: EDITED TO REPAIR CLICKY ABOVE

 
Last edited by a moderator:
Gary-

Your link doesn't work, but I would be very interested in what you have to say. Already have a 1 1/4 socket I want to cut up, so I'm a little late on that.

Phil-

THATS the thread I was looking for! Thanks!

 
Gary- Your link doesn't work, but I would be very interested in what you have to say. Already have a 1 1/4 socket I want to cut up, so I'm a little late on that.

Phil-

THATS the thread I was looking for! Thanks!
The above link has been repaired. I don't know if the 1 1/4 socket will do for this cut'em up project. The OD of the socket is going to have to be something like a minimum of 1.560, I would think... as the ID of your finished (cut up) socket is 1.437 or slightly larger. That's why a 1 7/16 - 6 point socket would be just about right for your carving project. The ID is about 1.437 and OD would be maybe 1.650 (or so) That's figuring that the wall thickness of the socket might be about .100-.125 before you start carving.

Gary

 
Last edited by a moderator:
Top