Stripped Bolt Hole Options

Yamaha FJR Motorcycle Forum

Help Support Yamaha FJR Motorcycle Forum:

This site may earn a commission from merchant affiliate links, including eBay, Amazon, and others.

MCML

Not All Who Wander Are Lost
Joined
Jun 13, 2005
Messages
1,188
Reaction score
47
Location
Tarzana, CA USA
I have been getting a mist of oil low on the right side fairing. First noticed by Carver on our trip with Turbo Dave and the Clampers to Death Valley earlier this year, it become more pronounced while on the trip to CFR/Alaska last month.

While I have the bike torn down to do the repairs and cleaning necessitated by the Alaska trip, I was able to inspect the situation. It turns out that one of the bolts that hold the cover has no purchase because the threads into which it screws (cast into the engine casing?) are stripped. They came out with the bolt!

I have never tried Heli-coils but that might be a solution or I could try to re-tap the threads. Any thoughts on the matter, and/or other options that you might come up with, would be appreciated.

The empty hole is shown at approximately "one o'clock" in the photo below. Thanks.
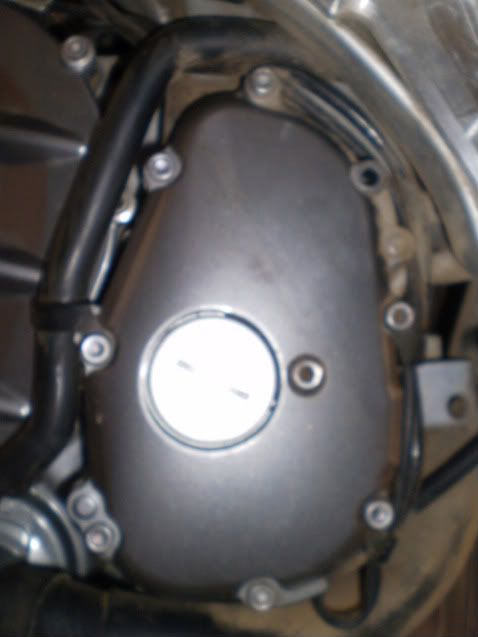
P8040005.jpg


Last edited by a moderator:
You'll have to re-tap the threads either way. Might as well use a Heli-coil threaded insert.

Very easy into aluminum and the Heli-coil will be much stronger than aluminum threads.

 
Definatly a case for Heli-Coil or any other Screw Thread Insert. Take the bolt that came out to any machinest supply house and they should be able to supply you with the inserts, instalation tool, STI tap, and propper drill to do the job perfect the first time. I'm sure there's a helluvalot of info on the neenernet on how to actually install them B)

 
Go with a Heli-Coil, doing a threaded insert you might not have room on the side of the casting. A Heli-coil is the thinest most unobtrusive fix. You will most likely have to remove that cover, the Heli-coil tap will be to big. It's pretty easy take you time and do it right. A Heli-coil kit is spendy 30-60 bucks, but it will come with a few inserts, a drill the installation tool, and the special tap. Most importantly make sure you drill and tap perpendicular to that surface. Also spray that Tap with WD-40 to keep is lubes and cutting well. Aluminum with cut like butter.

Good Luck!!

 
You could do a heli-coil or go one size up and tap it out (i.e. if it's a 5mm bolt go to a 6mm). There still needs to be enough meat for the threads. There is a minimum and max hole size for the tapping, you can look it up at a fastener website. You also may have to open up the hole in the cover to get the next larger size bolt thru.

 
Last edited by a moderator:
If the materials are soft (plastic cover, aluminum meat) and there is not a lot of torque on the fastener, then would it not make sense to first try a simple tap job? That way, I could work through the existing hole in the cover without removing it thereby avoiding replacing the gasket, the risk of another thread stripping and the inevitable "unforseen" problem. Of course, that lurks no matter how I proceed.

 
I could work through the existing hole in the cover without removing it
I would recommend removing the cover before working on it.

Running a tap trough the existing hole will push whatever chips it cleans up. There's always the possibility that everything will stick between the flutes and come out when you unscrew the tap, but I would't bet on it.

 
Last edited by a moderator:
And if there has been an oil leak for some time it's probably better to replace the gasket anyway. I'd agree with trying to re-tap the hole first. However, you'll never get enough torque on the now dodgy bolt hole to pull the 6-months-leaking-and-out-of-place gasket back to a sealing position without replacing the old gasket first. Add blue locktite if you go this way. I've done this before on old Triumps and BSA's with good success

 
Re-tapping the hole might be easier, but then you'll have one bolt different from all the rest for all of eternity. With a Heli-coil you can match the original thread and use the original bolt, and never have to keep the odd one straight as to which hole it goes in.

 
Re-tapping the hole might be easier, but then you'll have one bolt different from all the rest for all of eternity. With a Heli-coil you can match the original thread and use the original bolt, and never have to keep the odd one straight as to which hole it goes in.
There is only one hole. It doesn't need to match anything. It's the timing mark access hole.

I'm pretty sure he's not talking about re-tapping to a different thread; just chasing the existing (non-existant?) threads with a tap.

 
Last edited by a moderator:
There is only one hole. It doesn't need to match anything. It's the timing mark access hole.

I'm pretty sure he's not talking about re-tapping to a different thread; just chasing the existing (non-existant?) threads with a tap.

Go back and look at the picture. He's talking about the cover bolt, which has been removed in the picture.

 
If memory serves, of all the bolts holding the timing cover on, the two at 12 & 1 are longer than the rest, so replacing with the next larger size isn't going to be any more inconvenient than the fact the original doesn't match the rest to begin with.

Pull the cover off for any retapping or helicoil work.

And while the cover's off, go ahead and replace your CCT and timing chain. Why not? you're in there already, right? :)

 
If the materials are soft (plastic cover, aluminum meat) and there is not a lot of torque on the fastener, then would it not make sense to first try a simple tap job? That way, I could work through the existing hole in the cover without removing it thereby avoiding replacing the gasket, the risk of another thread stripping and the inevitable "unforseen" problem. Of course, that lurks no matter how I proceed.
Please do a 'first class' job -- any subsequent owners of your bike will appreciate it (of course, if you never plan to get rid of it? -- anything's okay).

My vote's for a Heli-Coil repair along with the correct fastener (bolt/screw) -- just like it never happened (almost..). :)

 
If memory serves, of all the bolts holding the timing cover on, the two at 12 & 1 are longer than the rest, so replacing with the next larger size isn't going to be any more inconvenient than the fact the original doesn't match the rest to begin with.
Pull the cover off for any retapping or helicoil work.

And while the cover's off, go ahead and replace your CCT and timing chain. Why not? you're in there already, right? :)
Wise words...

You stated when the bolt came out so did the threads, I assume there is no meat left to tap the same size. You can always chase the threads with the standard size and see what happens.

When you use a heli-coil you must open the hole up rather large and put in the coil. If for some reason that gets hosed up, you have a real big hole now. That was the reason for my thought on going one size up on the bolt and tapping it. Either way would work fine.

Good luck.

 
Good advice from all and thanks to all.

In the spirit of taking it one step at a time, I ran a 6mm tap into the hole today. The original bolt now threads in but, of course, there was not much to cut into and I dared not tighten the bolt very much. As soon as I complete the rest of my repairs/maintenance I will take a shakedown ride with the fairing still off. If I am lucky, the leak will not be there. If I am not, then the next step will be either a Heli Coil or a 7mm or 8mm tap and new bolt. . . and a new cover gasket from Gary at Mondak.

 
There are three options, in order of preference:

a. Tap deeper with the existing size and use a longer screw: easiest. Measure the depth of the bore with a piece of wire, and compare to the stock fastener length. If you've got 3+ mm of usable bore past the stock screw length, go to the longer screw.

b. Drill/Tap/Helicoil- This is the best option for a long-term fix, and the proper way to do the job. You will need to drill the hole up to an odd size, and tap with an odd size. Both the drill bit and tap were included in the last helicoil kit I got. Last you thread in the insert. Then it would be as good as new. It sounds difficult, but is an easy job to do if you take your time and think it through.

c. Drill/Tap to a larger diameter: Least preferred method. You'll also have to drill out the cover to fit the larger screw.

 
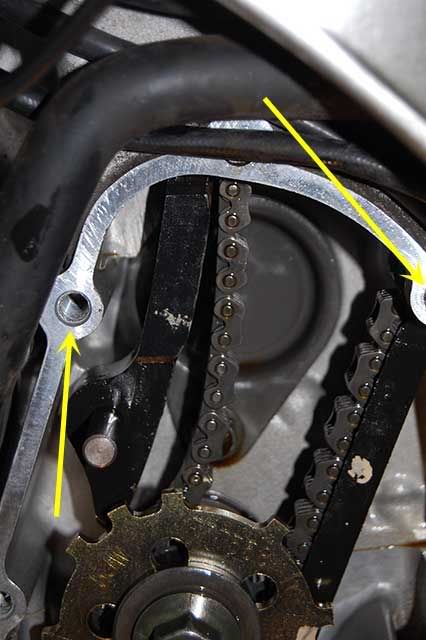
Had a close-up of the area in question...unfortunately the affected bolt hole is just off camera to the right, but one can plainly see the amount of "meat" surrounding the bolt holes on the left side.

Helicoil or re-tap next size up? I think I'd go for the re-tap option first. There's enough "meat" to work with, in my opinion.

bolt.jpg


Had a close-up of the area in question...unfortunately the affected bolt hole is just off camera to the right, but one can plainly see the amount of "meat" surrounding the bolt holes on the left side.
Helicoil or re-tap next size up? I think I'd go for the re-tap option first. There's enough "meat" to work with, in my opinion.

bolt.jpg

Damn Howie! You be Da Man! Took your bike all apart just to take a picture of the area to show him? Wow!

Looks like you might need some work on your CCT

Oh....wait.....ah......never mind :D

 
Top