Tire Change - Old School

Yamaha FJR Motorcycle Forum

Help Support Yamaha FJR Motorcycle Forum:

This site may earn a commission from merchant affiliate links, including eBay, Amazon, and others.
Like many others, I spent lots of time kneeling on the floor with a bucket and irons to change tires. Over the years, I've progressively upgraded my equipment to make the job easier.

Sorry Fred and Ion, but we have our own brand of ingenuity here in the Pacific Northwet that doesn't involve any Yankees.
wink.png
I too made a tire changer with the standard car wheel, but with some custom touches. It's mounted to some 2 inch square tubing so it will fit in the truck trailer hitch. And there's a bead breaker integrated.

tire_changer.jpg


Total cost was just a few bucks for the threaded rod as I had all the other parts laying around or scrounged for free. A later upgrade that I really like is the No Scuff Tire tool (https://www.no-scufftiretool.com/) that costs $89 delivered and makes it much easier to mount and dismount tires.

For balancing, I also made a stand for free.

balance_stand.jpg


It uses a set of low rolling resistance bearings bolted to scrap brackets and then screwed to the 2x4 stands. The bearings were designed for use in old, tape based, flight recorders for aircraft use, but any number of bearings would work for this purpose. The wheel rests on the stand using the bike's axle (which doesn't even rotate in use because the bearings are much more sensitive). Works like a champ!

 
Last edited by a moderator:
Old school for CT's as well. 2 pairs of hands is a must though.

Too cheap to buy one of those high falootin tire changers.
Only need one pair if...

You have a way to secure the wheel-I cobbed up a wheel holder that clamps in my bench vise and holds the wheel vertical and is easy on the backbone..

I welded up a clamp using cheapo Harbor Freight C-clamps and some bed iron.. it will squeeze about 90 degrees of the beads opposite the tar arns..

I used to do about 20 a year, charge for the service was pizza and beer.. wonder where all the riders went?
Sounds very interesting. You have any pictures of the set up? I still do it on my hands knees with the wheel on 2x4's on the ground. I always tell myself I'm going to get a 14" wheel, garden hose, etc like Fred's set up but I never get round to it. Your set up sounds like a good winter's day project, though.
To dumb to do pics

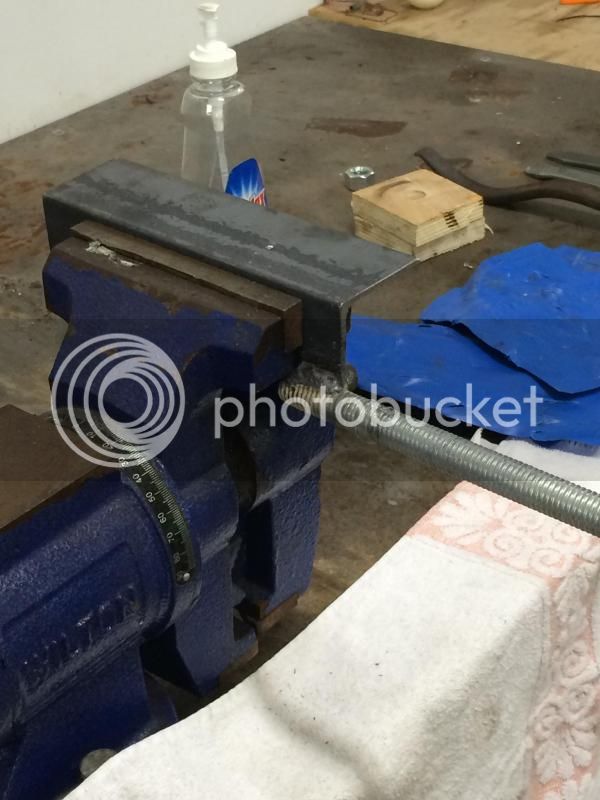
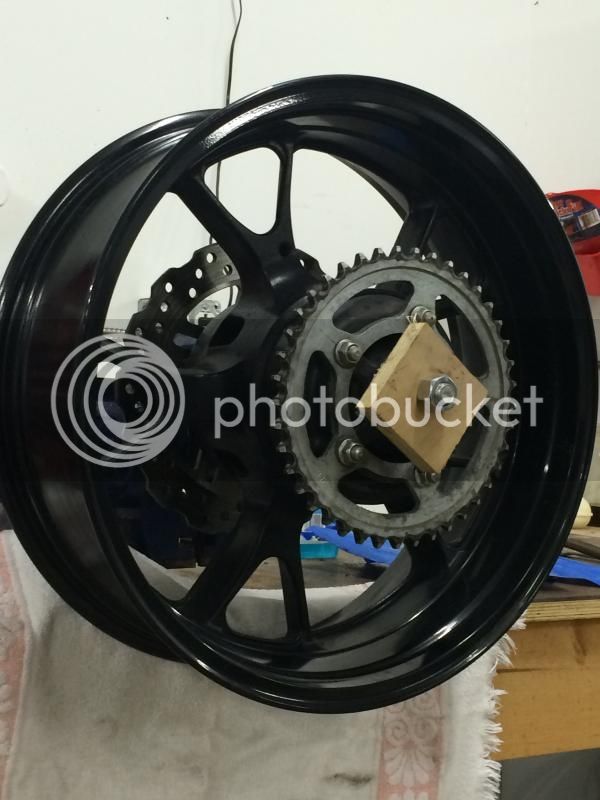
Basically, I welded a 7/16" threaded rod onto a 2" piece of angle iron....clamp the angle iron in the bench vice [after the vise is used to break the beads] and swivel the vise so the rod sticks out straight from the bench. I use some washers and a nut to clamp the wheel on the rod and slide the angle iron thru the vise jaws until the rim is up against the bench. Can't get away now.. C-clamps to squeeze the beads together on the top and the tire drops into the deep part of the wheel -tire irons and pieces of leather gloves to protect the rim and it's easy peasy.. As they say, installation is the reverse of removal..
Finally got around to trying Inewlf's idea using a 2x2 angle and a 5/8" rod. Welded it up and started by removing the roadsmart on the FJR rear. After 45 minutes of cussing, tire irons flipping out and flying across the shop and busting a couple knuckles, I got it off but thought this set up was completely ass! Then I remembered what a pain it was mounting that thing and decided to try it once more. Mounting the new tire was a piece of cake and removing and replacing the 023's on the ZX was equally as easy. The key is getting the c-clamps really cinched down on the tire in the correct locations. Oh and not using a roadsamart! Total PIA to change and only got 3,950 out of it. Never again.

Here's a couple pics:

Angle and rod welded up and in vice.

IMG_0339_zps4b4daa17.jpg


Rim in place

IMG_0336_zpsb1cfb266.jpg


Rest of the tools

IMG_0338_zps266a7ff7.jpg


Forgot to shoot a picture of the tire while being changed but it was a snap. And much easier for me to work at waist level versus on the floor using my knee to get the tire lip into the vally of the rim. Thanks for the idea Inewlf!

 
There are as many different ways to get this stuff done as there are people out there who want to do it. I applaud everyone who wings it and comes up with a solution that works for their own situation!

 
Old school for CT's as well. 2 pairs of hands is a must though.

Too cheap to buy one of those high falootin tire changers.
Only need one pair if...

You have a way to secure the wheel-I cobbed up a wheel holder that clamps in my bench vise and holds the wheel vertical and is easy on the backbone..

I welded up a clamp using cheapo Harbor Freight C-clamps and some bed iron.. it will squeeze about 90 degrees of the beads opposite the tar arns..

I used to do about 20 a year, charge for the service was pizza and beer.. wonder where all the riders went?
Sounds very interesting. You have any pictures of the set up? I still do it on my hands knees with the wheel on 2x4's on the ground. I always tell myself I'm going to get a 14" wheel, garden hose, etc like Fred's set up but I never get round to it. Your set up sounds like a good winter's day project, though.
To dumb to do pics

Basically, I welded a 7/16" threaded rod onto a 2" piece of angle iron....clamp the angle iron in the bench vice [after the vise is used to break beads] and swivel the vise so the rod sticks out straight from the bench. I use some washers and a nut to clamp the wheel on the rod and slide the angle iron thru the vise jaws until the rim is up against the bench. Can't get away now.. C-clamps to squeeze the beads together on the top and the tire drops into the deep part of the wheel -tire irons and pieces of leather gloves to protect the rim and it's easy peasy.. As they say, installation is the reverse of removal..
Finally got around to trying Inewlf's idea using a 2x2 angle and a 5/8" rod. Welded it up and started by removing the roadsmart on the FJR rear. After 45 minutes of cussing, tire irons flipping out and flying across the shop and busting a couple knuckles, I got it off but thought this set up was completely ass! Then I remembered what a pain it was mounting that thing and decided to try it once more. Mounting the new tire was a piece of cake and removing and replacing the 023's on the ZX was equally as easy. The key is getting the c-clamps really cinched down on the tire in the correct locations. Oh and not using a roadsamart! Total PIA to change and only got 3,950 out of it. Never again.
Here's a couple pics:

Angle and rod welded up and in vice.

IMG_0339_zps4b4daa17.jpg


Rim in place

IMG_0336_zpsb1cfb266.jpg


Rest of the tools

IMG_0338_zps266a7ff7.jpg


Forgot to shoot a picture of the tire while being changed but it was a snap. And much easier for me to work at waist level versus on the floor using my knee to get the tire lip into the vally of the rim. Thanks for the idea Inewlf!
Hey Will...I'll be right over...and I'll bring my tires with me.

 
That's it exactly..

Squeezing the beads together is the trick...The beads on both sides must be into the wheel "well" or you will fight to the death..The advantage to having the tire vertical is you are less likely to push the bottom bead out of the well while pushing down on the top one.

I cobbed a bead clamp using a large C clamp from Harbor Freight and small angle iron..I cut, bent and welded about 12 inches of iron so that it curved around about 60 degrees of the tire. I welded one of these irons to each side of the clamp. This spreads out the pressure from the clamp. I clamp it on the top of the vertical tire and start with the irons on the bottom. I can usually yank the last bead off by hand and get the first bead of the new tire on by hand [with lube].

 
Yeah, I have found that the first bead will always go on with just hand pressure (if well lubed), which suggests that if you can just get the beads on the opposite side all the way down down into the valley you would not need any prying levers to get the 2nd one on either.

The problem is that, especially with wider rear tires, that is easier said than done. Folks try to use ratchet straps, ty-wraps and all manner of things to get the two beads (on the opposite side) close enough together to get them both into that valley with varying degrees of success.

 
I cobbed a bead clamp using a large C clamp from Harbor Freight and small angle iron..I cut, bent and welded about 12 inches of iron so that it curved around about 60 degrees of the tire.
This is what I need to do before my next tire change. I was using two C-clamps with the stock clamp heads and it was a little tricky to keep them from sliding too high or too low on the tire as I was tightening.

 
Last winter I spent some of my tax refund on a Cycle Hill changer. It was just under $500. It does a nice job bead breaking and of holding the wheels up at waist level for the tire mount / demount. The big bar they give you works great for demounting, but I still usually find myself spooning the new tires on the rim rather than using the mount bar as it is just easier to do that way. Plus it takes me longer to setup the Cycle Hill as I don't have the space to leave it set up and have to bolt it to a spot in the floor each time and then put it away when done. Certainly not worth the $500 for someone that only changes tires once or twice a year.
I'm almost the same way, except less money on the HF changer. Mine was a birthday present from my wife some years ago. I don't do many changes per year but at $25 per tire, it's done and paid for itself a long long time ago.

3 spoons, Harbor Freight bead breaker and Dyna beads for balancing for me. Yea it works, and saves some $$$. If I didn't go through 2 sets a year I would just have the shop change them for $25 a tire (wheel carried in). The Dyna beads work, but I am going with a static balancer like in ionbeam's photo above soon. Too difficult to get the beads out of the old tire (I recycle them), then put them through the valve stem after new tire is mounted, especially with angled valve stems.
Curious...I've looked into the beads but have never used them yet. If the beads are so hard to get out, in that they don't pour out of the tire, why not just put the beads in the new tire and then mount it? Why do they have to go through the valve stem?
If you simply dump the beads into the new tire, they will most likely fall out (at least many of them) during tire installation on the rim. It might work for those who change tires while the rim is vertical rather than horizontal.

 
I respectfully disagree.

I have changed a dozen tires or more using Dyna Beads and pouring them in before mounting.

Do it half ways carefully and you don't loose a single bead. The tires even when horizontal are rounded enough that the beads stay inside the recessed area of the tire. Then I remove the wheel from the Cycle Hill changer and set on the floor vertically for inflation. Never have a problem with the bead seating or air loss after changing.

Have never lost and beads taking the tire off either. I too recycle the beads and they are easy to get out. Simply drill a hole in the old tire and pour the beads through a funnel into a container for use later.

Regards

Scooper

IBA# 55459

 
Last edited by a moderator:
https://www.harborfreight.com/24-in-heavy-duty-cable-ties-10-pc-60258.html
Use three of these to hold the tire beads together.

It's fairly easy to lever on the last bead when you have the beads held together, pulled into the wheel's small radius.
I watched a small dirt bike tire changed this way, it went pretty easy.

I watched a big bike tire changed this way, it appeared to me that this was the most difficult way possible. Eet no go good at all, removed fingernails, bust gut, blew out left testicle and still no mount.

 
Last edited by a moderator:
It's very easy to mount the FJR's front tyre using this technique. It's a bit more difficult for the rear tyre but very doable. I've done it solo more than once. You just have to take small, incremental bites with your tools.

I space the three ties about 45 degrees apart so that a bit more than 130 degrees of the tyre is compressed.

Putting the first bead on the rim is a little more difficult with the beads held together. But, you can slam it on with one motion if everything is lubed properly.

For me the worst part of having someone mount a tyre is that I have to make two trips -- one to drop off the wheel and tyre and a return trip to retrieve the mounted tyre. Two 28 mile round trip excursions.

 
Last edited by a moderator:
It's very easy to mount the FJR's front tyre using this technique. It's a bit more difficult for the rear tyre but very doable...But, you can slam it on with one motion if everything is lubed properly...
With or without the tie-wraps the front tire is easy to mount and can indeed be slammed on, us NERDS make a game of it. The rear, especially the 'B' spec or equivalent is *much* harder. We need CM to come north and show us how a few tie-wraps are easier than 3 people with spoons an rim protectors. I've seen the tie wrap method and it wasn't easy with big burly guys, even when fully lubed.

 
Last edited by a moderator:
Don't recall saying it was easier than three people with spoons and rim protectors. Don't know how you could get three people working effectively around a wheel anyway? I don't worry about rim protectors. After doing this a few times I discovered I wasn't marring the rims to any significant degree by not using rim protectors. I use some very thin flat tools which don't chew up the rims.

I don't use the special rear tyres for heavy bikes so the sidewalls are a bit more flexible. I believe the tread is usually a bit deeper on the standard tyres and I get a few more miles from those.

"Slamming it on" refers only to the first, easy bead. Obviously the 2nd one requires some ingenuity and tools.

Did the big, burly guys have good brains or were they dullards? How many fingertips did they lose?

 
Top