Trunk Mount

Yamaha FJR Motorcycle Forum

Help Support Yamaha FJR Motorcycle Forum:

This site may earn a commission from merchant affiliate links, including eBay, Amazon, and others.

Hoggiedoo

New member
Joined
Jun 8, 2011
Messages
3
Reaction score
0
Location
Lincoln, RI
I have a small dilemma. I bought a stock trunk and the mounting kit. The trunk was broken so I sent the whole thing back. The new replacement trunk came in and I never looked at the contents of the box until recently. They neglected to send the mounting kit back with the new trunk. I know, I should've kept it but I bought it as a complete unit. My dilemma is that I bought a used one on ebay and I don't know how to put it on. It came with the screws but that's it. I thought there were spacers too... It looks like I can use the existing screw hole in the back but the two in the front don't line up with anything. Does anyone have a copy of the instructions that they can email me? If I need spacers I can make those at work. I also need to do this before Saturday morning before my road trip.

Thanks,

Rich

[email protected]

 
Funny this should come up as I just did this yesterday. Couple tips that worked for me anyway. I put the base plate on with the shorter of the three bolts, lined it up the way I thought it should be when completely mounted. Mark the two holes with a pencil on your fender. Remove the base plate. Then I took a small bit and drilled the holes. Take a flashlight and see where you are in relation to the threads below. I found that I had to move a cm here or there with a new pilot hole to be above the threads. I then took a 3/4 inch wood bit and held my breath! It's takes some nerve but if you line up the threads it's really a piece of cake. Drill the holes and the rest is easy sneezy! I used some bigger washers than what came in the kit also but as Fred above always says....YMMV.

Good luck! The hardest part is getting the nerve up to drill in your shiny fender!

 
Well,under of the plastic there is the subframe with the two ready threated holes where the two spacers will seat on them with the two bolts.Firstly you must screw the central bolt with the plate in the most correct position and then with a thin pencil or a like this through the holes, mark the the two points where you must drilling the two holes.Firstly start with a small drill to see if the threated holes in the subframe are exactly under from your drilling holes in the plastic and correct if is necessary.until the 20mm holes in the plastic are exactly over of the threated holes of the subframe..For a perfect job you must use many drills in steps until to 20mm..Be careful with your drill to not damage the threated holes in the subframe!
The most difficult thing in this job is the alignment of the holes with the threaded holes of the subframe for the spacers..and believe me it isn't the more easy thing in the world..!It took me some hours,but i did a perfect job there i think!The holes are perfectly alignment with the spacers and the threaded holes..
I really didn't like to drilling my beautiful plastic..Thought about the drilling for many days and nights..But finally i decided to drilling it with heavy heart because no other way in the horizon except a Givi system,but i liked more the OEM top case...It looks nice now..!
Good luck!
smile.png

 
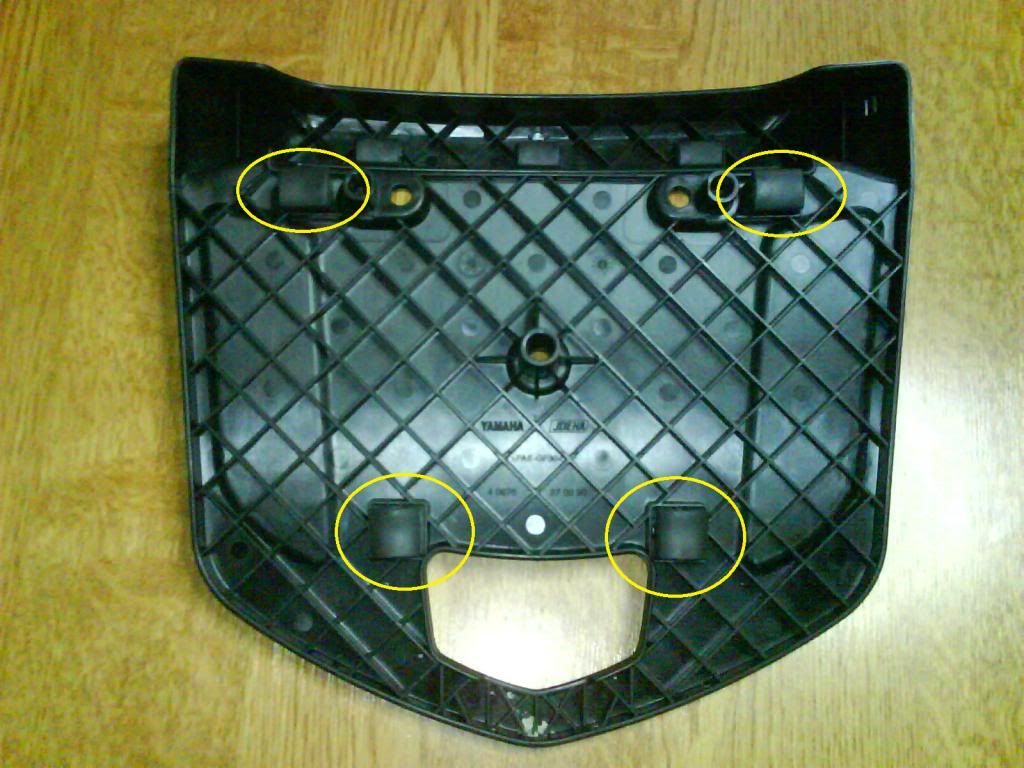
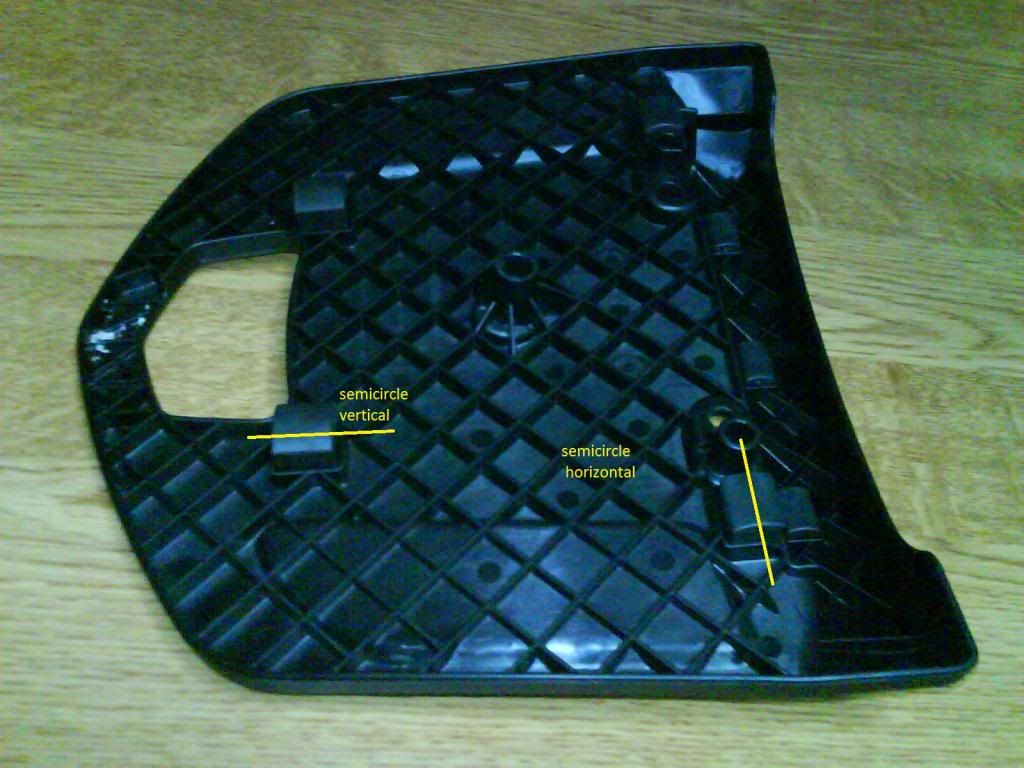
Hoggiedoo and ericboutin could you tell me if the four rubbers bumpers under of your plates are stick from the factory in the same position like my plate?I mean the two front rubbers near to the passenger seat are stick in horizontal position and the two rear rubbers are stick in vertical position?I mean the semicircle edge of the rubbers..Please have a look in the picture and tell me if your rubbers in your plates looks the same like mine?


Hoggiedoo and ericboutin could you tell me if the four rubbers bumpers under of your plates are stick from the factory in the same position like my plate?I mean the two front rubbers near to the passenger seat are stick in horizontal position and the two rear rubbers are stick in vertical position?I mean the semicircle edge of the rubbers..Please have a look in the picture and tell me if your rubbers in your plates looks the same like mine?
Mine are identical to yours. It appears that the the two rear ones (by the passenger seat) are actually are oblong and the two front ones are more perfect squares. Either way though mine are in the exact positions as yours pictured here. Hope that helps!
I was waiting for this answer too long!I believe for an unknown reason,in the latest plates the Yamaha turns the two rear rubbers in vertical position..!Thanks for the very helpful answer!

 
BTW, I would put painters tape around the locations that you're going to drill. You just drill right through it. It'll help minimize the risk of chipping the paint and make for a cleaner hole.

 
You mean this for sure?!Sorry the plate looks from the side..

Yup for sure! lol. I actually looked at mine from both side and front and that's how I noticed that the rubber pads don't appear to be the same size. But mine is identical to yours. It's mounted right now but if you would like me to pull it and snap a couple pics I can sure do it for yah. Just say the word.

In ref. to CopB8, that is definately a good suggestion, I thought of doing that after I had already drilled the holes!
fool.gif
Anyway I got lucky and they turned out great but the bit I used was also brand new as in real sharp so that may be why, anyway good suggestion on the tape for sure! Have you done the surgery yet?

 
Yes ericboutin,i have done the surgery,with heavy heart..haha
smile.png
but the holes looks nice!not bad..!

I would like to see a picture of your plate..Don't pull it from the bike,only please take a close clear picture from the rear of the bike to see how it looks the rear rubbers..

Many thanks!!
smile.png


ps.

Don't forget to torque the three bolts slow and carefully because it is plastic,to 23nm.

 
Last edited by a moderator:
Hey Mihalis - I've got some pics for you of the base but this insane site won't let me post the pics I took....soooooo how bout you PM me your email addy and I'll get them off to you that way. I gotta tell yah the info on this site is amazing but the UI is the worst I have ever seen! I've belonged to and belong to numerous other forums and this is by far the worst! I get so freaking frustrated everytime I visit here....first it's the slow speed of it and now this dumb arse picture posting!! Anyway sorry to dump on yah but it sure is aggravating when every other forum site on the planet is functional except this one! Ok phew....I wish I could say I feel better...lol....anyway pm me and I'll get those pics off to yah. And like I said if you need me to take the base off for better pics just let me know.

 
Many thanks ericboutin!I will PM you my e-mail..

About the post of the pictures i have never a problem here..First you must take the IMG code of the picture from your Photobucket acount,paste here the code,click Post.After click on More Replay Options in the right of the Post,wait a little and after click Add Reply.Thats it!
smile.png


Top