Whats the secret

Yamaha FJR Motorcycle Forum

Help Support Yamaha FJR Motorcycle Forum:

This site may earn a commission from merchant affiliate links, including eBay, Amazon, and others.

Slappy

Well-known member
Joined
Apr 29, 2008
Messages
322
Reaction score
2
Location
Austin, TX
to removing the front cowling? I have removed all the other panels and removed the glove box. I have unscrewed both the headlight phillips screws and the cowling phillips screws near where the morrors go. I pull and twist and I just cannot get the whole front piece off. All wiring assemblies are disconnected. What is the trick to getting it off without breaking anything?

Why am I removing it because the rubber gasket is starting to drag against the windshield carrage. If I dont fix it im going to burn out the motor.

 
Last edited by a moderator:
There is a center screw way up in the nose. Don't worry about that, remove the headlights with the nose fairings as one piece, it's easier.

I assume you have the mirrors off, and the windscreen arms, etc. With all that off, you should only need to remove the headlight bulb connections and aux light connectors and the ~6 bolts.

 
I removed all the black phillips holding the front on but it feels like something is still holding it. I can almost get it past the windscreen supports but not quite. I dont know where else to look. I used the shop manual to disassemble but the front still wont come off. What am I missing? Do you have to tilt it or twist it or something? I dont want to yank.

 
Madmike I am following a freaking shop manual step by freaking step. The bin o facts is for what size wrench is the oil plug and crap like that, not where every wiring harness is and what its purpose is and where it begins and terminates or where is the secret screw that holds the front piece on the bike. That is where you call on people that have done this before and use their experience. Not every question can be answered by BINOFACTS. Thanks for trying though.

 
Thats great info for gen 1
IIRC, Kaitsdad says its the same for his Gen II.

[SIZE=8pt]Pierre, you misunderstand. I hoped he'd look through the Bin-O-Facts so he'd know what else is there the next time he needed information.....[/SIZE]
yeah i somehow knew thats why you did it :) It forced me to go there (so much info my head spins )! I'll play the game....

 
Madmike I am following a freaking shop manual step by freaking step. The bin o facts is for what size wrench is the oil plug and crap like that, not where every wiring harness is and what its purpose is and where it begins and terminates or where is the secret screw that holds the front piece on the bike. That is where you call on people that have done this before and use their experience. Not every question can be answered by BINOFACTS. Thanks for trying though.
...and yet if you scroll down through there, he has helpfully directed you to a link that has all the answers regarding cowling removal you were looking for ...INCLUDING PICTURES... :clapping:

I have a freakin shop manual as well, but will certainly not follow those procedures for plastic removal...I will help myself by following gleaned wisdom from this site as well as a few others. ;)

 
luvtoride Ive done steps 1-12 but I cannot get to 13. The genII is slightly different. After you remove all the interior panels and the side fairings and all the wiring harnesses and the wind screen you are left with 4 phillips screwes and the headlight wires. Even after removing those I still get resistance. Must be something else in there.

Great input. I never would have found that and it was very helpful.

Wheaton I am a Jerrys child because I cannot find this link in the binofacts you and mike pointed out.

 
Last edited by a moderator:
Wheaton I am a Jerrys child because I cannot find this link in the binofacts you and mike pointed out.
I found it here after reading through the Gen II Bin-O-Facts then reading through the 03-05 Bin O' Facts (Generation I), Accumulation of FJR Data by Ignacio until I found it. Here is what it looks like in that thread:

SuspensionFront preload: Many like 2 to 2.5 rings showing per Warchild

Motorcycle Suspension Setup

Cowling and Nose

Details for removing cowling.

Close-ups of speedometer instrument cluster including changing lights

Cooling System
Those are the direct links Pierre and Heidi have given.

I'll PM someone I know who has taken the nose off their Gen II and ask him to respond.

 
Last edited by a moderator:
to removing the front cowling? I have removed all the other panels and removed the glove box. I have unscrewed both the headlight phillips screws and the cowling phillips screws near where the morrors go. I pull and twist and I just cannot get the whole front piece off. All wiring assemblies are disconnected. What is the trick to getting it off without breaking anything? Why am I removing it because the rubber gasket is starting to drag against the windshield carrage. If I dont fix it im going to burn out the motor.
The nose panel has a certain degree of flexibilty close to the mirror insert holes. Pull the cowling to tle left on the left side and to the right on the right side. That will free the cowling from the "stay"' where the mirrors attach and the whole thing will come off in one piece (including the headlights). I have done this many times for the exact reasn: the rubber gasket coming loose. Now, reattaching that is a different PITA. Sam

 
to removing the front cowling? I have removed all the other panels and removed the glove box. I have unscrewed both the headlight phillips screws and the cowling phillips screws near where the morrors go. I pull and twist and I just cannot get the whole front piece off. All wiring assemblies are disconnected. What is the trick to getting it off without breaking anything? Why am I removing it because the rubber gasket is starting to drag against the windshield carrage. If I dont fix it im going to burn out the motor.
Slappy, I just sent you a PM - please check it -

I can send you (and anyone else) a .pdf file that shows step by step removal of the GenII plastic removal. Please PM me with your email address. (edit)

KD

 
Last edited by a moderator:
to removing the front cowling? I have removed all the other panels and removed the glove box. I have unscrewed both the headlight phillips screws and the cowling phillips screws near where the morrors go. I pull and twist and I just cannot get the whole front piece off. All wiring assemblies are disconnected. What is the trick to getting it off without breaking anything? Why am I removing it because the rubber gasket is starting to drag against the windshield carrage. If I dont fix it im going to burn out the motor.
Slappy, I just sent you a PM - please check it -

I can send you (and anyone else) a .pdf file that shows step by step removal of the GenII plastic removal. I just need your email address.

KD
Wow, great offer. I'll be removing mine some time soon. Could you send me a copy? Rickpat at usa dot com Thanks
Will be on it's way in just a few -

 
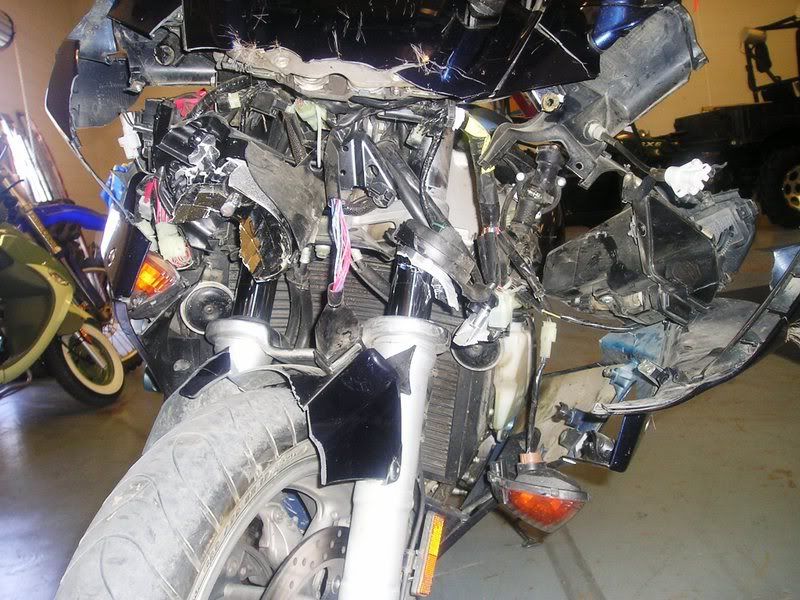
Here's my technique! Easy access to everything, all connectors in plain site.. :unsure:

Don't need no stinkin manual, either! Just one Bambi will do the trick..

MassDamage.jpg


For what it's worth,after this Bambi strike the rubber gaskets were replaced. Within in 4 months they were loose again. Check, and many FJR's have sagging gaskets due to?? Well, I don't know why.

The second time around, I simply took some needle nose pliers and pulled it out and away.. and into the trash can.

 
Last edited by a moderator:
I need to replace the left upper side fairing and have been following the scanned TSB kaitsdad has been circulating, but I can't figure out where the storage box wire bundle it mentions is. It shows a flexible nylon wire holder you're supposed to undo in Step 7 but I can see no such thing. Does anyone know what exactly has to be disconnected, storage-box-wise, on a 2008?

 
Top