Who here has installed Cruise Control?

Yamaha FJR Motorcycle Forum

Help Support Yamaha FJR Motorcycle Forum:

This site may earn a commission from merchant affiliate links, including eBay, Amazon, and others.

flienlow

Well-known member
Joined
Apr 24, 2006
Messages
100
Reaction score
-1
Funny thing. I was on this site and found the link to: https://www.fjr1300.info/howto/audiovox.html

I was reading this person's post and thought it would be awesome to have CC on my trip to alaska. Then sent it to a friend asking if I should do it. We both immediately agreed that I dont want my brand new $14k fjr looking all ghetto-ass with some shelving bracket for mount. (not knocking the author as he did the best with what he had.) Since then I have found Skyway's beautiful mounting bracket, and I am going to go through with this. But before I start tearing into this blue beauty, I would like to get some insights from some folks that have already sailed these waters.

What went good? what went bad? what should be changed?

Any suggestions would be greatly appreciated.

BTW- while you are posting a reply, I think I am going to take the 'ol Iron Stallion out for a gallop!

 
The most demanding part of the installation is the throttle hook-up. you need to be careful. Otherwise it's just a function of your mechanical aptitude and patience.

"all ghetto-ass"

Just what is this supposed to mean anyway? I think that looked fine. There are better ways to say you didn't like it's looks.

 
Last edited by a moderator:
"all ghetto-ass"
Just what is this supposed to mean anyway? I think that looked fine. There are better ways to say you didn't like it's looks.
But that was the most lucid and easiest way! I mean c'mon mounting a hardware store bracket on a bike like this? Surely not the look I would want. But like I said, the author was doing the best with what he had, and more than likely didnt have a machine shop in his garage.

 
I thought the same thing when i seen that bracket,take the time to install everything right

then top it off with that ugly bracket.

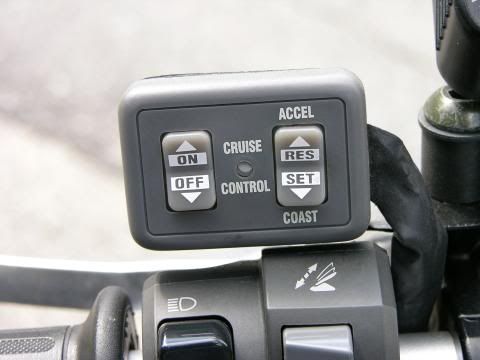
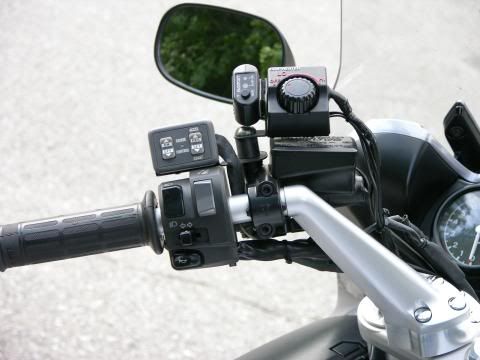
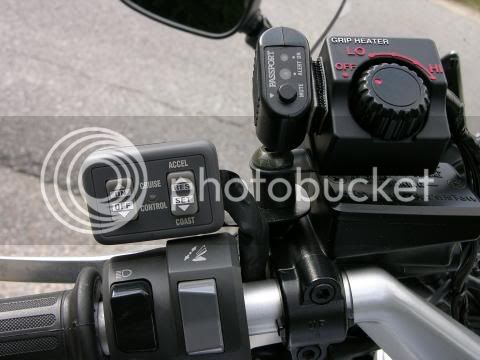
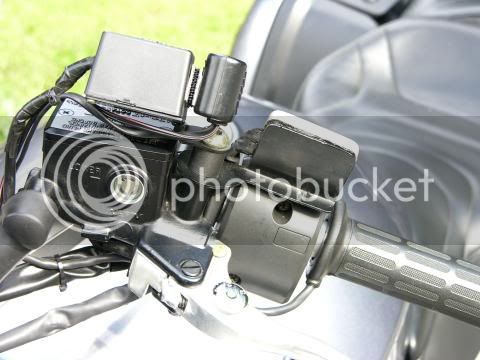
I made up my own out of stainless steel and painted it black.

Basiclly the only thing thats noticable is the pad itself.

 
Things evolve over time, (unless it is a Harley-Davidson™). The early-adopters took the Audiovox unit and adapted it with what was available at the time. As more people became interested, others(Skyway, etc.), with different skill sets arrived and were able to improve on the original.

For what it was the first design was workable. The follow-ons are much more "elegant" but require a higher degree of skill and $$$ to produce.

Don't begrudge the first wheelmaker because he used wood or stone. That idea led to your modern rolling stock you have today. A mea-culpa is in order. You can post your apology anytime. :D

 
Hacked at Home

pad2.jpg


pad1.jpg


pad3.jpg


pad_back.jpg


Great work Ion Beam!!

My real question on this post was more about the installation of the unit itself. Reading the webpage by the guy who did this left a few questions.

1. Where does the vent tube go? he has the check valve with the tube on one end running up under the tank somewhere? Where does that connect to?

2. When wiring he states that the "red" lead is supposed to be connect to a SWitched 12v. source. Where?

3. Do you have to splice your wiring harness for the brake light connection?

4. is removing all the tank hoses and fuel rail (whatever that is) fairly self-explanitory?

5. once you get everything together, did it work right out of the box, or did you experince troubleshooing issues?

Once again, I want a good plan in place before I start chopping this thing up.

THANKS IN ADVANCE GUYS!!

 
flienlow, this is one several farkle installs that is very well documented and supported, time to use the search feature :)

1. The 'vent tube' is the vacuum supply to the vacuum servo of the AVCC, it is what moves the diaphragm that pulls the throttle linkage. One end connects to 1 or more of the vacuum port nipples that are used for synching the throttle bodies; to a vacuum reservoir if used; then to the servo unit. It has been a topic of much discussion as to how many ports should be used and if a vacuum reservoir is necessary. Every port you use should have a vacuum check valve (vacuum diode). You can't make a wrong choice here. My results, in my application, shows that using 4 ports (4 check valves) and a small reservoir (Honda Goldwing fuel filter) works best for me. Others have been just as satisfied with their results using fewer ports and some having no reservoir either. A topic search should show why people choose different setups.

2. "red" lead is supposed to be connect to a SWitched 12v. source. Where?" -- > Depends on how much work you want to do. Adequate: use a 3M Scotch connector, the taco type wire tap and pick up one of the front signal lights Better: make a Tee connector using spade connectors and pick up power at the front handle bar brake wire, no cutting, it simply Tees in Best: add a power strip with an ignition switched relay, as more electrical farkles show up you are already set up for easy install

3. "Do you have to splice your wiring harness for the brake light connection" Again, 3M makes it easy, perhaps not entirely reliable and it usually slightly damages the wires but it works. More effort is to make a Tee or use a better style wire tap such as Posi-Tap.

4. See FJRTech for working under the tank. It is very easy to get the tank up on 03-05 FJRs, there is a How To here in the Forum for addressing the tank and insulator on the '06 models.

5. My AVCC worked right out of the box, no problems. I would guess that having them wake up working is more common than not working. Most of the problems end up being electrical connections. Some times aftermarket tail lights have caused problems. I haven't heard of an AVCC itself being a problem

Research the install. You have already seen a good outline at the Micapeak site. Take your time. You will need to decide where to put the servo. With an ABS FJR your choices will be limited to under the seat or on the rear swing arm. Truly, the hardest part will be the connection at the throttle tang. Good Wife helped me and in just a few minutes we had the hole drilled. She tied a piece of string to the ball chain and held it for me while making connections. The rest was just a matter of taking my time, knowing when it was time to take a break and taking the time to do things correctly vs. just hacking it to get the job done. It will help to prepare first by shopping for the vacuum check valves, any fabrication of brackets, painting said brackets, fabricating/purchasing a vacuum reservoir, wire connectors, fuses, etc. There are some pretty good wiring aids available at most auto parts stores.

After you decide to do the job, have done the research and still have questions write!

Good luck!

 
Last edited by a moderator:
Funny thing. I was on this site and found the link to: https://www.fjr1300.info/howto/audiovox.html
I was reading this person's post and thought it would be awesome to have CC on my trip to alaska. Then sent it to a friend asking if I should do it. We both immediately agreed that I dont want my brand new $14k fjr looking all ghetto-ass with some shelving bracket for mount. (not knocking the author as he did the best with what he had.) Since then I have found Skyway's beautiful mounting bracket, and I am going to go through with this. But before I start tearing into this blue beauty, I would like to get some insights from some folks that have already sailed these waters.

What went good? what went bad? what should be changed?

Any suggestions would be greatly appreciated.

BTW- while you are posting a reply, I think I am going to take the 'ol Iron Stallion out for a gallop!
Where are you located?

2 more record-breaking installs in Minnesota this weekend. Get close and bring your cool skyway bracket, we'll pimp your ride!

Shane

 
Ionbeam-Thanks for the reply!

Shane-I live in Seattle so I dont think I can make it, but thanks anyway!

 
Shane,

I finished all the details. Wrapped the wires on the control pad up all the way under the dash. Used some of the ribbed plastic to protect the servo wires through the engine bay. Thing looks almost as good as a factory install. Thanks! :bb:

For the rest of you, mounting the servo underseat with a Corbin seat installed will require "modification" to the existing tool tray. Don't ask me how I know... :D

Now we just need a nice sunny day to celebrate!!! :drinks:

 
Ionbeam-Thanks for the reply!
Shane-I live in Seattle so I dont think I can make it, but thanks anyway!

I'm in Portland (Gresham). If you want to come down, I'll help you out with the install. It's a little time consuming, but not overly complex, and well worth it once it's in.

Jeff

 
Shane,
I finished all the details. Wrapped the wires on the control pad up all the way under the dash. Used some of the ribbed plastic to protect the servo wires through the engine bay. Thing looks almost as good as a factory install. Thanks! :bb:

For the rest of you, mounting the servo underseat with a Corbin seat installed will require "modification" to the existing tool tray. Don't ask me how I know... :D

Now we just need a nice sunny day to celebrate!!! :drinks:

You're welcome,

and thanks for all the fish, er, I mean pizza.

Shane :D

P.S. keep radman away from your grease. Dielectric, pizza, any kind of grease........................... :D

 
Last edited by a moderator:
Funny thing. I was on this site and found the link to: https://www.fjr1300.info/howto/audiovox.html
I was reading this person's post and thought it would be awesome to have CC on my trip to alaska. Then sent it to a friend asking if I should do it. We both immediately agreed that I dont want my brand new $14k fjr looking all ghetto-ass with some shelving bracket for mount. (not knocking the author as he did the best with what he had.) Since then I have found Skyway's beautiful mounting bracket, and I am going to go through with this. But before I start tearing into this blue beauty, I would like to get some insights from some folks that have already sailed these waters.

What went good? what went bad? what should be changed?

Any suggestions would be greatly appreciated.

BTW- while you are posting a reply, I think I am going to take the 'ol Iron Stallion out for a gallop!
Flienlow

I don't know if you resolved your CC install. I was considering an Audiovox CC install on my 06 AE but was concerned by alot of "problem" posts. I found MCCruise which produces a CC specifically for the FJR. This was one of my first farkels and it was the smoothest install of ANY aftermarket part I have installed. I have worked on my own dirtbkes and Harleys for years and expected the common modifications etc. to complete the install. I was more than surprised how well engineered the kit is, including the routing and length of the wires. The instructions were easily followed. The resulting performance is excellant right out of the box. MCCruise says adjustments are easily done but I have been happy the way mine was delivered. Check it out.

RP

 
FL, I'm in Des Moines, just south of Sea-Tac. If you want to see my installation PM me and we'll arrange a time.

Phil

 
Shane,
I finished all the details. Wrapped the wires on the control pad up all the way under the dash. Used some of the ribbed plastic to protect the servo wires through the engine bay. Thing looks almost as good as a factory install. Thanks! :bb:

For the rest of you, mounting the servo underseat with a Corbin seat installed will require "modification" to the existing tool tray. Don't ask me how I know... :D

Now we just need a nice sunny day to celebrate!!! :drinks:

I do know about the servo install with the corbin seat! I removed the entire tool tray and had plenty of room, made some servo support barackets out of aluminum and still had room for the vacuum canister that was made out of 2.5" pvc pipe. I did my CC install and pretty much followed the well written instructions from FJRcarshopguy, along with his pictures the install is pretty easy. The only issue I had, and maybe it was in the write up and I was too drunk to catch it, was to remove the jumper when you set the dip switches. I used the control pad mount from Skyway and the install looks OEM and works perfect.

 
I installed the MC Cruise on my 2003 last summer. I'm not a mechanic, but the directions were very clear and easy to follow. I took my time and made it through the install without any problems. Some of it took some extra thinking, but I think that was more me than the manufacturer. We e-mailed back and forth several times to get things straight, and once I got it all in it worked like a dream right from the start. It still does and I love it.

-Danny-

 
Top