Auxiliary Cell Design

Yamaha FJR Motorcycle Forum

Help Support Yamaha FJR Motorcycle Forum:

This site may earn a commission from merchant affiliate links, including eBay, Amazon, and others.
Thought you were putting a filler neck on it???Go with the latter.
I have two JAZ flush mount caps to use up.

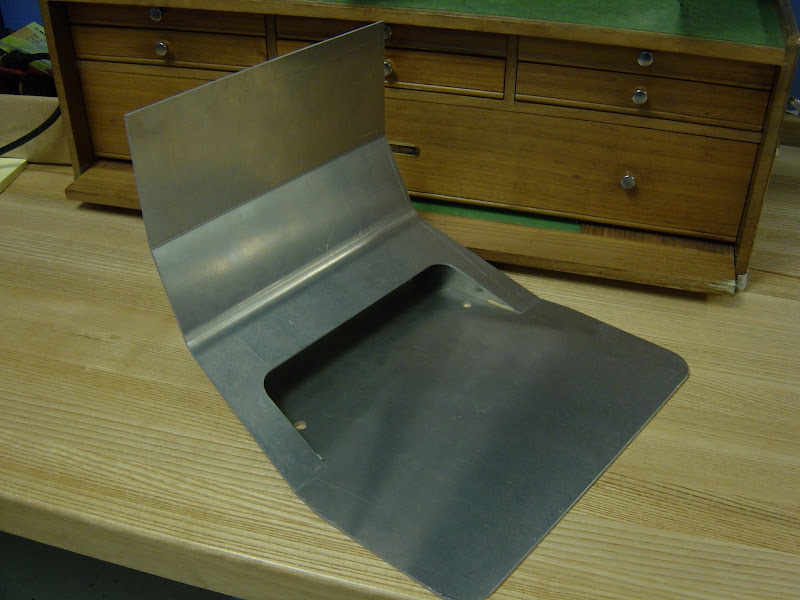
I would go with the latter, but I'm not positive the plate will stay flat with a hole in the corner. Since I'm cutting the hole before welding, and since the gasket will work better if it's up against a flat surface, I'm leaning toward putting it in the middle.

You know what? Now that I think about it, one of those flush mount caps is for my plastic tank. I could put a filler neck on one of these and a flush mount cap on the other.

Hhhmmm.

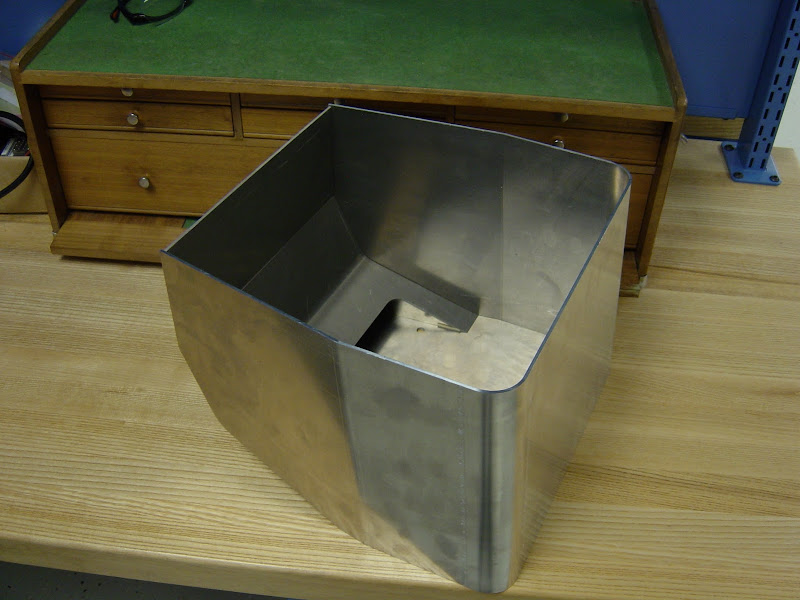
Glad I asked! I have them clamped together in the mill right now.

homer_the_scream1.jpg


I owe you a beer Jeff!
What are the pro's and cons of each option, flush vs. filler neck?

I'll take a stab at it

Filler cap PRO's

Can stick nozzle in neck while lighting cigeratte with free hand.

Makes a good place to connect a bungie cord.

CON's

Sticks out like a sore thumb, disrupting visually clean lines?

It can catch your crotch in case of accidental get off neutring your male gender

Flush PRO

Can stack luggage on tank top

Looks cool

If one wanted to, could add Givi mounting tits to tank top then use Givi or other box for small storage (maps, gloves, flares, etc)

Flush CON

No place for bungee cords

Easier to overfill tank and make a mess

I'm sure interested to hear what some of the true LD Riders think about these pros' and con's..

Warchild?

Iggie?

Skoot?

 
I just got back from picking up the pieces that were bent. I had to stop at home to pick-up my check book before heading over to the fab shop. I caught myself thinking about how close I am to getting this next tank finished and I stopped myself. I thought it was better to brace myself - just in case. I cut all of those pieces and handed them off to someone else with a bunch of dimensions. There were plenty of opportunities for error. It was better not to get my hopes up.

I am happy to report that everything went as planned.

Here is a shot of the three pieces that make up the bottom and back of the tank:

DSC05208.JPG


This one shows the wrap around front & sides piece in place:

DSC05212.JPG


Another angle showing the right, rear of the tank:

DSC05214.JPG


I'm very happy with the results. The shop that did the bends for me was very cooperative. Not only did they not scrap out the pieces that I gave them, the pieces are even more beautiful than I imagined. When I arrived, a very friendly woman read the paperwork and said; "It says here that you are a walk in customer. I hope we can make you a return customer." My response was that I hoped so too.

I am really hoping there is some interest in these things because that shop does beautiful work! They'll be able to fab these start to finish. I already know they can handle the bends. They also have laser cutting capabilities and welding. I checked out their aluminum welding capabilities and it is really spectacular. I saw carts full of aluminum parts ready to ship to the customer and every part looked perfect and identical to the next. This wasn't the work of a robot either; these are skilled workers. Next week, I'll give them all of pieces and let them work their magic to finish this tank.

It's been a long road. I started out wanting something that I couldn't have; so I decided to make one. After making my first tank, I took all of the lessons I learned from that experience and poured them into this effort. I am really excited about this one. I can hardly wait for Spring!

Thank you for following along with me.

:drinks:

I wonder what color I should paint it... I was thinking black, but now I don't know...

 
Joe, Don't know if you want to go with Black. You might end up with a lot of expansion due to heat gain from the Sun on the black surfaces.

I insulated mine with adhesive backed foil and the Wife made a light gray padded cover to go over it to try and minimize the heat gain.

 
Joe, Don't know if you want to go with Black. You might end up with a lot of expansion due to heat gain from the Sun on the black surfaces.
True, but one of the lessons I learned from the Tanji style tank that I built was that I don't want to use a clear powder coat. I had a clear powder coat over silver powder coat and the clear can discolor.

If their aren't any deep scratches when everything is finished, maybe I could go with silver (clear) anodize.

edit: If you have ever looked at eyeglass frames that are wire or metal bands covered with a clear coat that has swirls of color in it, chances are that's a clear powder coat. So, on one hand a clear coat that takes pigment is a good property to have. It's just not a good trait for a clear coat that's going on a gas tank. I learned that from the guy who did my powder coating (as he was explaining the discoloration near the filler neck) ;)

 
Last edited by a moderator:
Oh my, she's beeyooooteeefuulllll! I'm thinking powder coat gun metal grey or matching 06 blue is in order... :lol:

These tanks are exceeding even my high expectations! :yahoo:

 
This may be a dumb questions and mostly to answer my own curiosity. Here goes.

Why are are tanks normally made from steel?

Next dumb question?

Joe: Why did you decide to make yours from aluminum and not steel?

I may attempt something of this nature down the road so I am just looking for an answer myself. I am just wondering whether to do it in steel or aluminum. Either way sure is some nice work.

Dave

 
Last edited by a moderator:
I believe more tanks are made of plastic these days.

Back in the day, gas tanks were made of steel for the same reason that body panels were made of steel. Strength and cost. It was less about strength-to-weight ratio and more about strength to cost. A strong, cheap container could me made out of steel, the same reason beans and peaches came in steel cans.

Why did I make mine outta aluminum? Good question.

I could have gotten the same strength out of a thinner sheet of steel (although it would weigh more). I went with aluminum because it was easer for me to deal with than the thinner sheets of steel would have been and I accepted the added benefit that my tank ended up lighter as a result.

Edit: What the hell do I know about 'back in the day'? I wasn't there. I'm just a young buck!

 
Last edited by a moderator:
Very nice Joe...those guys at that shop have some talent.
Yup, I'm lucky I found 'em.

There's a reason for every curve and every angled surface on this tank. The drawback is that each of those curves and angles made designing and building this a challenge. I was able to work through the design challenges. I was even able to cut the flat sheets. If you look at the drawings a few pages back, you can see that the sheet that makes the front and sides of the tank has a slight crescent shape. Now look at how flat it sits on the maple bench. That is all controlled by the shape of the flat sheet. All of those bends were 90° to one edge and parallel to each other. The 5° angle on the front and 9.5° angles on the back all come together.

It's a good thing I made two. If I only had one, I don't think Don would be able to pry my fingers off it :D

 
Last edited by a moderator:
Nice job Joe!

Well thought out design and nice workmanship. If I'm allowed a vote for colour, I would do blue anodizing (to match your bike) or any colour that other people may like. It's inexpensive if you can slip it into a batch of anodizing from work (wink wink).

 
If I'm allowed a vote for colour, I would do blue anodizing (to match your bike) or any colour that other people may like. It's inexpensive if you can slip it into a batch of anodizing from work (wink wink).
The thought had crossed my mind!

:whistle:

:D

 
A work of art my man!

Dean may have to step aside as the designer of the most desirable FJR fuel cell out there! (But with full 'Pioneering' credit though!) :D

 
A work of art my man!Dean may have to step aside as the designer of the most desirable FJR fuel cell out there! (But with full 'Pioneering' credit though!) :D
If imitation is the most sincere form of flattery, I have flattered Mr. Tanji more than anyone else on this forum! :) His FlatBed Fuel Cell is beautiful.

It's just not for me.

I'm pretty sure he will remain the FJR auxiliary fuel tank champion. I'd need to sell 21 of these to change that. (Or sell one of these for one million dollars) [/Dr. Evil impersonation]

 
What are the pro's and cons of each option, flush vs. filler neck?
my experience with flush-mounted filler caps (while on the clock) have not been good. sometimes they don't get locked down and come loose, sometimes there's water intrusion during heavy rains from accummulated water in the recess if either the cap isn't locked in just right or if needing to refill, that kind of stuff. tanji and smith fillers (filler neck designs) were always more positive imho.

 
Last edited by a moderator:
I remember the filler neck hurdle from last year. *heavy sigh*

I can't argue with Bounce. A filler neck can be plus, but when done right it can add considerable cost. If it's not done right it can add considerable hassle.

*heavy sigh & slow head shake* Alright, we have some time. It's still February. I can take another shot at getting the filler neck right, but I'm sticking with the plan to cut holes for the flush mount Wisco/JAZ caps in the top plates of the first two tanks.

I have spent many hours trying to find a bung that can just be welded on the tank, but I don't like anything I've seen so far. The sticking point always seems to be the cap. Last year, I made the really cool filler neck (see Post #119), but I started running out of time and went with that butt ugly Coyote filler neck. I've wanted to redo the neck on that tank. Maybe someone would want to buy it then. :dntknw: Maybe as a consolation puchase after losing the Tanji auction... *

The cap looks like the same one mehaffydr has. I'm not a big fan of aluminum treads on both the cap and the bung, but maybe I'm just being too picky. I did find a modern Stant cap with plastic threads into aluminum threads, but that was a flange and it was a replacement for IH Scout <Link>. Cool, but not quite what I'm looking for.

A filler neck that would accept a Perko locking cap would be cool <Link>, but I'd have to make the neck...

Fig%201324.jpg
If money were no object...

 
Hi Joe

Nice work on your latest fuel tank! I just spent my morning reviewing this thread - I am interested in one.

At this point you have a unit ready to test fit on your bike. Have you tried it yet? I'd be interested in how well it fits. Does it take away any space that was under the passenger seat? Will it accommodate the stock seat in both the upper and lower position? Will it fit as planned with the modifications you made for the Givi rack? A lot of us have trunks on our bikes. They need to be able to fully open with your tank in place. Some of us have custom seats that were modified from stock to give us more leg room. My Bill Mayer seat has me sitting 3/4 inch further back, the rear seat was trimmed to fit.

When mounted to the bike, you are using the OEM grab rail mount bolt locations. These use a sleeve under the bolt to keep from damaging the ABS plastic the grab rail is made from. Will your tank sit properly on this sleeve and not touch the cross bar? Since only 2 bolts are used, are you resting the tank bottom on any other frame locations? Have you considered reinforcing the metal at the bolt holes to keep from having metal fatigue? When mounted how stable is the tank when grabbed and pushed around - the design lends itself to be a low back rest for the driver. How well does it feel when sitting in the saddle?

When designing the filler opening, if flush mount will there be an internal neck to fill up to? The neck need not be a solid ring. This may be the way to keep from over filling and creating a mess. Have you given thought to where the puke bottle and pluming will go?

My inclination would be to have a gravity feed, will there be room for a large enough line to the main tank. Placement of the ball valve within easy reach?

All these questions came to mind from studying your tank in progress from 2000 miles away.

As for color - DOT lime yellow would fit in good with my bike's paint job. :D

I'm excited, I hope this tank works out well.

Brodie

 
Last edited by a moderator:
Top