Buzzing foot pegs...

Yamaha FJR Motorcycle Forum

Help Support Yamaha FJR Motorcycle Forum:

This site may earn a commission from merchant affiliate links, including eBay, Amazon, and others.
This is only a guess; I could be way off here. Did you recently find a shipping box when you came home, a plain, unmarked shipping box, and when you looked inside, did you see what you assumed was a pair of after-market footpegs that your wife got you as a surprise gift, since the box was addressed to her? And after you mounted them, is that when the buzzing started?
Hey, you have to consider all the possibilities.
I am sure there is a joke in there somewhere...when I figure it out, I promise to laugh :crazy:


Yah, this is getting a little weird...
What's the punchline Mikey?
You guys are amazingly dense......

vibrating_egg.jpg
LMAO!! I admit I am pretty retarded then... :dribble: :dribble: :dribble:

 
Last edited by a moderator:
Just my thoughts as far as the buzzzzzzzzz.

May be a dumb ass question but here goes: Have you looked at your tires? If you have any scalloping starting to show up maybe that's what is causing the buzz. JMT

Dave

 
Just my thoughts as far as the buzzzzzzzzz.
May be a dumb ass question but here goes: Have you looked at your tires? If you have any scalloping starting to show up maybe that's what is causing the buzz. JMT

Dave
Brand new tires less than 500 miles on them. Plus I feel the buzz even when I put it on the center stand and rev it in neutral (only did this to confirm that this wasn't a tire issue).

 
Last edited by a moderator:
When I get to the house later, I'll pull up my engine replacement pictures to show you where all the motor mounts are.
Also, VERY important to remember, if the torque spec is 35 lbs, that means the bolt will strip the engine block at 36. Don't ask me how I know. :(
That is a thought which scares me because when I installed the Motovation sliders (no cut) - the instructions said to torque those 4 bolts to 40 lb-ft. These were only supposed to go 35 max weren't they? I hope I didn't strip anything, will loosen them up again and follow the pictures and instructions from you about the engine mounting bolts and their torques when I get home this evening. :blink:
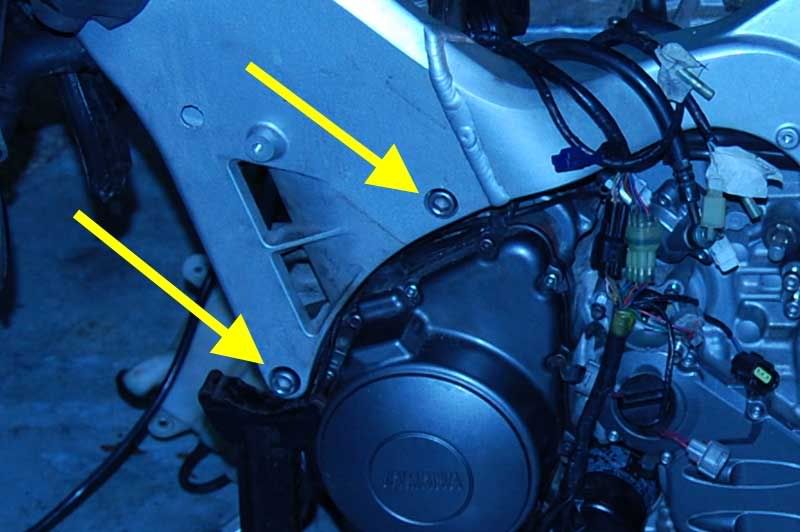
Okay, puppychow...you know about 4 of the motor mounts...two on each side of the bike on the frame spars (left side shown)

install21.jpg


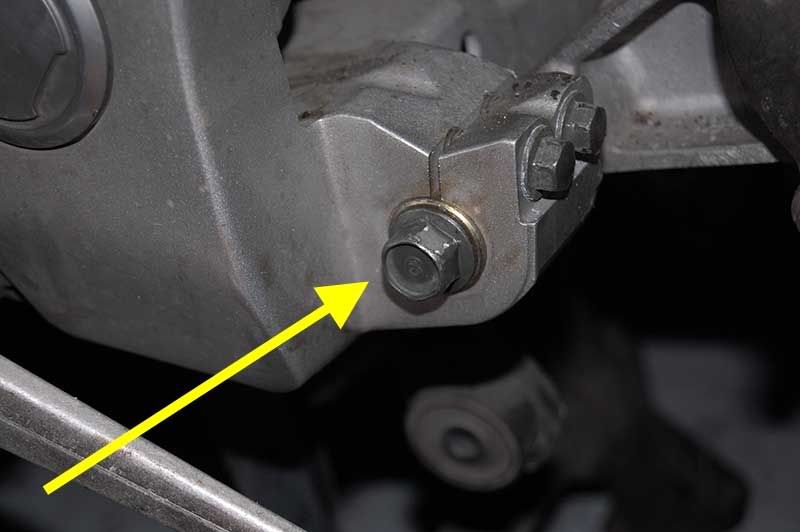
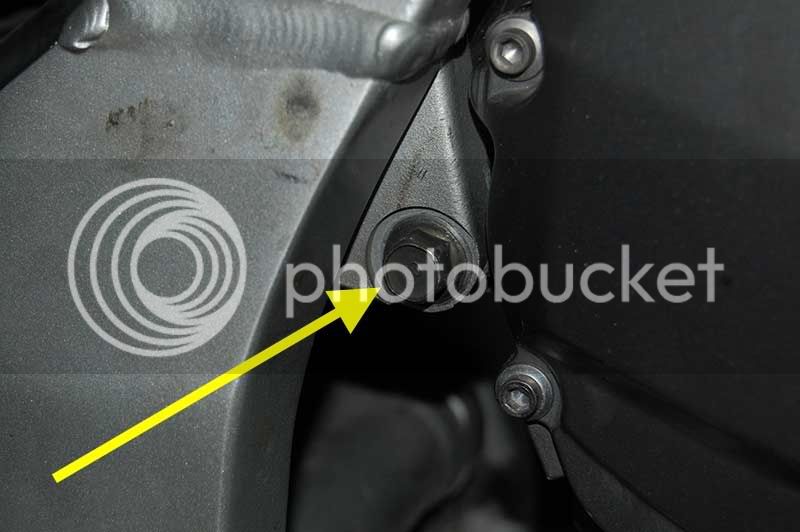
There's one at the bottom back of the motor (right side shown just above foot peg)

install17.jpg


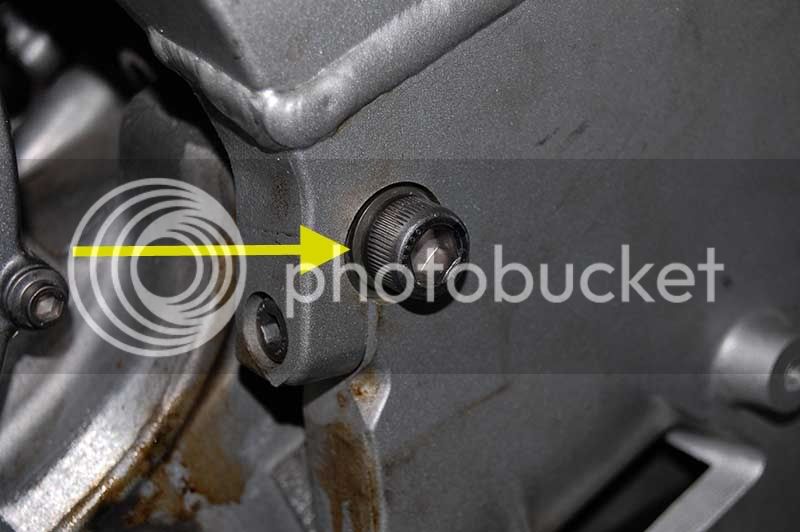
One at the top back of the motor, a long bolt that goes all the way from outside left to outside right (left side shown just above foot peg, just below the final motor mount shown in Pic #6)

install18.jpg


install20.jpg


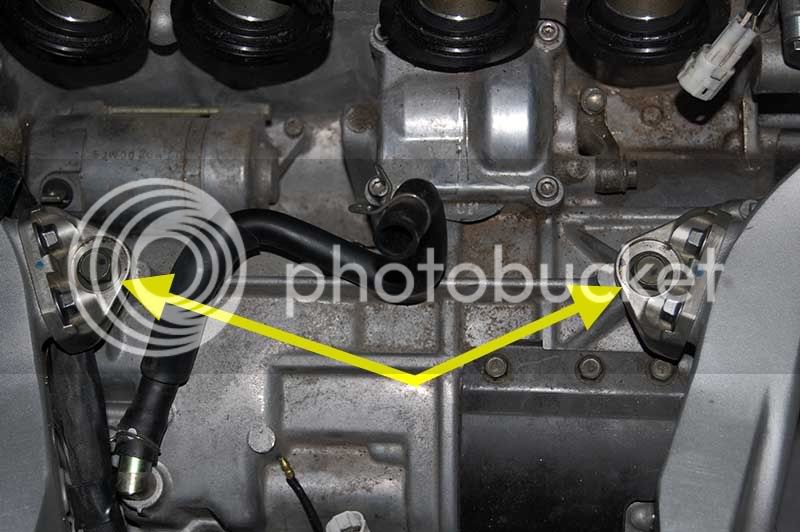
Two on top of the motor (underneath the throttle bodies)

install19.jpg


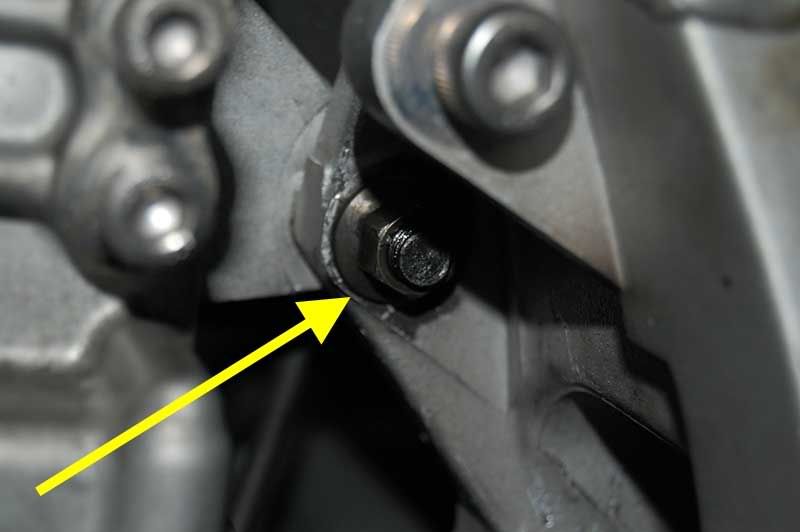
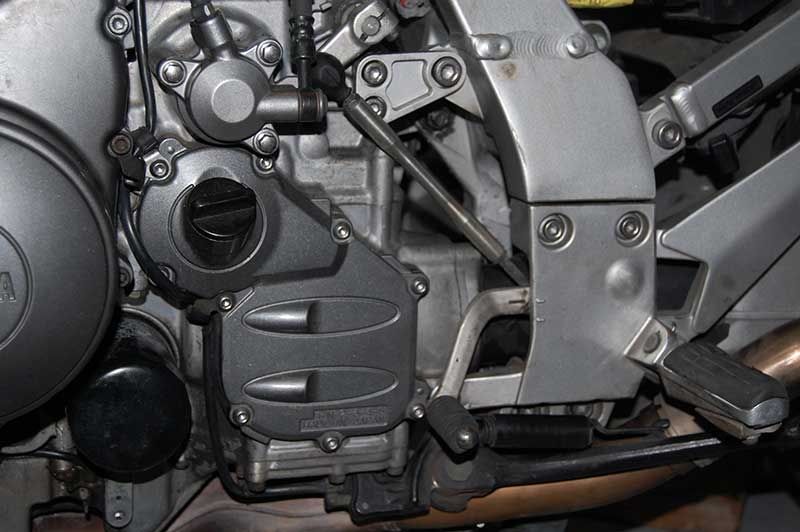
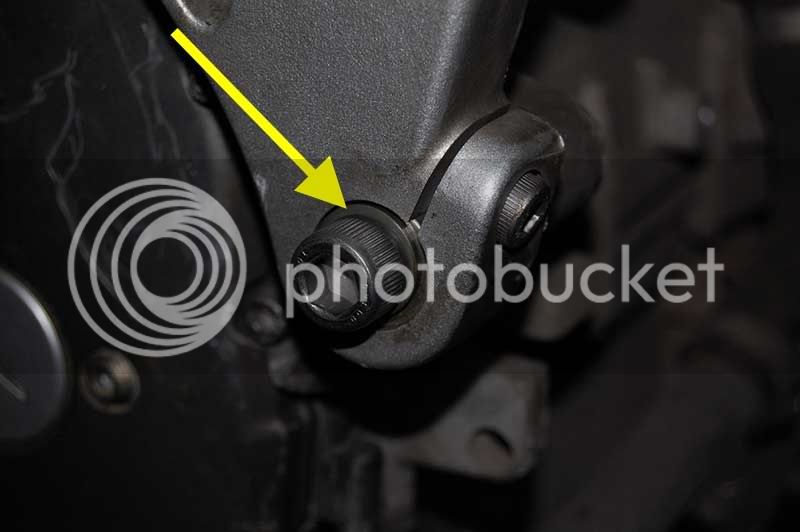
and last but not least one just below the shift arm, the triangular looking bracket with two small hex head bolts on the left, one large on the right.

install25.jpg


There is a "correct" tightening sequence involving the four long hex-head bolts that go through the frame spars...

install23.jpg


install22.jpg


You would first loosen the pinch bolts locating the spacers the bolts pass through on the right side. When they are loose, you torque down the two bolts on the LEFT side first, then torque down the two bolts on the spacers on the RIGHT side, THEN tighten the pinch bolts to spec.

What this does is lets the left side bolts pull the motor tight to the left frame spar. Then the bolts on the right side have been torqued to the spacers and finally, the pinch bolts on the spacers are tightened. Done this way, you guarantee that the motor is tight in the frame, up against the left side.

You'll notice in Pic#2, the bottom/rear motor mount, also passes through a spacer that is held in place by pinch bolts. The same sequence is done here....i.e., loosen the pinch bolts, torque the bolt into the motor to spec, then tighten the pinch bolts.

The top/rear motor mount is basically just a long bolt that goes through the frame and bolts from the outside. The motor basically just "hangs" from this bolt, so there is no spacer/pinch setup.

So the correct tightening sequence, assuming ALL the motor mounts are loose, would be:

1: Torque left side frame spar bolts.

2: With pinch bolts loose on right frame spar, torque right side bolts to the motor through the spacers,

3: With the pinch bolts loose on the bottom/rear mount, torque the bolt to the motor through the spacers,

4: Torque down the pinch bolts on the frame spar spacers and bottom;rear spacer,

5. Torque down the top motor mounts to the frame first, then the mount to the motor (picture #5)

6: Torque to spec the small, triangular mount just below the upper shift arm, just right of the shift rod that runs from the foot shift to the shift arm.

Hope this helps.

 
This is only a guess; I could be way off here. Did you recently find a shipping box when you came home, a plain, unmarked shipping box, and when you looked inside, did you see what you assumed was a pair of after-market footpegs that your wife got you as a surprise gift, since the box was addressed to her? And after you mounted them, is that when the buzzing started?
Hey, you have to consider all the possibilities.
I am sure there is a joke in there somewhere...when I figure it out, I promise to laugh :crazy:


Yah, this is getting a little weird...
What's the punchline Mikey?
You guys are amazingly dense......

vibrating_egg.jpg

Thanks, Howie. Didn't want to have to explain my own joke. How about that guy, everybody, posts the helpful picture (of the engine mounts, that is) AND explains the joke. What a guy.

Um, Sam, I was afraid I offended you there for a while. None meant, of course.

BTW, that's a damn sweet looking, uh, footpeg.

 
Last edited by a moderator:
Um, Sam, I was afraid I offended you there for a while. None meant, of course.
BTW, that's a damn sweet looking, uh, footpeg.
No you didn't offend me at all. I was honestly dense enough not to get the joke, but was just talking smack anyway to detract from the fact... :)

 
I'm somewhat ashamed to admit, that vibrating foot-peg thing sailed right over my head too. :rolleyes:

Damn, I must really be getting old. :glare:

+1 on the thanks for the tutorial, Howie.

I've never re-torqued my engine mounts. Might have to give it a go next time I have the tupperware off for service.

And puppychow, since the problem started roughly coincident with your last TBS, you may want to try another TBS, but consider doing the UA version discussed here. It did smooth out my engine vibes (both foot peg and handlebar) at ~4-5k rpm considerably.

 
Last edited by a moderator:
Re-torqued engine mounts and replaced the after-market "gel" foot pegs discussed above from the bike and all is well. Thanks Radio Howie!

Chowputz...

 
Last edited by a moderator:
Puppychow did you re-torque the two mounts on the engine? Reason I ask is that I have been trying to get rid of vibration on my 2009 and the only way to access the top mounts would be to remove the throttle bodies :( . So I re-torqued all the other mounts, but haven't had a test run yet.

 
Everything but...I dared not remove the throttle bodies by myself. If you ask me I would guess I was just not tightening the frame spar mount bolts (my no cut sliders were using) in the proper way (order/torque) YMMV :ermm:

 
Last edited by a moderator:
Let me add this quickly....if the four lateral motor mounts and the two rear mounts are correctly torqued, those two dinky mounts on top of the motor aren't gonna make a snowball-in-hell's bit of difference.

The six mentioned in the first sentence do ALL the heavy lifting.

:D

 
I have a few vibes after doing some maintenance work and think I may need to re-torque. Does anyone know if the Gen II procedure/bolt location is the same? I have a service manual but it is not NEARLY as clear as RH's pictorial.

 
If you retorque the engine mount bolts, do you loosen them first? all of them?

I appreciate your instructions Howie...been reading them over and over and comparing with the manual to see if I fully understand the whole process

I would pay good American dollars for a video on how to re torque these bolts, or pics per instruction step. Certainly, we could call it: Re Torque Engine Mount Bolts for Dummies...I subscribe to that.

 
I would say yes you have to loosen them first to ensure you get the correct torque setting- because if your bolt is already at 100 lbs, and the bolt is only supposed to be torqued to '80 lbs', and your get your torque wrench and check the bolt, the wrench will 'go off' at the 80 lb mark, but the bolt is still over torqued.

 
Last edited by a moderator:
Top