Removing the Relay Arm

Yamaha FJR Motorcycle Forum

Help Support Yamaha FJR Motorcycle Forum:

This site may earn a commission from merchant affiliate links, including eBay, Amazon, and others.

JamesK

Got to ride
Joined
Mar 6, 2006
Messages
1,621
Reaction score
114
Location
Sydney, Australia
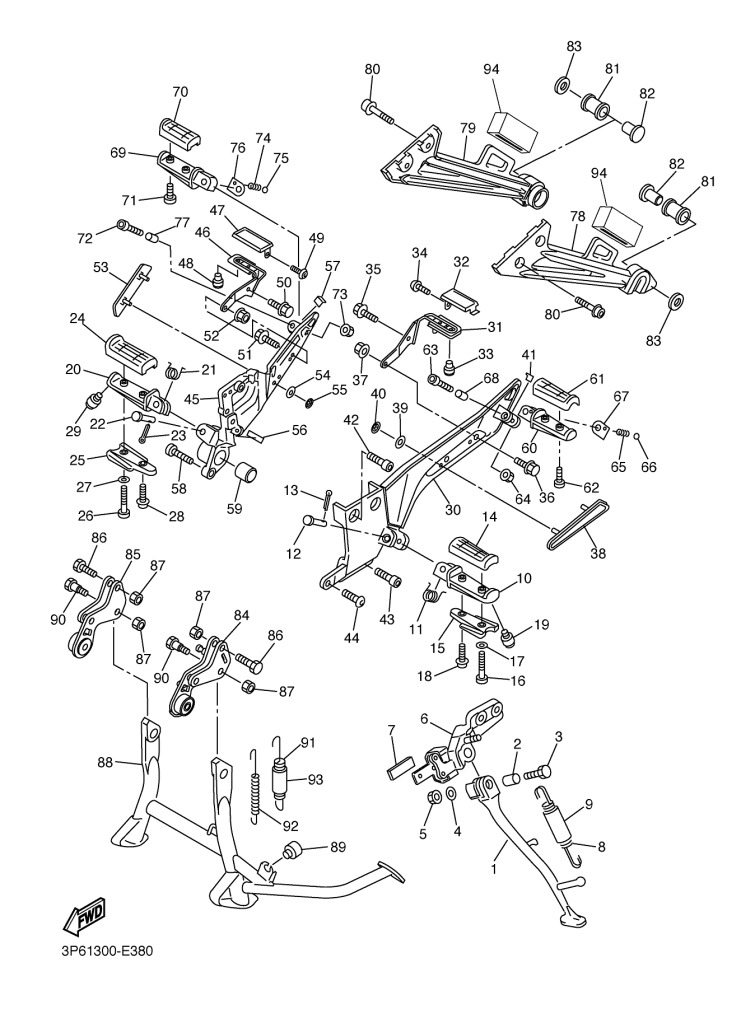
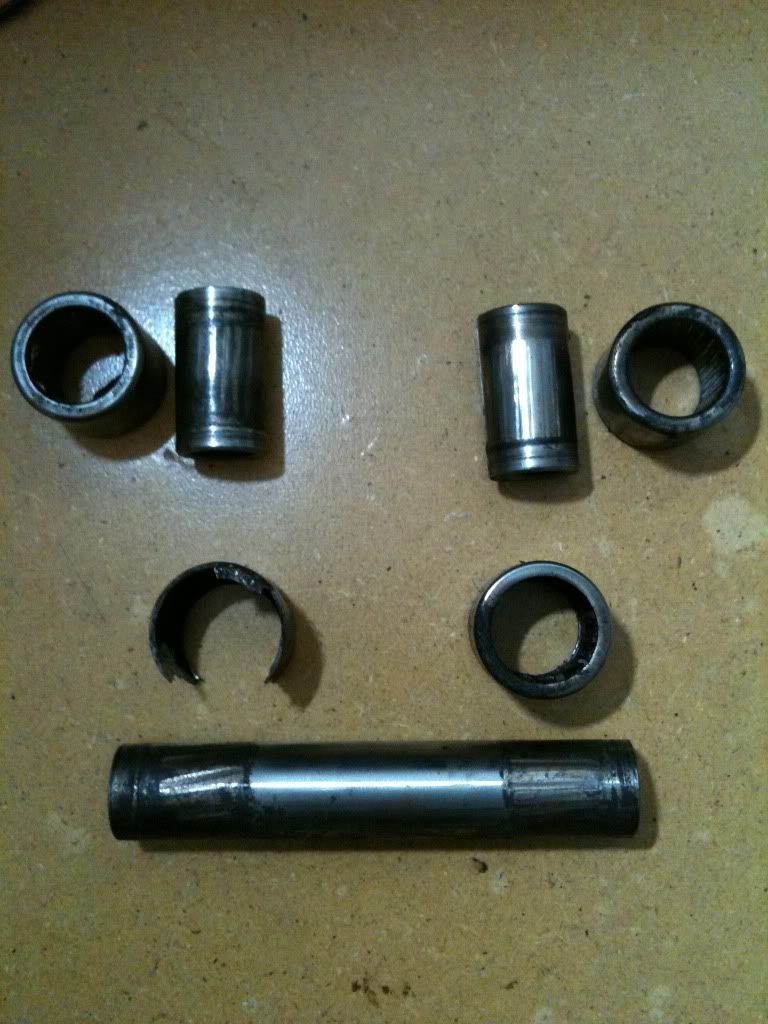
The bottom race and bearings (#19 in the diagram below) on my Relay Arm were tight, almost seized up, so when I pulled it apart I found that some of the roller bearings had broken into smaller pieces. I also found pitting marks/galling on the collar (#19). It appears that some water/moisture got inside this joint; it was not totally dry of grease but did have some corrosion... All the linkages appeared ok and moved freely and smoothly about 40k miles ago when I installed the rebuilt rear Penske shock.

At 115k miles I don't mind replacing all the bearings, seals and collars in the Relay Arm, even though only the lower one (middle) is badly pitted/galled, with the front collar (where the bottom of the rear shock connects) is discolored but does not show obvious galling. The top collar (that mounts to the swing arm and requires the R/R of the center stand) is moving freely but has a lot of play in it. I am not sure if this means I just need new roller bearings, collars and seals or if there is actually some kind of wear in the Relay Arm innards.

I have already ordered replacements of the bearings, collars and oil seals as shown on the fiche on RonAyers.com

I am trying to remove the Relay Arm since I'll need to have it on the bench to clean up and install the bearings and seals. Unfortunately I seem to be running into problems getting the Relay Arm off. I've removed the center stand (because the top Relay Arm bolt (#23) will not come out with the center stand brackets (#84 & 85) in place) however, I still can't get the center stand brackets off because the top bolts on each side hit the header pipes.

Do you really need to drop the headers in order to just be able to remove the Relay Arm :blink:

The only reference I've been able to find in my search is this Relay Arm Link, but it does not mention the bits that need to be removed. The FSM for this job does not show/include the exhaust assembly so there is no mention of having to drop the headers, just to be able to get the bolts of the center stand brackets (#84 & 85) off, which in turn will enable you to get the top Relay Arm bolt out.

I am also wondering if these two top center stand bracket bolts (#86) can be reinserted with the bolt heads facing inwards to make the removal in the future less of a PITA, since these seem to be just "straight" bolts with nothing that would interfere if they were reversed.

Another question for the folks who have done this job or know what the inside (where the roller bearings sit) of the Relay Arm looks like. The bottom/middle part (where the #19 collar goes) seems to have different surfaces b/w the LHS and RHS sides. When sitting on the bike, the LHS inner surface is smooth, where as the RHS inner surface has distinct recesses where each roller bearing sits in. Should these not be identical since the roller bearings that sit in them are the same?

I would really appreciate any advice/help on my questions.
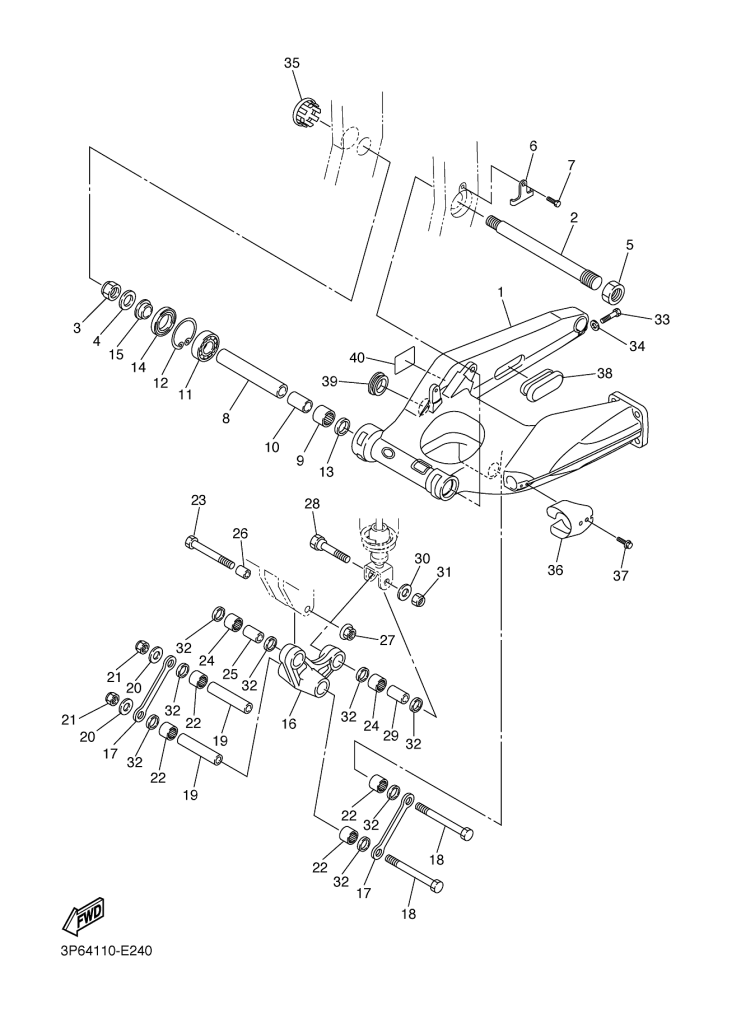
REAR_ARM.png


STAND_FOOTREST.png


Last edited by a moderator:
Removing the four exhaust system bolts will allow you to move the exhaust system down far enough to clear the front two center stand bolts (yes, when you put them back do it from the inside outward).

You really have to lean on the exhaust system to pry it downward. Either get a helper or be prepared to hook your leg over it to force it down. It's scary at first but a number of people have done it without breaking anything. There's thread someplace that describes it. Try searching for "center stand removal".

Dan

 
Hey James

When I replaced my rear shock I had the same problem with the center stand bolts. I took a recip saw, cut off the bolt, then replaced it, except this time I turned that bolt around facing the other way. I thought that would be alot easier than taking loose the pipes.

As far as the different surfaces on the #19 collar, I'm not sure about that.

In my shop I'm able to use an overhead lifting device (come-a-long) to raise and lower the bike with a fair amount of precision, which made it easier when remounting everything.

And while your down there, I think I remember there might be a couple of places to mount some lights :lol:

Good luck dude!

Scott

 
Last edited by a moderator:
You don't have to remove the headers or loosen, but you have to get the centre stand off completely. I did the centre stand bolt reversal when I was playing with different headers. Chock the rear of the engine on the right side whilst on the side stand, undo the linkage bolts and dog bones connections. The linkage is quite stiff to prise out, but I discovered that I didn't need to remove the bolt(23 exploded diagram) fully from the engine frame to get the linkage out. I will be performing this task again very soon, I will let you know if I have problems, but im not expecting any ;)

Andy

 
I would remove the swingarm with the relay arm attached. Now remove the relay arm. Very easy to do.

Damn, Talk about a lightbulb turning on!!! Especially if your doing maintenance on all that stuff back there, anyway. Removing the swingarm would be much easier than fighting with the center stand and exhaust - at least the first time, ubtil you get those centerstand bolts reversed. OTOH, once they're reversed, it's easier to drop the centerstand and get the relay arm out the bottom.

Dan

 
I would remove the swingarm with the relay arm attached. Now remove the relay arm. Very easy to do.
Can that be done with the bike on the center stand - without having to remove the centerstand at all? Need to do it but haven't examined the logistics.

 
Yes you can remove the whole swingarm whilst on the centre stand. A good idea is you have never done it before for cleaning and re greasing.

 
Yes you can remove the whole swingarm whilst on the centre stand. A good idea is you have never done it before for cleaning and re greasing. The linkage is still attached to the rear frame, but you will have better access

 
Yes you can remove the whole swingarm whilst on the centre stand. A good idea is you have never done it before for cleaning and re greasing. The linkage is still attached to the rear frame, but you will have better access
So you still have to remove the centerstand to get at the linkage? Makes sense - as I said, I haven't really examined the logistics. I still have to see if I can find some means of supporting the bike. I may end out building a pipe stand.
I am convinced it is a waste of time and effort to remove the centerstand for lubercation. The centerstand bolts are such a loos fit one can spray a lubercant on the pivot bolts and be done.

Removal of the swing arm with reaction link attached takes less time then the combination of removing centerstand then RL . Hope this helps.

 
I didn't look carefully enough yesterday. The front pivot point of the relay arm is still attached to the frame and you can't get the pivot bolt out without removing the center stand. Nothing else to do but hang the bike and get that center stand off.

You can loosen the front two center stand bolts with the bike on the center stand (just break them loose). It'll give you a firmer base to pull against, as opposed to having the bike swinging in the air. There is also a wire tube guide behind the front bolt on the clutch side. You will have to bend it out of the way or break it off to get a wrench on the bolt.

It isn't rocket science, just a PITA.

Good luck.

Dan

 
Once you have reversed the bolts on the centre stand, you can then do a full strip of the swingarm, but leave the relay attached to the rear frame, or prop the bike on its side stand and chock RHS engine and do a full rear end strip including taking off the relay. Due to knee problems I've bought a bike lift and jack to help with my servicing instead of crawling around on the floor.

 
Thanks everyone for your help and suggestions. Per the info provided I was able to remove the center stand brackets by just forcing the exhaust out of the way without braking anything and the Relay Arm is now out :yahoo: I will flip the two top CS bolts around too as has been suggested here. At some future date I'll try removing the complete swing arm.

Since I don't have a press I'll take the Relay Arm, bearings and seals to a shop to have them pull out the old and press in the new...

 
Just performed my linkage service, pretty straight forward. Centre stand now sent for powder coating as its looking poor. Nothing else to do now but wait for my new leather Russell day long seat to arrive. :)

 
Thanks again to everyone for the info and additional links, just finished and she's as good as new :D

As embarrassed as I am to post this first picture I'm doing it in the hope that it will convince others out there who like I have rationalized away the need to do this PITA maintenance task fully. As I mentioned in my original post, the last time I was playing with that part of the bike was when I was installing the rebuilt Penske shock (about 40k miles ago, I typically do around 30+k per year). At that time I moved around all the linkages and they all appeared to move freely and smoothly. I reasoned, like an :******: that this meant that all was OK, and skipped the R/R job to make sure and add some new grease... I guess the joints, especially the bottom/center one was already degraded and starting get dry.

The scary thing is that as bad as this joint looks based on one destroyed bearing and the noticeably galled collars (all three) I only could start to feel something that resembled a shock that was due for a rebuild in the last few weeks.

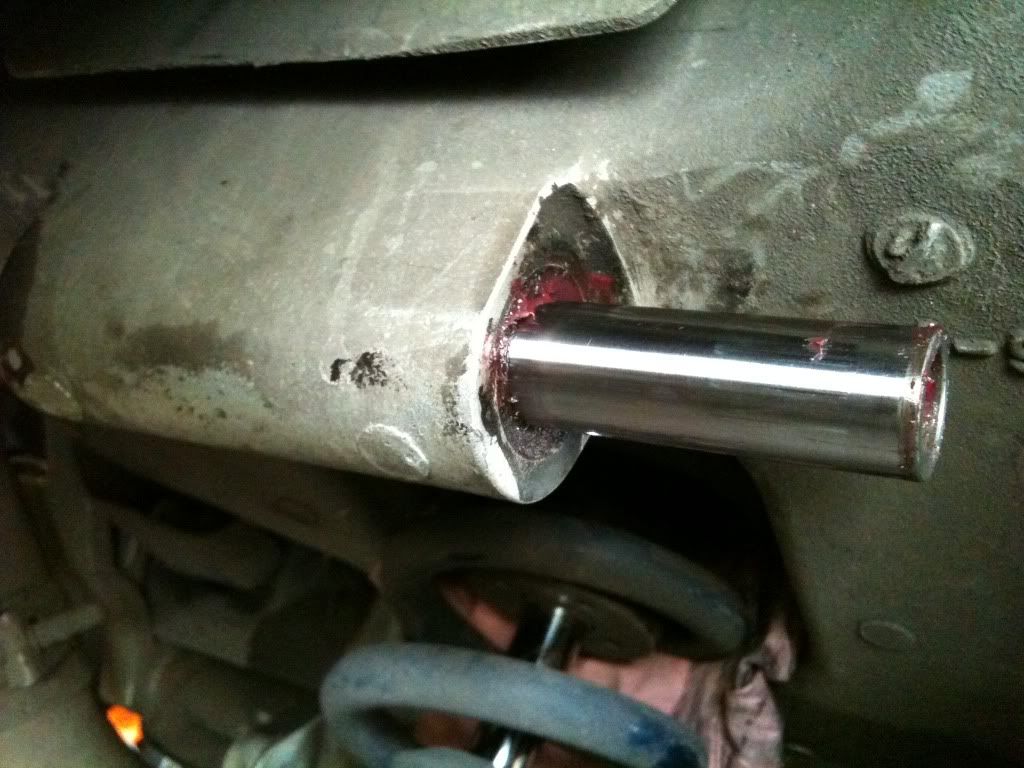
It is interesting to me that the top link (on the swing arm) is in pristine condition, this is the original collar, bearings & seals (with 115,856 miles), whereas the links on the Relay Arm where toast, even the two that sit pretty high up so in theory are subject to similar exposure to the elements as the swing arm link.

Relay Arm: old bearings and collars.

IMG_1474.jpg


The Swing Arm link, amazing, not a mark on it after 115k miles.

IMG_1481.jpg


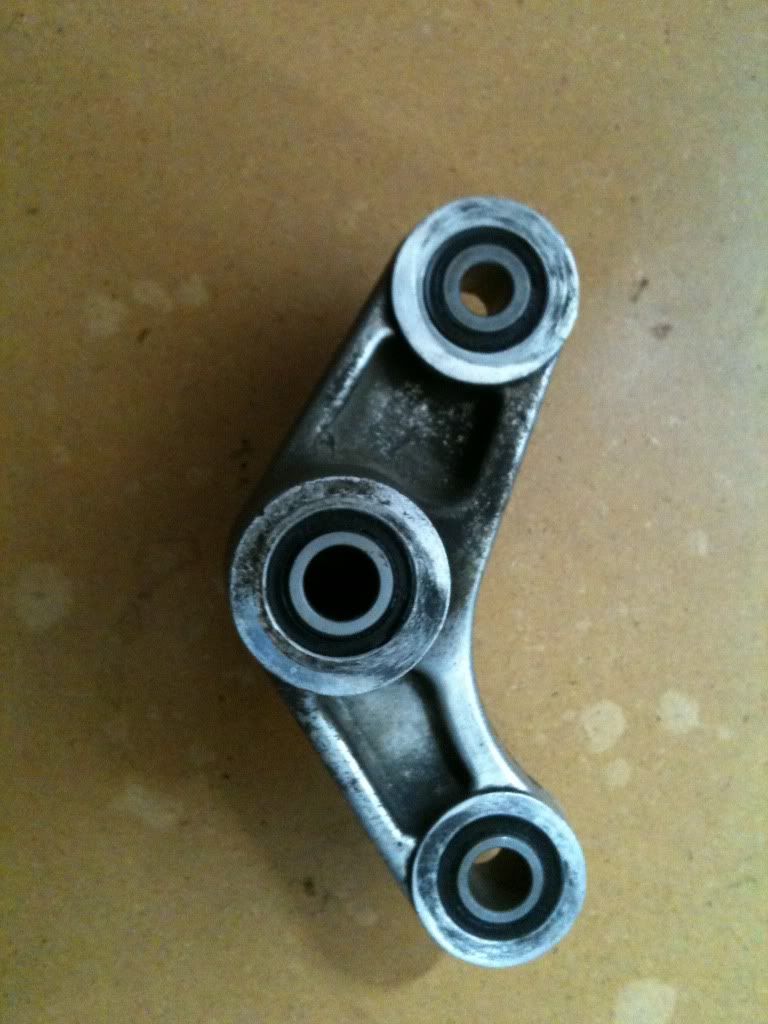
Relay Arm: all new bearings, collars and seals, I also replaced the bush (#26 in the diagram).

IMG_1477.jpg


Last edited by a moderator:
You don't have to remove the headers or loosen, but you have to get the centre stand off completely.
This is not entirely true.

Perhaps someone else has pointed this out already but for future reference, the center stand does not have to come out. If you remove the forward most pair of bolts, the entire stand can then pivot down and free up enough room remove the relay arm bolt. Unfortunately -as has been pointed out, the exhaust is in the way to remove those two bolts. Take the smart route and grind them off and replace them. I believe they are M10 x 1.25 (1.5 appears to work as well) and are approx 30 mm long. I ended up using imperial bolts as I couldn't source any metric but they fit fine.

Of course, as already pointed out, you need to install the bolt from the inside (backwards from factory). From this point forward, it's only a matter of removing two centerstand bolts to get at the relay arm in the future.

My bike has 60,000 on it and although the bearings were fine, the bolts were dry and corroded so I am glad I did the maintenance.

 
getting ready to tackle this...

please advise: when removing (cutting off) the center stand bolts and putting them in in reverse, do i simply replace with factory bolts? or would i replace with a flanged bolt/nut like this??

https://www.amazon.com/Dorman-981531-Screw-Flanged-Class/dp/B00X8PADM4/ref=sr_1_47?s=hi&ie=UTF8&qid=1521039366&sr=1-47&keywords=M10+x+1.25+30mm

https://www.amazon.com/dp/B076T1Z8TZ/ref=sspa_dk_detail_0?psc=1&pd_rd_i=B076T1Z8TZ&pd_rd_wg=3wMhm&pd_rd_r=J9AQW4C0HPKXBE64RKXQ&pd_rd_w=Kz92Y

or with a straight bolt/nut like this??

https://www.amazon.com/Dorman-429-530-M10-1-25-Class-Screw/dp/B0033YF57S/ref=sr_1_13?s=hi&ie=UTF8&qid=1521039296&sr=1-13&keywords=M10+x+1.25+30mm

and do i need washers? locking washers?

any grade i need to look for and or type of coating? zinc?

Also, i see some riders adding zerk fittings to all the linkage while off... ive read a lot of links on this, but is there one that's considered the best?

thanks!

looking for guidance...

 
Last edited by a moderator:
Top