Let the Surgery Begin!

Yamaha FJR Motorcycle Forum

Help Support Yamaha FJR Motorcycle Forum:

This site may earn a commission from merchant affiliate links, including eBay, Amazon, and others.

08FJR4ME

-WYNPRO-
Joined
Apr 10, 2008
Messages
3,943
Reaction score
691
Location
Acushnet, MA
Hello Folks,

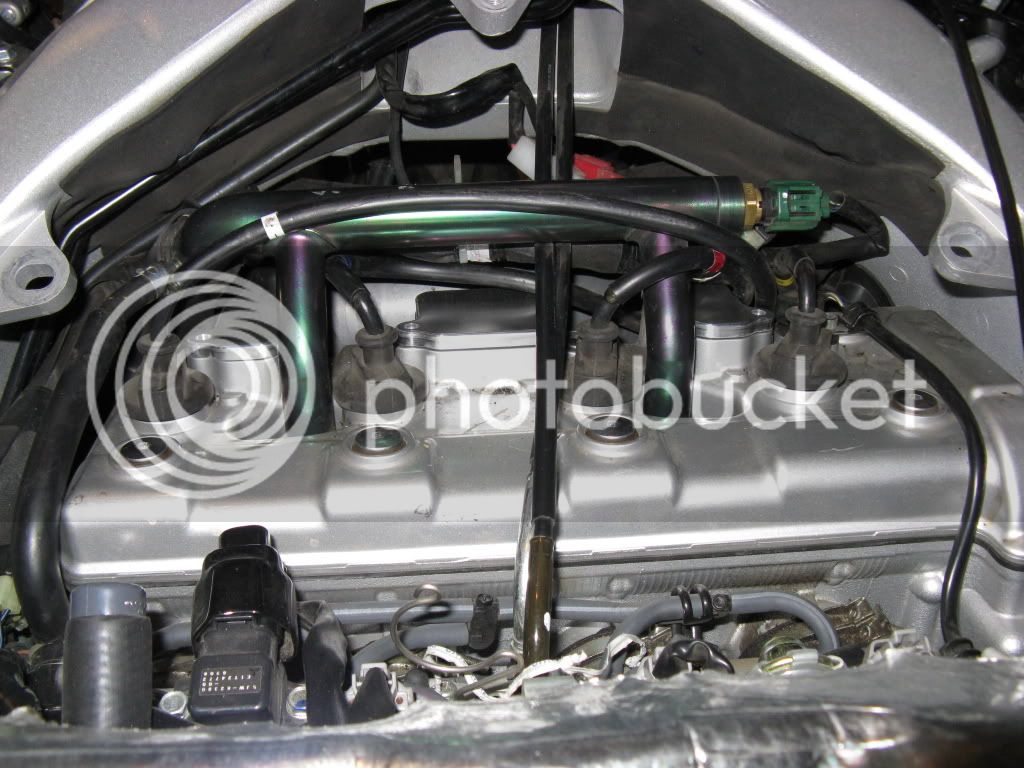
Well I figure I would install the new covers I made for my 2008 FJR. I want to make sure everything fits well before I start shipping these out. Here are some pics of what i have done so far tonight. I will rap this up tomorrow hopefully. It's getting a little late.

Step one Raise the tank and disconnet the fuel pump thingy.


Then remove the cross bar and heat shield.


Here comes the fun, Twisting all the little clamps to remove the hoses. You may need a couple of needle nose

pliers. long pair and regular


This inlet leads into the airbox, I may have an idea for this one, more to come.

any suggestions? When I did this on my XR650 I just ran a hose from the tranny vent to the air box.

I would suck some oil into the bottom of the air box. I am thinking of keeping it open to allow more

air into the throttle body's. Phone call for WW!!!!


Well heres what comes out when you are done disasembly


Befor Pair Cover instilation (Tomorrow's adventure, Good night all)


Last edited by a moderator:
Pardon my ignorance for not knowing what you're doing... but what are you doing? Saw these for sale yesterday. What is a pair cover?... besides underwear (boxers or briefs), that is.

 
Last edited by a moderator:
Pardon my ignorance for not knowing what you're doing... but what are you doing? Saw these for sale yesterday. What is a pair cover?... besides underwear (boxers or briefs), that is.
Covers for the now removed AIR inlets into the head. With aftermarket exhaust, removal rids the bike of the tendency to pop on decel. Regardless of stock or aftermarket exhaust, cleans up the top end of EPA crap. CAUTION--removal will affect cat operation if cats still in place, reducing effectiveness and possibly life.

 
Last edited by a moderator:
Ok, so it is something that I don't need. Had to be sure, you know!

 
Ok, so it is something that I don't need. Had to be sure, you know!
Crap, LTR...if you base your "needs" on what you read about in the FJR Forum, you're gonna be up to yer ass in Zumos, iPods, AirBox mods, crash bars that don't fit and gerbils before ya know it. :)

 
Ok, so it is something that I don't need. Had to be sure, you know!
Crap, LTR...if you base your "needs" on what you read about in the FJR Forum, you're gonna be up to yer ass in Zumos, iPods, AirBox mods, crash bars that don't fit and gerbils before ya know it. :)
Howie,

You had to go ahead and mention Gerbils!! :dribble: :dribble: Now you're going get Odot and Bust all excited!! :unsure: :p

 
FYI...

IMPORTANT NOTE FOR YOU GEN I OWNERS CONSIDERING THESE PLATES.....

I don't know if Gramps has posted up about this yet [ (edit:) Looks like he already did] but... The pair covers do not come off as simple and easy as they do on the Gen II's. Gramps and I were going to change out his ('05) this past weekend but we could not get to the rear bolt of the middle assembly without the removal of the coolant pipe. We decided that we didn't want to get that deep into it so.. We opted to just cap them off on his bike, like I had previously done on my Gen II.

My original post (regarding capping this system) maybe the best way of doing this on the Gen I's.

https://www.fjrforum.com/forum//index.php?s...=106119&hl=

Lucky for Gramps, I still had this stuff left over from when I switched it out (for these style plates) on my Gen II (a few weeks ago). Big thanks to Joe2Lmaker for all his hard work!

WW

 
Last edited by a moderator:
Well She's all back together and the bike started up fine. Weather pemiting (why should that stop me?) I will take the bike to work tomorrom. Final picks after reinstall.

Rubber insert with metal strip. This is what the cover go over. They get a little cruddy to.

This is the bottom, flip over to reinsert. No need to take these out but a couple of them stuck to the original covers.


A little blury on this one but you get the jist of things.


All cleaned up, no more hoses.


These are the tools i used, Most important in the pick is the little 5MM stub allen that i had to grind

another 1/4 of an inch off of to make life easy. Word of caution, you must have patiance removing the front

screws under the rail. Pull up a chair and little by little it will come out. Maybe a ball end would be better.


The other 2 neccesary tools, 10 1/2 inch long board and magnetic pickup to pick up all the screws you

drop down into the engine compartment.


Yahoo! it's done :yahoo:

I must say Joe nailed the dimensions on these, everything fit great and the bike started right up.

Now to get going on the machining end of things.

Thanks all, I hope this thread helps for those that are going to attempt this. Approximately 2 1/2 hrs. for me to get this done. If you got Howie's experience it would probably take an hr. (HaHa, Get that feej back together soon H'man)

 
Last edited by a moderator:
08FJR4ME,

Good post. You are correct... Short ball-end allens make for a very smooth removal and re-install.

Here is a closer pic of the plates (almost installed) Joe made up for me:

Pairplates.jpg


WW

 
Last edited by a moderator:
Well She's all back together and the bike started up fine. Weather pemiting (why should that stop me?) I will take the bike to work tomorrom. Final picks after reinstall.


Yahoo! it's done :yahoo:

I must say Joe nailed the dimensions on these, everything fit great and the bike started right up.

Now to get going on the machining end of things.

Thanks all, I hope this thread helps for those that are going to attempt this. Approximately 2 1/2 hrs. for me to get this done. If you got Howie's experience it would probably take an hr. (HaHa, Get that feej back together soon H'man)
Nice job!!!

Quick question. Are your Cats removed? It doesn't look llike it in the picture. If not do think there will be any issues with the cats or fuel/air mixture problems as Radman has pointed out above? I do have a Power Commander installed but still have the OEM exhaust and would really like to get rid of PATs crap.

 
Nice job!!!
Quick question. Are your Cats removed? It doesn't look llike it in the picture. If not do think there will be any issues with the cats or fuel/air mixture problems as Radman has pointed out above? I do have a Power Commander installed but still have the OEM exhaust and would really like to get rid of PATs crap.
Here's my take on that question. The PAIR valve only opens under very limited situations, like during decel with a cold engine. It injects air into the exhaust to allow more complete combustion of exhaust gasses in the cats. This is to insure low emmisions during those limited times the ECU opens the valve.

You (and I) have already screwed the pooch from an emissions standpoint by disconnecting the O2 sensor and putting a PCIII in that adds fuel, thereby making the exhaust stream far richer than the design engineers intended. In essence, we are horribly abusing our cats already (it's OK, I'm more of a dog guy...). Will they continue to work to reduce exhaust emissions? I'd say yes, there is a really good chance the cats will stand up to this abuse and continue to clean up the exhaust as long as when you use the bike it is typically brought fully up to temperature. As in riding for a long time, not a series of short trips as a 5 mile commuter might experience.

Personally, if my cats go tits up, I'll just send my header off to have them gutted and go on with life. I have no intention of ever riding this bike without a PCIII. It is just so much better with that installed it is not worth considering.

As to difficulty with installing on Gen1, my intention is to install these plates when I have the coolant pipe and PAIR crap off already to do my 1st valve clearance check. I just won't be putting all that messy plumbing back in! ;)

 
Last edited by a moderator:

Quick question. Are your Cats removed? It doesn't look llike it in the picture.

?????????

I just GOTTA ask....how could you possibly tell from that picture whether or not the cats are removed? Neither your avatar or profile imply or indicate X-ray vision. :)

 
Nice job!!!
Quick question. Are your Cats removed? It doesn't look llike it in the picture. If not do think there will be any issues with the cats or fuel/air mixture problems as Radman has pointed out above? I do have a Power Commander installed but still have the OEM exhaust and would really like to get rid of PATs crap.
Here's my take on that question. The PAIR valve only opens under very limited situations, like during decel with a cold engine. It injects air into the exhaust to allow more complete combustion of exhaust gasses in the cats. This is to insure low emmisions during those limited times the ECU opens the valve.

You (and I) have already screwed the pooch from an emissions standpoint by disconnecting the O2 sensor and putting a PCIII in that adds fuel, thereby making the exhaust stream far richer than the design engineers intended. In essence, we are horribly abusing our cats already (it's OK, I'm more of a dog guy...). Will they continue to work to reduce exhaust emissions? I'd say yes, there is a really good chance the cats will stand up to this abuse and continue to clean up the exhaust as long as when you use the bike it is typically brought fully up to temperature. As in riding for a long time, not a series of short trips as a 5 mile commuter might experience.

Personally, if my cats go tits up, I'll just send my header off to have them gutted and go on with life. I have no intention of ever riding this bike without a PCIII. It is just so much better with that installed it is not worth considering.

As to difficulty with installing on Gen1, my intention is to install these plates when I have the coolant pipe and PAIR crap off already to do my 1st valve clearance check. I just won't be putting all that messy plumbing back in! ;)
Thanks Fred, makes sense. I just did my first valve job and it would be nice to get all that PAIR crap out of there. Time to get on the list. :yahoo:


Quick question. Are your Cats removed? It doesn't look llike it in the picture.

?????????

I just GOTTA ask....how could you possibly tell from that picture whether or not the cats are removed? Neither your avatar or profile imply or indicate X-ray vision. :)
You're right. I try not to let people know of my special talents :rolleyes: :rolleyes: . I

 
So after you install the plates, what do you do with the backside hose inlet? Talking about the one circled in this pic....

2567.jpg


do you cap it off, or leave it open?

 
Here is a closer pic of the plates (almost installed) Joe made up for me:
Almost installed and almost finished.

I wish you would have let me include those in the batch that went out to anodize.
Joe,

A perfectionist work is never done! Those babies are a work

of art just in the polished state. Those babies are on for good.

I don't know if you recognized the pic but you were there when

I took that one. Thanks again for all your work on this project.

I still owe you a few beers!

Webby

 
Top